November 5, 2025
|
5 min read

Published: July 4, 2026
Blazingly fast way to build, track and deploy your models!
Last year, we discussed running Hosted Jupyter Notebooks and VS Code (Code Server) on your Kubernetes Clusters. We compared several approaches and existing solutions including renting and managing VMs. We then described our approaches to address usability issues to make the experience nicer and abstract away Kubernetes details.
Since then we have received lots of feedback from our customers, primarily the lack of a better development experience for full-fledged apps. While Jupyter Lab is great for interactive notebooks and lightweight editing, pushing it to full IDE capabilities might require a lot of fiddling with Jupyter Extensions and it still might not be a great experience for non-Python codebases. To address such shortcomings we launched Code Server support which is more or less VS Code in the browser. While it is a zero setup solution and eases out many Developer Experience problems with Jupyter Lab, users reported friction when working with VS Code extensions.
For example, Pylance, the extension that provides excellent Python language support in VS Code cannot be installed on Code Server because of a Microsoft proprietary license. Instead, users have to rely on a combination of Jedi and Pyright which are still not up to the mark with Pylance. Yet another example is Github CoPilot - while it is possible to install it on Code Server it requires manually fiddling with the extension file and upgrading the Code Server version.
While the Code Server editing experience is not bad, sometimes there is a noticeable lag and jumbled-up text in the terminal which can be annoying. We always knew connecting local VS Code with remote VS Code Server via SSH or Tunnels would be a better experience.
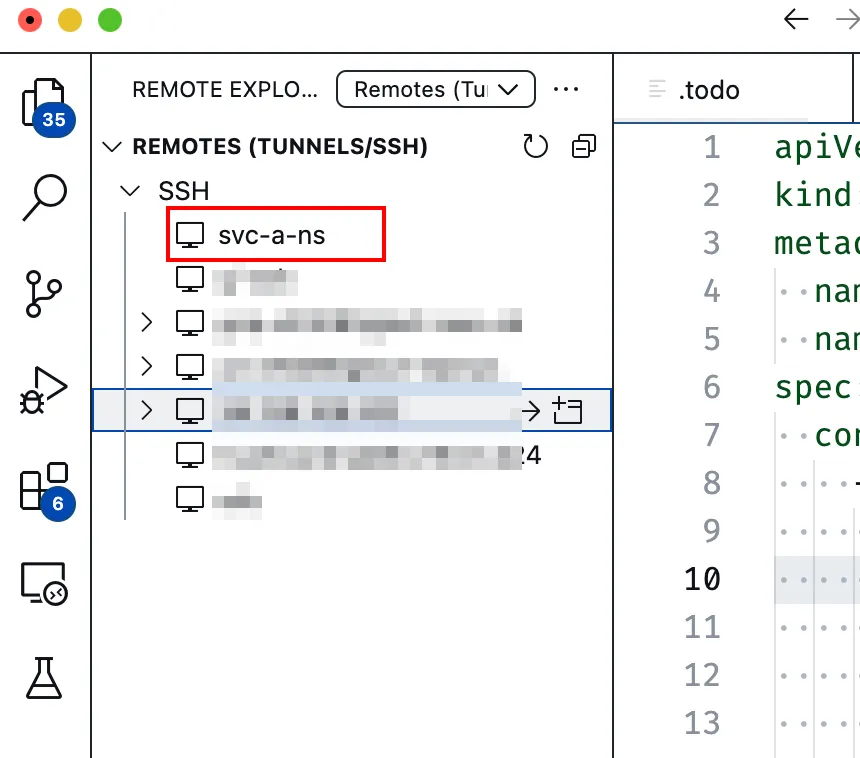
The goal is to allow the users to create a deployment running OpenSSH Server in an Ubuntu-based container image with the same disk persistence as Jupyter Lab and let the users connect to it.
Here is how it looks on the platform (docs):
In this post, we'll walk over how we implemented connecting to containers via SSH without providing direct access to the cluster and without sending traffic outside the VPC.
When we deploy applications, we usually configure a domain name to reach those services, but buying a domain for each application is prohibitively expensive. Instead we buy a single domain (e.g. acmecorp.com), configure subdomains (docs.acmecorp.com) and/or path prefixes (acmecorp.com/blog/) and then use a router to match rules and route traffic to different applications.
We use Istio for all our ingress routing. Istio, among many features, offers convenient abstractions to configure the underlying Envoy proxy that is actually handling all the routing.
Let's understand how an HTTP request is routed
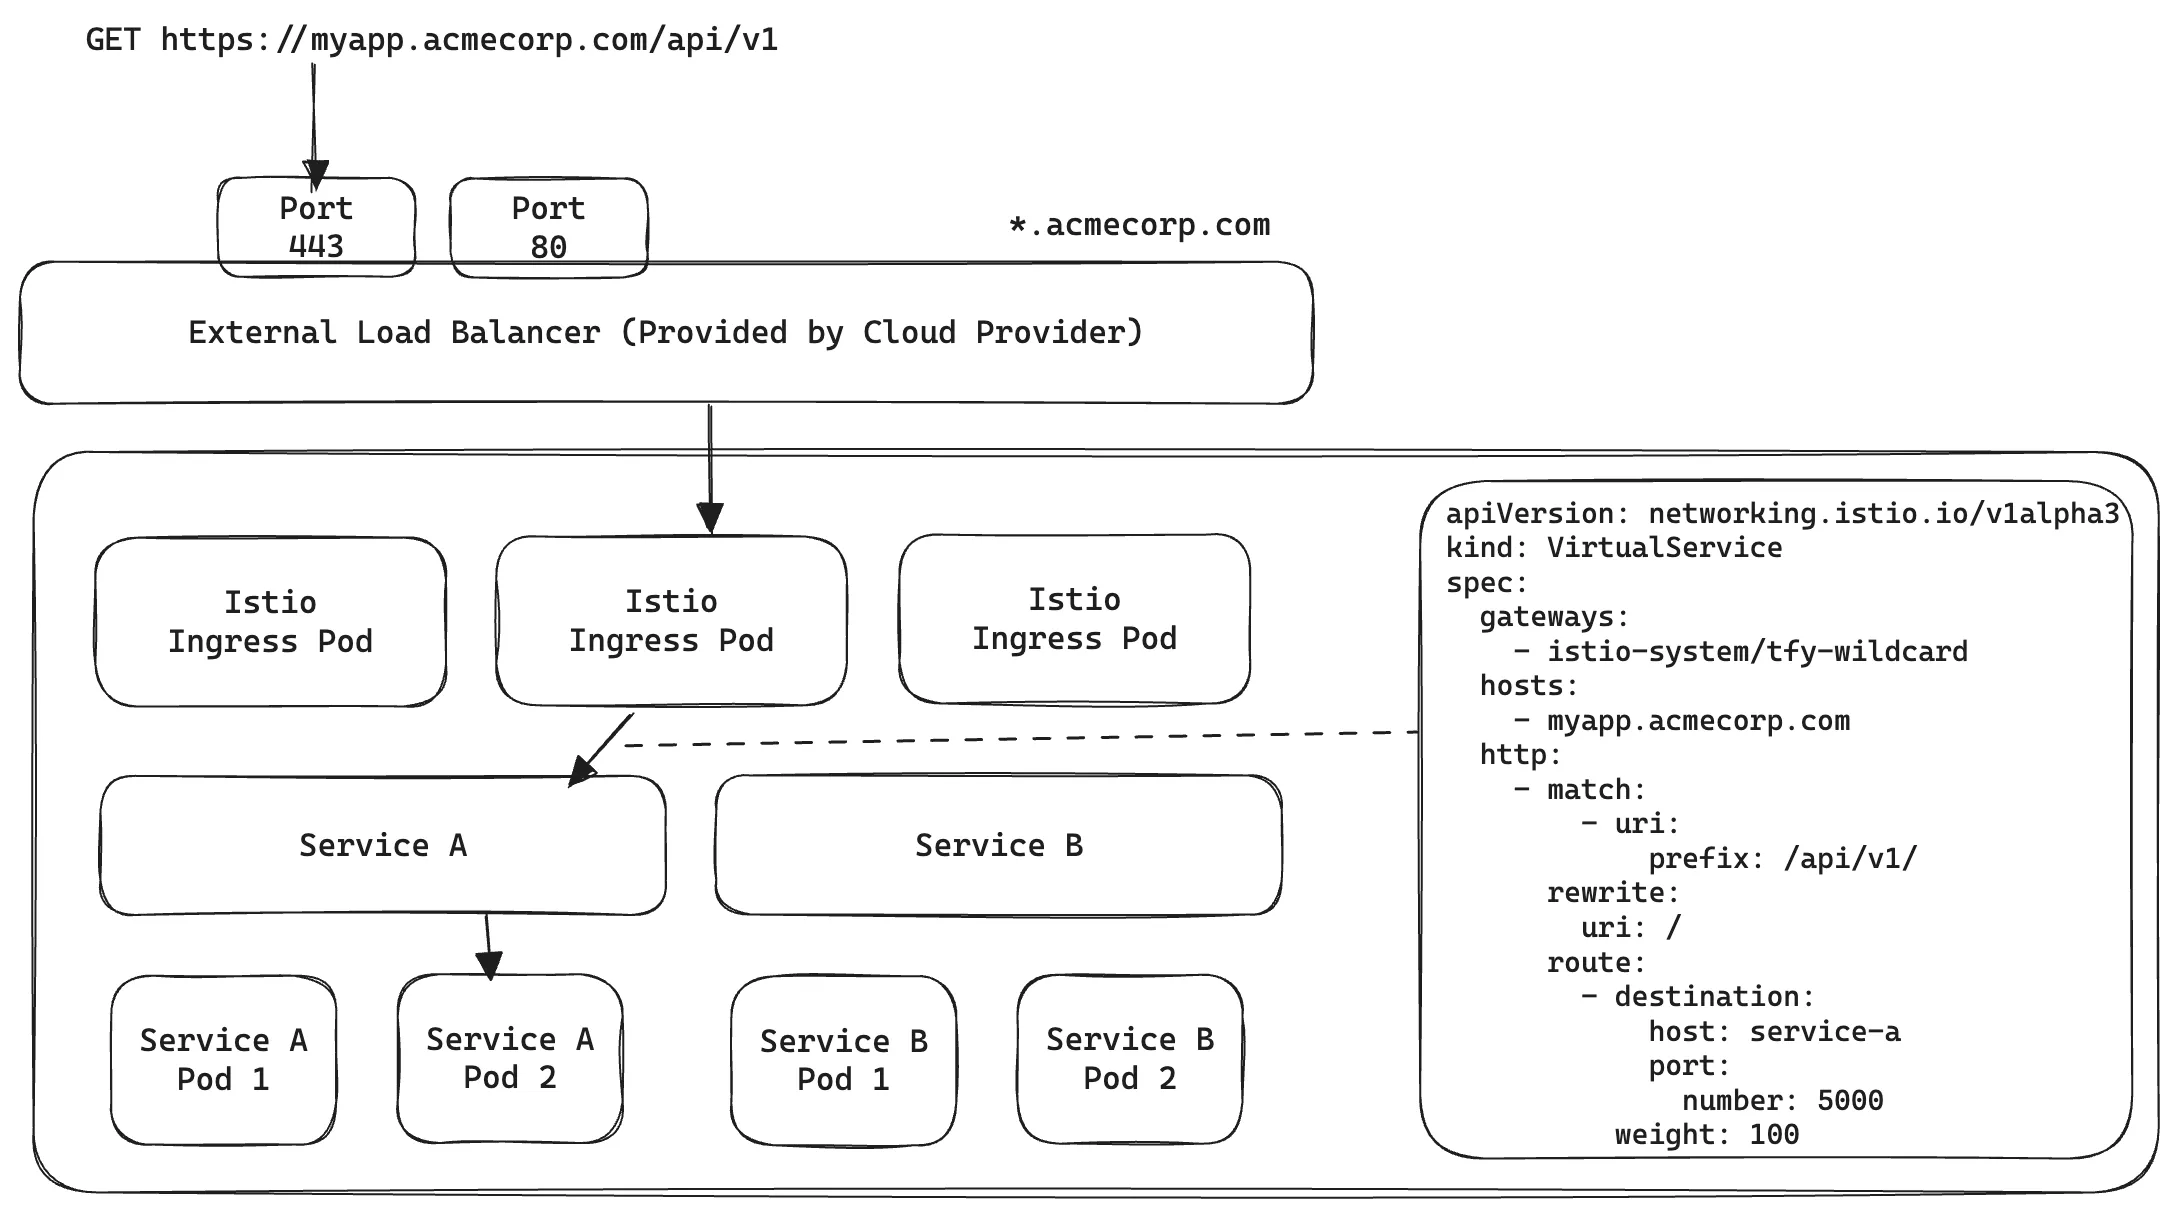
In the above when a user tries to fetch https://myapp.acmecorp.com/api/v1
This is called Layer 7 Routing because we use actual fields from HTTP spec to do routing.
SSH uses a custom protocol that uses TCP for transport. A simple SSH connection looks something like the following
ssh user@somemachine.acmecorp.com -p 22
Here we are trying to connect to somemachine.acmecorp.com on port 22. Here somemachine.acmecorp.com:22 has to resolve to a unique IP address and port combination to reach the destination. But recall in our setup, all subdomains are configured to point to the same Load balancer - that means abc.acmecorp.com, xyz.acmecorp.com, somemachine.acmecorp.com all resolve to the same IP address and then Istio/Envoy is supposed to look at the subdomain and decide where to route. But in the case of SSH, this is not possible because after resolving the IP address and establishing a TCP connection, all Istio sees is the Load balancer IP and port number, the actual contents of the packets are being encrypted by SSH. So how can we route to multiple different SSH destinations in the cluster?
As we only need to ensure unique combinations of IP address and ports, so we can just assign different ports on the load balancer to unique SSH containers
We can then configure TCP Route port match using Istio

Here, all TCP traffic coming to port 22 of the LoadBalancer will reach Service A and all TCP traffic on port 23 will reach Service B.
While this works well, there are a few limitations
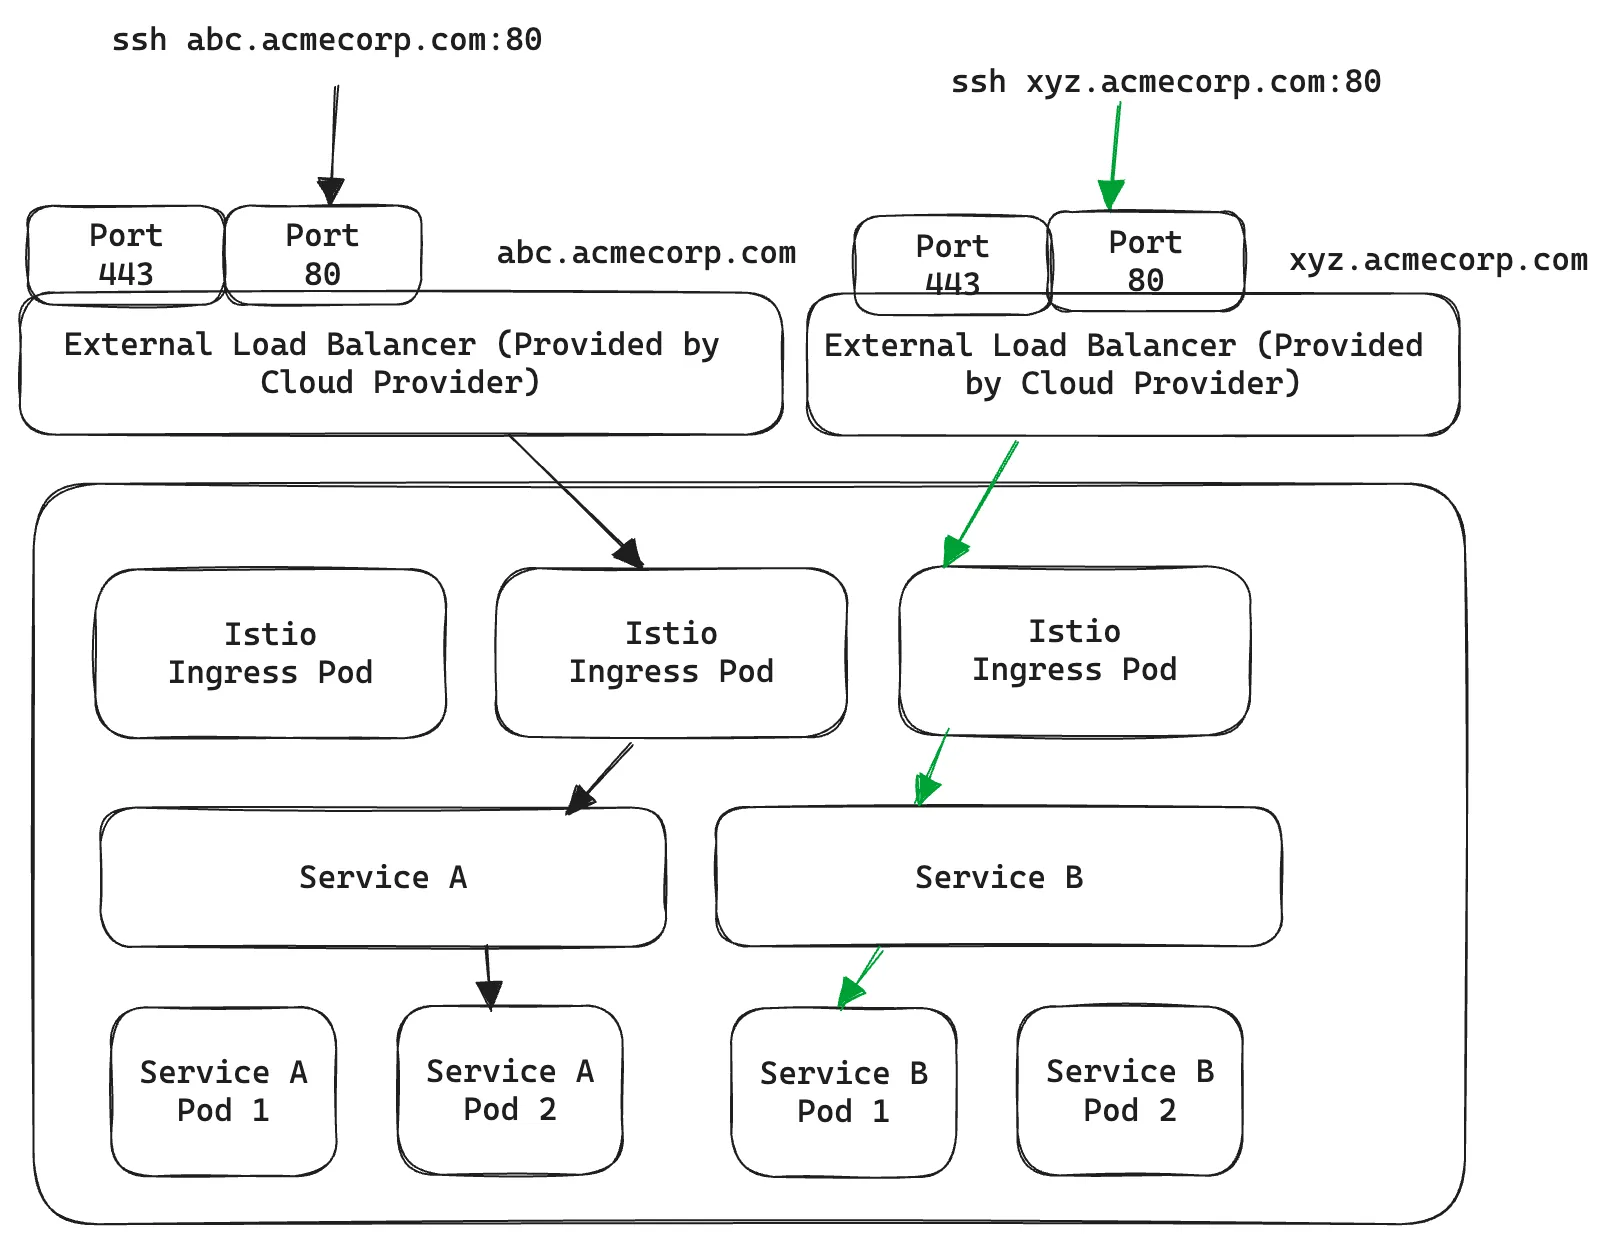
In this case, we have explicitly pointed abc.acmecorp.com and xyz.acmecorp.com to two different external Load Balancers instead of wildcard *.acmecorp.com. Now they point to a unique IP address each and can be routed by two different Istio Gateway (one-to-one linked with an external load balancer). The obvious limitation here is provisioning a new load balancer per SSH container becomes prohibitively expensive.
Is there any way to take advantage of HTTP-level routing yet still only work with TCP traffic? Enter HTTP CONNECT!
The HTTP CONNECT method allows establishing a "tunnel" between two destinations via a Proxy. Imagine the old days of telephone switchboards - you want to call a number but don't have a direct line to reach it, instead, an operator in between facilitates the connection on your behalf and then gets out of the way to let the two parties communicate.

We recommend watching the following video for a good explanation: https://www.youtube.com/watch?v=PAJ5kK50qp8
Fortunately, in our case, we already use a proxy capable of using CONNECT - Envoy Proxy. Let's look at how it would work in our use case:

CONNECT svc-a.ns.cluster.svc.local:80 HTTP/1.1
Host: svc-a.ns.cluster.svc.local
which is instructing Envoy to establish a TCP Connection to svc-a.ns.cluster.svc.local:80 on their behalf

Note that svc-a.ns.cluster.svc.local:80 is a Kubernetes Service and does not point to any public IP address, rather it can only be resolved inside the Kubernetes Cluster. Since Envoy lives inside the cluster we can configure it to reach the pods behind it.
All that is left is to configure Envoy to do such routing. Unfortunately, Istio does not have high-level abstractions to configure this easily instead we have to apply patches to Envoy configuration using Envoy Filters
Understanding Envoy capabilities and Envoy Filters is out of the scope of this blog post but just take it as a convenient way to modify Istio routing rules using small patches. To enable CONNECT based routing we need to
 E.g. Enable CONNECT on Port 2222apiVersion: networking.istio.io/v1alpha3
kind: EnvoyFilter
spec:
  configPatches:
    - applyTo: NETWORK_FILTER
      match:
        context: GATEWAY
        listener:
          filterChain:
            filter:
              name: envoy.filters.network.http_connection_manager
          portNumber: 2222
      patch:
        operation: MERGE
        value:
          typed_config:
            '@type': >-
              type.googleapis.com/envoy.extensions.filters.network.http_connection_manager.v3.HttpConnectionManager
            http2_protocol_options:
              allow_connect: true
            upgrade_configs:
              - upgrade_type: CONNECT
  workloadSelector:
    labels:
      app: tfy-istio-ingress
apiVersion: networking.istio.io/v1alpha3
kind: EnvoyFilter
metadata:
  name: svc-a-ns-ssh-envoy-filter
  namespace: istio-system
spec:
  configPatches:
    - applyTo: NETWORK_FILTER
      match:
        context: GATEWAY
        listener:
          filterChain:
            filter:
              name: envoy.filters.network.http_connection_manager
          portNumber: 80
      patch:
        operation: MERGE
        value:
          typed_config:
            '@type': >-
              type.googleapis.com/envoy.extensions.filters.network.http_connection_manager.v3.HttpConnectionManager
            route_config:
              name: local_route
              virtual_hosts:
                - domains:
                    - svc-a.ns.svc.cluster.local:80
                  name: svc-a-ns-ssh-vh
                  routes:
                    - match:
                        connect_matcher: {}
                      route:
                        cluster: >-
                          outbound|80||svc-a.ns.svc.cluster.local
                        upgrade_configs:
                          - connect_config: {}
                            enabled: true
                            upgrade_type: CONNECT
  workloadSelector:
    labels:
      istio: tfy-istio-ingress
一見すると複雑なYAMLですが、ゲートウェイのポート80のリスナーを修正し、svc-a.ns.svc.cluster.local:80へのCONNECTリクエストに一致させ、それらをoutbound|80||svc-a.ns.svc.cluster.local、つまりコンテナ内でOpenSSHサーバーがSSH接続を待機しているKubernetesサービスsvc-a.ns.svc.cluster.localのポート80にルーティングしているだけです。
SSHクライアント単体ではHTTP CONNECTについて何も知りません。その代わりに、 ProxyCommand オプションを提供しており、他のプログラムがSSH接続を仲介できるようにします。ここでは、 ProxyTunnel プロジェクトを使用します。これにより、この作業が容易になります。 ~/.ssh/config は以下の通りです
Host svc-a-ns
  User jovyan
  HostName svc-a.ns.svc.cluster.local
  ポート 80
  ServerAliveInterval 100
  IdentityFile ~/.ssh/my-private-key
  ProxyCommand proxytunnel -v -p ssh.acmecorp.com:80 -o %h -d %h:%p
これで全て完了し、ユーザーは簡単に接続し、お気に入りの開発ワークフロー(Neovim、VS Code、JetBrains IDEなど)をセットアップできるようになります。
この機能はコードの編集と実行に関して開発者のエクスペリエンスを大幅に向上させますが、私たちはまだコンテナ内で実行しているため、いくつかの制限が依然として存在します。
/ )は、コンテナの再起動後も保持されません。当社では、SSHサーバーイメージを拡張し、それらのカスタムイメージから開始する方法を提供しています。TrueFoundry は、Kubernetes上でML/LLMをデプロイするためのPaaSであり、開発者のワークフローを加速させます。モデルのテストとデプロイにおいて完全な柔軟性を提供しつつ、インフラチームには完全なセキュリティと制御を保証します。当社のプラットフォームを通じて、チームは デプロイと監視 を15分で実行し、100%の信頼性、スケーラビリティ、そして数秒でのロールバック機能を備えています。これにより、コストを削減し、モデルをより迅速に本番環境にリリースできるようになり、真のビジネス価値の実現を可能にします。
TrueFoundry AI Gateway delivers ~3–4 ms latency, handles 350+ RPS on 1 vCPU, scales horizontally with ease, and is production-ready, while LiteLLM suffers from high latency, struggles beyond moderate RPS, lacks built-in scaling, and is best for light or prototype workloads.


最新のニュース、記事、リソースをメールでお届けします
© 2026 無断複写・転載を禁じます。


.webp)


.png)


.webp)
.webp)