Blank white background with no objects or features visible.

تعلن TrueFoundry عن استحواذها على Seldon AI، موسعة بذلك لوحة التحكم الخاصة بها للذكاء الاصطناعي للمؤسسات. البيان الصحفي الكامل →

أفضل 6 أدوات ضبط دقيق لتدريب النماذج في عام 2026

By TrueFoundry

Published: July 4, 2026

Best Fine Tuning Tools for Model Training

Introduction

Fine-tuning is a technique used in machine learning, especially deep learning, where a pre-trained model is further trained or "tuned" on a smaller, specific dataset tailored to a particular task. 

Suppose you're developing a model that generates technical manuals for electronics using GPT-3 (a large language model with 175 billion parameters), but the generic output from GPT-3, isn't meeting the required technical accuracy and tone.

In this case, you can think of retraining the model for your specific use case but directly training a model like GPT-3 from scratch to address this niche task is impractical due to the computational resource requirement and specialized data. 

Here's where fine-tuning comes into play.

Fine-tuning is like teaching GPT-3 a new trick. It already knows a lot about languages thanks to its training on numerous texts from books to websites. Your job is to further train it on a targeted dataset— in this case, a corpus of existing technical manuals and documentation specific to electronics.

Some basic methods of fine-tuning:

  1. Layer Freezing: Selectively freezing the weights of certain layers while allowing others to update during the fine-tuning process.
  2. Learning Rate Adjustment: Adjusting the rate at which the model learns during the fine-tuning process, typically to prevent overwriting valuable pre-learned knowledge.
  3. Adding Task-Specific Layers: This involves extending the model architecture with new layers that are directly trained for the task.

Parameter Efficient Fine Tuning

Parameter Efficient Fine-tuning (PEFT) is a technique aimed at minimizing the number of additional parameters required during the fine-tuning of pre-trained neural network models,

This helps cut down on computational expenses and memory usage while still maintaining or even enhancing performance PEFT achieves this by adding prompt embeddings as extra model parameters and tuning only a small number of extra parameters. 

PEFT also require a much smaller dataset as compared to traditional fine-tuning.

Steps to perform PEFT

  1. Loading the chosen model

Load your chosen model using a machine learning framework such as TensorFlow, PyTorch, or Hugging Face's Transformers library. These frameworks provide APIs to download and load pre-trained models easily.

Here is a sample code:

from transformers import GPT2Model, GPT2Tokenizer
model_name = 'gpt2-medium'  # Choose the model variant
tokenizer = GPT2Tokenizer.from_pretrained(model_name)
model = GPT2Model.from_pretrained(model_name)

  1. Prompt Engineering

Before fine-tuning, you must experiment with different prompts to guide the model's responses. Test various prompts with the pre-trained model to see how they affect the output and choose the most appropriate one. You can also change different parameters like max_length, temperature, etc.

It's like figuring out the best way to ask your question so the model understands what you want.

from transformers import pipeline

generator = pipeline('text-generation', model='gpt2')

prompt = """"""

# Generate responses
responses = generator(prompt, max_length=200, num_return_sequences=3)

for i, response in enumerate(responses):
    print(f"Response {i+1}: {response['generated_text']}")

  1. Dataset

In a dataset for fine-tuning, there are typically two parts: Prompt (Input) and Answer (Output).  The Prompt is like a question or a starting point, and the Answer is what you want the model to generate in response to that question. It can be in the form of columns or a sequence of text entries (more common).

The best prompt identified in the last step will be used here and the Answer will be exactly what we want the model to produce when given that Prompt. 

  1. Fine-Tuning the Model

This is where you teach the model to get better at your task. You’ll use the dataset to adjust the model’s “knowledge” slightly. 

Here's a simplified overview of setting up and running the fine-tuning process with PyTorch:

  • Setting Up for Training:

from transformers import AdamW

optimizer = AdamW(model.parameters(), lr=5e-5)  # lr is the learning rate

  • Training Loop:
for epoch in range(total_epochs):
    for batch in data_loader:
        inputs, labels = batch
        outputs = model(**inputs)
        loss = outputs.loss
        loss.backward()
        optimizer.step()
        optimizer.zero_grad() 

Tools for Fine-Tuning

When exploring tools for prompt engineering, it's helpful to categorize them into two main domains: Code Platforms and No-Code Platforms. This distinction simplifies the selection process
Code Platforms refer to platforms that provide virtual machines which can be used to run your custom Python script for fine-tuning like the one mentioned before. Meanwhile, No-Code Platforms refer to tools that require simple or no Python script to run. It has a dedicated UI where you can start training with a few clicks.

No-Code Platforms:

No-code platforms, on the other hand, are tailored for simplicity and ease of use. They eliminate the need for writing Python scripts, offering an intuitive UI where training can be initiated with just a few clicks. This domain is suited for users without programming knowledge or those who prefer a straightforward approach to prompt engineering.

1. TrueFoundry

TrueFoundry is a tool that helps ML teams get their models up and running smoothly. It's built on Kubernetes, which means it can run on different clouds or even on your own servers. This is important for businesses worried about keeping their data safe and controlling costs

For Fine-tuning, It is one of the best tools out there, catering to both beginners and experts. Here you have two options, deploying a fine-tuning notebook for experimentation or launching a dedicated fine-tuning job.

  1. Notebooks: Experimentation Playground

Notebooks offer an ideal setup for explorative and iterative fine-tuning. You can experiment on a small subset of data, trying different hyperparameters to figure out the ideal configuration for the best performance.

  1. Jobs: Reliable and Scalable

Once you've identified the optimal hyperparameters and configuration through experimentation, transitioning to a deployment job helps you fine-tune on whole dataset and facilitates rapid and reliable training.

Therefore, notebooks are strongly recommended for early-stage exploration and hyperparameter tuning and deployment jobs are the preferred choice for large-scale LLM finetuning, particularly when the optimal configuration has been established through prior experimentation.

Here's a step-by-step guide to fine-tune using both Notebook and Jobs:

  1. Setting up the Training Data

Truefoundry supports two different data formats:

  1. Chat: Data needs to be in JSONL format with each line containing a whole conversation in OpenAI Chat format

Each line contains a key called messages. Each message key contains a list of messages, where each message is a dictionary with role and content keys. The role key can be either user, assistant or system and the content key contains the message content.

  1. Completion: Data needs to be in JSONL format with each line containing a JSON encoded string containing two keys prompt and completion.
{"prompt": "What is 2 + 2?", "completion": "The answer to 2 + 2 is 4"}
{"prompt": "Flip a coin", "completion": "I flipped a coin and the result is heads!"}
{"prompt": "", "completion": ""}

2. Fine-Tuning

Fine tuning tool interface showing model selection and input fields

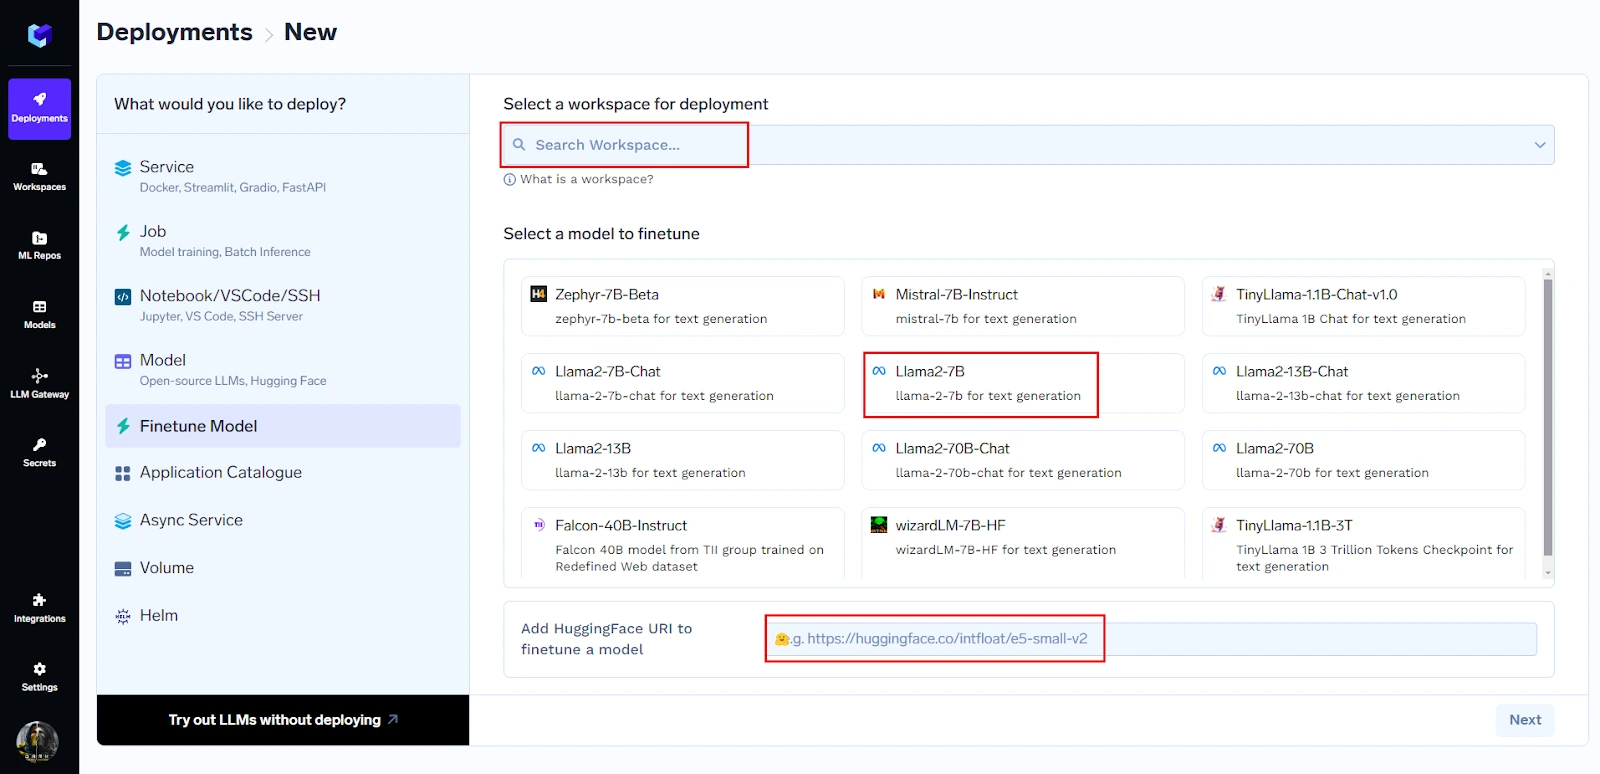
You can begin fine-tuning by just three clicks:

  1. Select workspace where you want to work
  2. Choose model:

You can choose model from the comprehensive list present or can just paste the huggingface URL to begin fine-tuning.

  1. Click on Next
Fine tuning tool interface showing configuration options for model training

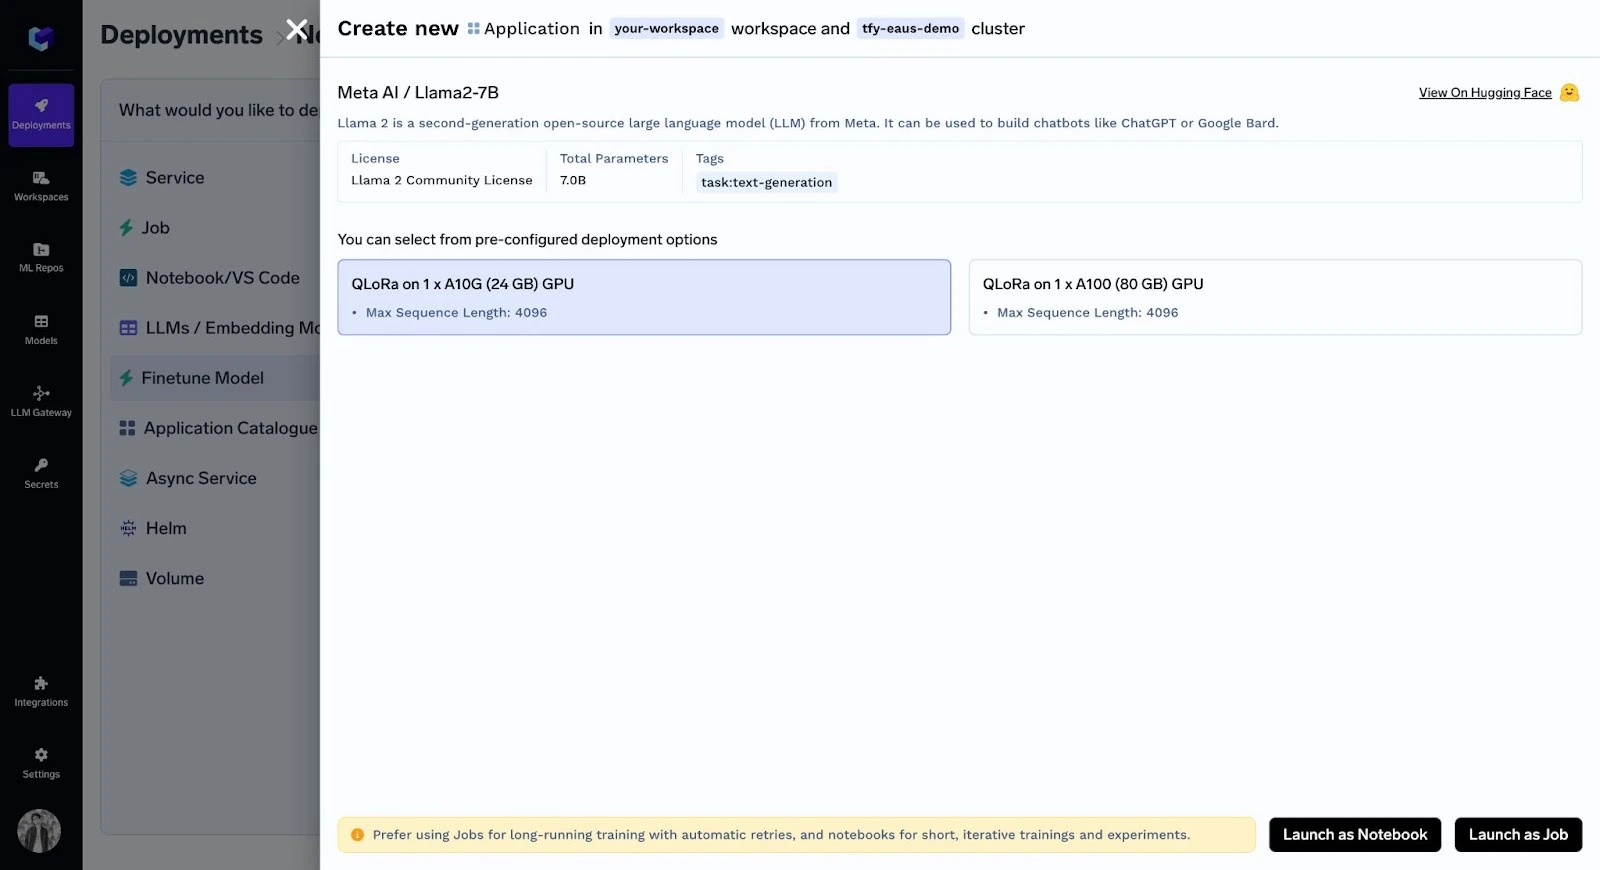
Now after selecting the desired GPU, you have two options: Run as notebook or Job.

3. Fine-Tuning using a Notebook

After choosing ‘Launch as Notebook’ and selecting default values for hyperparameters, you can see you notebook:

 Fine tuning tool interface showing configuration and hyperparameter settings

4. Fine-Tunning as Job:

Before you start, you will first need to create an ML Repo (this will be used to store your training metrics and artifacts, such as your checkpoints and models) and give your workspace access to the ML Repo. You can read more about ML Repo's in Truefoundry’s documentation.

Now you have to choose ‘Launch as Job’ and select default values of hyperparameters for initiating fine-tuning.

Fine tuning tool dashboard showing job deployment and execution status

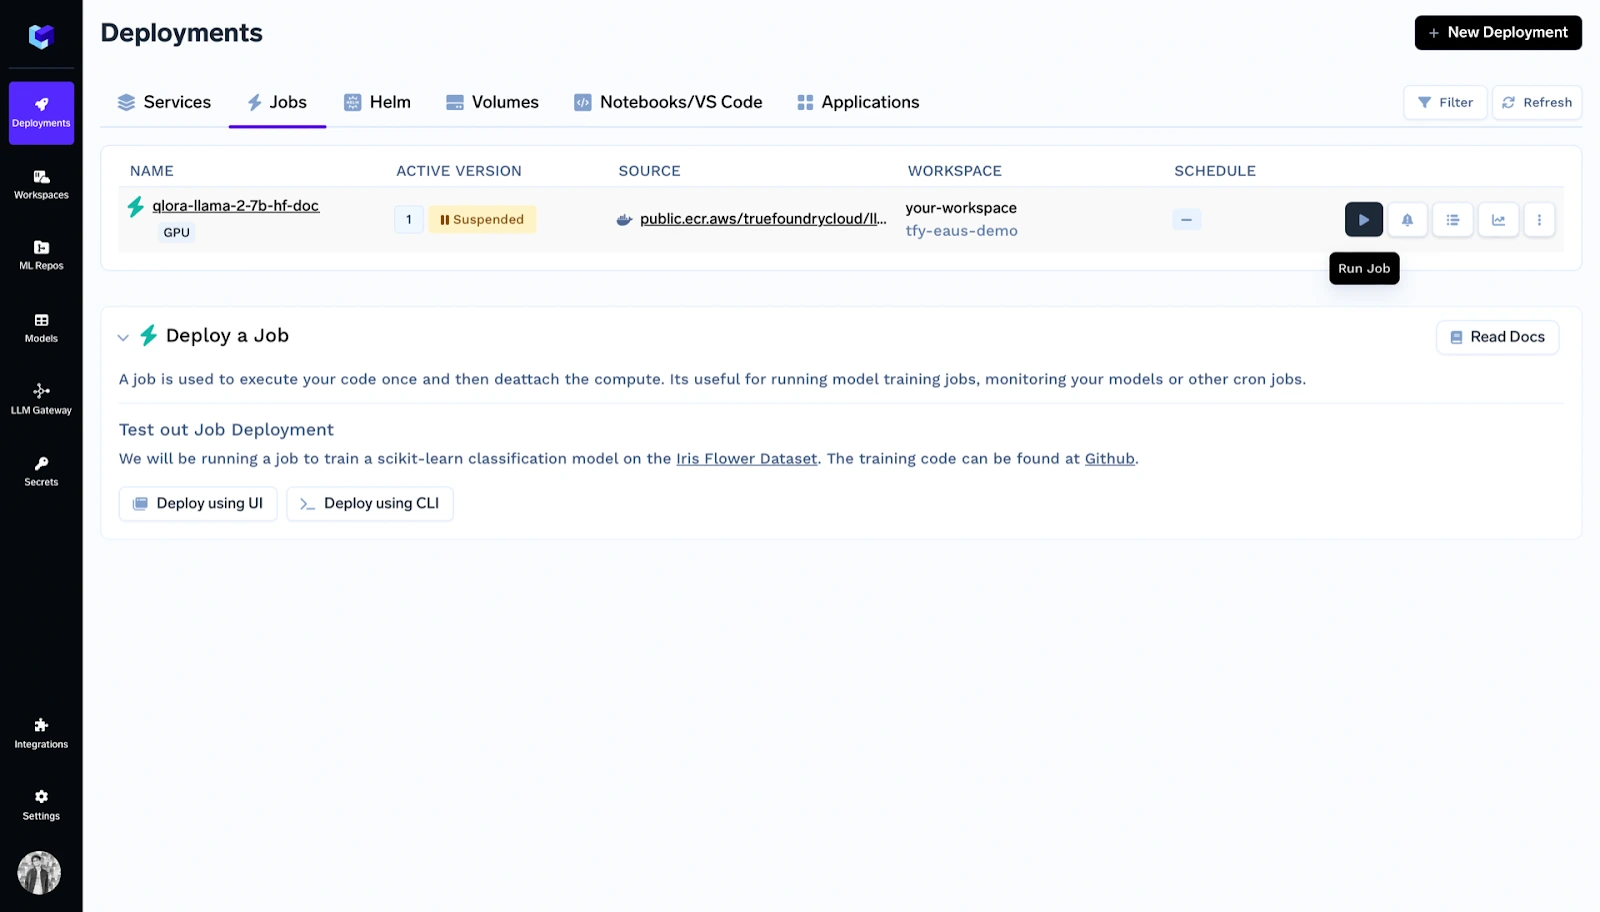
Inside deployments you can see the job listed and click on run job.

Key Features:

  • Support for Popular LLMs: Allows fine-tuning of widely-used open-source LLMs like Llama 2, Mistral, Zephyr, and Mixtral.
  • Flexibility in Fine-Tuning Approach: Offers the option to fine-tune LLMs using either Jobs for scalability and reliability or Notebooks for experimentation and iterative tuning.
  • QLoRA Technique: Employs the QLoRA fine-tuning technique, which balances efficiency with performance, enabling fine-tuning on less powerful hardware without compromising quality.
  • Data Format Support: Supports data in jsonl format, catering to both chat and completion type datasets, facilitating a range of LLM applications.
  • Easy Data Integration: Offers options to upload training data as a TrueFoundry artifact, to cloud storage services, or locally, providing flexibility in data management.
  • Deployment Support: Post fine-tuning, guides on deploying the fine-tuned model for practical application are available, enhancing the model’s utility.
  • ML Repository Integration: Allows tracking of fine-tuning progress and managing training metrics/artifacts through ML Repositories, ensuring organized and accessible model development.
Know more about TrueFoundry
Book Demo

2. Open AI API

The OpenAI API provides access to advanced artificial intelligence models developed by OpenAI, including the latest versions of GPT (Generative Pre-trained Transformer). One of the standout features of the OpenAI API is its ability to fine-tune models on custom datasets.

Thus you can tailor the behavior of models like GPT-3 or newer versions to specific applications or to adhere to particular content styles and preferences.

Since I am referring to the API, it is not exactly ‘’No-Code’, still one can easily set it up for training as compared to other tools in the previous section.

Example Code for Fine-Tuning:

  1. Preparing Your Dataset

To fine-tune a model, you first need to prepare your dataset in a format that the OpenAI API can understand. Typically you would have to create a JSON file which looks like this:

{"prompt": "The capital of France is", "completion": " Paris"}
{"prompt": "The largest planet in the solar system is", "completion": " Jupiter"}

  1. Uploading Your Dataset to OpenAI

You can easily upload the dataset using Open AI CLI (Command Line Interface). 

openai tools fine_tunes.prepare_data -f your_dataset.jsonl

  1. Fine-Tuning the Model

Once your dataset is prepared and uploaded, you can initiate a fine-tuning process. The following is an example using OpenAI's Python library:

import openai

openai.api_key = "your-api-key"

response = openai.FineTune.create(
  training_file="file-YourFileIDHere",
  model="gpt-3.5-turbo",
  n_epochs=4,
  learning_rate_multiplier=0.1,
  batch_size=4
)

  1. Using Your Fine-Tuned Model

After the fine-tuning process is complete, you can use your fine-tuned model for generating text or other tasks by specifying the fine-tuned model's ID:

response = openai.Completion.create(
  model="YOUR_FINE_TUNED_MODEL_ID",
  prompt="The capital of Italy is",
  max_tokens=50
)
print(response.choices[0].text.strip())

You can also deploy your fine-tuned model.

Key Features:

  • Ease of Use: The API simplifies interactions with powerful AI models, removing the complexities of directly managing or training large neural networks.
  • Scalability: OpenAI handles the infrastructure and scaling, providing consistent performance regardless of the workload.
  • Continual Updates: OpenAI frequently updates its API and models, giving users access to the latest advancements in AI research.

3. Microsoft Azure

Microsoft Azure is a cloud computing platform offering a wide range of services, including computing, storage, analytics, and more. It provides users with the tools to build, deploy, and manage applications efficiently. 

One notable feature is its intuitive interface, making it easy for beginners to navigate without extensive coding knowledge. With simple clicks rather than complex coding, users can fine-tune their applications, making Azure an accessible tool for stress-free development.

Here is simple walkthrough on how to set-up a fine-tuning ‘job’ in Azure:

  1. Preparing your data:

Obviously, this is the basic requirement for all tools. The training data can be in JSON Lines (JSONL), CSV, or TSV format. The requirements of your data vary based on the specific task you intend to fine-tune your model for.

For text classification:
Two columns: Sentence (string) and Label (integer/string)

  1. Choose a foundation model
Fine tuning tool interface showing model catalog and task filters
  1. Configure a fine-tuning job: 
Fine tuning tool interface showing training and validation setup

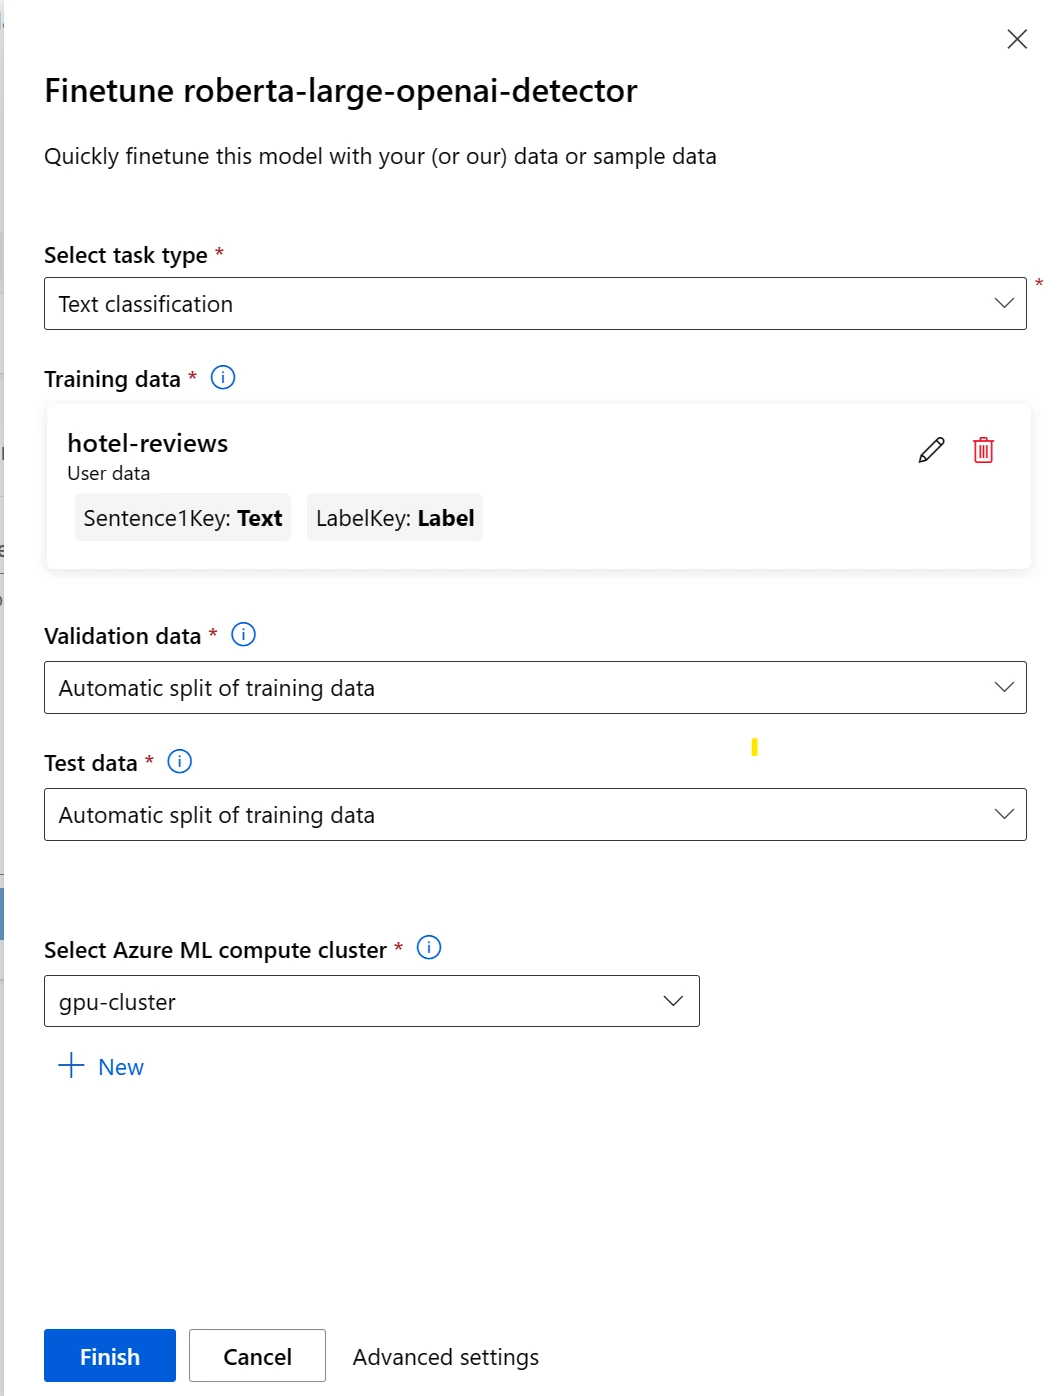
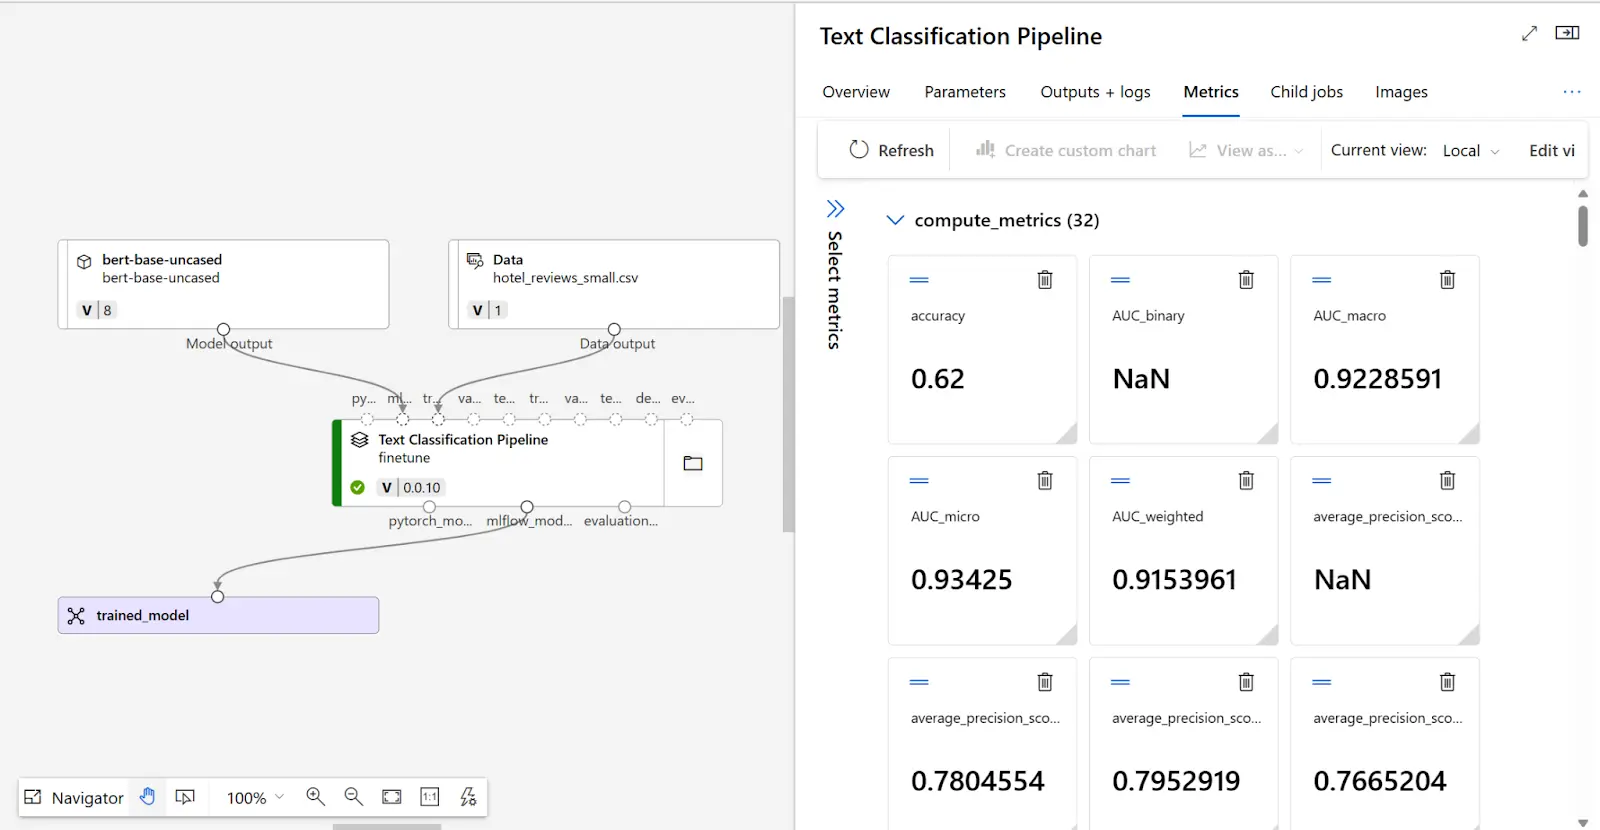
After you submit the fine-tuning job, a pipeline job will be created to train your model. You can review all inputs and collect the model from the job outputs.

  1. Evaluate your fine-tuned model

To decide whether your fine-tuned model performs as expected, you can review the training and evaluation metrics.

Fine tuning tool interface showing training pipeline and performance metrics

Key Features:

  • User-Friendly Interface: Azure's easy-to-use interface simplifies navigation for beginners.
  • No-Code Options: Fine-tuning doesn't require extensive coding; users can achieve tasks with simple clicks.
  • Scalability: Applications can be easily scaled up or down to meet changing demands.
  • Comprehensive Services: Azure offers a range of tools for fine-tuning, including analytics and monitoring features.
  • Integration: Seamlessly integrates with Microsoft and third-party tools for flexibility in workflows.

4. Replicate

Replicate is a versatile tool designed for fine-tuning various aspects of software applications. Replicate's applications as a fine-tuning tool include optimizing performance, adjusting configurations, and enhancing functionality with minimal effort. It simplifies the process by handling GPU setup. Similar to Open AI API, it is not exactly ‘’No-Code’ like other tools in the list, still one can easily set it up for training as compared to other tools in the previous section.

Steps to Fine-Tunning llama-2b:
  1. Prepare Your Training Data

Your training data needs to be in a JSONL format. Below is an example of how you might structure this file:

{"prompt": "What's the weather like?", "completion": "The weather is sunny."}
{"prompt": "Tell me a joke.", "completion": "Why don't scientists trust atoms? Because they make up everything!"}

  1. Authenticate with Replicate

You need to set your Replicate API token as an environment variable in your terminal:

export REPLICATE_API_TOKEN=<your-token-here>

  1. Upload Your Training Data

You can upload your data to an s3 bucket or directly at Replicate using curl commands:

  1. Create a Model on Replicate

You need to create an empty model on Replicate for your trained model. When your training finishes, it will be pushed as a new version to this model.

  1. Create a Training Job

You need to create a training Job on your IDE, as shown below:

import replicate

training = replicate.trainings.create(
  version="meta/llama-2-7b:version-id", # Replace "version-id" with the actual version ID of the model you chose
  input={
    "train_data": "https://yourdata.com/data.jsonl", # Use your actual data URL here
    "num_train_epochs": 3
  },
  destination="your-username/your-model-name" # Use your actual username and model name here
)

print(training)

  1. Monitor Training Progress

To monitor the progress programmatically, you can use:

training.reload()
print(training.status)

  1. Run Your Fine-Tuned Model

After the training is complete, you can run your model with the API:

output = replicate.predictions.create(
  version=training.output["version"], # Use the version output from your training
  input={"prompt": "Your prompt here"}
)

print(output)

Key Features:

  • Ease of Use: Simplifies the fine-tuning process with a user-friendly interface and straightforward API, making it accessible to both beginners and experienced practitioners.
  • Cloud-Based Training: Removes the need for local GPU resources by offering cloud-based training, allowing users to train models regardless of their hardware.
  • Flexible Data Input: Supports JSONL format for training data, allowing for flexible and structured input for a variety of tasks.
  • Model Hosting: Automatically hosts fine-tuned models, enabling easy integration and deployment of AI models into applications.
  • Version Control: Keeps track of different training versions, making it easy to manage, compare, and revert to previous versions of a model.

5. Google Gen AI Studio

At Gen AI Studio, you have both options for setting up fine-tuning jobs, through API or the website, here I will talk about only the API method. It has the most streamlined process as compared to the tools discussed above.

Here's a step-by-step guide:
  1. Prepare Your Dataset

Your dataset should be in JSONL format, with each line being a JSON object with "input_text" and "output_text" keys. It can start training with only 10 examples but at least 100 examples are recommended.

  1. Upload Your Dataset

You must upload your dataset to Google Cloud Storage (GCS) bucket, if you don’t have one you can create one in Google Drive.

  1. Authentication and Initialization

Now you have to provide your credentials to establish the connection:

from google.auth import default
from google.cloud import aiplatform
from vertexai import init

credentials, _ = default(scopes=["https://www.googleapis.com/auth/cloud-platform"])
project_id = "your-project-id"
location = "your-project-location" # e.g., "us-central1"
init(project=project_id, location=location, credentials=credentials)

  1. Prepare the Tuning Function

You need to define a function for tuning with the necessary parameters.

from vertexai.language_models import TextGenerationModel
from vertexai.preview.language_models import TuningEvaluationSpec

def tuning(project_id, location, model_display_name, training_data, train_steps=10, evaluation_dataset=None, tensorboard_instance_name=None):
    eval_spec = TuningEvaluationSpec(evaluation_data=evaluation_dataset)
    if tensorboard_instance_name:
        eval_spec.tensorboard = aiplatform.Tensorboard(tensorboard_name=tensorboard_instance_name)
    model = TextGenerationModel.from_pretrained("text-bison@002")

    model.tune_model(
        training_data=training_data,
        model_display_name=model_display_name,
        train_steps=train_steps,
        tuning_job_location="europe-west4",
        tuned_model_location=location,
        tuning_evaluation_spec=eval_spec,
    )
    print(model._job.status)
    return model

  1. Execute Model Tuning

Call the tuning function specified earlier, with your specific parameters. The training_data parameter can be a GCS URI or a pandas DataFrame.

Key Features:

  1. Provision for both API Access and User Interface: For those who prefer a graphical approach, Gen AI Studio offers an intuitive user interface.
  2. Scalable Infrastructure: Leverage Google Cloud's scalable infrastructure to handle large datasets and compute-intensive tuning jobs efficiently.
  3. Integration with Google Cloud Services: Seamless integration with other Google Cloud services, such as Cloud Storage for dataset management and Vertex AI for deploying models.
  4. Wide Range of Pre-Trained Models: Access a variety of pre-trained models suitable for different tasks and languages, offering a solid starting point for fine-tuning.
  5. Collaboration and Version Control: Facilities to collaborate with team members, share fine-tuning projects, and maintain version control over fine-tuned models.

6. Predibase

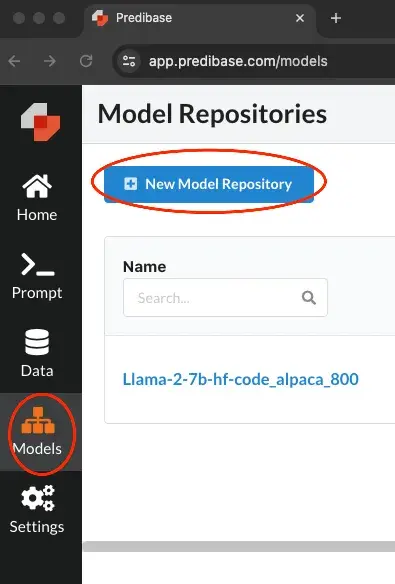
Predibase is a specialized platform designed to facilitate the fine-tuning of large language models (LLMs), such as GPT-4, for specific tasks or applications. It provides access to the advanced capabilities of LLMs by providing a streamlined, user-friendly environment for customizing these models according to individual needs.

Predibase gives you the option of both Python SDK and UI for performing fine-tuning jobs.

Here's a step-by-step guide to fine-tune mistral-7b-instruct:

  1. Basic Setup

First, sign up for an account on Predibase and deposit to add credits. Afterwards, generate your API Key.

  1. Creating Model Repository

Go to Models and then click on “New Model Repository” as shown below:

Fine tuning tool interface showing model repository creation

Now, name your repository and add a description.

  1. Start Fine-Tunning:
Fine tuning tool interface showing training setup options

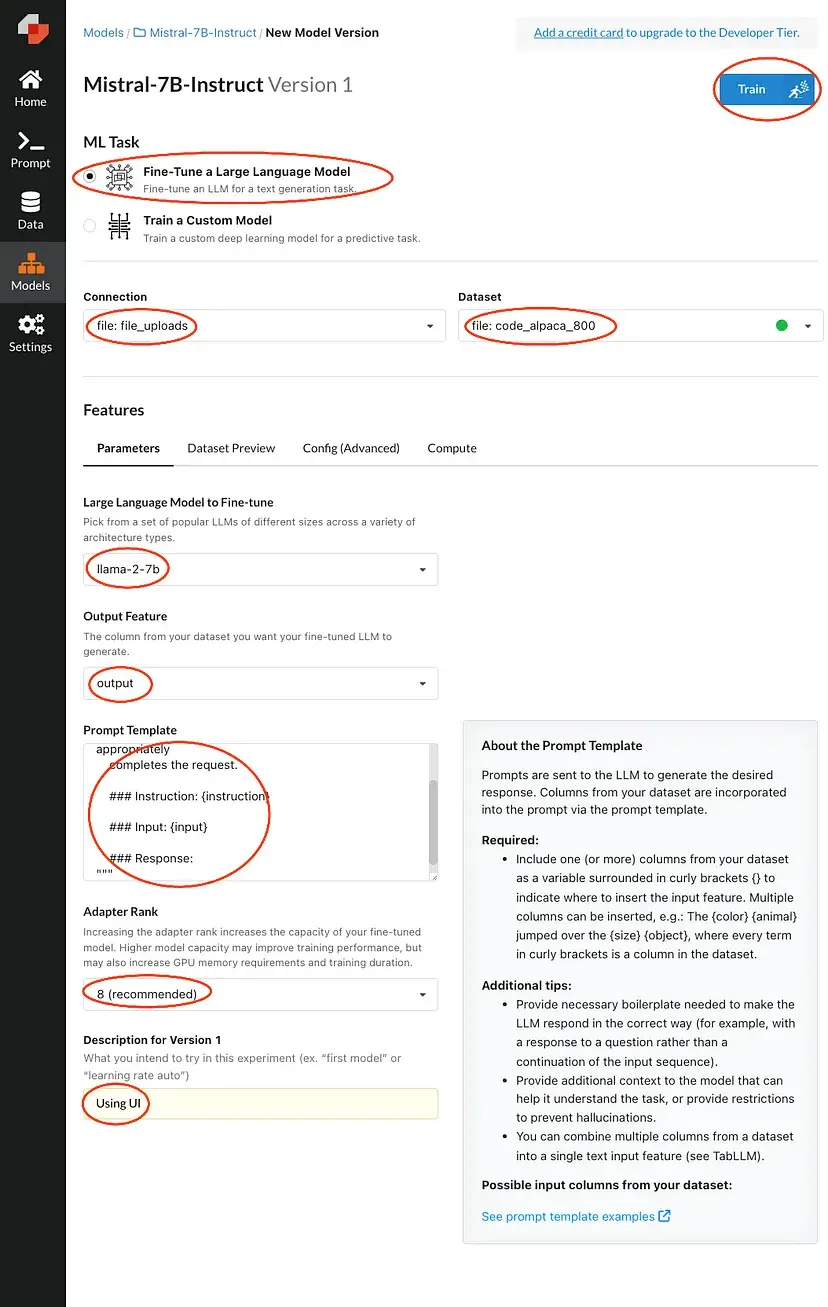
Fill in the areas highlighted and then press train. This will queue your request until there's an available compute.

Code Platforms:

Code Platforms are designed for users with a solid background in programming. These platforms provide virtual machines that allow for the running of custom Python scripts for tasks such as fine-tuning. These platforms are perfect for projects that demand high customization and intricate control over the training and deployment phases.

1. Amazon Sagemaker:

Amazon SageMaker is a fully managed service that provides developers and data scientists with the ability to build, train, and deploy machine learning models quickly.

Amazon SageMaker doesn't have a dedicated, built-in "fine-tuning" feature specifically labelled as such for large language models. Instead, it provides a powerful and flexible platform that allows you to run custom Python scripts to accomplish fine-tuning tasks.

Here's a simple example of how you might start a fine-tuning job for a language model with Hugging Face on SageMaker. This assumes you have already set up an AWS account and configured the AWS CLI. (you can use TensorFlow or PyTorch directly on Amazon SageMaker for fine-tuning tasks)

  1. Setup and Initialize SageMaker Session:
import sagemaker
from sagemaker.huggingface import HuggingFace

# Initialize a sagemaker session
sagemaker_session = sagemaker.Session()

# Set up the role for SageMaker
role = sagemaker.get_execution_role()

  1. Prepare the Fine-Tuning Script:

You'd typically write a fine-tuning script (train.py) that you pass to the estimator. This script should include your model loading, fine-tuning, and saving logic.

# Define hyperparameters (if any), model name, and fine-tuning script
hyperparameters = {'epochs': 3, 'train_batch_size': 16, 'model_name': 'distilbert-base-uncased'}

huggingface_estimator = HuggingFace(
    entry_point='train.py',          # Your script name
    instance_type='ml.p3.2xlarge',   # Training instance type
    instance_count=1,                # Number of instances
    role=role,                       # IAM role with permissions
    transformers_version='4.6.1',    # Transformers library version
    pytorch_version='1.7.1',         # PyTorch library version
    py_version='py36',               # Python version
    hyperparameters=hyperparameters)

  1. Create a Hugging Face Estimator:
# Define hyperparameters (if any), model name, and fine-tuning script
hyperparameters = {'epochs': 3, 'train_batch_size': 16, 'model_name': 'distilbert-base-uncased'}

huggingface_estimator = HuggingFace(
    entry_point='train.py',          # Your script name
    instance_type='ml.p3.2xlarge',   # Training instance type
    instance_count=1,                # Number of instances
    role=role,                       # IAM role with permissions
    transformers_version='4.6.1',    # Transformers library version
    pytorch_version='1.7.1',         # PyTorch library version
    py_version='py36',               # Python version
    hyperparameters=hyperparameters
)

  1. Start the Training Job:
# Assuming you have your training data in an S3 bucket
data = {'train': 's3://your-bucket/train-dataset/', 'test': 's3://your-bucket/test-dataset/'}

# Fit the model
huggingface_estimator.fit(data)

Key Features:

  1. Pre-built algorithms and support for popular frameworks: SageMaker supports TensorFlow, PyTorch, Hugging Face, and others, making it easier to fine-tune LLMs on custom datasets.
  2. Managed Spot Training: It reduces the cost of training models by using Amazon EC2 Spot Instances.
  3. Distributed Training: SageMaker makes it simpler to train models faster and more cost-effectively by distributing the training job across multiple GPUs or instances.

2. Google Colab:

Google Colab is a popular cloud-based Jupyter notebook service that offers free access to computing resources, including GPUs and TPUs, making it an excellent platform for fine-tuning large language models (LLMs)

It is particularly beginner-friendly. Colab notebooks run in the cloud, directly from your browser, without requiring any local setup.

Here is the simple code snippet for fine-tuning a Transformer Model with Hugging Face Transformers and PyTorch in Google Colab

  1. Setting Up the Environment:

!pip install torch torchvision transformers

  1. Loading a Pre-trained Model and Tokenizer:
from transformers import BertTokenizer, BertForSequenceClassification
from transformers import AdamW

tokenizer = BertTokenizer.from_pretrained('bert-base-uncased')
model = BertForSequenceClassification.from_pretrained('bert-base-uncased')

# Prepare the model for training
model.train()

  1. Fine-Tuning the Model:  (assuming you have a dataset loaded into variables input_ids, attention_masks, and labels)
from torch.utils.data import DataLoader, RandomSampler, TensorDataset

# Create a data loader
dataset = TensorDataset(input_ids, attention_masks, labels)
dataloader = DataLoader(dataset, sampler=RandomSampler(dataset), batch_size=32)

optimizer = AdamW(model.parameters(), lr=2e-5)

# Example training loop
for epoch in range(4):  # loop over the dataset multiple times
    for step, batch in enumerate(dataloader):
        batch = [r.to('cuda') for r in batch]  # Move batch to GPU
        b_input_ids, b_input_mask, b_labels = batch

        # Forward + backward + optimize
        outputs = model(b_input_ids, token_type_ids=None, attention_mask=b_input_mask, labels=b_labels)
        loss = outputs[0]
        loss.backward()
        optimizer.step()
        optimizer.zero_grad()

  1. Saving the Model:

model.save_pretrained("/content/drive/My Drive/Colab Models/my_finetuned_model")

Key Features:

  1. Free Access to GPUs/TPUs: Colab provides free access to NVIDIA GPUs and Google TPUs, which can significantly speed up the training and fine-tuning of machine-learning models.
  2. التكامل مع جوجل درايف: قم بتخزين والوصول إلى مجموعات البيانات والنماذج الخاصة بك بسهولة مباشرة من جوجل درايف، مما يسهل التعامل السلس مع البيانات وحفظ النماذج.
  3. مكتبات مثبتة مسبقًا: يأتي كولاب مع معظم مكتبات علم البيانات والتعلم الآلي مثبتة مسبقًا، بما في ذلك TensorFlow و PyTorch و Hugging Face Transformers والعديد من المكتبات الأخرى، مما يسهل البدء في ضبط النماذج على الفور.
  4. بيئة تفاعلية: تتيح واجهة دفتر الملاحظات التطوير والتوثيق التفاعليين، من خلال الجمع بين التعليمات البرمجية الحية والمرئيات والتعليقات النصية.

3. بيبرسبيس جراديانت

بيبرسبيس جراديانت عبارة عن مجموعة من الأدوات المصممة لتبسيط عملية تطوير وتدريب ونشر نماذج التعلم الآلي في السحابة.

جراديانت فعال بشكل خاص للمهام مثل الضبط الدقيق لنماذج اللغة الكبيرة (LLMs) نظرًا لبنيته التحتية القابلة للتوسع ودعمه للحاويات، مما يجعله خيارًا قويًا لعلماء البيانات وممارسي التعلم الآلي.

فيما يلي مثال على الضبط الدقيق لنموذج Transformer باستخدام PyTorch على Paperspace Gradient.

  1. تحميل نموذج ومدقق (tokenizer) مدربين مسبقًا:
from transformers import BertTokenizer, BertForSequenceClassification
import torch

tokenizer = BertTokenizer.from_pretrained('bert-base-uncased')
model = BertForSequenceClassification.from_pretrained('bert-base-uncased')

  1. إعداد مجموعة البيانات:
from transformers import TextDatasetForNextSentencePrediction

dataset = TextDatasetForNextSentencePrediction(
    tokenizer=tokenizer,
    file_path="./my_dataset.txt",
    block_size=128
)

  1. الضبط الدقيق للنموذج:
from torch.utils.data import DataLoader
from transformers import AdamW

dataloader = DataLoader(dataset, shuffle=True, batch_size=8)
optimizer = AdamW(model.parameters(), lr=1e-5)

model.train()
for epoch in range(3):  # Loop over the dataset multiple times
    for batch in dataloader:
        optimizer.zero_grad()
        inputs, labels = batch['input_ids'], batch['labels']
        outputs = model(inputs, labels=labels)
        loss = outputs.loss
        loss.backward()
        optimizer.step()

  1. حفظ النموذج:

model.save_pretrained("./my_finetuned_model")

الميزات الرئيسية:

  1. بيئات مهيأة مسبقًا: يقدم جراديانت بيئات مهيأة مسبقًا لـ TensorFlow و PyTorch و Hugging Face وأطر عمل التعلم الآلي الأخرى، مما يتيح إعدادًا سريعًا لمهام الضبط الدقيق.
  2. وحدات معالجة رسوميات (GPUs) قوية: يضمن الوصول إلى مجموعة واسعة من خيارات وحدات معالجة الرسوميات (GPU) إمكانية توسيع قوة الحوسبة الخاصة بك وفقًا لاحتياجات مشروعك، بدءًا من الخيارات الأكثر فعالية من حيث التكلفة للتجارب الأولية وصولاً إلى وحدات معالجة الرسوميات (GPU) المتطورة لجلسات التدريب المكثفة.
  3. دفاتر ملاحظات جراديانت: بيئة ترميز تفاعلية مشابهة لدفاتر ملاحظات Jupyter، ولكن مع ميزة إضافية تتمثل في التشغيل على البنية التحتية السحابية لـ Paperspace. هذا مثالي للتطوير والضبط الدقيق والتجريب مباشرة في السحابة.
  4. المهام وسير العمل: أتمتة مسارات عمل التعلم الآلي الخاصة بك عن طريق تشغيل المهام بالتسلسل أو بالتوازي، مما يتيح تدريب ونشر النماذج بكفاءة.

4. رن.إيه آي

رن.إيه آي هي منصة مصممة لتحسين موارد وحدات معالجة الرسوميات (GPU) لأعباء عمل التعلم الآلي، مما يسهل على علماء البيانات وباحثي الذكاء الاصطناعي تشغيل وإدارة نماذج الذكاء الاصطناعي المعقدة، بما في ذلك الضبط الدقيق لنماذج اللغة الكبيرة (LLMs). 

يعتمد على Kubernetes، وهي أداة تنظم موارد الحاسوب بكفاءة. لذا، فإنه يسهل تشغيل مشاريع الذكاء الاصطناعي المعقدة ويسمح للفرق بتطوير مشاريعها بسلاسة.

يمكنك الرجوع إلى وثائق Run.AI للحصول على رؤى مفصلة، وإليك مثال مبسط يستند إلى سير العمل العام لضبط نموذج مثل LLaMA-2 على منصة Run.AI.

  1.  إعداد بيئتك
  1. إعداد مشروعك وطلبات وحدة معالجة الرسوميات (GPU)

runai submit my-fine-tuning-job -p my-project --gpu 2 --image my-llama2-fine-tuning-image train.py

  1. كتابة سكربت الضبط الدقيق

يجب أن يتضمن سكربت train.py الخاص بك المنطق اللازم لتحميل LLaMA-2 (أو النموذج الذي اخترته)، ومجموعة بياناتك، وتنفيذ عملية الضبط الدقيق. قد يتضمن ذلك استخدام مكتبات مثل Hugging Face Transformers لتحميل النموذج و TensorFlow أو PyTorch لحلقة التدريب.

from transformers import LlamaForConditionalGeneration, LlamaTokenizer

# Load model and tokenizer
model = LlamaForConditionalGeneration.from_pretrained('Llama-2-model-name')
tokenizer = LlamaTokenizer.from_pretrained('Llama-2-tokenizer-name')

# Load your dataset, prepare data loaders, define your training loop here #
model.train()


for epoch in range(num_epochs):
    for batch in dataloader:
        # Training loop logic
        pass

# Save your fine-tuned model
model.save_pretrained('./fine-tuned-model')

  1. مراقبة وإدارة مهمة التدريب

توفر Run.AI أدوات لمراقبة استخدام وحدة معالجة الرسوميات (GPU)، وتقدم مهام التدريب الخاصة بك، وإدارة الموارد الحاسوبية بفعالية. استخدم لوحة تحكم Run.AI أو واجهة سطر الأوامر (CLI) لتتبع حالة مهمتك وأدائها.

runai list jobs

يعرض هذا الأمر جميع المهام الحالية، مما يتيح لك مراقبة التقدم واستخدام الموارد لمهمة الضبط الدقيق الخاصة بك.

الميزات الرئيسية:

  1. تحسين أداء وحدة معالجة الرسوميات (GPU) والتخصيص المرن لوحدة معالجة الرسوميات (GPU): يعمل على تحسين استخدام وحدة معالجة الرسوميات تلقائيًا، ويحسن الكفاءة ويخصص موارد وحدة معالجة الرسوميات ديناميكيًا بناءً على متطلبات عبء العمل، مما يقلل التكاليف بشكل كبير.
  2. إدارة الموارد المبسطة: توفر لوحة تحكم بديهية وواجهة سطر أوامر (CLI) لإدارة أعباء عمل الذكاء الاصطناعي، مما يسهل مراقبة استخدام الموارد وتعديله في الوقت الفعلي.
  3. التكامل مع الأطر الشائعة: يدعم أطر عمل التعلم الآلي الشائعة مثل TensorFlow و PyTorch و Hugging Face Transformers، مما يسهل التكامل السلس في سير العمل الحالي.

اختيار الأداة المناسبة لك:

سهولة الاستخدام: اختر الأدوات المباشرة والسهلة، خاصة إذا لم تكن من محبي البرمجة. بعض الأدوات لا تتطلب منك كتابة أي كود على الإطلاق!

قابلية التوسع: تأكد من أن الأداة يمكنها التطور مع مشروعك، والتعامل مع مجموعات البيانات الأكبر والنماذج الأكثر تعقيدًا بسلاسة.

دعم النماذج ومجموعات البيانات: اختر الأدوات التي تتوافق جيدًا مع الأنواع المحددة من البيانات والنماذج التي تستخدمها.

الموارد الحاسوبية: ابحث عن إمكانية الوصول إلى وحدات معالجة الرسوميات (GPUs) أو وحدات معالجة الموترات (TPUs) إذا كان مشروعك يتطلب قوة حاسوبية كبيرة.

التكلفة: ضع في اعتبارك المبلغ الذي ترغب في إنفاقه. بعض الأدوات مجانية؛ بينما تفرض أخرى رسومًا بناءً على الموارد التي تستخدمها.

قابلية التخصيص والتحكم: إذا كنت ملمًا بالبرمجة، فقد تفضل الأدوات التي تتيح لك تعديل كل شيء.

التكامل: يكون الأمر أسهل إذا كانت الأداة تتكامل بسلاسة مع سير عملك وأدواتك الحالية.

المجتمع والدعم: يمكن للمجتمع الداعم والوثائق الجيدة أن يجنبوك الكثير من المتاعب.

الأسئلة الشائعة

ما هي أفضل أدوات الضبط الدقيق لنماذج اللغات الكبيرة (LLMs)؟

تشمل أدوات الضبط الدقيق الرائدة Hugging Face للوصول إلى النماذج، وSiliconFlow للتدريب المستند إلى السحابة، وTrueFoundry للتنسيق على مستوى المؤسسات. تدعم المكتبات مفتوحة المصدر مثل Axolotl وLLaMA-Factory أيضًا التقنيات المتقدمة مثل LoRA. تتميز TrueFoundry بكونها توحد بشكل فريد الوصول إلى النماذج وتتبع التجارب وحوكمة النشر في منصة آمنة واحدة.

ما هي تكلفة استخدام أدوات الضبط الدقيق على السحابة؟

تعتمد تكاليف الضبط الدقيق على السحابة على ساعات عمل وحدات معالجة الرسوميات (GPU)، وحجم النموذج، ومتطلبات التخزين. عادةً ما تتراوح تكلفة تدريب نموذج بـ 7 مليارات معلمة بين 100 و400 دولار، بينما يمكن أن تتجاوز تكلفة نماذج الـ 70 مليار معلمة 10,000 دولار. يقلل استخدام الطرق الفعالة للمعلمات مثل QLoRA هذه النفقات بشكل كبير لتصل إلى ما يقرب من 50 إلى 300 دولار لكل عملية تدريب.

ما هي أدوات الضبط الدقيق الفعالة للمعلمات (PEFT)؟

تستخدم أدوات الضبط الدقيق PEFT تقنيات مثل LoRA لتعديل جزء صغير جدًا فقط من معلمات النموذج. وهذا يقلل من متطلبات ذاكرة وحدات معالجة الرسوميات (GPU)، مما يسمح للفرق بتدريب نماذج ضخمة على أجهزة المستهلك أو وحدة معالجة رسوميات واحدة. تعمل هذه الأدوات على تسريع سرعات التدريب مع توفير دقة مماثلة لإعادة تدريب النموذج بالكامل.

كيف تختلف أدوات الضبط الدقيق عن هندسة الأوامر؟

تقوم أدوات الضبط الدقيق بإعادة تدريب النماذج على مجموعات بيانات متخصصة، مع تعديل المعلمات لتحسين الأداء في المهام الخاصة بمجال معين. بينما تقوم هندسة الأوامر بتعديل نص الإدخال لتوجيه المخرجات دون تغيير الأوزان الداخلية للنموذج. وفي حين أن هندسة الأوامر أسرع، يوفر الضبط الدقيق تحكمًا أعمق ودقة فائقة لحالات الاستخدام المعقدة في المؤسسات.

كيف تعمل TrueFoundry كأداة ضبط دقيق؟

تبسط TrueFoundry عملية الضبط الدقيق من خلال توفير واجهة موحدة لتكامل البيانات، وتتبع التجارب، ونشر النماذج. يقوم المستخدمون بتحميل بياناتهم الخاصة ويطلقون مهام الضبط الدقيق على بنية تحتية محسّنة باستخدام واجهات خلفية عالية الأداء. بمجرد اكتمال التدريب، يمكن للفرق نشر نقاط الفحص المحدثة مباشرة إلى الإنتاج بنقرة واحدة.

The fastest way to build, govern and scale your AI

Sign Up
Table of Contents

One Gateway for Every LLM, Agent and MCP Server

Book a 30-min with our AI expert

Book a Demo

The fastest way to build, govern and scale your AI

Book Demo
Summarize with
ChatGPT logo by OpenAI
Perplexity AI logo
Blurry red snowflake on white background, symmetrical frosty design with soft edges and abstract shape.

Discover More

November 5, 2025
|
5 min read

توطين البيانات في عصر الذكاء الاصطناعي الوكيل: كيف تمكّن بوابات الذكاء الاصطناعي التوسع السيادي والامتثال

October 5, 2023
|
5 min read

<Webinar> عرض الذكاء الاصطناعي التوليدي للمؤسسات

May 25, 2023
|
5 min read

النماذج اللغوية الكبيرة مفتوحة المصدر: تبنّها أو تندثر

August 24, 2023
|
5 min read

عمليات نشر تعلم الآلة في عام 2023

July 4, 2026
|
5 min read

تكاملات منصة التعلم الآلي #1: Weights & Biases

Use Cases
Engineering and Product
July 4, 2026
|
5 min read

تكامل Pillar Security مع TrueFoundry

No items found.
July 4, 2026
|
5 min read

التخزين المؤقت الدلالي لنماذج اللغة الكبيرة (LLMs): تقليل التكلفة وزمن الاستجابة بما يتجاوز التخزين المؤقت للبادئات

No items found.
July 4, 2026
|
5 min read

تكاملات أدوات التعلم الآلي #2 DVC لإدارة إصدارات بياناتك

Engineering and Product
Use Cases
July 4, 2026
|
5 min read

ما هو الضبط الدقيق باستخدام Lora؟ الدليل الشامل

LLMs & GenAI
July 4, 2026
|
5 min read

التوجيه (Prompting)، أو RAG، أو الضبط الدقيق (Fine-tuning) - أيها الخيار الصحيح؟

Engineering and Product
July 4, 2026
|
5 min read

الضبط الدقيق: نماذج OpenAI + بيانات Confluence الخاصة بك

LLMs & GenAI

Recent Blogs

Black left pointing arrow symbol on white background, directional indicator.
Take a quick product tour
Start Product Tour
Product Tour