


November 5, 2025
|
5 min read


احصل على وصول فوري إلى بيئة TrueFoundry مباشرة. انشر النماذج، ووجّه حركة مرور LLM، واستكشف المنصة بالكامل — بيئة الاختبار الخاصة بك جاهزة في ثوانٍ، ولا يلزم وجود بطاقة ائتمان.


Published: July 4, 2026

Blazingly fast way to build, track and deploy your models!
Jupyter notebooks are a powerful and popular tool that provides an interactive computing environment, combining code, data visualization, and explanatory text, making it easier to work with data and share insights. Data scientists use Jupyter notebooks for various tasks throughout the data analysis and machine learning lifecycle like exploratory data analysis (EDA), data preprocessing, visualization, model development, evaluation and validation, etc. For many of these usecases, just installing Jupyter Notebook on your laptop is enough to get started. However, for many companies and organizations, this is not an option and we need hosted Jupyter notebooks.
Here are the options that a company can have today to provide access to Jupyter Notebook to its engineers:
DS/MLEs can set up the environment and run a jupyter-server on a VM which can be used for running the workloads. Here is a simple guide on how you can run jupyterlab on an ec2 instance.
👍 Pros:
- Gives full control of the machine in the hand of a DS
- The whole environment is persistent. The VM can be stopped and restarted in the same state.
👎 Cons:
- Large cloud computing cost - There will be no auto-stop feature. DS can start a VM and can be left unutilized for a large part of the time thereby increasing the costs.
- Difficult to manage and track a large number of VMs centrally.
- DS needs to set up a lot of things to set up the workbench for starting the experimentation.
- Difficulty in reproducibility - DS might have installed a bunch of packages which are not tracked anymore and it takes a lot of time to productionize that code which runs on that VM.
Another option can be using a managed solution like AWS Sagemaker, Vertex AI Notebooks, or Azure ML Notebooks. While each of these methods has advantages, here are a few pros and cons of these in general.
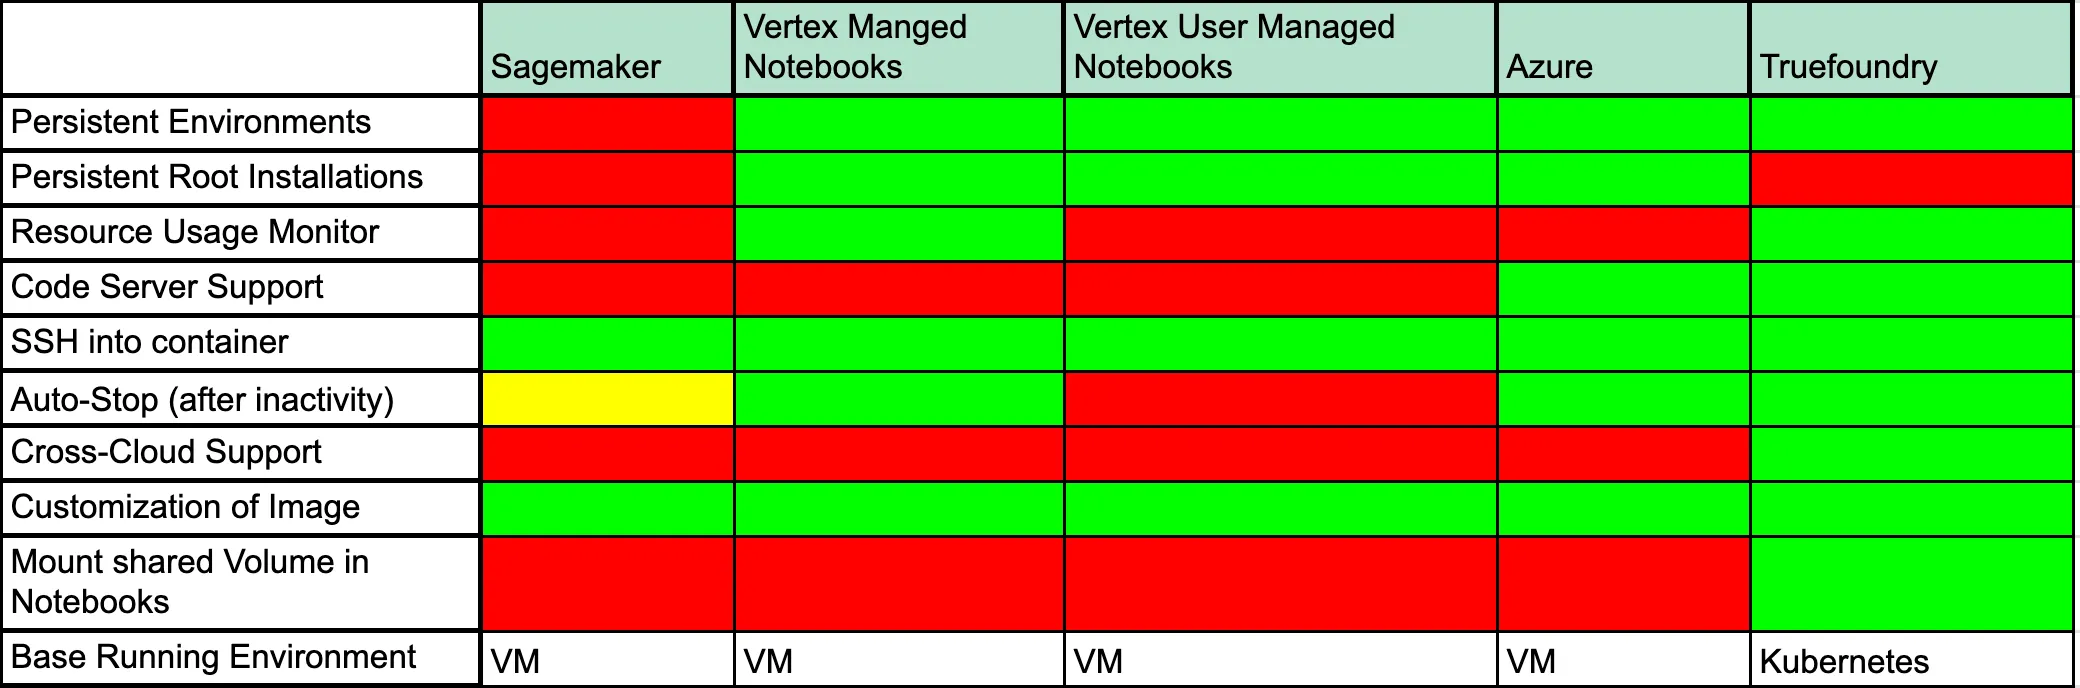
Let us discuss what each of these fields means:
Another option can be hosting notebooks over Kubernetes, but it comes with its own set of challenges as data scientists cannot directly interact with Kubernetes and need software in between that provides a simple interface to launch Jupyter notebooks. Lets us see what are the options available in this:
Kubeflow Notebook Operator:
Kubeflow helps to make deployments of machine learning (ML) workflows on Kubernetes simple, portable, and scalable. It has a notebook feature that helps to manage and run notebooks easily.
While Kubeflow is a large open-sourced project which provides a lot of features for Machine Learning use cases, it is very difficult to install and manage Kubeflow by yourself.
👍 Pros:
- Easy to launch and manage notebooks for DS
- Persistent home directory backed by a disk
- Option for pre-defined images for sklearn, pytorch, and tensorflow which comes with all installed dependencies.
- Open-sourced code-base
- Get a culling feature that stops notebooks after some time of inactivity.
👎 Cons:
- Difficult to set up Kubeflow on Kubernetes. It takes a lot of time to install and maintain Kubeflow
- For providing notebooks in multiple regions, different Kubernetes clusters need to be created and Kubeflow needs to be installed on every single cluster - leading to high infrastructure and maintainenance costs.
- Python packages are by default not persistent, which means you need to install packages each time you restart
- No direct way to gain root access to the container [ can be useful for multiple use cases ]
- Stopping notebooks cannot be configured on a per notebook level and is a global setting.
Host JupyterHub on Kubernetes:
JupyterHub is a great setup for multi-user use cases which helps in the optimal usage of resources. Deploying JupyterHub on Kubernetes can be done with an Open-Sourced project called Zero to JupyterHub with Kubernetes:
👍 Pros:
- Multiple users can work together easily with authentication support
- Easily setup auto-stop for notebooks
- Easy management of environments
👎 Cons:
- Difficult to set up and manage. We must configure Networking, Persistent Volumes, Scaling, and Load Balancing for JupyterHub to work correctly.
- Difficult to run GPU workloads on different types of GPUs on Jupyterhub. For instance, read this.
- Environments are not persistent
While there are a lot of solutions available right now, each solution comes with its own set of limitations. At Truefoundry we have tried to bridge this gap and tried to build a notebook solution that satisfies all the needs of a DS and also keeps costs in check. In the next section, we will describe our approach to building the notebook solution and the challenges we faced in making the same.
Truefoundry is a developer platform for ML teams that helps in deploying Models, Services, Jobs, and now Notebooks on Kubernetes. You can read more about what we do here. Our motivation for building a notebook solution was to simply enable experimentation and development on our platform. After studying all the solutions available, we decided to solve the pain points and missing features in the other platforms so that data scientists can have the best experience without incurring a lot of costs. A few things we wanted to enable are:
يدعم Kubeflow تشغيل دفاتر الملاحظات على Kubernetes. ويوفر عددًا من الميزات الجاهزة لدفاتر الملاحظات. ومع ذلك، أردنا معالجة المشكلات التي أبرزناها أعلاه في دفاتر ملاحظات Kubeflow وتوفير تجربة سلسة لعلماء البيانات والمطورين.
لذلك، كان علينا إجراء تغييرات في وحدة التحكم بالدفاتر، ودمجها مع الواجهة الخلفية لـ Truefoundry، وعرض دفاتر الملاحظات على واجهة المستخدم الخاصة بنا.
قمنا بتثبيت وحدة التحكم بالدفاتر ولكن واجهنا بعض المشكلات، مما اضطرنا إلى إجراء تغييرات في kubeflow-notebook-controller:
لقد قمنا بحل المشكلتين المذكورتين أعلاه وأطلقنا tfy-notebook-controller
ونشرناه كـ helm-chart في مستودع Truefoundry للرسوم البيانية العامة (Public Charts). يمكنك العثور على الرسم البياني هنا.
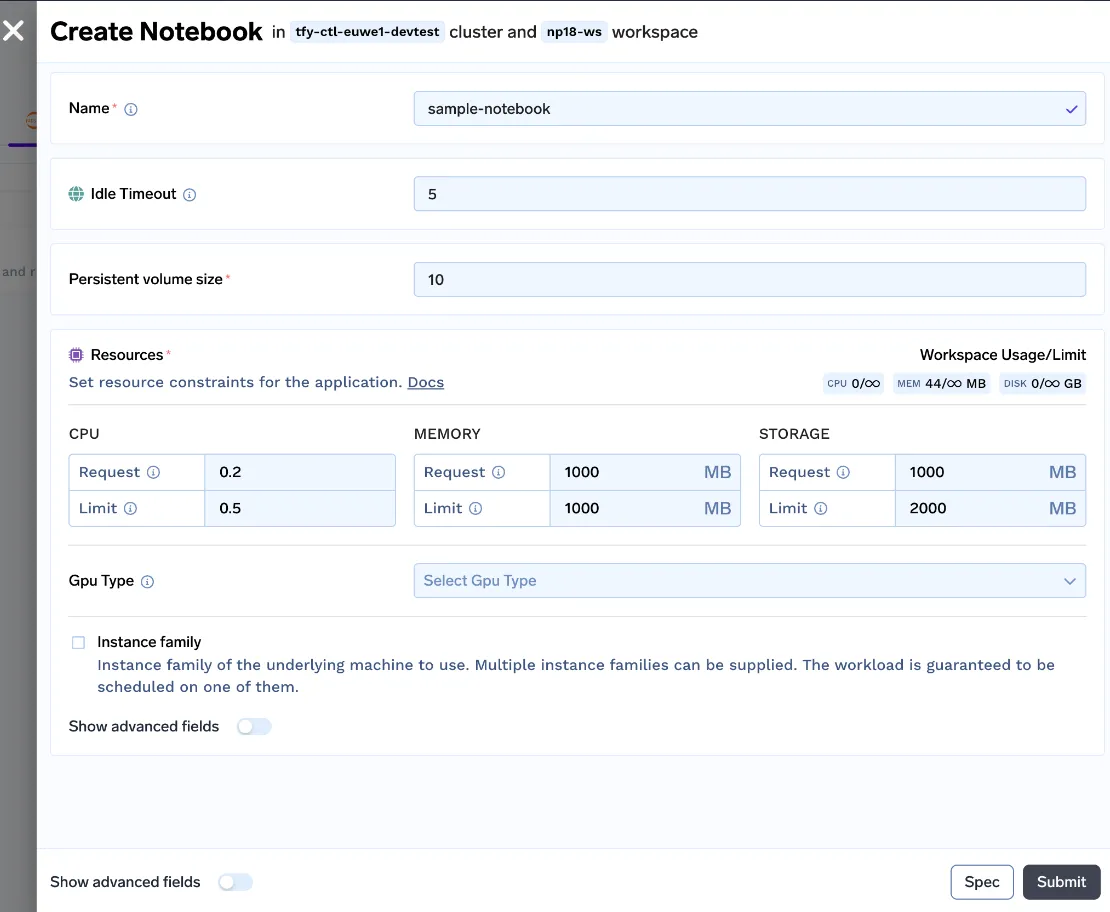
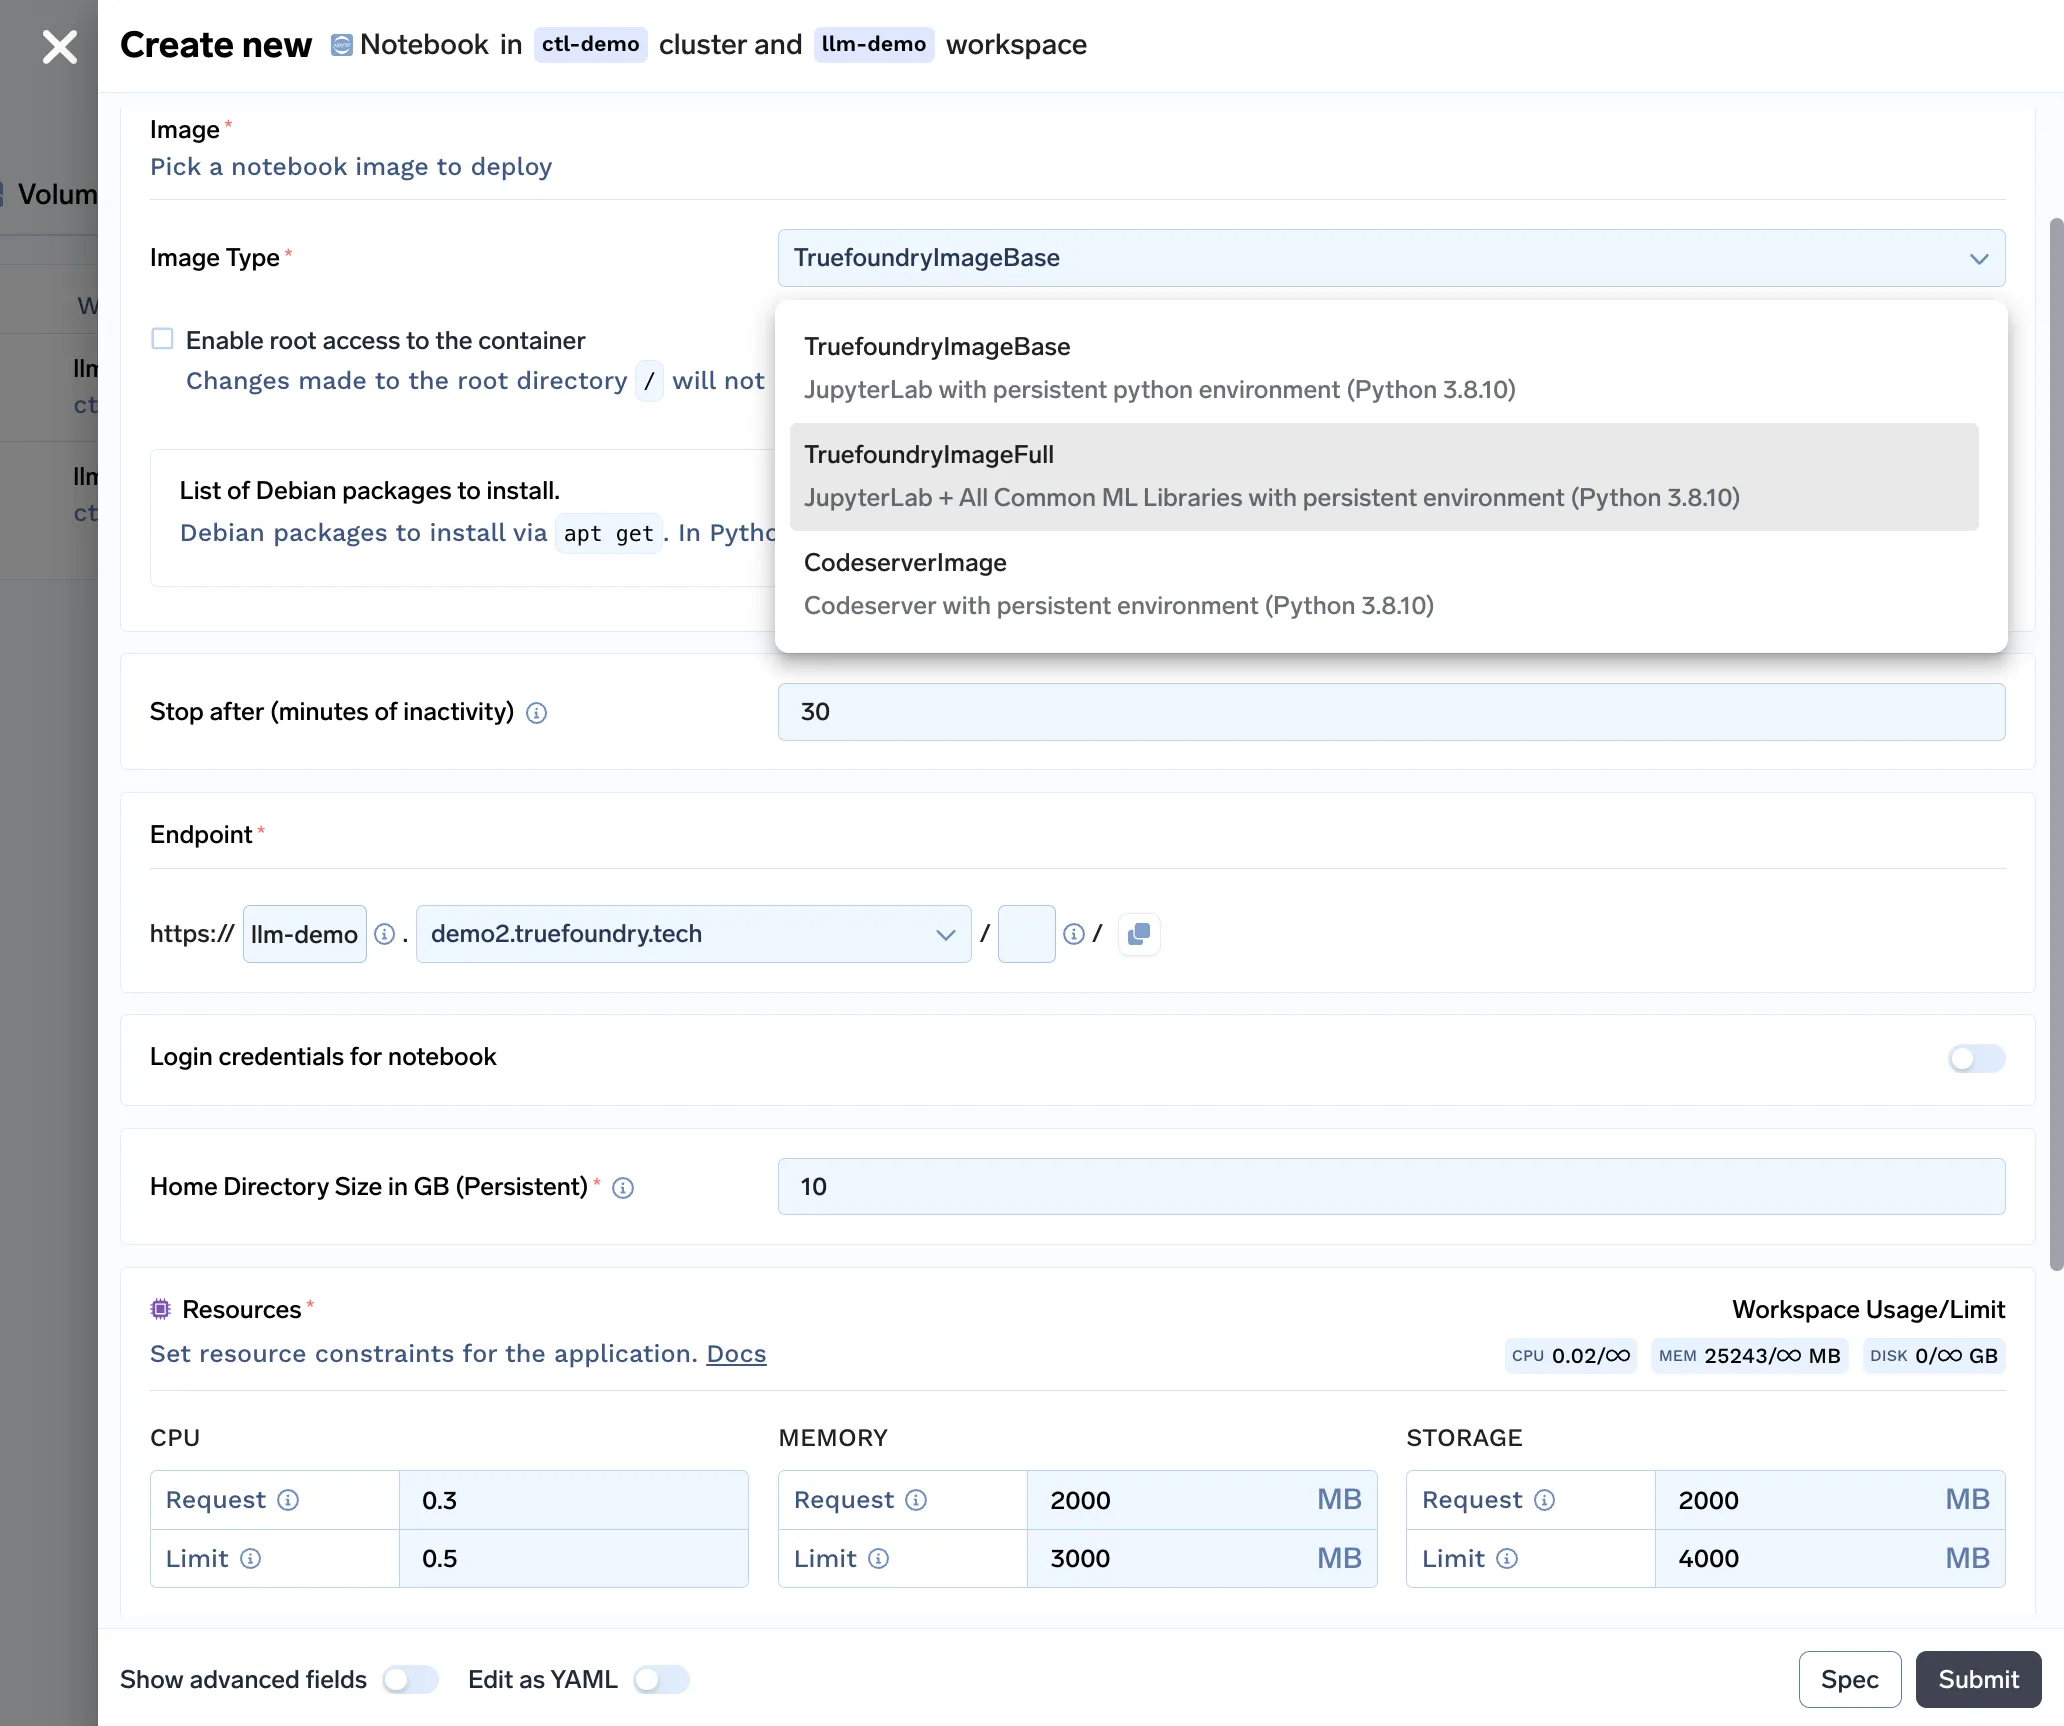
لقد أنشأنا واجهة مستخدم سهلة الفهم لعلماء البيانات لبدء دفاتر الملاحظات. يمكن للمستخدم تخصيص مهلة الخمول (مدة عدم النشاط التي بعدها سيتم إيقاف دفتر الملاحظات)، وحجم وحدة التخزين الدائمة (حجم القرص الذي يخزن مجموعة البيانات وملفات التعليمات البرمجية)، والموارد (متطلبات وحدة المعالجة المركزية والذاكرة ووحدة معالجة الرسوميات) وتشغيل دفتر الملاحظات!
مع كل هذه التغييرات، أطلقنا v0 من دفاتر الملاحظات الخاصة بنا.
ولكن لا يزال أمامنا طريق طويل لتحقيق تجربة مستخدم جيدة، دعونا نرى إيجابيات وسلبيات هذا النهج:
👍 المزايا:
- دليل رئيسي دائم [سيتم الاحتفاظ بجميع الملفات والحزم]
- يمكن تكوين مهلة عدم النشاط (مهلة الإزالة) لكل دفتر ملاحظات
- تشغيل دفتر الملاحظات ببضع نقرات
- تشغيل دفتر الملاحظات بسهولة باستخدام وحدات معالجة الرسوميات (GPUs)
👎 القيود:
- بيئة بايثون غير دائمة (تختفي جميع الحزم المثبتة مع إعادة تشغيل الـ pod)
- لا توجد طريقة لتثبيت الحزم التي تتطلب صلاحيات الجذر
- لا توجد طريقة مناسبة لإدارة بيئات متعددة للتجارب
- لا يمكن تكوين نقطة نهاية لدفتر الملاحظات [أضيفت في الإصدار التالي]
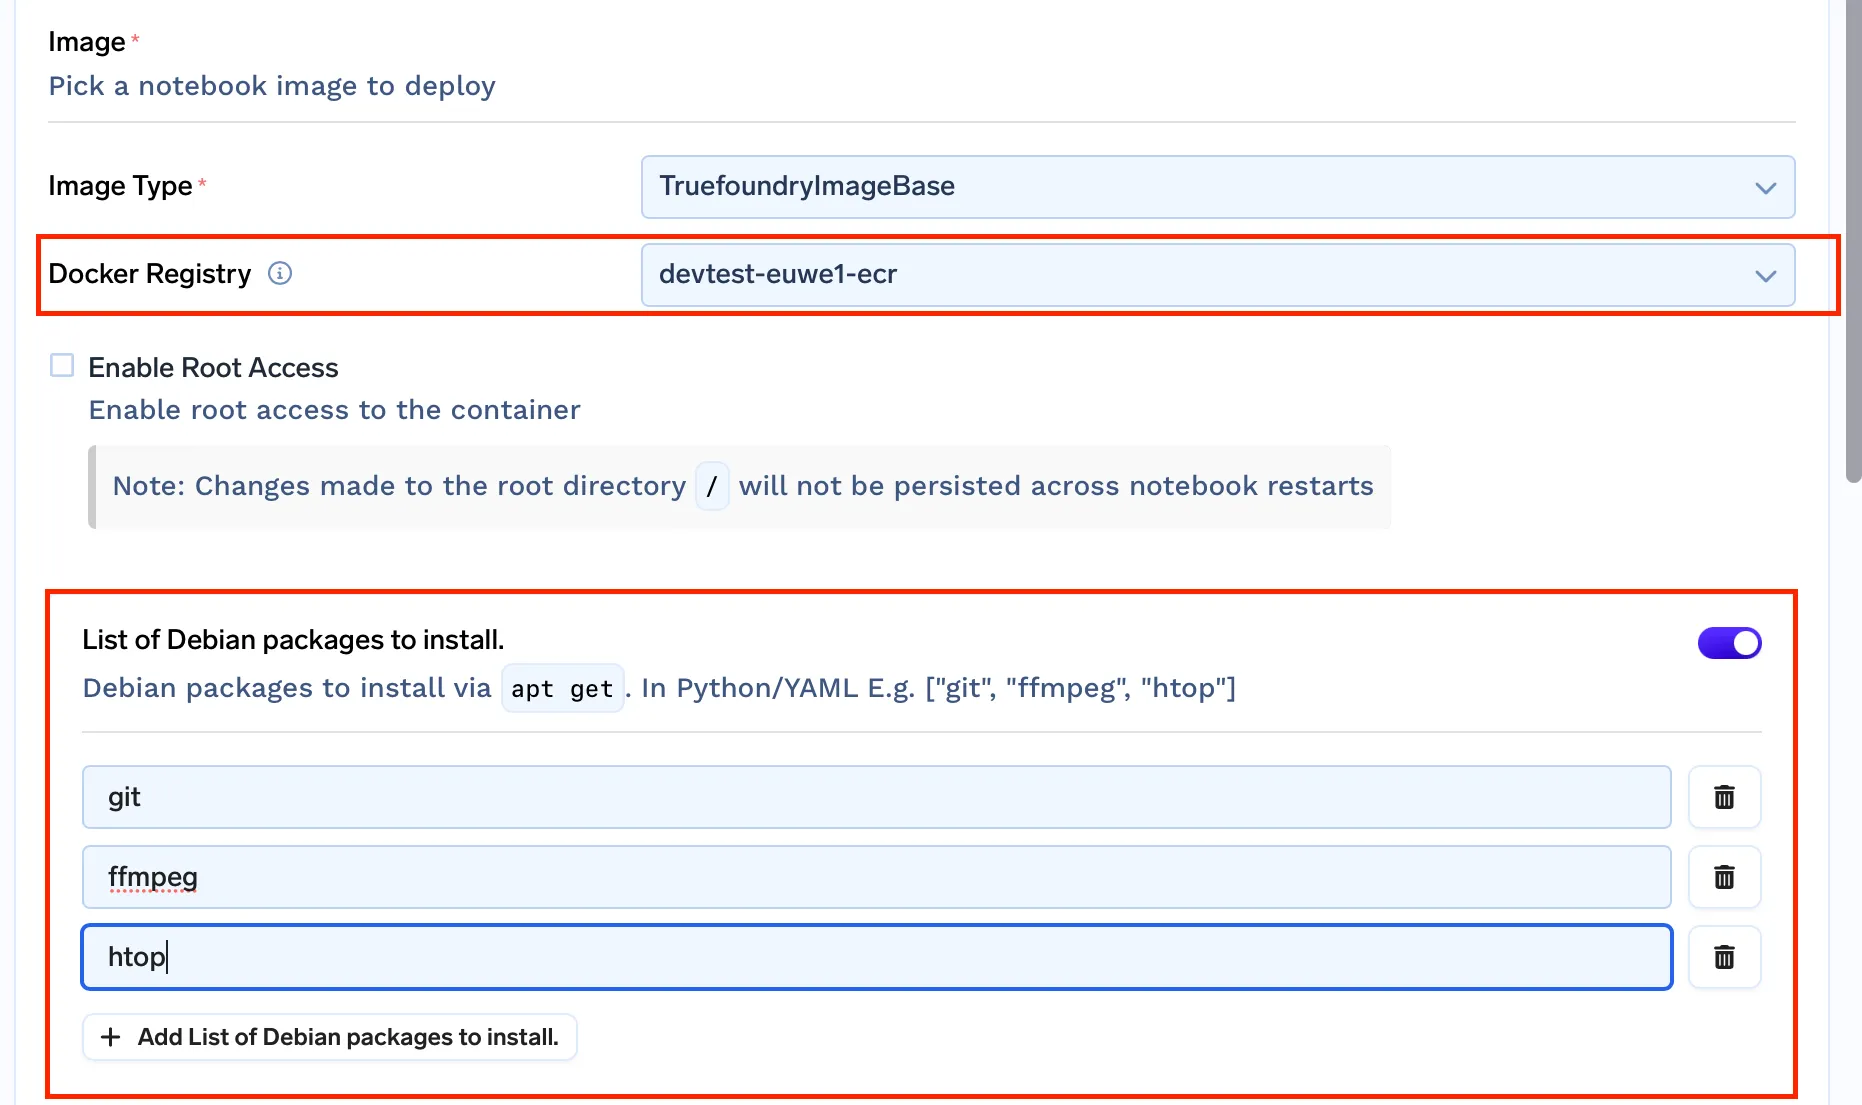
الآن، تعد هذه القيود حاسمة للحل لأنها تعيق العديد من سير عمل علماء البيانات، والتي يمكن أن تكون بسيطة مثل تثبيت "حزم apt" مثل ffmpeg.
حتى هذه النقطة، كنا نستخدم الصور المُعدة مسبقًا لـ Jupyterlab التي يوفرها Kubeflow. ولكن بما أننا بحاجة إلى حل مشكلة البيئات غير الدائمة، والسماح بالوصول إلى الجذر وتثبيت حزم apt. فنحن بحاجة إلى مجموعة خاصة بنا من صور Docker.
فلنلقِ نظرة على كيفية حلنا لهذه المشكلات!
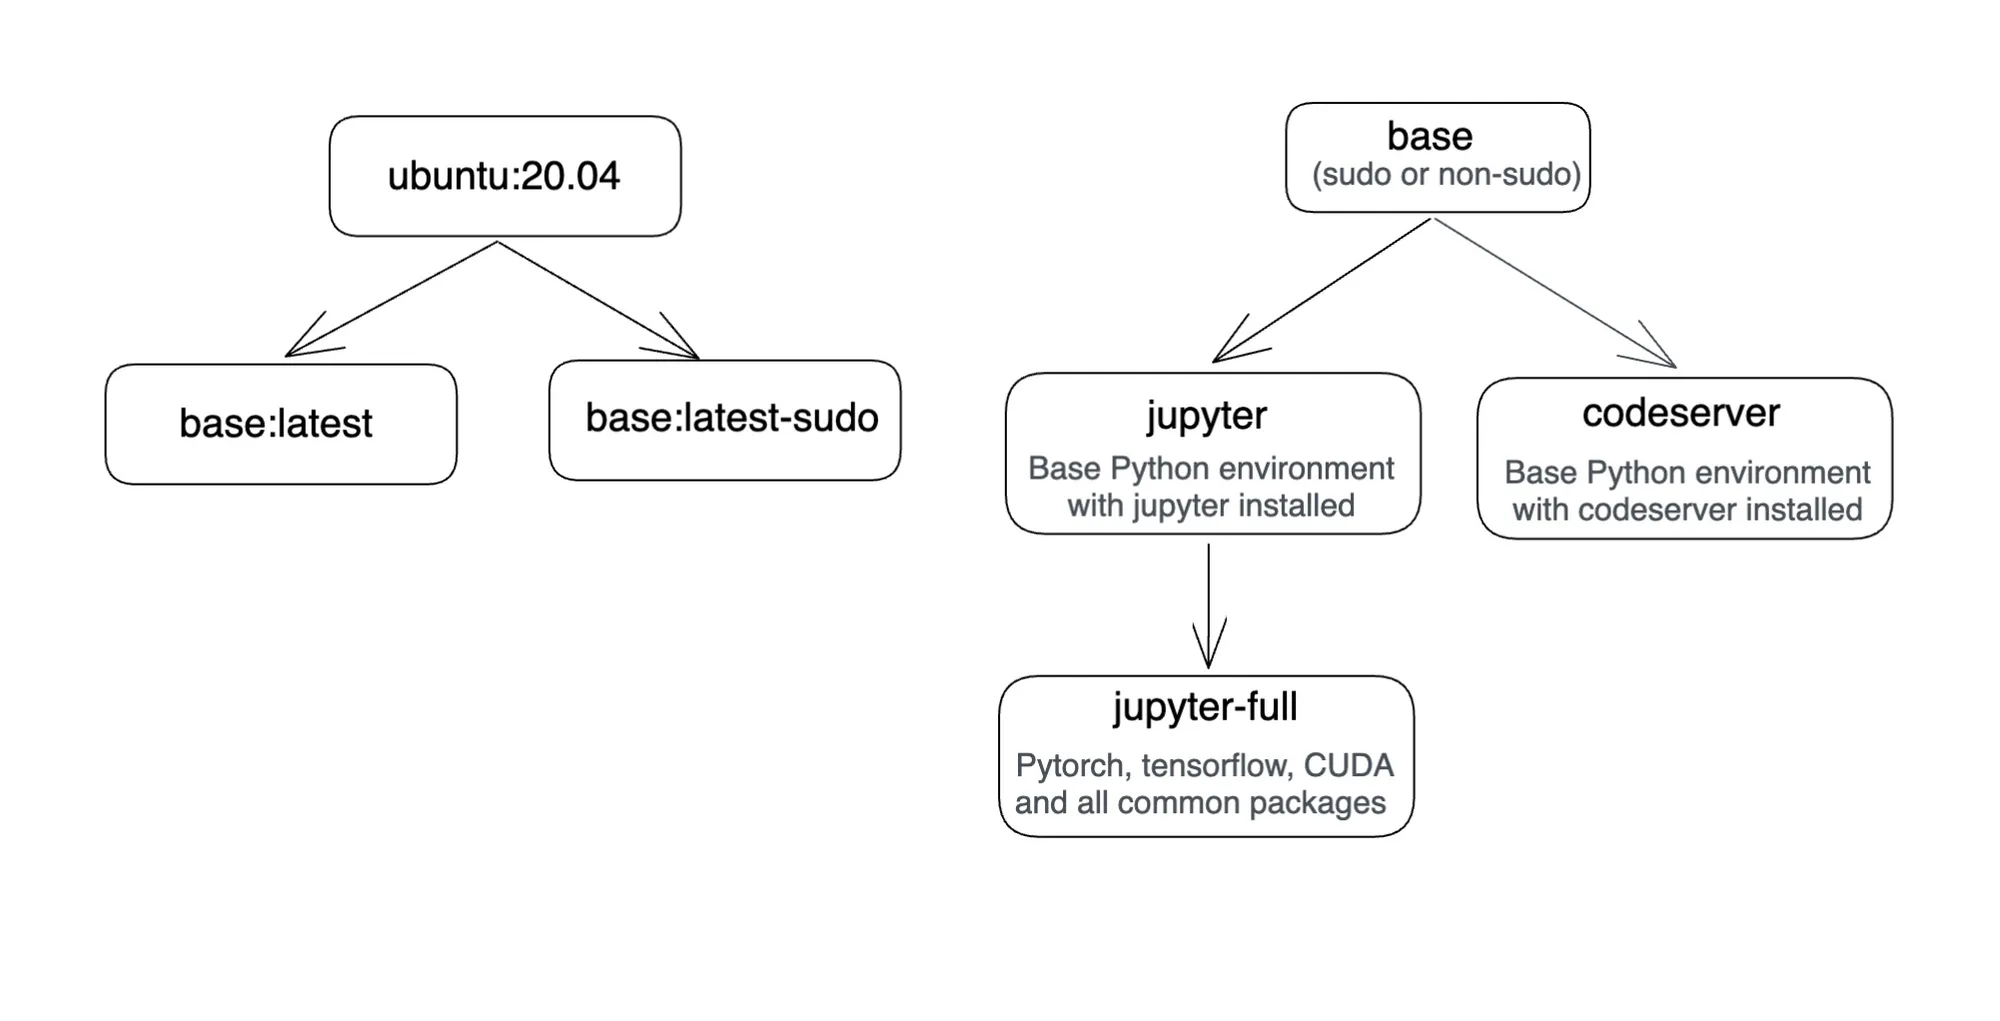
- تم تعديل نص التهيئة (init script) لصورة Docker واستنساخ بيئة Conda الأساسية إلى الدليل الرئيسي وتسميتها jupyter-base
- إضافة ملف .condarc وتعيين $HOME الدليل كمسار افتراضي للبيئة
- تعديل ملف .bashrc لتنشيط jupyter-base البيئة بشكل افتراضي
truefoundrycloud/jupyter:latest و truefoundrycloud/jupyter:latest-sudo. حيث توفر الصور التي تحتوي على sudo وصول sudo للمستخدم بدون كلمة مرور.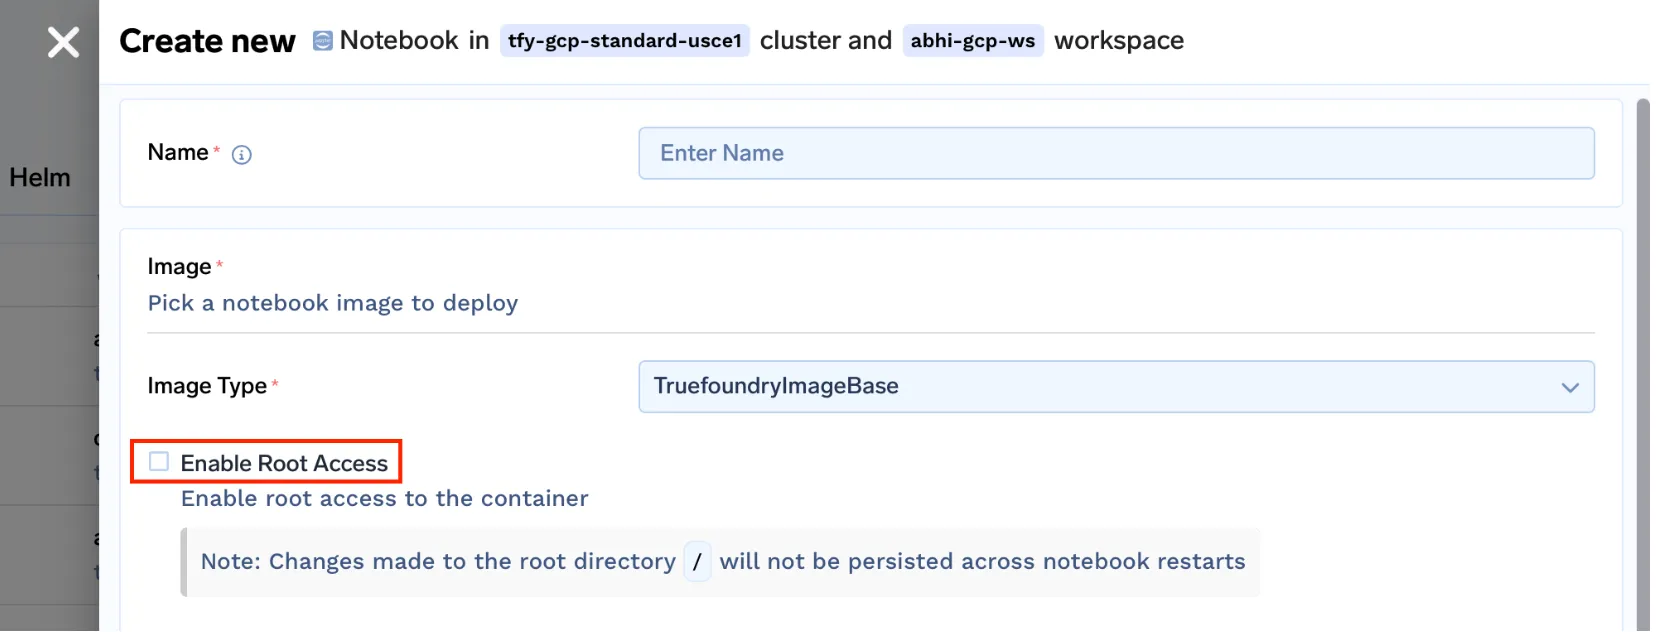
ملاحظة: نظرًا لأننا نقوم بتشغيل دفاتر الملاحظات (notebooks) على Kubernetes مع تثبيت دليل المستخدم (home directory)، فإن دليل المستخدم فقط سيكون مستمرًا. لن تكون تثبيتات الحزم الجذرية مستمرة عبر عمليات إعادة تشغيل الـ pod. يرجى قراءة هذا للحصول على فهم أفضل لذلك.
من خلال حل هذه المشكلات، قمنا بحل معظم المشكلات التي يواجهها المستخدمون وقدمنا تجربة جيدة لدفاتر الملاحظات. ولكن مع مرور الوقت، لاحظنا أن المستخدمين واجهوا بعض التحديات التي سنصفها في القسم التالي.
jupyterlab الحزمة. نظرًا لأن البيئة مستمرة، يفشل دفتر الملاحظات في البدء (بمجرد إيقاف دفتر الملاحظات الحالي)kernelspec والتأكد من أن kernelspec تم تكوينه بشكل صحيح مما قد يسبب مشكلات.
إضافة مقاييس استخدام الموارد إلى دفتر الملاحظات:
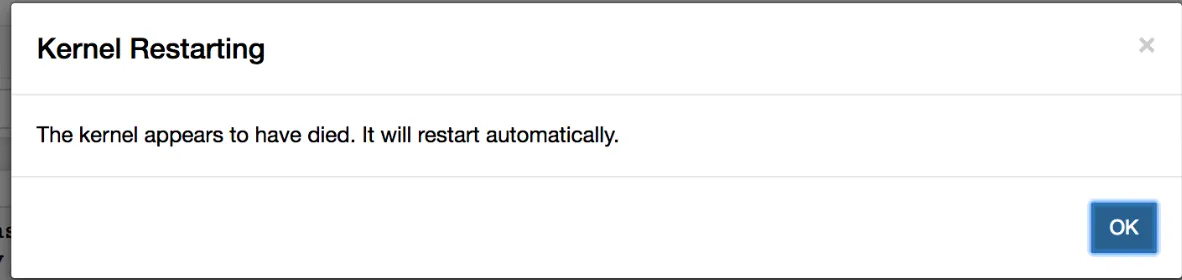
أضفنا مقاييس استخدام الموارد إلى دفتر الملاحظات عن طريق تثبيت الإضافة jupyterlab-system-monitor==0.8.0 وقمنا بتكوين إعداداتها في نص بدء التشغيل عن طريق تمرير الوسائط أثناء بدء تشغيل خادم Jupyterlab.
...


jupyter lab \
    ...
    --ResourceUseDisplay.mem_limit=${mem_limit} \
    --ResourceUseDisplay.cpu_limit=${cpu_limit} \
    --ResourceUseDisplay.track_cpu_percent=True \
    --ResourceUseDisplay.mem_warning_threshold=0.8
هذا ما يبدو عليه الأمر في واجهة المستخدم:
فصل النواة التي تشغل خادم Jupyterlab عن نواة التنفيذ
نحتاج إلى التأكد من أن أي تغييرات يجريها المستخدم في الدليل الرئيسي، يجب أن يعاد تشغيل دفتر الملاحظات دائمًا دون أي مشاكل. لهذا، استخدمنا بيئة anaconda 'base' من /opt/conda الدليل لبدء تشغيل خادم Jupyterlab.
بالإضافة إلى ذلك، أنشأنا بيئة منفصلة في $HOME الدليل، ولكن هذا يضيف نواة من نوع الـ قاعدة بيئة conda إلى قوائم النواة.
لحل هذه المشكلة قمنا بتثبيت nb_conda_kernels لإدارة نواة Jupyter. قمنا بتهيئة السكربت الأولي لضمان ظهور بيئات بايثون المستمرة فقط في قائمة النواة.
jupyter lab \
    ...
    --CondaKernelSpecManager.conda_only=True \
    --CondaKernelSpecManager.name_format={environment} \
    --CondaKernelSpecManager.env_filter=/opt/conda/*"
بهذا، نضمن أن خادم الدفتر سيبدأ دائمًا بأي تغييرات يجريها المستخدم داخل الدفتر.
كما يسهل إدارة النواة المتعددة. ما عليك سوى إنشاء بيئة conda جديدة باستخدام الأمر conda create -n myenv ويبدأ بالظهور في قائمة النواة.
بينما تحل دفاتر Jupyter عددًا من المشكلات، هناك عدد من المهام التي تتوقف عندها عن المساعدة:
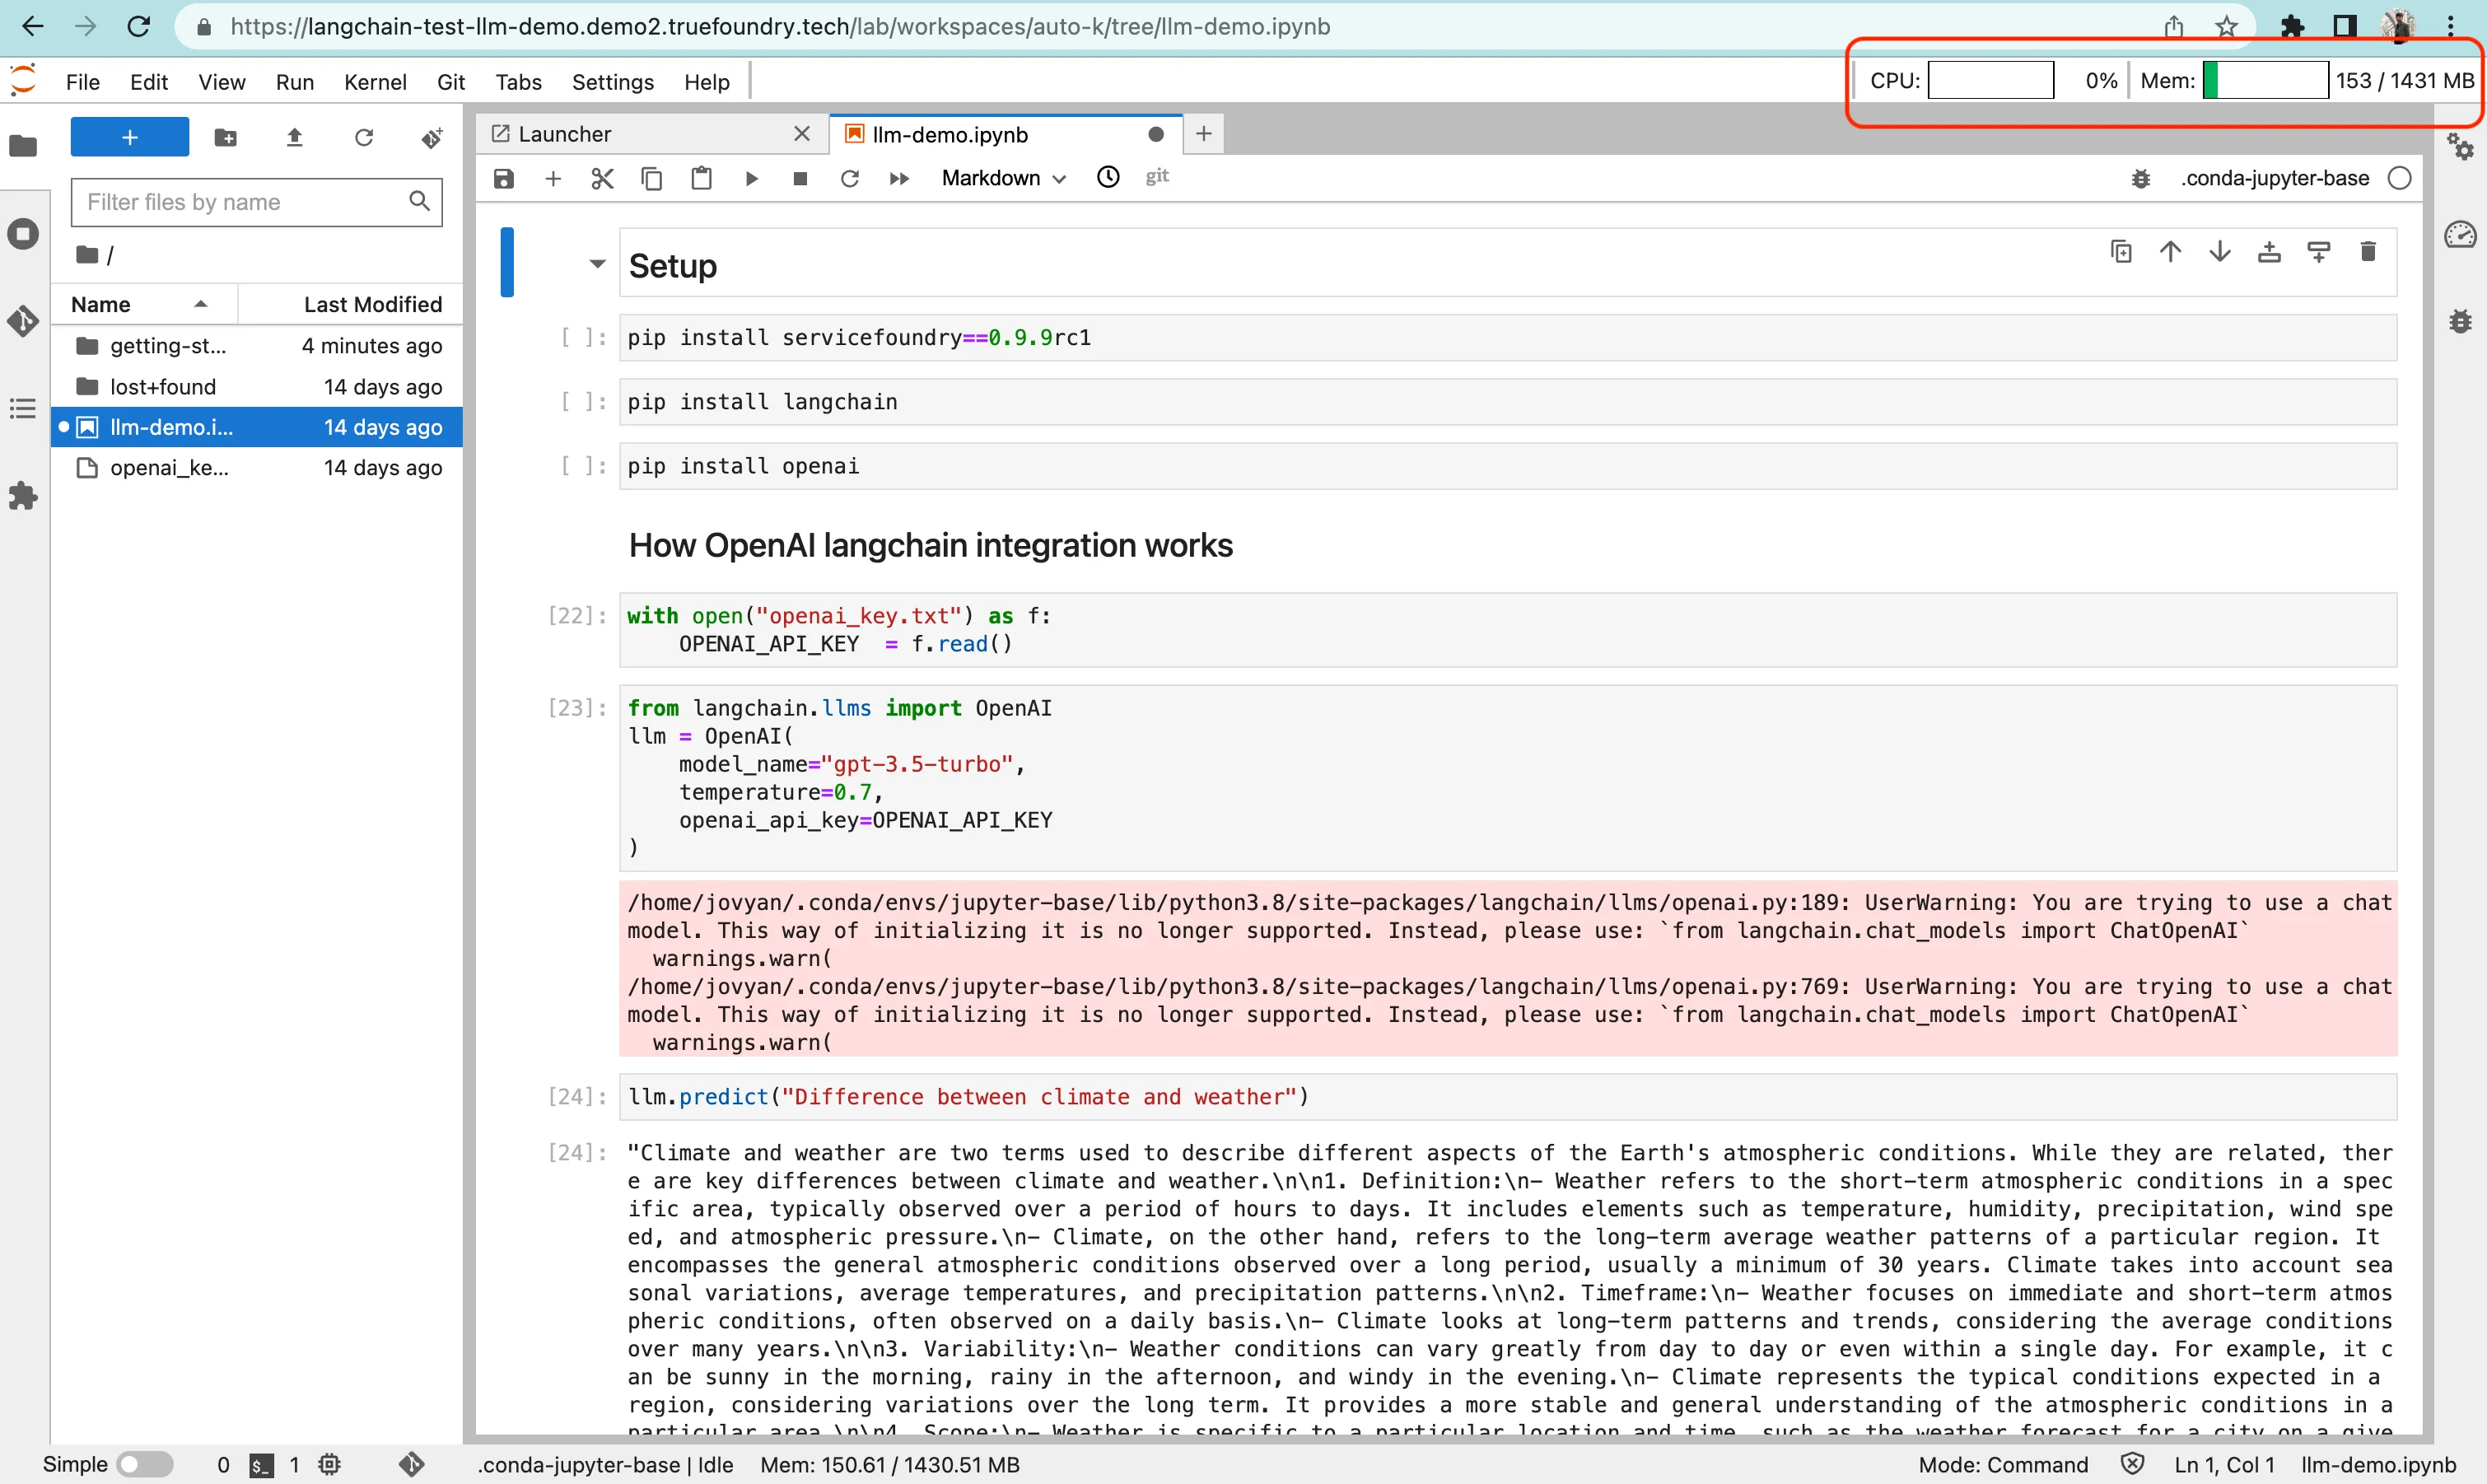
بالنظر إلى هذه القيود، قررنا إيجاد حل لها. أضفنا دعم code-server لتوفير تجربة بيئة تطوير متكاملة (IDE) للمستخدمين في المتصفح.
بإضافة دعم VS Code، نمكّن المستخدمين من القيام بالأمور التالية:
localhost:8000 يمكن إتاحتها على ${NOTEBOOK_URL}/proxy/8000
تم ذلك عن طريق إضافة صورة Docker أخرى. فيما يلي رسم بياني يوضح صور Docker الخاصة بـ Truefoundry.
الوصول عبر SSH إلى دفتر الملاحظات/VSCode الخاص بك:
بينما في معظم الحالات، يمكن لـ VS Code المستضاف حل المشكلة. ولكن قد تكون هناك حالات (خاصة لدفاتر ملاحظات Jupyter) حيث يواجه المستخدم صعوبة ويحتاج إلى وصول مباشر إلى الحاوية التي تشغل دفتر ملاحظات Jupyter / خادم VS Code الخاص به.
لذلك قمنا بتبسيط ذلك عن طريق تثبيت خادم SSH في كل دفتر ملاحظات، وللاتصال بحاويتك، تحتاج إلى تنفيذ أمر بسيط وإدخال كلمة المرور الخاصة بك:
ssh -p 2222 jovyan@test-notebook.ctl.truefoundry.tech

يمكن تعزيز قوة هذه الأداة باستخدام إضافة VS Code الخاصة بك المسماة Remote Explorer حيث يمكنك فتح جميع الملفات مباشرةً داخل VS Code الخاص بك!
انقر هنا لقراءة المزيد عنه
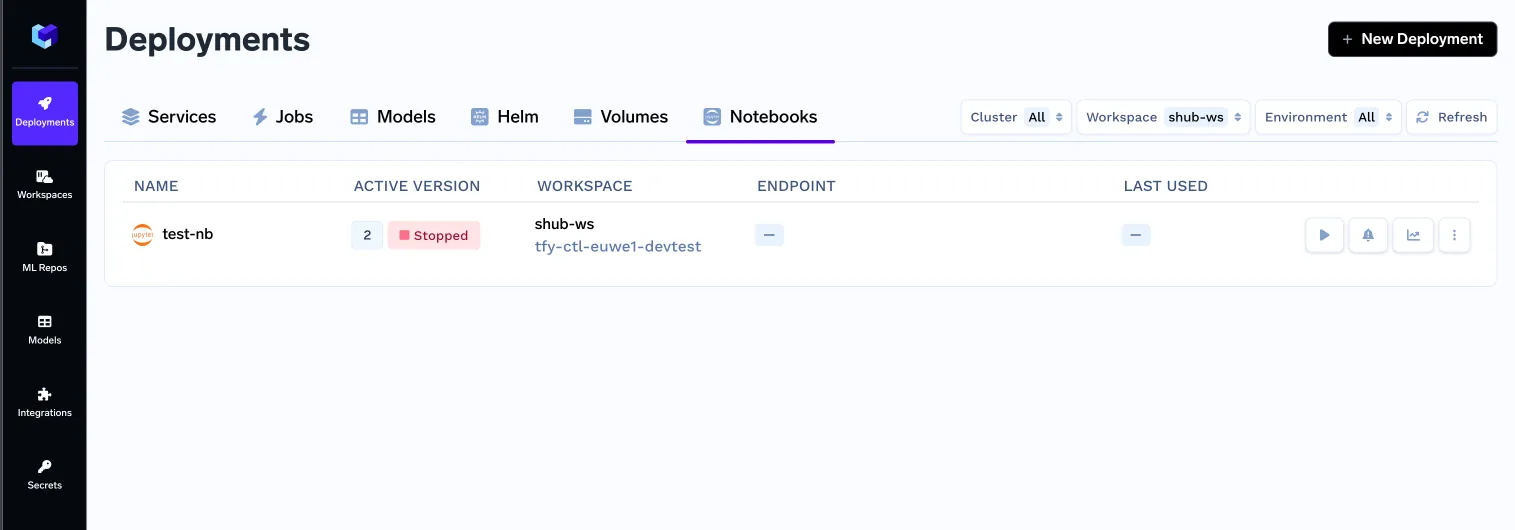
مع جميع الميزات المدمجة في حل دفاتر الملاحظات لدينا، إليك شكل نموذج نشر دفاتر الملاحظات الخاص بنا:
أخيرًا، لنقارن أسعار كل من الحلول المدارة مع Truefoundry.
بما أن Truefoundry يعمل بالنشر على سحابة العميل عن طريق ربط مجموعة Kubernetes الخاصة به، فإليك أسعار Truefoundry عند تشغيله على مزودي الخدمات السحابية المختلفين.
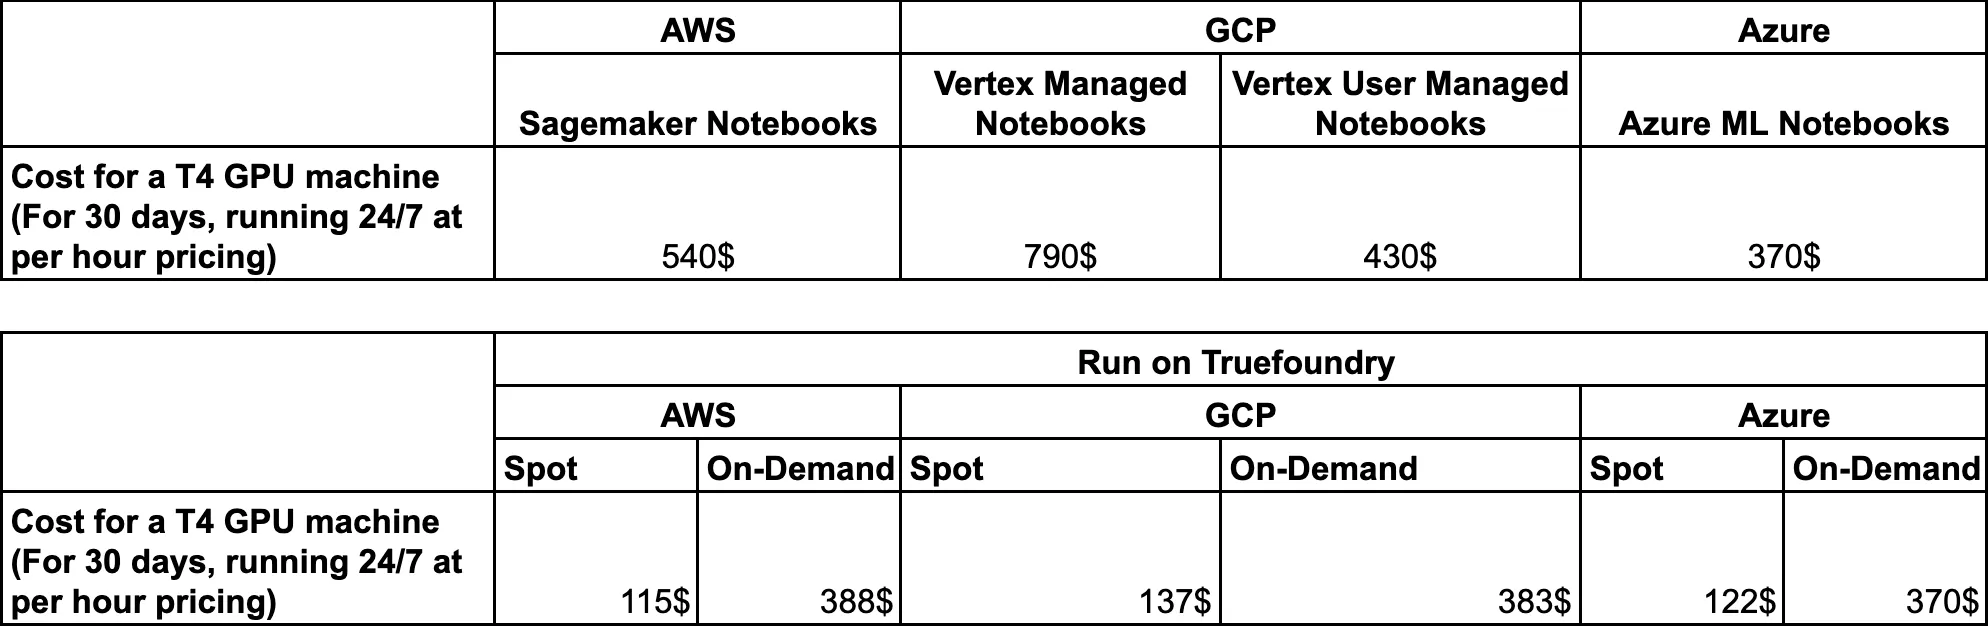
مع Truefoundry، يمكنك بالفعل توفير الكثير من التكاليف لأن:
كان هذا موجزًا عن جهودنا في بناء حل دفاتر الملاحظات. يمكنك الانضمام إلى أصدقاء Truefoundry قناة Slack الخاصة بنا إذا كنت ترغب في مناقشة نهجنا بعمق أو إذا كان لديك أي اقتراحات.
إذا كنت ترغب في تجربة منصتنا، يمكنك التسجيل هنا!
TrueFoundry AI Gateway delivers ~3–4 ms latency, handles 350+ RPS on 1 vCPU, scales horizontally with ease, and is production-ready, while LiteLLM suffers from high latency, struggles beyond moderate RPS, lacks built-in scaling, and is best for light or prototype workloads.


أحدث الأخبار والمقالات والموارد تصلك مباشرة إلى بريدك الوارد
© 2026 جميع الحقوق محفوظة.


.png)
.webp)


.webp)
