
November 5, 2025
|
5 min read

Published: April 27, 2026

Blazingly fast way to build, track and deploy your models!
Jupyter notebooks are a powerful and popular tool that provides an interactive computing environment, combining code, data visualization, and explanatory text, making it easier to work with data and share insights. Data scientists use Jupyter notebooks for various tasks throughout the data analysis and machine learning lifecycle like exploratory data analysis (EDA), data preprocessing, visualization, model development, evaluation and validation, etc. For many of these usecases, just installing Jupyter Notebook on your laptop is enough to get started. However, for many companies and organizations, this is not an option and we need hosted Jupyter notebooks.
Here are the options that a company can have today to provide access to Jupyter Notebook to its engineers:
DS/MLEs can set up the environment and run a jupyter-server on a VM which can be used for running the workloads. Here is a simple guide on how you can run jupyterlab on an ec2 instance.
👍 Pros:
- Gives full control of the machine in the hand of a DS
- The whole environment is persistent. The VM can be stopped and restarted in the same state.
👎 Cons:
- Large cloud computing cost - There will be no auto-stop feature. DS can start a VM and can be left unutilized for a large part of the time thereby increasing the costs.
- Difficult to manage and track a large number of VMs centrally.
- DS needs to set up a lot of things to set up the workbench for starting the experimentation.
- Difficulty in reproducibility - DS might have installed a bunch of packages which are not tracked anymore and it takes a lot of time to productionize that code which runs on that VM.
Another option can be using a managed solution like AWS Sagemaker, Vertex AI Notebooks, or Azure ML Notebooks. While each of these methods has advantages, here are a few pros and cons of these in general.
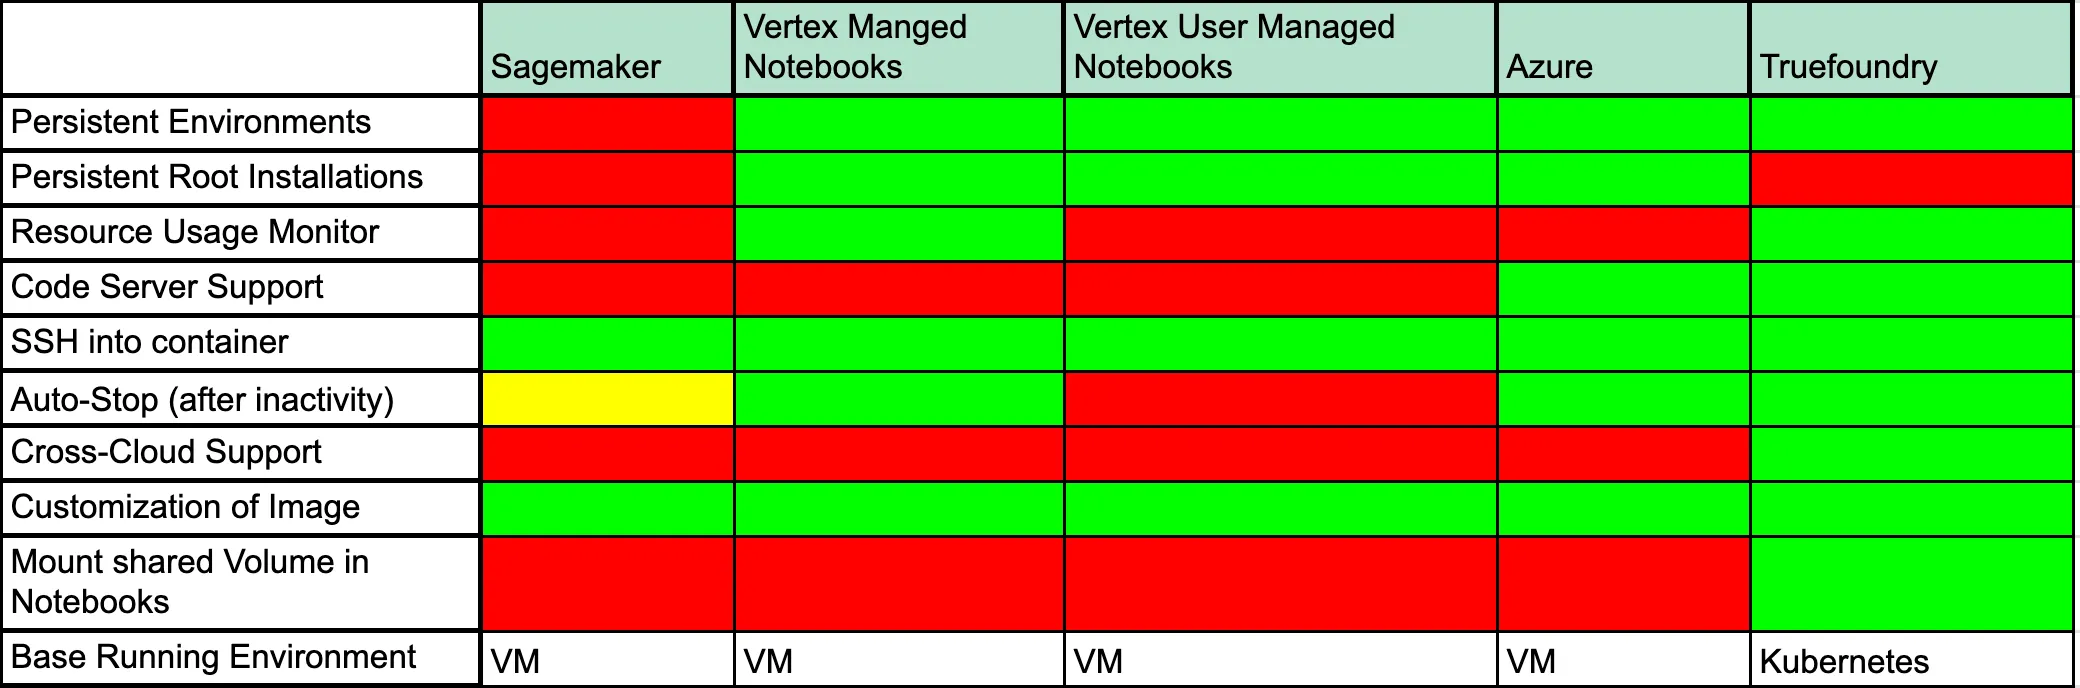
Let us discuss what each of these fields means:
Another option can be hosting notebooks over Kubernetes, but it comes with its own set of challenges as data scientists cannot directly interact with Kubernetes and need software in between that provides a simple interface to launch Jupyter notebooks. Lets us see what are the options available in this:
Kubeflow Notebook Operator:
Kubeflow helps to make deployments of machine learning (ML) workflows on Kubernetes simple, portable, and scalable. It has a notebook feature that helps to manage and run notebooks easily.
While Kubeflow is a large open-sourced project which provides a lot of features for Machine Learning use cases, it is very difficult to install and manage Kubeflow by yourself.
👍 Pros:
- Easy to launch and manage notebooks for DS
- Persistent home directory backed by a disk
- Option for pre-defined images for sklearn, pytorch, and tensorflow which comes with all installed dependencies.
- Open-sourced code-base
- Get a culling feature that stops notebooks after some time of inactivity.
👎 Cons:
- Difficult to set up Kubeflow on Kubernetes. It takes a lot of time to install and maintain Kubeflow
- For providing notebooks in multiple regions, different Kubernetes clusters need to be created and Kubeflow needs to be installed on every single cluster - leading to high infrastructure and maintainenance costs.
- Python packages are by default not persistent, which means you need to install packages each time you restart
- No direct way to gain root access to the container [ can be useful for multiple use cases ]
- Stopping notebooks cannot be configured on a per notebook level and is a global setting.
Host JupyterHub on Kubernetes:
JupyterHub is a great setup for multi-user use cases which helps in the optimal usage of resources. Deploying JupyterHub on Kubernetes can be done with an Open-Sourced project called Zero to JupyterHub with Kubernetes:
👍 Pros:
- Multiple users can work together easily with authentication support
- Easily setup auto-stop for notebooks
- Easy management of environments
👎 Cons:
- Difficult to set up and manage. We must configure Networking, Persistent Volumes, Scaling, and Load Balancing for JupyterHub to work correctly.
- Difficult to run GPU workloads on different types of GPUs on Jupyterhub. For instance, read this.
- Environments are not persistent
While there are a lot of solutions available right now, each solution comes with its own set of limitations. At Truefoundry we have tried to bridge this gap and tried to build a notebook solution that satisfies all the needs of a DS and also keeps costs in check. In the next section, we will describe our approach to building the notebook solution and the challenges we faced in making the same.
Truefoundry is a developer platform for ML teams that helps in deploying Models, Services, Jobs, and now Notebooks on Kubernetes. You can read more about what we do here. Our motivation for building a notebook solution was to simply enable experimentation and development on our platform. After studying all the solutions available, we decided to solve the pain points and missing features in the other platforms so that data scientists can have the best experience without incurring a lot of costs. A few things we wanted to enable are:
Kubeflow supports running notebooks on Kubernetes. It provides a number of features on notebooks out of the box. However, we wanted to address the issues we highlighted above in Kubeflow Notebooks and provide a seamless experience to datascientists and developers.
So, we had to make changes in the notebook controller, integrate it with Truefoundry's backend, and surfaced the notebooks on our UI.
We installed the notebook controller but bumped into some issues, because of which we had to make changes in the kubeflow-notebook-controller:
We solved the above two problems and launched the tfy-notebook-controller
and published it as a helm-chart Truefoundry's Public Charts repository. You can find the chart here.
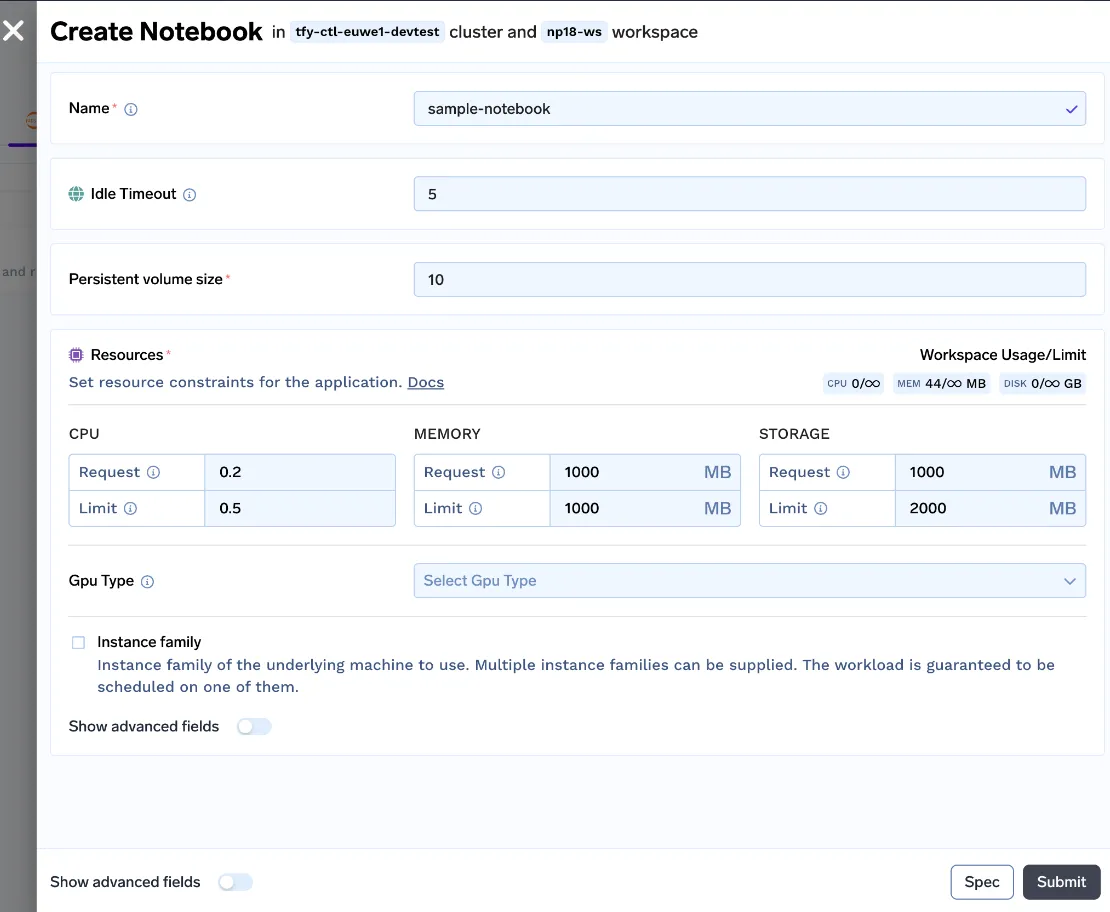
We created an easy-to-understand UI for data scientists to start notebooks. The user can customize the Idle Timeout (time of inactivity after which the notebook will be stopped), Persistent Volume Size (Size of Disk which stores the Dataset and code files), Resources (CPU, Memory and GPU requirements) and spin up the notebook!
With all these changes, we launched the v0 of our notebooks.
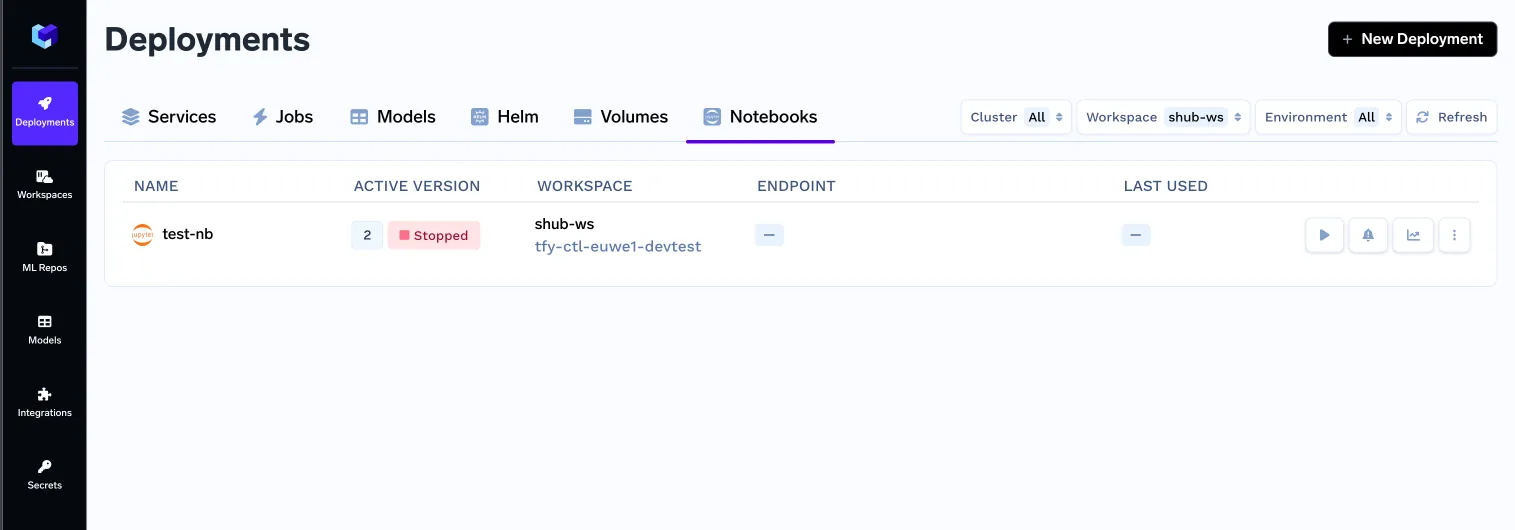
But still, we are a long way from a good user experience, lets us see the pros and cons of this approach:
👍 Advantages:
- Persistent home directory [ all files and packages will be persisted]
- Inactivity Timeout (Cull Timeout) per notebook can be configured
- Launch notebook with a few clicks
- Easily launch notebook with GPUs
👎 Limitations:
- Python environment is not persistent (all packages installed go away with pod restart)
- No way to install packages that require root access
- No proper way to manage multiple environments for experimentation
- Cannot configure an endpoint for the notebook [ added in next version]
Now these limitations are critical to solving as it blocks a lot of Data Scientist workflows which can be as simple as installing 'apt-packages' like ffmpeg.
Till this point, we were using the pre-built images for Jupyterlab provided by Kubeflow. But since we need to solve the issue of non-persistent environments, allowing root access and installing apt-packages. We need to have our own set of docker images.
So let us look at how we solved these problems!
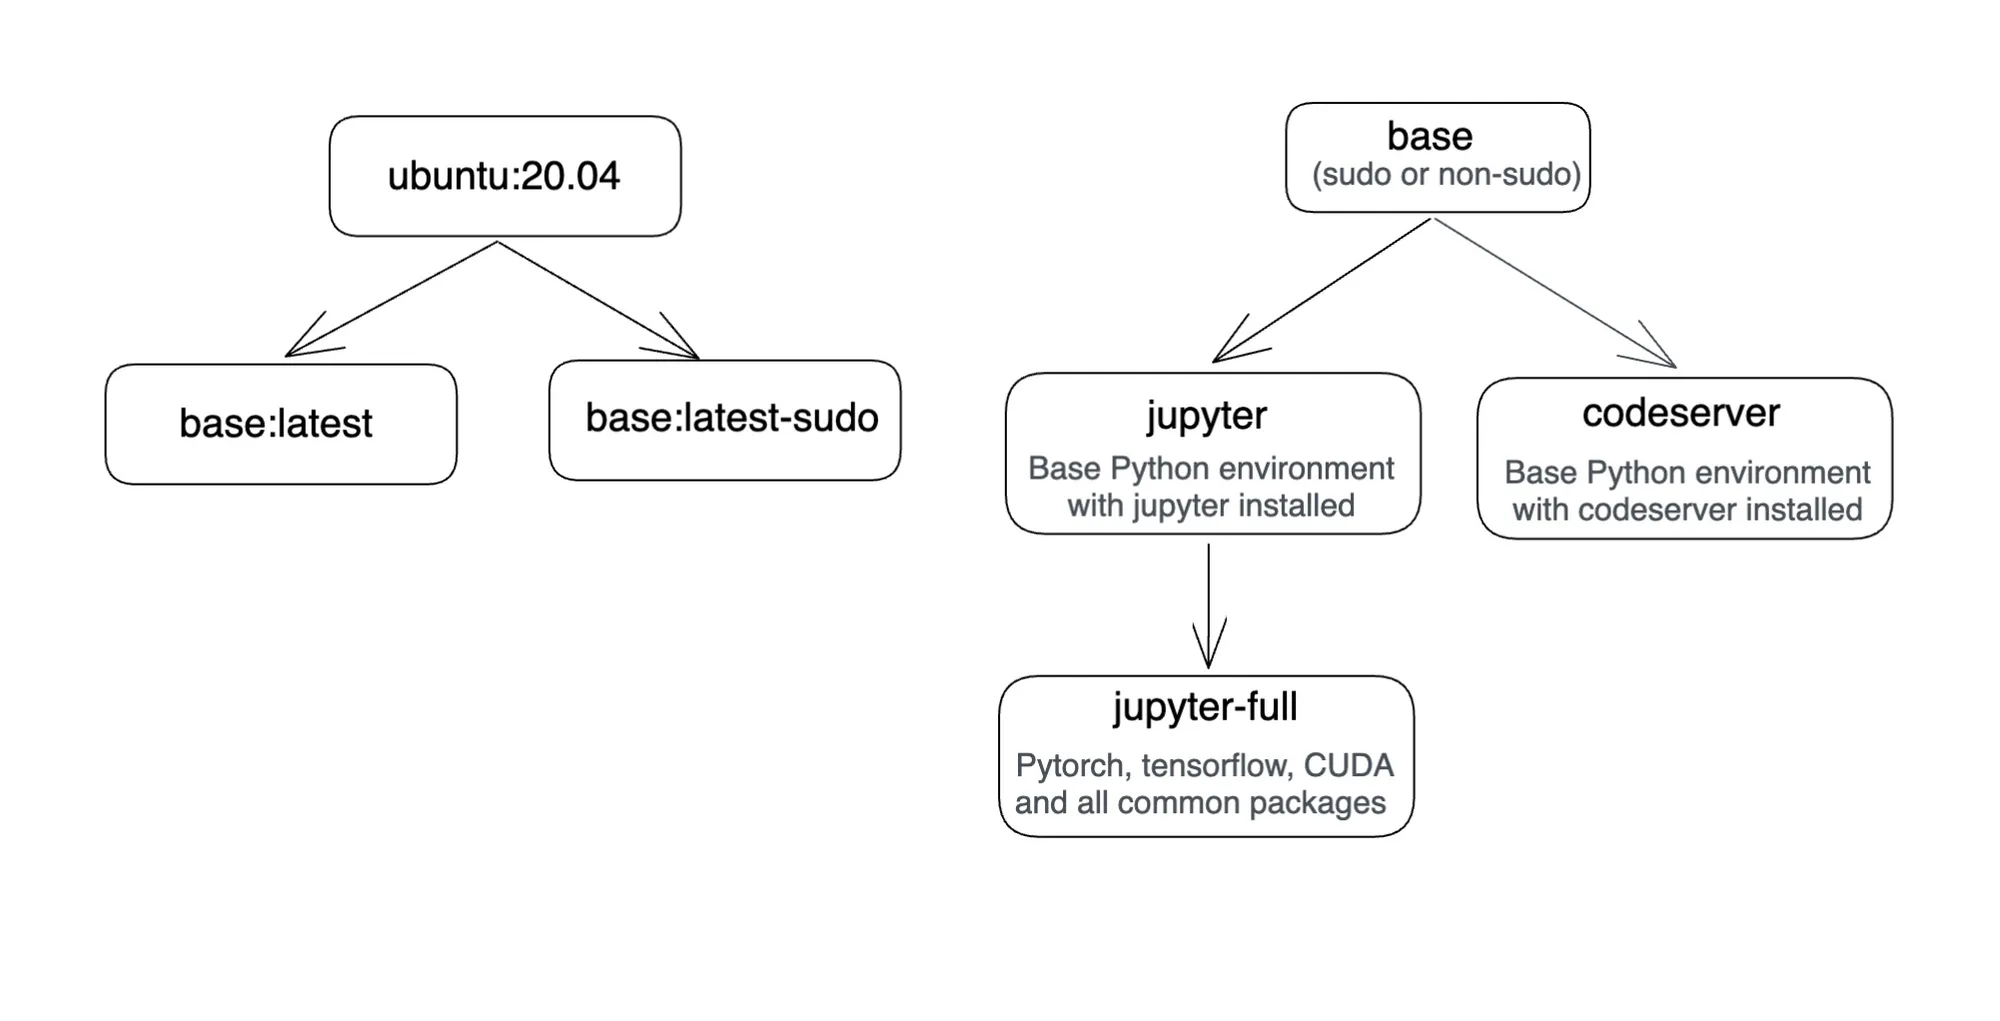
- Modified the init script of the docker image and cloned the base conda environment to the home directory and name it jupyter-base
- Add a .condarc file and set $HOME directory as the default environment path
- Modify the .bashrc file to activate the jupyter-base environment by default
truefoundrycloud/jupyter:latest and truefoundrycloud/jupyter:latest-sudo. Where the images with sudo provide n0-password sudo access to the user.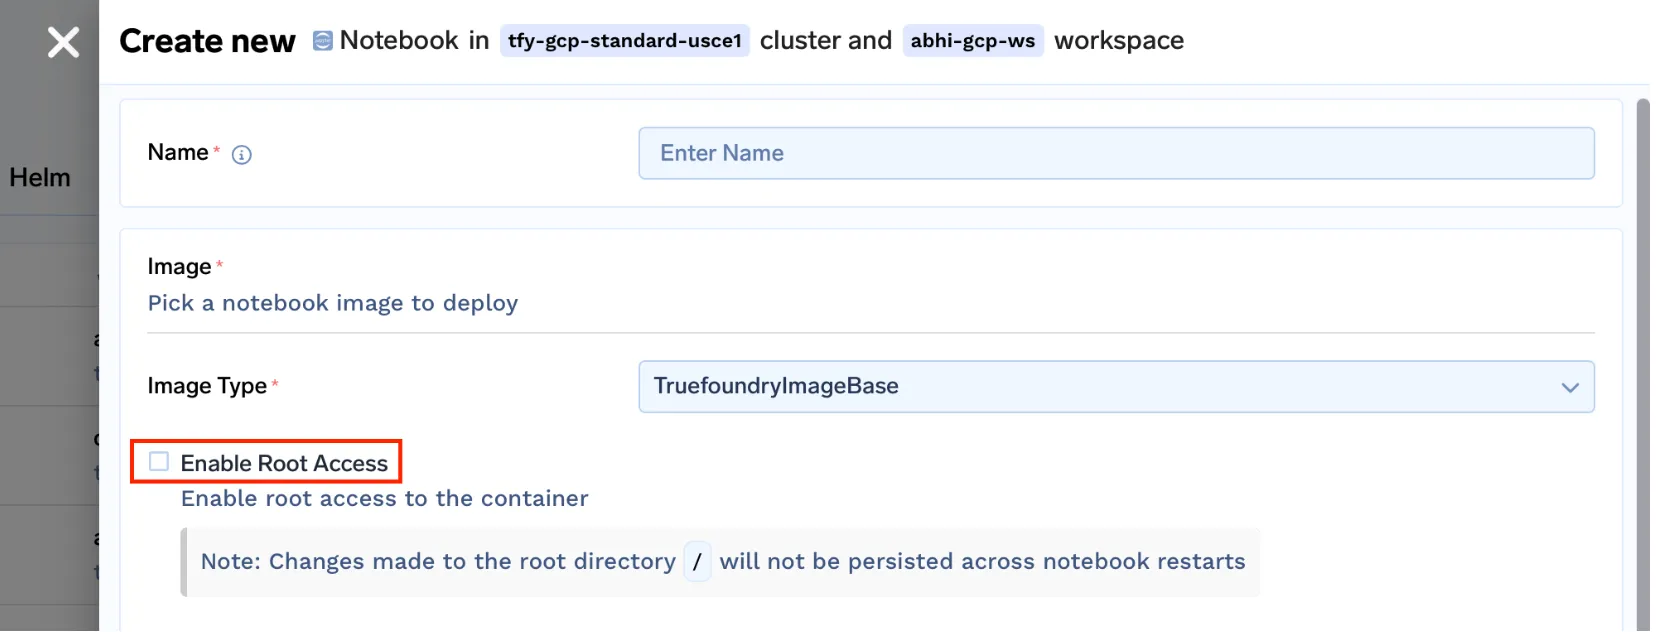
Note: Since we are running notebooks on kubernetes with the home directory mounted, only the home directory will be persistent. The root packages installations will not be persistent across pod restarts. Please read this to get a better understanding of the same.
By solving these problems we solved most of the issues faced by a user and provide a decent notebooks experience. But with time we saw that users faced a few challenges which we will describe in the next section.
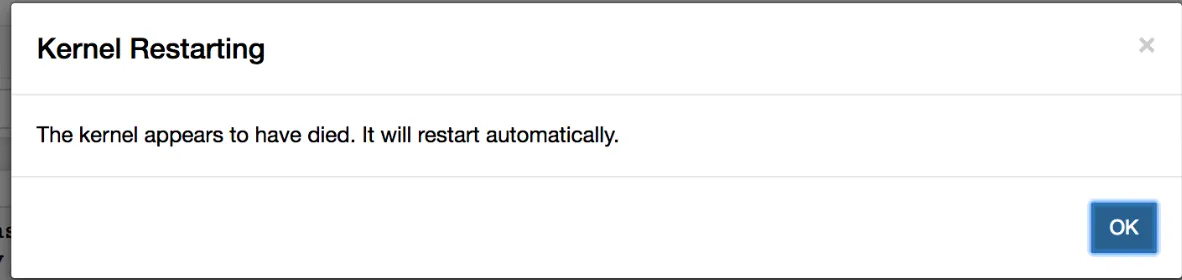
jupyterlab the package. Since the environment is persisted, the notebook fails to start (once the current notebook is stopped)kernelspec and ensure that kernelspec is configured correctly which can issues.
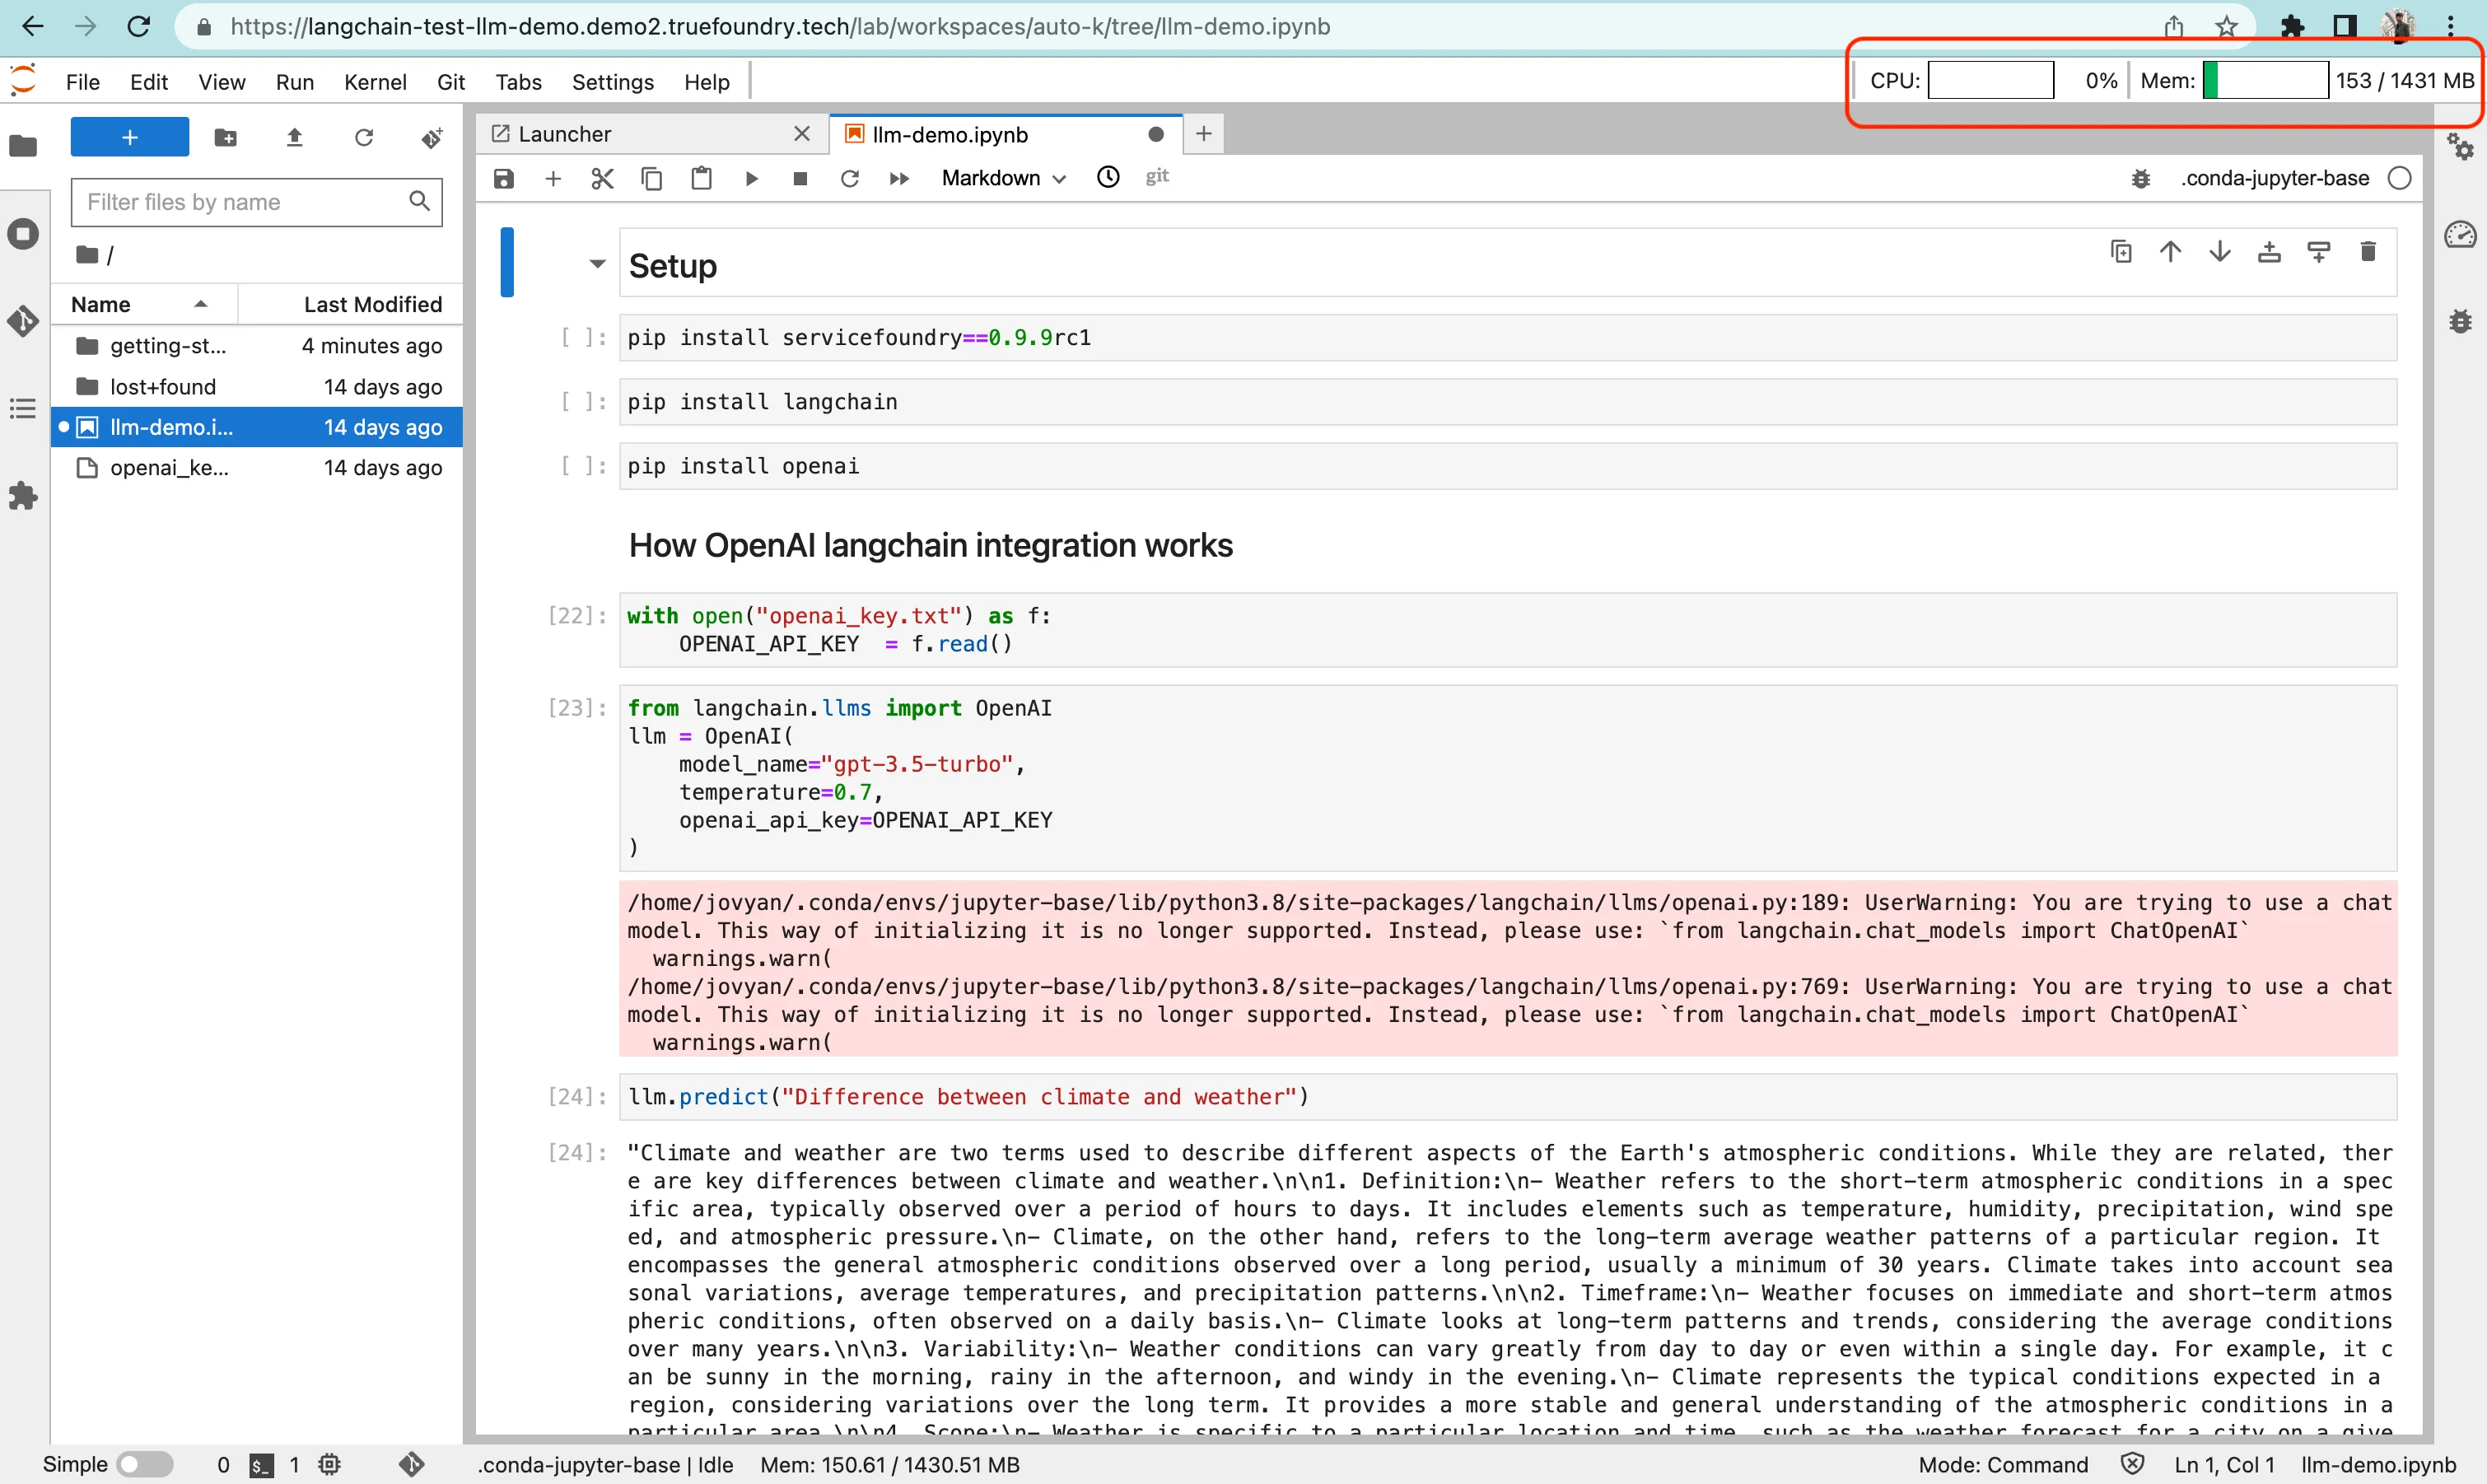
Adding resource usage metrics to the notebook:
We added the resource usage metrics to the notebook by installing the extension jupyterlab-system-monitor==0.8.0 and configured its settings in the init script by passing arguments while starting the Jupyterlab server.
...


jupyter lab \
    ...
    --ResourceUseDisplay.mem_limit=${mem_limit} \
    --ResourceUseDisplay.cpu_limit=${cpu_limit} \
    --ResourceUseDisplay.track_cpu_percent=True \
    --ResourceUseDisplay.mem_warning_threshold=0.8
This is what it looks like on the UI:
Separating out the kernel that runs the Jupyterlab server from the execution kernel
We need to ensure that whatever changes are done by the user in the home directory, the notebook should always restart without any issues. For this, we used the 'base' anaconda environment from /opt/conda the directory to start the Jupyterlab server.
Along with this, we created a separate environment in the $HOME directory, but this adds a kernel of the base conda environment to Kernels lists.
To solve for this we installed nb_conda_kernels to manage Jupyter kernels. We configured the init script to ensure that only the persistent Python environments show up in the kernel's list.
jupyter lab \
    ...
    --CondaKernelSpecManager.conda_only=True \
    --CondaKernelSpecManager.name_format={environment} \
    --CondaKernelSpecManager.env_filter=/opt/conda/*"
With this, we get a guarantee that the notebook server will always start with whatever changes a user does inside the notebook.
It also eases out the management of multiple kernels. You simply need to create a new conda environment using the command conda create -n myenv and it starts to show up in the kernels list.
While Jupyter notebooks solve a number of problems. There are a number of tasks at which it ceases to help:
Considering these limitations, we decided to solve for the same. We added code-server support in order to provide a full IDE experience to the users in the browser.
By adding VS Code support, we enable users to do the following things:
localhost:8000 can be made available at ${NOTEBOOK_URL}/proxy/8000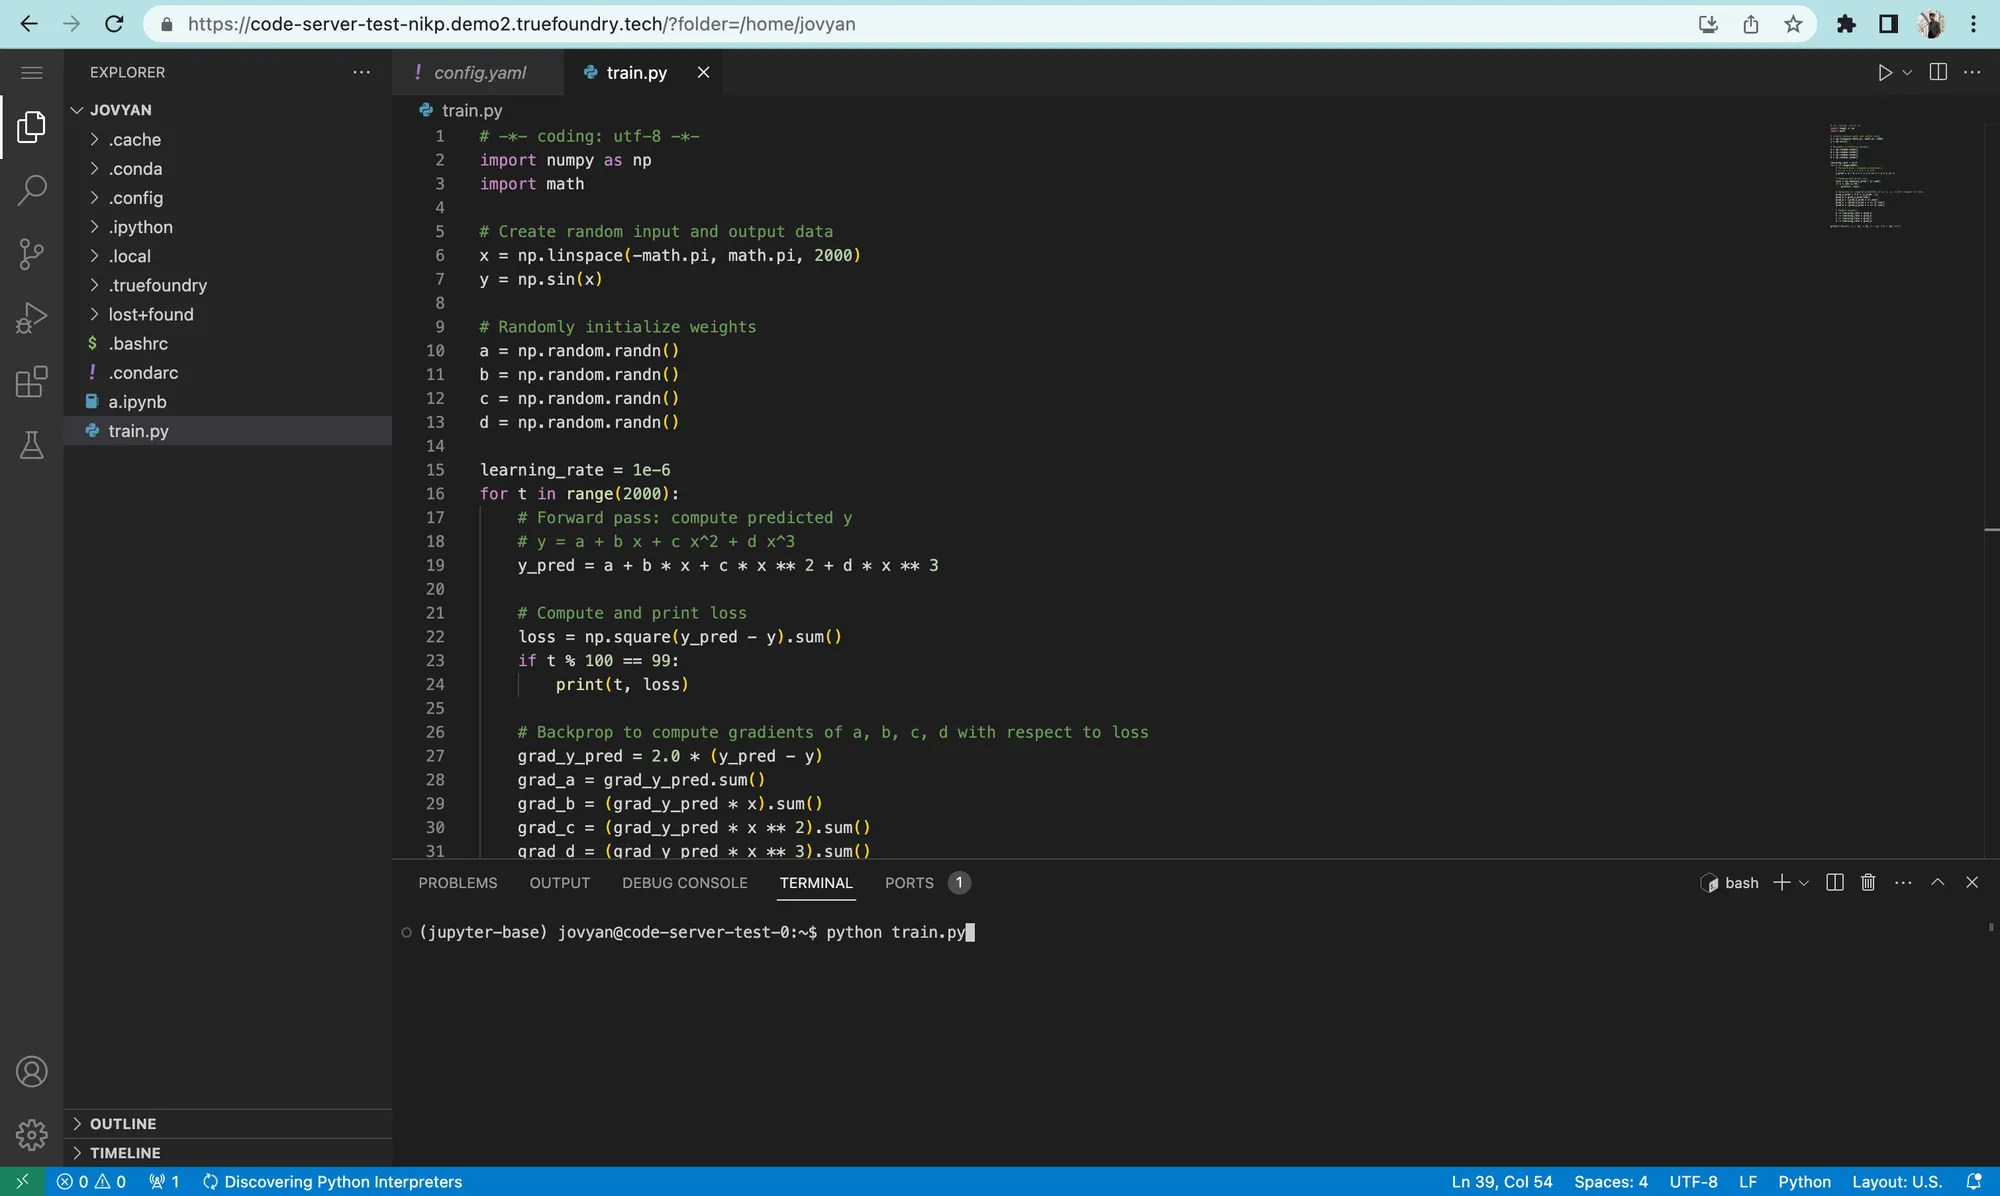
This was done by adding another docker image. Here is a diagram that shows Truefoundry's docker images.
SSH Access to your Notebook/VSCode:
While in most of the cases Hosted VS Code can solve the issue. But there can be cases (especially for Jupyter Notebooks) where the user gets stuck and needs direct access to the container running their Jupyter Notebook / VS Code Server.
So we have made that simplified by installing an ssh server in each of the notebooks and to connect to your container, you need to execute a simple command and enter your password:
ssh -p 2222 jovyan@test-notebook.ctl.truefoundry.tech

The power of this tool can be enhanced with your VS Code Extention called Remote Explorer where you can directly open all the files inside your VS Code!
Click here to read more about it
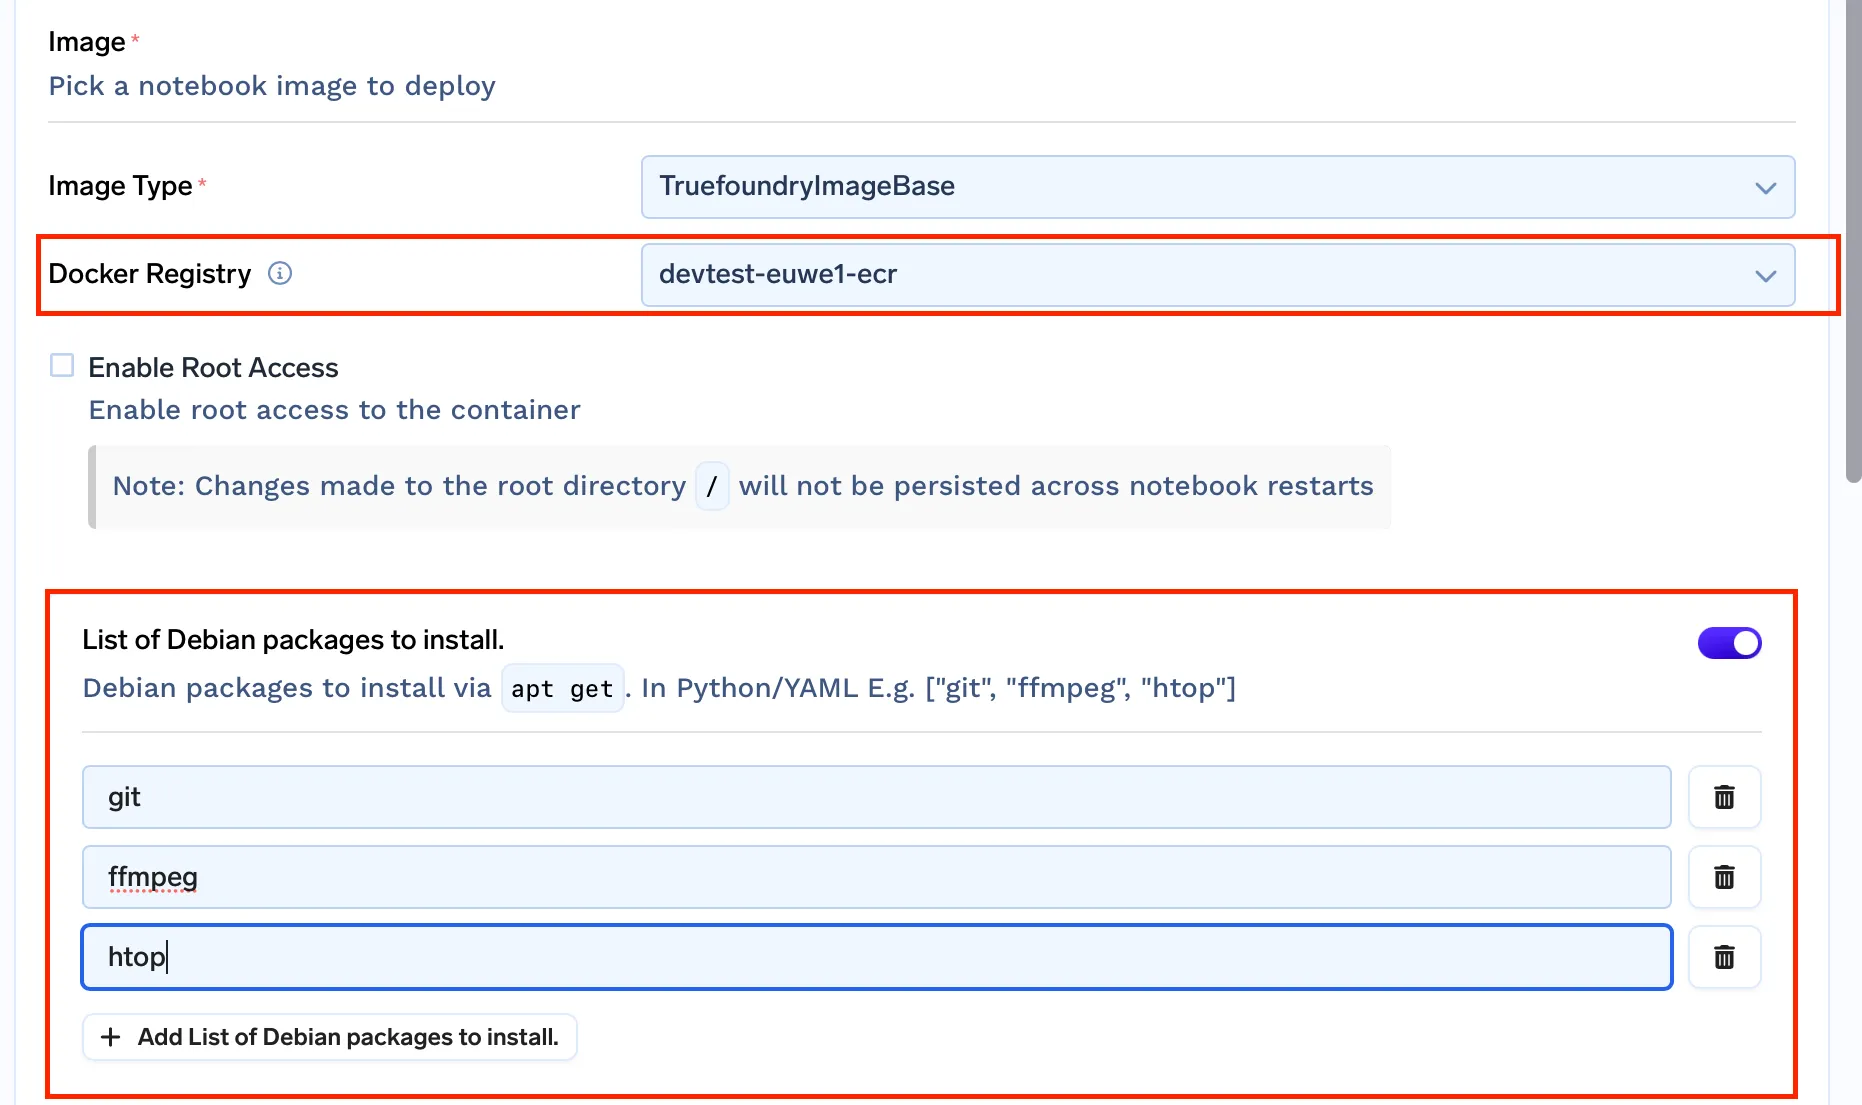
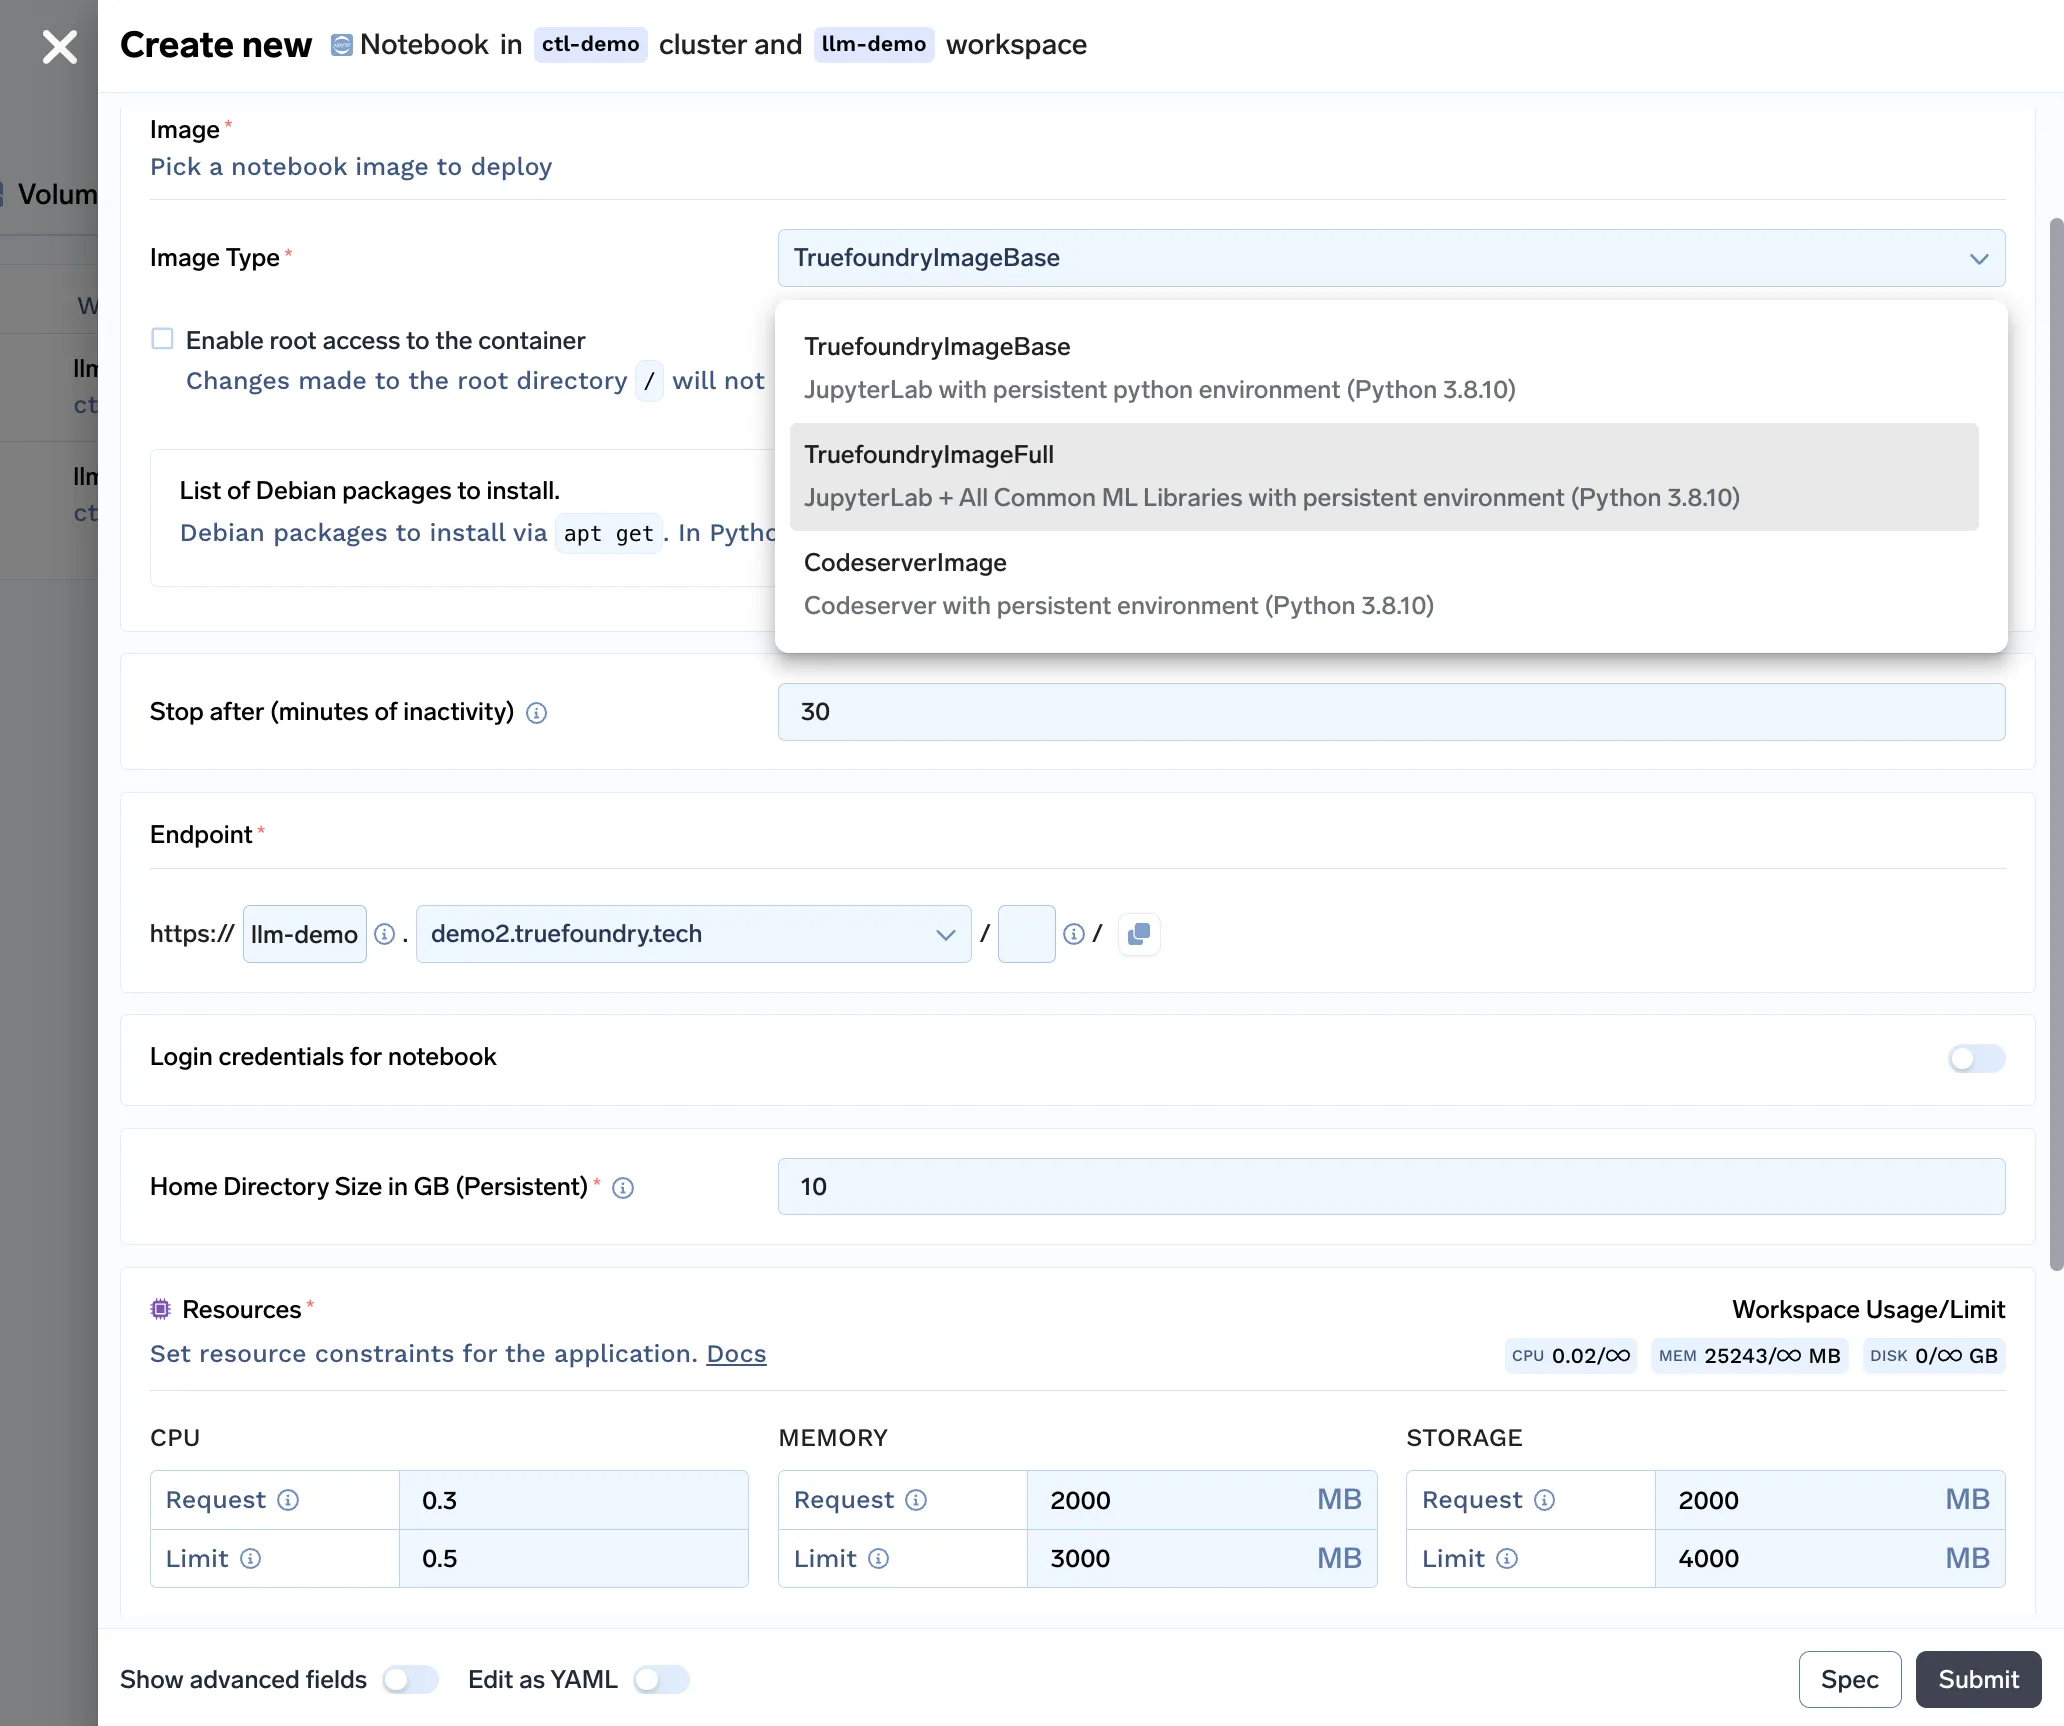
With all the features bundled into our notebook solution, here is what our notebook deployment form looks like:
Finally, let us compare the pricing of each of the managed solutions with Truefoundry.
Since Truefoundry works by deploying on the customer's cloud by connecting their Kubernetes Cluster, here is the pricing for Truefoundry running on different cloud providers.
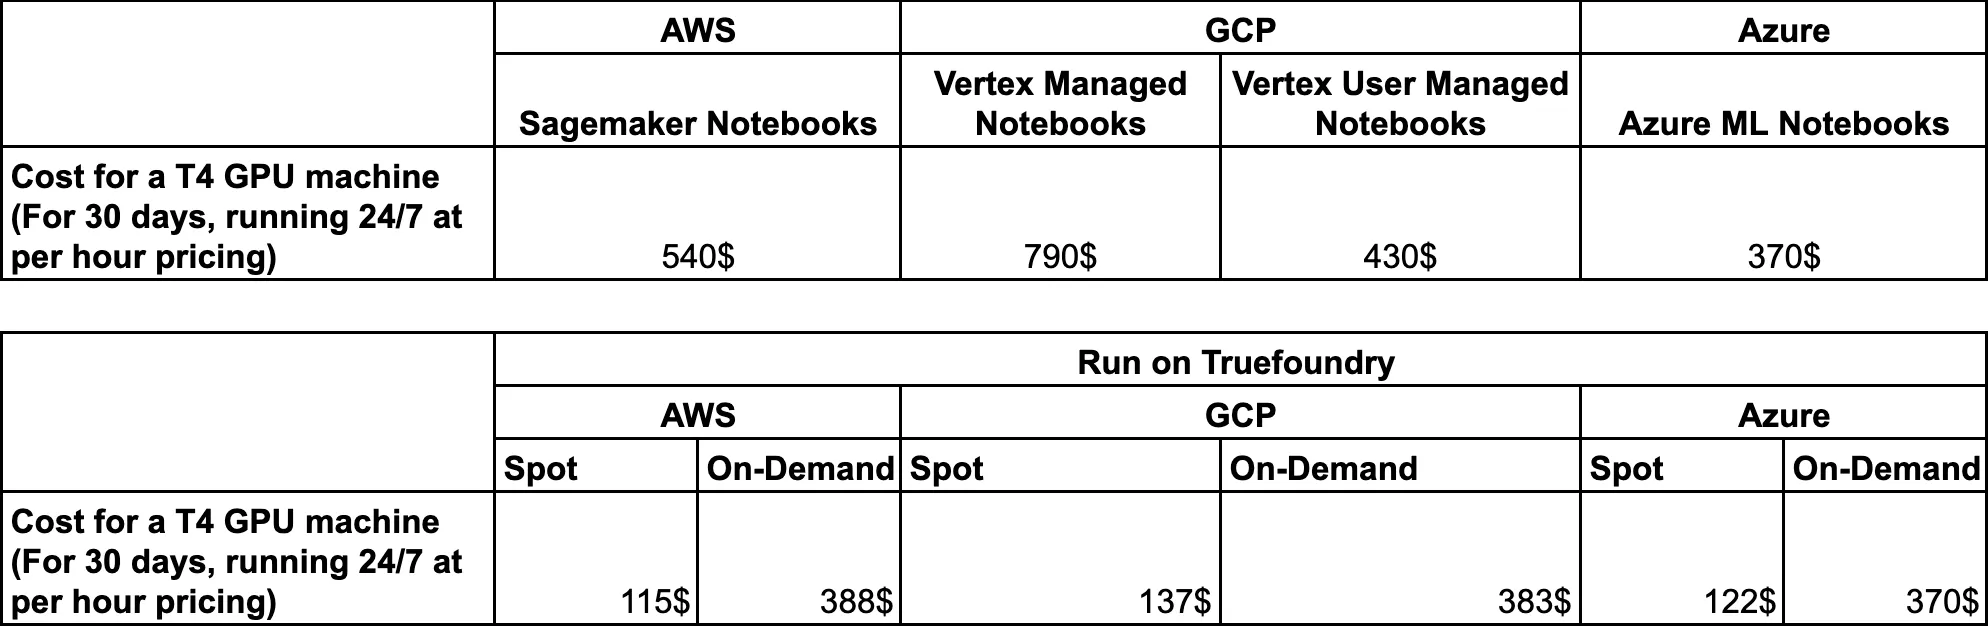
In the case of Truefoundry, you can actually save a lot of costs as:
This was a brief about our effort in building the notebooks solution. You can join our Friends of Truefoundry Slack channel if you would like to discuss in depth about our approach or if you have some suggestions.
If you want to try out our platform you can register here!
TrueFoundry AI Gateway delivers ~3–4 ms latency, handles 350+ RPS on 1 vCPU, scales horizontally with ease, and is production-ready, while LiteLLM suffers from high latency, struggles beyond moderate RPS, lacks built-in scaling, and is best for light or prototype workloads.


The latest news, articles, and resources sent to your inbox


.webp)

.webp)
.webp)


.webp)
.webp)
.webp)