

Prerequisites
- A TrueFoundry tenant with Admin access to Settings → Security & Access → SSO.
- Administrator access to your Identity Provider, with permission to register applications / clients.
- An IdP that implements OpenID Connect with the Authorization Code grant.
- Network access from TrueFoundry to your IdP’s discovery document (
/.well-known/openid-configuration) is strongly recommended — it lets TrueFoundry auto-discover the OIDC endpoints. If discovery isn’t reachable you can still configure the endpoints manually (see Step 4).
Configuration overview
Register a client application in your IdP
Configure claims
email and a stable unique identifier such as sub.Configure TrueFoundry
(Fallback) Manual endpoint configuration
Assign users and test sign-in
Step 1 — Register a client application in your IdP
The exact wording varies by IdP, but every OIDC-compliant Identity Provider asks for the same set of inputs.Create a new OIDC client
Set the redirect / callback URL
Enable the Authorization Code grant
Capture the client credentials
- Client ID (sometimes called Application ID)
- Client Secret (sometimes called Application secret or Key)
- Issuer URL — usually of the form
https://<idp-host>/...and used to build the discovery URL<issuer>/.well-known/openid-configuration.
Step 2 — (Optional) Configure claims
TrueFoundry needs at least two claims in the ID token: the user’s email and a stable unique identifier. Most IdPs include these by default — this step is only needed if yours doesn’t.Confirm the ID token claims
Decide on scopes
openid email by default. Add profile if you want first/last name. You’ll enter the final scope list in Step 3.Step 3 — Configure TrueFoundry
Open SSO settings
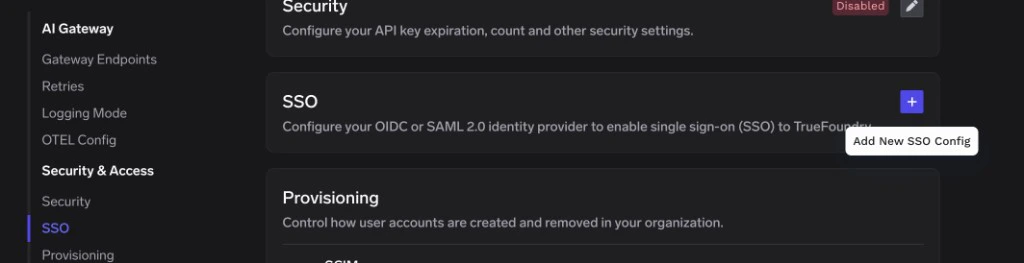
SSO page in TrueFoundry — click the + icon to add a new SSO configuration
Fill in the SSO form
- Enabled: turn this on.
- Name: a lowercase alphanumeric label — for example,
companyoidc. - SSO Provider: choose Custom.
- Authentication Configuration: select OIDC.
- Client ID: the Client ID from Step 1.
- Client Secret: the Client Secret from Step 1.
- Discover endpoints: leave this on so TrueFoundry pulls the OIDC endpoints from the discovery document.
- Issuer URL: the issuer string from your IdP — for example
https://idp.example.com/realms/main. TrueFoundry will fetchhttps://idp.example.com/realms/main/.well-known/openid-configurationto discover the rest of the endpoints. - Scopes (optional): leave blank to use the default
openid email. Addprofileor any other scopes your IdP requires to emit the claims you configured in Step 2.
Save
Step 4 — (Fallback) Manual endpoint configuration
Most modern IdPs expose/.well-known/openid-configuration at the issuer URL. Skip this step if discovery worked in Step 3.
Use manual configuration when:
- Your IdP does not publish a discovery document at the standard path.
- The discovery document is reachable from a browser but not from TrueFoundry’s network (for example, the IdP is on a private network).
- The discovery document returns non-standard or invalid JSON.
Locate the four OIDC endpoints
Turn off discovery and paste the endpoints
iss value when validating ID tokens.Step 5 — Assign users and test sign-in
Assign users in your IdP
Test sign-in
- Open a private/incognito window and visit your TrueFoundry login page.
- Click Login with SSO (or whichever button label you chose under Show advanced fields → Button Text).
- Authenticate as an assigned user.
Optional customizations
The fields below live under Show advanced fields on the SSO form and apply to both OIDC and SAML.Troubleshooting
'Failed to discover OIDC endpoints' or 'discovery document not found'
'Failed to discover OIDC endpoints' or 'discovery document not found'
<issuer>/.well-known/openid-configuration. Verify the URL in a browser. If the document is unreachable or returns non-JSON content, follow Step 4 to enter the four endpoints manually.'invalid_client' or 'invalid client secret'
'invalid_client' or 'invalid client secret'
Sign-in works but the user's email is empty
Sign-in works but the user's email is empty
email claim.- Make sure the
emailclaim is included in the ID token in your IdP. - Add
email profileto Scopes on the TrueFoundry SSO form. - If your IdP uses a non-standard claim name (for example
mailorupn), expand Show advanced fields and set Email Claim to that name.
'redirect_uri_mismatch' during sign-in
'redirect_uri_mismatch' during sign-in
https://login.truefoundry.com/oauth2/callback listed exactly — no trailing slash, no extra query parameters, and the scheme must be https.'Issuer mismatch' or 'iss claim does not match expected value'
'Issuer mismatch' or 'iss claim does not match expected value'
iss value inside the ID token doesn’t equal the Issuer URL you entered in TrueFoundry. Some IdPs return an issuer with or without a trailing slash, or with a different host than the one used for discovery. Check the iss claim in a returned token (use jwt.io) and update the Issuer URL to match it exactly.'Token validation failed: token used too early' or clock-skew errors
'Token validation failed: token used too early' or clock-skew errors
iat/nbf/exp timestamps on the ID token. If your IdP host clock drifts, NTP can fall behind by enough seconds to break validation. Sync the IdP host’s clock with an authoritative time source.HTTP vs HTTPS issuer
HTTP vs HTTPS issuer
https:// for the Issuer URL and all four endpoints. If your IdP is only reachable on http://, terminate TLS in front of it (for example, with a reverse proxy) and use the HTTPS URL. Self-signed certificates must be issued by a CA trusted by TrueFoundry’s Auth Server.Optional next steps
- Use SAML instead — see SAML with a Custom Identity Provider.
- Automate user provisioning — see Manage Users for SCIM, JIT, and Invite-only options.