FAQs
How to add multiple gateway planes to the control plane?
How to add multiple gateway planes to the control plane?
Create Kubernetes Secret for License Key and DB Credentials
- Store the License Key
- Store the Image Pull Secret
Create Kubernetes Secret for License Key
Create Kubernetes Secret for License Key
truefoundry namespace)Create Kubernetes Secret for Image Pull Secret
Create Kubernetes Secret for Image Pull Secret
truefoundry namespace)Create Helm chart Values file for gateway plane
CONTROL_PLANE_URL: URL that you will map to the control plane dashboard.TENANT_NAME: Tenant name provided by TrueFoundry team.GATEWAY_ENDPOINT_HOST: The domain where you will expose the gateway endpoint (e.g.,gateway.example.com)
Can I use my Artifactory as a mirror to pull images?
Can I use my Artifactory as a mirror to pull images?
- URL:
https://tfy.jfrog.io/
Can I copy images to my own private registry?
Can I copy images to my own private registry?
truefoundry Helm Chart to identify and copy required images to your private registry.- Generic Registry
- AWS ECR Registry
- Skopeo
- Used to perform the image copy operation.
- Helm
- Used to get the list of images from the TrueFoundry Helm Chart.
<USERNAME> with the TrueFoundry registry username.Replace
<PASSWORD> with the TrueFoundry registry password.<USERNAME> with your registry username.Replace
<PASSWORD> with your registry password.Replace
<YOUR_REGISTRY> with the URL of your registry.Skopeo will use authentication details for a registry that was previously authenticated with docker login.Alternatively, you can use the --dest-user and --dest-password flags to provide the username and password for the destination registry.<TRUEFOUNDRY_HELM_CHART_VERSION> with the version of the Truefoundry
helm chart you want to use. You can find the latest version in the
changelog.Replace <TRUEFOUNDRY_HELM_VALUES_FILE> with the path to the values file you created in the Installation Instructions.Replace <DEST_REGISTRY> with the URL of your registry.How to install in an air-gapped / restricted network environment?
How to install in an air-gapped / restricted network environment?
truefoundry), you only need to make the container images available in your private registry and update the helm values to point to it.- Copy images to your private registry — set up a registry mirror or copy images directly using the steps described in the FAQs above
- Update helm values to point to your private registry (see the helm value overrides in the same FAQs above)
- Continue with the standard installation on the overview and choose your cloud install guide (AWS, GCP, Azure, or on-prem)
How to integrate with AWS bedrock models from a different AWS account?
How to integrate with AWS bedrock models from a different AWS account?
- Add the following IAM policy to the control plane IAM role so that it can assume the IAM role of the AWS account that has the bedrock models:
- In the IAM role in the destination AWS account (which has bedrock access), add the following trust policy to allow the control plane IAM role to assume it:
- Now you can use the IAM role of the destination AWS account while integrating AWS bedrock models in the TrueFoundry AI gateway.
Do we need any NFS volumes in Kubernetes for the AI Gateway or Control Plane?
Do we need any NFS volumes in Kubernetes for the AI Gateway or Control Plane?
What is the structure of access logs
What is the structure of access logs
- logfmt
- json
Log format
Standard log format structure:| Log operator | Details |
|---|---|
| START_TIME | ISO timestamp for request start. eg. 2025-08-12 13:34:50 |
| LEVEL | info|warn|error |
| IP_ADDRESS | IP address of the caller. eg. ::ffff:10.99.55.142 |
| TENANT_NAME | Name of the tenant. eg. truefoundry |
| SUBJECT_TYPE | user|virtualaccount |
| SUBJECT_SLUG | Email or virtual account name. eg. tfy-user@truefoundry.com|demo-virtualaccount |
| MODEL_ID | Model ID. eg. openai-default/gpt-5 |
| METHOD | GET|POST|PUT |
| PATH | Path of the request. eg. /api/inference/openai/chat/completions |
| STATUS_CODE | 200|400|401|403|429|500 |
| DURATION | Duration of the request. eg. 12 |
| TRACE_ID | Trace ID of the request |
How to use SSO directly without using TrueFoundry Auth Server?
How to use SSO directly without using TrueFoundry Auth Server?
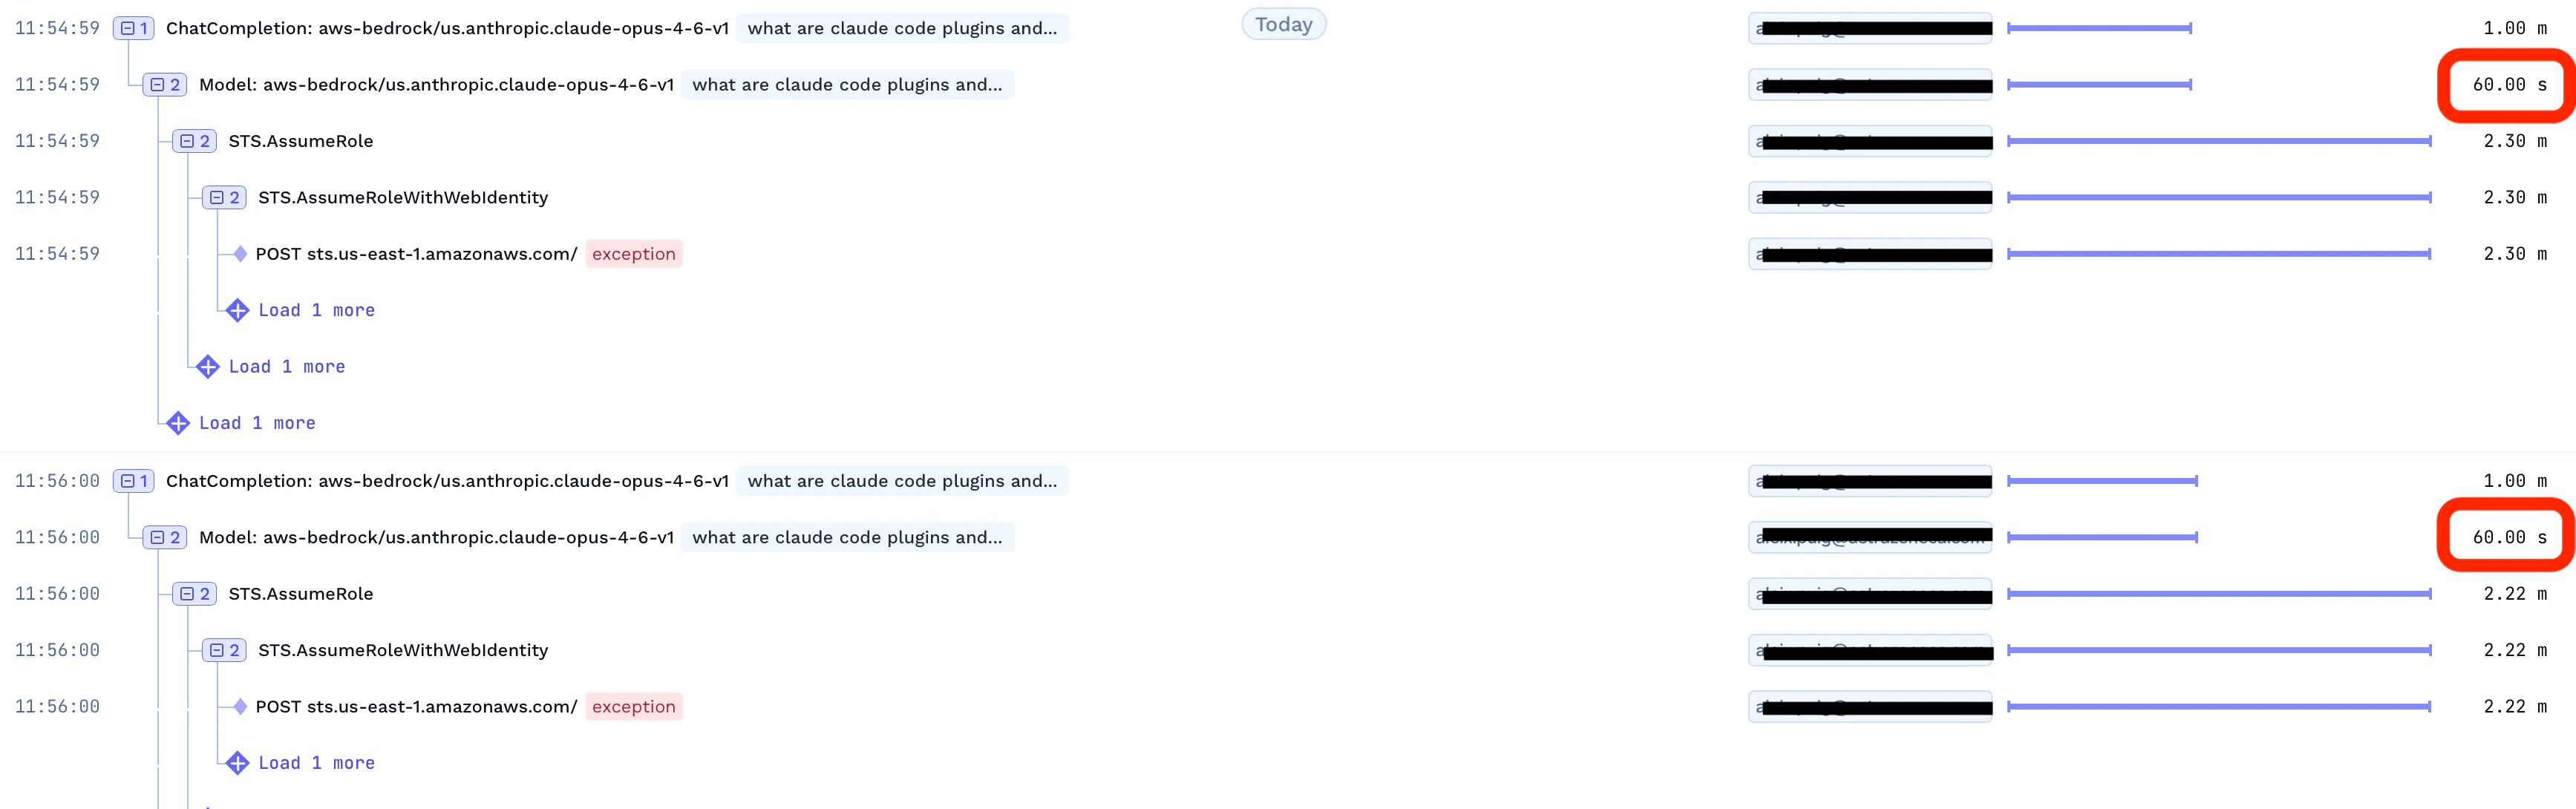
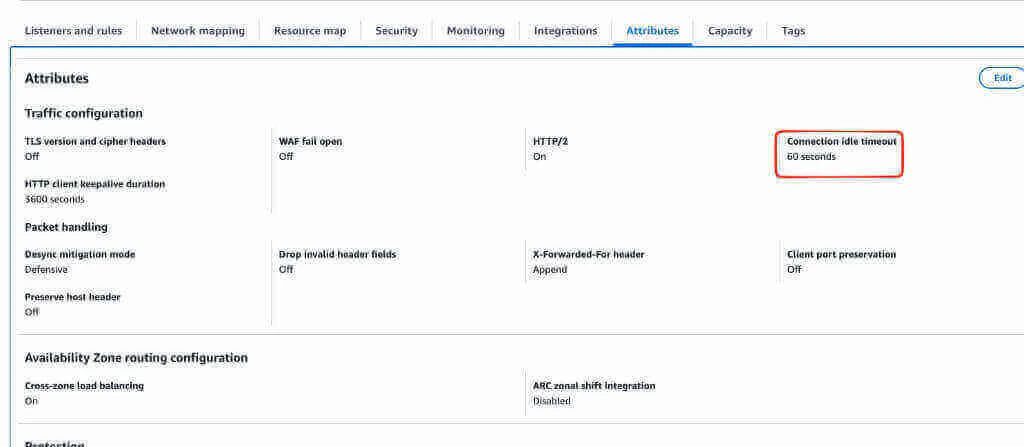
Requests to the gateway are timing out after a certain duration
Requests to the gateway are timing out after a certain duration
Can I get TrueFoundry metrics in Victoria Metrics instead of Prometheus?
Can I get TrueFoundry metrics in Victoria Metrics instead of Prometheus?
truefoundry-values.yaml file and upgrade the Helm release:VMServiceScrape and related custom resources for
scraping TrueFoundry metrics. It does not deploy Victoria Metrics itself —
you are responsible for installing and managing your own Victoria Metrics
instance.How to enable SSL for PostgreSQL connections?
How to enable SSL for PostgreSQL connections?
DB_SSL_MODE environment variable in your truefoundry-values.yaml.Supported DB_SSL_MODE values:| Mode | Encryption | Certificate Validation | Use Case |
|---|---|---|---|
disable | No | No | Local development or trusted networks |
no-verify | Yes | No | Managed databases with self-signed or unverified certs |
require | Yes | Yes (system CA store) | When you have a valid CA certificate and want full verification |
verify-ca | Yes | Yes (custom CA) | Same as require but explicitly checks CA |
verify-full | Yes | Yes (CA + hostname) | Strictest mode, validates CA and hostname |
| Variable | Purpose | Required |
|---|---|---|
DB_SSL_CA_PATH | Path to the server CA certificate file | For require, verify-ca, or verify-full modes |
DB_SSL_CERT_PATH | Path to the client certificate file (for mTLS) | Only for mTLS (GCP Cloud SQL, Azure Database for PostgreSQL) |
DB_SSL_KEY_PATH | Path to the client private key file (for mTLS) | Only for mTLS (GCP Cloud SQL, Azure Database for PostgreSQL) |
DB_SSL_CA_PATH), while GCP Cloud SQL and Azure Database for PostgreSQL may require all three certificate paths when client certificate authentication (mTLS) is enabled. Refer to the cloud-specific control plane documentation for detailed examples.no-verify)This is the simplest option for managed databases. It encrypts the connection but skips server certificate validation.require)This mode encrypts the connection and validates the server certificate. You must provide the appropriate certificate files for your database provider. The example below shows the full configuration with all three certificate paths (for GCP/Azure mTLS). For AWS RDS, only DB_SSL_CA_PATH is needed.Create a Kubernetes Secret containing your certificate files:truefoundry-values.yaml to mount the certificates and set the SSL paths:How to configure custom CA certificates?
How to configure custom CA certificates?
Method 1: Pass customCA as a multiline string
You can directly provide the CA certificate content as a multiline string in yourvalues.yaml:Method 2: Use an existing ConfigMap containing CA certificate(s)
If you already have your custom CA certificates in a Kubernetes ConfigMap, you can reference it directly. An initContainer will merge the custom CA with the system CAs.Create a ConfigMap with your custom CA certificate(s)
Reference the ConfigMap in your Helm values
truefoundry-values.yaml to reference the ConfigMap:Method 2b: Use an existing ConfigMap with overrideCAList
If you want the ConfigMap to replace the system CA bundle entirely instead of merging, set overrideCAList to true. In this mode, the ConfigMap is mounted directly at /etc/ssl/certs/ (no initContainer is used), so the ConfigMap must contain the full CA bundle (system + custom CAs).Prepare your CA certificate file
custom-ca.crt:/etc/ssl/certs/ca-certificates.crt with your custom CA included (system CAs + your custom CA).Create a ConfigMap from the complete ca-certificates.crt file
Reference the ConfigMap in your Helm values with overrideCAList
truefoundry-values.yaml to reference the ConfigMap with overrideCAList enabled:How to enable in-pod TLS termination on the proxy (control plane and gateway)?
How to enable in-pod TLS termination on the proxy (control plane and gateway)?
| Plane | Helm chart | Values path | Caddy listener |
|---|---|---|---|
| Control plane | truefoundry | global.proxy.tls | :8080 on tfy-proxy |
| Gateway | tfy-llm-gateway | proxy.tls | :8081 on the gateway proxy sidecar (app stays on :8787) |
Traffic flow (in-pod termination)
Prerequisites
- A Kubernetes TLS
Secretin the release namespace with PEM certificate and private key (standard keystls.crtandtls.key). - An ingress controller that can forward TLS without terminating it when using Ingress (see below).
- For self-signed or private CAs: also configure custom CA certificates so Node.js services trust outbound HTTPS, or use in-cluster HTTP URLs for internal API calls (recommended).
Control plane (truefoundry chart)
Create the TLS Secret
kubernetes.io/tls secret in the truefoundry namespace. Replace the paths with your certificate and key files:*.primary.example.com, issue a cert that covers your control-plane hostname (for example cp.primary.example.com).Enable proxy TLS in Helm values
truefoundry-values.yaml:Configure ingress for TLS passthrough
global.proxy.tls.enabled is true, Caddy expects HTTPS on the service port. Your ingress must forward the TLS connection without terminating it.ingress-nginx — enable passthrough on the controller (once per cluster) and annotate the control-plane Ingress:controller.extraArgs.enable-ssl-passthrough: "true".Istio / Gateway API — configure TLS mode PASSTHROUGH on the Gateway listener that fronts the control plane. TLS is not configured on the HTTPRoute itself.Verify the control plane
Update gateway `CONTROL_PLANE_URL` when `tags.llmGateway` is enabled and control-plane proxy TLS is on
global.proxy.tls.enabled is true, truefoundry-tfy-proxy listens with TLS on port 8080. In-cluster HTTP calls such as http://<release>-tfy-proxy:8080 will fail (for example ECONNRESET or certificate errors).If you deploy the gateway with the truefoundry chart (tags.llmGateway: true), override tfy-llm-gateway.env.CONTROL_PLANE_URL to your HTTPS control-plane URL (global.controlPlaneURL), not the internal http://...-tfy-proxy:8080 address:tfy-llm-gateway chart already sets CONTROL_PLANE_URL from global.controlPlaneURL by default. The override above is required when tags.llmGateway is true on the truefoundry chart, because the parent chart default uses http://{{ .Release.Name }}-tfy-proxy:8080.Gateway plane (tfy-llm-gateway chart)
Use this when deploying the gateway as its own Helm release (gateway plane only) or when overriding the tfy-llm-gateway subchart under the parent truefoundry chart.Enable proxy TLS and ingress passthrough
truefoundry-values.yaml for tfy-llm-gateway):truefoundry (tags.llmGateway: true) — nest under tfy-llm-gateway::Configure environment variables for startup
env based on whether the control-plane proxy has in-pod TLS enabled.When global.proxy.tls.enabled is true on the control plane (same cluster), set CONTROL_PLANE_URL to the public control-plane URL. Do not use http://<release>-tfy-proxy:8080 — that port expects HTTPS:controlPlaneURL uses a private or mkcert-signed certificate.When control-plane proxy TLS is disabled (default), you can use the internal proxy URL for CONTROL_PLANE_URL if the gateway and control plane share a release:truefoundry with your Helm release name if different. SERVICEFOUNDRY_SERVER_URL is used to fetch NATS credentials (/v1/x/llm-gateway/nats-creds); pointing it at servicefoundry-server avoids TLS issues on the proxy port.Verify the gateway
unable to verify the first certificate when fetching NATS credentials, see the custom CA section or the internal HTTP env overrides above.proxy.tls on the gateway sidecar secures traffic into the gateway pod from clients. On the control plane, global.proxy.tls makes port 8080 HTTPS on tfy-proxy. Gateway pods must use CONTROL_PLANE_URL: "{{ .Values.global.controlPlaneURL }}" (plus global.customCA for private CAs), or call servicefoundry-server / tfy-nats directly over HTTP — not http://...-tfy-proxy:8080.How to enable and access control plane monitoring (Grafana)?
How to enable and access control plane monitoring (Grafana)?
truefoundry-values.yaml:- Replace
<your-truefoundry-control-plane-url>with your actual control plane domain (e.g.,app.example.com) and<tenant-name>with your TrueFoundry tenant name provided during onboarding. - Only users with the admin role can access this endpoint.
- Make sure to include the trailing
/at the end of the URL. - If you already have Prometheus or VictoriaLogs in your cluster, you can point the monitoring stack to them using
externalServicesinstead of installing new instances.
How do you add default metadata to all requests passing via the gateway?
How do you add default metadata to all requests passing via the gateway?
DEFAULT_GATEWAY_METADATA environment variable on the gateway. The value should be a JSON string of key-value pairs.Add the following to your gateway configuration in values file of the gateway plane:How to expose additional metadata as Prometheus labels for gateway metrics?
How to expose additional metadata as Prometheus labels for gateway metrics?
customer_id, request_type, environment), set the LLM_GATEWAY_METADATA_LOGGING_KEYS environment variable on the gateway. The value is a JSON-encoded array of metadata keys.Each key listed here is exposed as a Prometheus label prefixed with ai_gateway_metadata_* — for example, customer_id becomes the label ai_gateway_metadata_customer_id. You can then use these labels for granular filtering and aggregation in Grafana.Add the following to your gateway configuration in values file of the gateway plane:ai_gateway_metadata_customer_id and ai_gateway_metadata_request_type labels.How to use HTTPRoute to route traffic using Kubernetes Gateway API?
How to use HTTPRoute to route traffic using Kubernetes Gateway API?
Ingress resources. Use HTTPRoute when your cluster uses a Gateway API-compatible controller (e.g. Envoy Gateway, Istio, NGINX Gateway Fabric, GKE Gateway).Control plane (truefoundry chart)Add the following to your truefoundry-values.yaml, setting parentRefs to point to your existing Gateway:- Only one routing method should be enabled at a time. Disable
global.ingress.enabledandglobal.virtualservice.enabledwhen usinghttpRoute. - The
sectionNamemust match a named listener on yourGatewayresource. Omit it if your Gateway has a single unnamed listener. - TLS termination is handled by the parent
Gateway— no TLS configuration is needed on theHTTPRouteitself.
How to restrict AWS S3 permissions to a minimal set?
How to restrict AWS S3 permissions to a minimal set?
s3:* for the S3 bucket IAM policy for simplicity. If your organization requires a least-privilege approach, you can replace s3:* with the following minimal set of permissions:How to configure security context for TrueFoundry components?
How to configure security context for TrueFoundry components?
runAsNonRoot: true), use a read-only root filesystem (readOnlyRootFilesystem: true), and drop all privileges (capabilities.drop: [ALL]).However, NATS (used internally for messaging) does not have these defaults applied automatically. If your cluster enforces Pod Security Standards (e.g. restricted profile) or you want a consistent security posture across all components, you need to explicitly add the security context for NATS by adding the following to your truefoundry-values.yaml:container.merge and podTemplate.merge) compared to other TrueFoundry components. This is because NATS uses its own Helm chart conventions for overriding pod and container specs.How to enable Network Policies for Control Plane?
How to enable Network Policies for Control Plane?
- Network policies are optional and shipped inside the
truefoundryHelm chart. They apply only to the release namespace.
Prerequisites
Your cluster CNI must enforceNetworkPolicy objects. Creating policies in the API is not enough.| Platform | Requirement |
|---|---|
| Amazon EKS | VPC CNI add-on with enableNetworkPolicy: "true" (v1.14.0+), or Calico/Cilium |
| GKE | Cluster network policy enabled (Calico) |
| AKS | Azure CNI with a policy-capable engine (Calico or Cilium) |
| OpenShift (OCP) | 4.5+ with OpenShift SDN, or 4.8+ with OVN-Kubernetes (default CNI from 4.12+); both enforce NetworkPolicy without an extra policy CNI |
| Generic | Any CNI that enforces NetworkPolicy (e.g. Calico, Cilium, Weave Net); vanilla clusters without a policy-capable CNI need one installed |
oc get network.config cluster -o jsonpath='{.spec.networkType}{"\n"}'. Clusters on OCP 4.5–4.11 typically report OpenShiftSDN; new installs on OCP 4.12+ default to OVNKubernetes (available as an option from 4.8). See About network policy (OpenShift).Policies created
WhennetworkPolicy.enabled: true, the chart creates up to four NetworkPolicy objects:| Policy | Purpose |
|---|---|
default-deny-ingress | Block all ingress into control-plane pods |
allow-all-egress | Allow all egress from control-plane pods |
intra-instance | Allow ingress between pods with app.kubernetes.io/instance: <release-name> |
ingress-external | Allow ingress from namespaces listed in allowedIngressFrom (only when that list is non-empty) |
Add network policy settings to your Helm values
truefoundry-values.yaml. Replace namespace names with the ones used in your cluster.Minimal enable (in-release traffic only — no Prometheus or ingress from other namespaces yet):allowedIngressFrom entry requires namespace. Omit podSelector to allow all pods in that namespace; set podSelector to allow only matching pods (recommended for ingress controllers).ingress-external policy. In-namespace microservice traffic uses the label app.kubernetes.io/instance: <helm-release-name> (for example app.kubernetes.io/instance: truefoundry).Verify NetworkPolicies are applied
allowedIngressFrom is empty, or four when cross-namespace sources are configured.Validate connectivity
- Control plane UI loads via ingress
- Prometheus scrape targets for control-plane services are UP
- Pods in the same Helm release can reach each other
- External dependencies still work (RDS, S3, cloud APIs) — egress is allow-all by default
Troubleshooting
| Symptom | Likely cause | Fix |
|---|---|---|
| Prometheus targets down | Monitoring namespace not in allowedIngressFrom | Add your Prometheus namespace (e.g. tfy-prometheus) |
| Ingress 502 / timeout | Ingress namespace not allowed or wrong podSelector | Add ingress namespace with labels matching your controller |
| Policies exist but no effect | CNI does not enforce NetworkPolicy | Enable enforcement on your cluster (EKS: enableNetworkPolicy on vpc-cni) |
| Pods cannot reach each other | Wrong or missing app.kubernetes.io/instance label | Verify pod labels match Helm release name |
Why are global tolerations and affinity not applied to NATS pods?
Why are global tolerations and affinity not applied to NATS pods?
global.tolerations value in the truefoundry Helm chart is applied to all TrueFoundry components (servicefoundry server, mlfoundry server, tfy-proxy, etc.). However, NATS is deployed via the upstream NATS Helm chart as a subchart, which does not read global.tolerations. So if you have set global tolerations to schedule the control plane on tainted nodes, the NATS pods will not get them and may remain in Pending state.The same applies to affinity and nodeSelector — global.affinity is not passed to the NATS subchart either, so NATS pods get an empty affinity/nodeSelector by default and will not follow the node-affinity rules used by the rest of the control plane.Set tolerations, affinity, and nodeSelector explicitly under tfyNats using the NATS chart’s podTemplate.patch (a JSON Patch) in your truefoundry-values.yaml:Why are volumes (PVCs) stuck in Pending state?
Why are volumes (PVCs) stuck in Pending state?
devMode is enabled) without specifying a storage class. These PVCs rely on the cluster having a default StorageClass. If no default is set, the PVCs stay in Pending state and the corresponding pods (e.g., truefoundry-tfy-nats-0) never start.1. Check the PVC status and events:no storage class is set or waiting for a volume to be created, the cluster is missing a default storage class or a provisioner.2. Check if a default storage class exists:(default). If none is, mark one as default:- On AWS EKS, ensure the EBS CSI driver addon is installed — without it, PVCs will not be provisioned even if a storage class exists.
- On GKE and AKS, a default storage class is usually present out of the box.
- Only block storage with
ReadWriteOnceaccess is required — see Do we need any NFS volumes?
Pending PVCs and their pods so they get recreated with the default storage class:How to deploy on OpenShift with restricted Security Context Constraints (SCC)?
How to deploy on OpenShift with restricted Security Context Constraints (SCC)?
podSecurityContext and securityContext values (such as runAsUser, runAsNonRoot, fsGroup, etc.) on its components, which conflicts with the restricted or restricted-v2 SCC.To resolve this, disable both pod-level and container-level security contexts for all components by adding the following overrides to your truefoundry-values.yaml:enabled: false removes all explicit security context fields from the pod and container specs, allowing OpenShift’s SCC admission controller to assign user and group IDs as needed.How to install Vector for log collection on OpenShift (OCP)?
How to install Vector for log collection on OpenShift (OCP)?
tfy-logs chart ships Vector as a DaemonSet that tails container logs from each node’s host filesystem and ships them to VictoriaLogs. Vector writes its checkpoint/snapshot state (the record of how far it has read in each log file) to a hostPath data directory on the node. The chart default points to a host directory that is not writable on RHCOS, so Vector cannot persist its checkpoints and the pod fails to start or restarts without retaining read positions. You must point this at a writable location on the node.On RHCOS the writable, persistent location is under /var/home/core (other paths such as /var/lib are managed and read-only for containers). Set persistence.hostPath.path to a writable directory there, for example /var/home/core/data/vector. If you mirror images into a private registry (common in air-gapped OpenShift clusters), also override the registry for victoria-logs-single and Vector — see Can I use my Artifactory as a mirror to pull images?.Because Vector runs as a DaemonSet that mounts the node’s host filesystem (hostPath) to read container logs, its service account must be granted the privileged SCC. Without this, OpenShift’s SCC admission controller blocks the pods and the DaemonSet will not start. Grant the SCC to the tfy-logs-vector service account in the tfy-logs namespace:container_t) cannot read the host log files under /var/log. Set the pod’s SELinux type to spc_t (super-privileged container) so Vector is allowed to read them — otherwise the pod runs but collects no logs (permission denied).How to deploy the control plane on AWS EKS with CloudWatch Observability addon installed?
How to deploy the control plane on AWS EKS with CloudWatch Observability addon installed?
PYTHONPATH that conflict with truefoundry-mlfoundry-server dependencies, causing the pod to enter CrashLoopBackOff. You may see errors like:truefoundry namespace from the addon’s auto-instrumentation by updating the addon configuration:How to enable the stdio MCP proxy?
How to enable the stdio MCP proxy?
truefoundry-values.yaml:truefoundry-tfy-proxy deployment as well