> ## Documentation Index
> Fetch the complete documentation index at: https://www.truefoundry.com/llms.txt
> Use this file to discover all available pages before exploring further.
# SAML with Rippling
> Configure SAML 2.0 single sign-on between TrueFoundry and Rippling using a Rippling Custom App.
This guide walks you through setting up SAML 2.0 single sign-on between TrueFoundry and **Rippling**. Once finished, members of your Rippling workforce can sign in to TrueFoundry through a **Login with Rippling** button.
Rippling does not have a pre-built TrueFoundry tile in its app catalogue, so this guide creates a **Custom App** of type **Single Sign-On (SAML)**.
## Prerequisites
* A TrueFoundry tenant with **Admin** access to **Settings → Security & Access → SSO**.
* A Rippling account with the **IT Admin** role (or higher) so you can create custom apps under **IT Management**.
Keep two tabs open side by side: the Rippling admin dashboard and **TrueFoundry → Settings → Security & Access → SSO**. You will copy SP metadata, an SSO URL, and a certificate between them.
## Configuration overview
Save a SAML SSO configuration in TrueFoundry to surface the **Assertion Consumer Service URL**, **Service Provider Entity ID**, and **Relay URL**.
Add a new **Single Sign-On (SAML)** custom app and configure its service provider settings.
Tweak the Advanced SAML Settings and add user attributes.
Copy the IdP SSO URL and signing certificate into TrueFoundry, then test.
## Step 1 — Create the SSO configuration in TrueFoundry
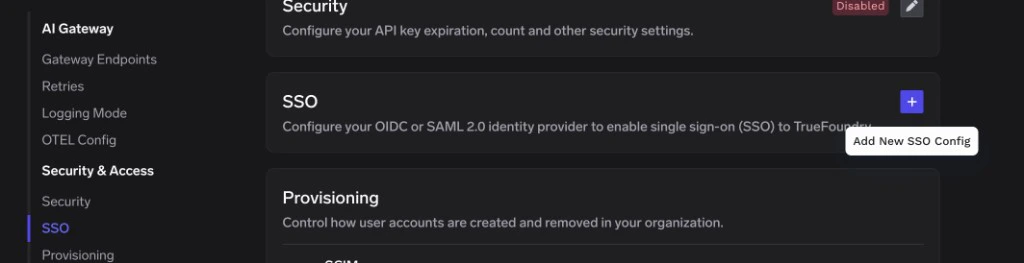
Go to **Settings → Security & Access → SSO**.
Click the **+** icon labeled **Add New SSO Config**.
 * **Enabled**: turn this on.
* **Name**: a lowercase alphanumeric label — for example, `rippleingsaml`.
* **SSO Provider**: choose **Custom**.
* **Authentication Configuration**: select **SAML v2**.
Leave **Identity Provider Endpoint** and **X.509 Certificate** blank for now — you'll fill them in once Rippling surfaces those values.
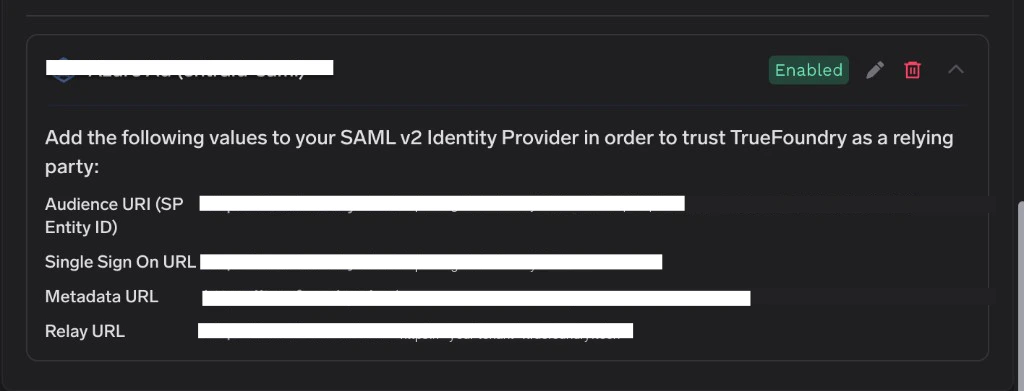
Click **Save**. TrueFoundry displays the values you need for Rippling on the SSO configuration card:
| Rippling field | Value from TrueFoundry |
| ----------------------------------------- | ------------------------------- |
| **Assertion Consumer Service URL** | **Single Sign On URL** |
| **Service Provider Entity ID** (Audience) | **Audience URI (SP Entity ID)** |
| **Relay State** *(if used)* | **Relay URL** |
* **Enabled**: turn this on.
* **Name**: a lowercase alphanumeric label — for example, `rippleingsaml`.
* **SSO Provider**: choose **Custom**.
* **Authentication Configuration**: select **SAML v2**.
Leave **Identity Provider Endpoint** and **X.509 Certificate** blank for now — you'll fill them in once Rippling surfaces those values.
Click **Save**. TrueFoundry displays the values you need for Rippling on the SSO configuration card:
| Rippling field | Value from TrueFoundry |
| ----------------------------------------- | ------------------------------- |
| **Assertion Consumer Service URL** | **Single Sign On URL** |
| **Service Provider Entity ID** (Audience) | **Audience URI (SP Entity ID)** |
| **Relay State** *(if used)* | **Relay URL** |
 ## Step 2 — Create a Custom App in Rippling
Sign in to the [Rippling dashboard](https://app.rippling.com/) as an administrator. In the left navigation, expand **IT Management** and select **Custom App** (sometimes labelled **Custom Integration**).
Click **Create New App**. On the **Create new integration** screen:
1. Enter an **App Name** — for example, `TrueFoundry`.
2. Pick a **Category** (e.g. *Developer Tools*).
3. Upload a logo (optional, used for the Rippling launcher tile).
4. For **What type of app would you like to create?**, select **Single Sign-On (SAML)**.
Click **Continue**. On the **Select Installer** screen, confirm that you are the admin installing the app and click **Continue**.
On the **SSO Setup Instructions** screen, scroll to the **Service Provider** section and paste in the values from TrueFoundry:
| Rippling field | Paste this value from TrueFoundry |
| ----------------------------------------- | --------------------------------- |
| **Assertion Consumer Service URL** | **Single Sign On URL** |
| **Service Provider Entity ID** (Audience) | **Audience URI (SP Entity ID)** |
Click **Move To Next Step** and accept the defaults on **SSO App Access Rules**, **SSO Provision Time**, **SSO for admin**, and **Group Attributes**. On **Verify SSO Integration**, click **Continue** — you will run the actual test later from TrueFoundry. On **Finished**, click **Visit the app**.
## Step 3 — Disable InResponseTo and map attributes
On the app page, select the **Settings** tab. In the left sub-navigation, choose **Advanced SAML Settings** and click **Edit**.
Check the box labelled **Disable 'InResponseTo' field in assertions for IdP initiated SSO** and click **Save**.
This step is **required** when integrating Rippling with TrueFoundry. Rippling injects dummy `InResponseTo` values in IdP-initiated SAML responses. If this option is not checked, TrueFoundry will reject the assertion with an **InResponseTo validation failed** error and users will not be able to sign in from the Rippling launcher.
Still on the **Settings** tab, open the **SAML Attributes** sub-tab and click **Create new**. For each entry below, choose **Global attribute** and fill the **Global attribute name** and **Value** fields:
| Global attribute name | Value |
| --------------------- | ----------------------- |
| `email` | User's email address |
| `sub` | User's Rippling ID |
| `firstName` | User's Legal first name |
| `lastName` | User's Legal last name |
## Step 4 — Paste Rippling's values back into TrueFoundry
Rippling exposes its IdP details on the same **SSO Setup Instructions** screen you saw in Step 2. The simplest path is to copy the **IdP Metadata URL**; if your environment cannot fetch external metadata, open the URL in a browser to view the metadata XML and pull values directly from it.
On the app page, scroll back to **SSO Setup Instructions** (or **IdP Setup Instructions**). You need two pieces of information:
* **IdP SSO URL** — also called **Single Sign-On URL** or **Login URL**. This is the `Location` of the `SingleSignOnService` element in the IdP metadata.
* **X.509 Signing Certificate** — the certificate Rippling uses to sign assertions. This is the `X509Certificate` element under `KeyDescriptor use="signing"` in the metadata.
If Rippling only surfaces an **IdP Metadata URL**, open it in your browser and copy the two values directly from the XML. Wrap the certificate body with `-----BEGIN CERTIFICATE-----` / `-----END CERTIFICATE-----` lines to produce a valid PEM.
Return to **Settings → Security & Access → SSO** in TrueFoundry and edit the SSO configuration you created in Step 1. Set:
* **Identity Provider Endpoint** → the IdP SSO URL from Rippling.
* **X.509 Certificate** → the full PEM body of the signing certificate (including the `-----BEGIN CERTIFICATE-----` and `-----END CERTIFICATE-----` lines).
Click **Save**.
Expand **Show advanced fields** to set:
* **Button Text** — for example, `Login with Rippling`.
* **Button Image URL** — a public URL to your Rippling or corporate logo.
* **Email Claim** → `email`
* **Unique ID Claim** → leave blank to use the SAML `NameID` (which Rippling defaults to the user's email).
## Step 5 — Assign users in Rippling
Rippling controls who can sign in via the app's **Groups** assignment.
On the custom app page, switch to the **Groups** tab.
Add the Rippling **Groups** (such as `All Employees` or `Engineering`) that should be able to sign in to TrueFoundry. Save.
Users see the new TrueFoundry tile in their Rippling launcher within a few minutes of being assigned.
## Step 6 — Test single sign-on
1. Open a private/incognito window and go to your TrueFoundry login page.
2. Click **Login with Rippling** (or the button label you chose).
3. Authenticate with a Rippling user that is assigned to the TrueFoundry app.
You can also test IdP-initiated sign-in by clicking the TrueFoundry tile from the Rippling launcher.
If sign-in succeeds you will land in the TrueFoundry dashboard. The user is created automatically when [JIT provisioning](/docs/platform/user-management#user-provisioning) is enabled; otherwise they must already exist in TrueFoundry or be invited first.
## Troubleshooting
Rippling is still sending dummy `InResponseTo` values. Return to the app's **Settings → Advanced SAML Settings**, click **Edit**, and confirm the **Disable 'InResponseTo' field in assertions for IdP initiated SSO** checkbox is checked. Save and retry — SP-initiated sign-in from the TrueFoundry login page is unaffected, but IdP-initiated launches from Rippling require this toggle.
Rippling is not sending an `email` attribute. Go to **Settings → SAML Attributes** on the custom app, add a **Global attribute** with name `email` and value **User's email address**, and save. Then expand **Show advanced fields** in the TrueFoundry SSO form and set **Email Claim** to `email`.
The certificate copied into TrueFoundry no longer matches the Rippling signing certificate — typically after a Rippling certificate rollover. Re-open the **IdP Metadata URL** in a browser, copy the latest `X509Certificate` value, wrap it with PEM headers, and paste it into TrueFoundry's **X.509 Certificate** field.
The user is not in any of the **Groups** assigned to the custom app. Open the app's **Groups** tab in Rippling and add the appropriate group (such as `All Employees`).
The **Service Provider Entity ID** (Audience) in Rippling does not match TrueFoundry's **Audience URI (SP Entity ID)**. Go back to **SSO Setup Instructions** in Rippling and confirm the Audience matches the TrueFoundry value exactly — it is case-sensitive and must not contain trailing whitespace.
## Step 2 — Create a Custom App in Rippling
Sign in to the [Rippling dashboard](https://app.rippling.com/) as an administrator. In the left navigation, expand **IT Management** and select **Custom App** (sometimes labelled **Custom Integration**).
Click **Create New App**. On the **Create new integration** screen:
1. Enter an **App Name** — for example, `TrueFoundry`.
2. Pick a **Category** (e.g. *Developer Tools*).
3. Upload a logo (optional, used for the Rippling launcher tile).
4. For **What type of app would you like to create?**, select **Single Sign-On (SAML)**.
Click **Continue**. On the **Select Installer** screen, confirm that you are the admin installing the app and click **Continue**.
On the **SSO Setup Instructions** screen, scroll to the **Service Provider** section and paste in the values from TrueFoundry:
| Rippling field | Paste this value from TrueFoundry |
| ----------------------------------------- | --------------------------------- |
| **Assertion Consumer Service URL** | **Single Sign On URL** |
| **Service Provider Entity ID** (Audience) | **Audience URI (SP Entity ID)** |
Click **Move To Next Step** and accept the defaults on **SSO App Access Rules**, **SSO Provision Time**, **SSO for admin**, and **Group Attributes**. On **Verify SSO Integration**, click **Continue** — you will run the actual test later from TrueFoundry. On **Finished**, click **Visit the app**.
## Step 3 — Disable InResponseTo and map attributes
On the app page, select the **Settings** tab. In the left sub-navigation, choose **Advanced SAML Settings** and click **Edit**.
Check the box labelled **Disable 'InResponseTo' field in assertions for IdP initiated SSO** and click **Save**.
This step is **required** when integrating Rippling with TrueFoundry. Rippling injects dummy `InResponseTo` values in IdP-initiated SAML responses. If this option is not checked, TrueFoundry will reject the assertion with an **InResponseTo validation failed** error and users will not be able to sign in from the Rippling launcher.
Still on the **Settings** tab, open the **SAML Attributes** sub-tab and click **Create new**. For each entry below, choose **Global attribute** and fill the **Global attribute name** and **Value** fields:
| Global attribute name | Value |
| --------------------- | ----------------------- |
| `email` | User's email address |
| `sub` | User's Rippling ID |
| `firstName` | User's Legal first name |
| `lastName` | User's Legal last name |
## Step 4 — Paste Rippling's values back into TrueFoundry
Rippling exposes its IdP details on the same **SSO Setup Instructions** screen you saw in Step 2. The simplest path is to copy the **IdP Metadata URL**; if your environment cannot fetch external metadata, open the URL in a browser to view the metadata XML and pull values directly from it.
On the app page, scroll back to **SSO Setup Instructions** (or **IdP Setup Instructions**). You need two pieces of information:
* **IdP SSO URL** — also called **Single Sign-On URL** or **Login URL**. This is the `Location` of the `SingleSignOnService` element in the IdP metadata.
* **X.509 Signing Certificate** — the certificate Rippling uses to sign assertions. This is the `X509Certificate` element under `KeyDescriptor use="signing"` in the metadata.
If Rippling only surfaces an **IdP Metadata URL**, open it in your browser and copy the two values directly from the XML. Wrap the certificate body with `-----BEGIN CERTIFICATE-----` / `-----END CERTIFICATE-----` lines to produce a valid PEM.
Return to **Settings → Security & Access → SSO** in TrueFoundry and edit the SSO configuration you created in Step 1. Set:
* **Identity Provider Endpoint** → the IdP SSO URL from Rippling.
* **X.509 Certificate** → the full PEM body of the signing certificate (including the `-----BEGIN CERTIFICATE-----` and `-----END CERTIFICATE-----` lines).
Click **Save**.
Expand **Show advanced fields** to set:
* **Button Text** — for example, `Login with Rippling`.
* **Button Image URL** — a public URL to your Rippling or corporate logo.
* **Email Claim** → `email`
* **Unique ID Claim** → leave blank to use the SAML `NameID` (which Rippling defaults to the user's email).
## Step 5 — Assign users in Rippling
Rippling controls who can sign in via the app's **Groups** assignment.
On the custom app page, switch to the **Groups** tab.
Add the Rippling **Groups** (such as `All Employees` or `Engineering`) that should be able to sign in to TrueFoundry. Save.
Users see the new TrueFoundry tile in their Rippling launcher within a few minutes of being assigned.
## Step 6 — Test single sign-on
1. Open a private/incognito window and go to your TrueFoundry login page.
2. Click **Login with Rippling** (or the button label you chose).
3. Authenticate with a Rippling user that is assigned to the TrueFoundry app.
You can also test IdP-initiated sign-in by clicking the TrueFoundry tile from the Rippling launcher.
If sign-in succeeds you will land in the TrueFoundry dashboard. The user is created automatically when [JIT provisioning](/docs/platform/user-management#user-provisioning) is enabled; otherwise they must already exist in TrueFoundry or be invited first.
## Troubleshooting
Rippling is still sending dummy `InResponseTo` values. Return to the app's **Settings → Advanced SAML Settings**, click **Edit**, and confirm the **Disable 'InResponseTo' field in assertions for IdP initiated SSO** checkbox is checked. Save and retry — SP-initiated sign-in from the TrueFoundry login page is unaffected, but IdP-initiated launches from Rippling require this toggle.
Rippling is not sending an `email` attribute. Go to **Settings → SAML Attributes** on the custom app, add a **Global attribute** with name `email` and value **User's email address**, and save. Then expand **Show advanced fields** in the TrueFoundry SSO form and set **Email Claim** to `email`.
The certificate copied into TrueFoundry no longer matches the Rippling signing certificate — typically after a Rippling certificate rollover. Re-open the **IdP Metadata URL** in a browser, copy the latest `X509Certificate` value, wrap it with PEM headers, and paste it into TrueFoundry's **X.509 Certificate** field.
The user is not in any of the **Groups** assigned to the custom app. Open the app's **Groups** tab in Rippling and add the appropriate group (such as `All Employees`).
The **Service Provider Entity ID** (Audience) in Rippling does not match TrueFoundry's **Audience URI (SP Entity ID)**. Go back to **SSO Setup Instructions** in Rippling and confirm the Audience matches the TrueFoundry value exactly — it is case-sensitive and must not contain trailing whitespace.