> ## Documentation Index
> Fetch the complete documentation index at: https://www.truefoundry.com/llms.txt
> Use this file to discover all available pages before exploring further.
# SAML with PingOne
> Configure SAML 2.0 single sign-on between TrueFoundry and Ping Identity, covering both PingOne (cloud) and PingFederate (hybrid/on-prem).
This guide walks you through setting up SAML 2.0 single sign-on between TrueFoundry and **Ping Identity**. The cloud-hosted **PingOne** flow is the primary path; if you are running **PingFederate** instead, the steps are nearly identical and the differences are called out inline.
Once finished, users in your Ping directory can sign in to TrueFoundry through a **Login with PingOne** button.
## Prerequisites
* A TrueFoundry tenant with **Admin** access to **Settings → Security & Access → SSO**.
* A Ping environment with permission to create applications:
* **PingOne** — Identity Admin (or higher) in the PingOne admin console.
* **PingFederate** — administrator access to the PingFederate admin console.
Keep two browser tabs open side by side: the Ping admin console and **TrueFoundry → Settings → Security & Access → SSO**. You will copy a handful of URLs and a certificate between them.
## Configuration overview
Save a SAML SSO configuration in TrueFoundry to surface the **ACS URL**, **Entity ID**, and **Relay URL**.
Add a new SAML application and paste TrueFoundry's values into it.
Set `saml_subject` to the user's email and grab Ping's signing certificate.
Copy the Single Sign-On Service URL and signing certificate into TrueFoundry, then test.
## Step 1 — Create the SSO configuration in TrueFoundry
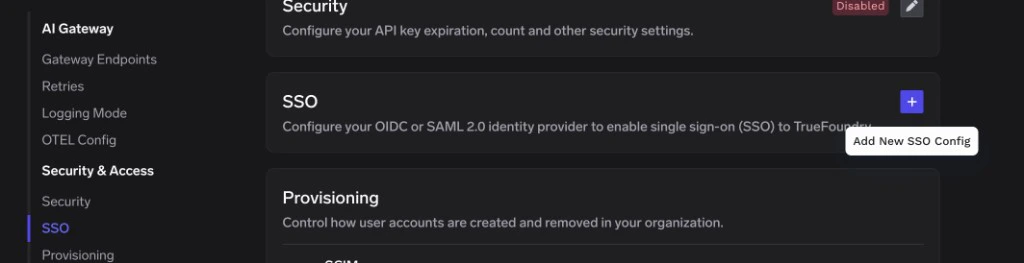
Go to **Settings → Security & Access → SSO**.
Click the **+** icon labeled **Add New SSO Config**.
 * **Enabled**: turn this on.
* **Name**: a lowercase alphanumeric label — for example, `pingonesaml`.
* **SSO Provider**: choose **Custom**.
* **Authentication Configuration**: select **SAML v2**.
Leave **Identity Provider Endpoint** and **X.509 Certificate** blank for now — you'll fill them in once Ping surfaces those values.
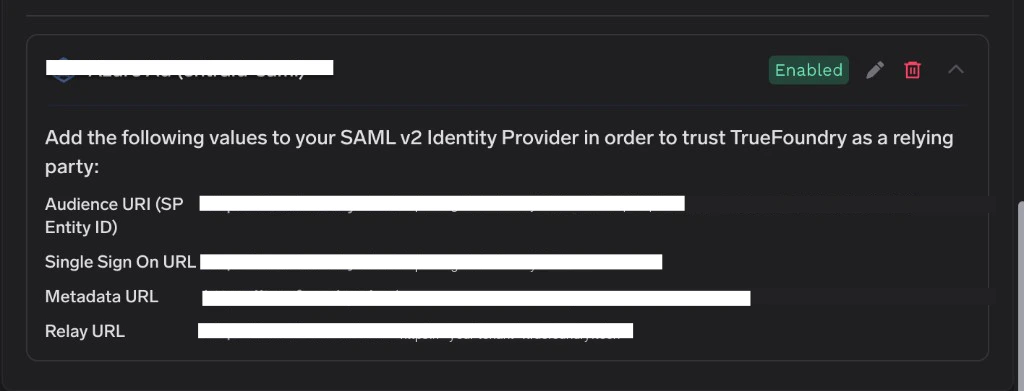
Click **Save**. TrueFoundry displays the values you need for Ping on the SSO configuration card:
| Ping field | Value from TrueFoundry |
| --------------------------------------- | ------------------------------- |
| **ACS URLs** / **Endpoint URL** | **Single Sign On URL** |
| **Entity ID** / **Partner's Entity ID** | **Audience URI (SP Entity ID)** |
| **Relay State** *(if used)* | **Relay URL** |
* **Enabled**: turn this on.
* **Name**: a lowercase alphanumeric label — for example, `pingonesaml`.
* **SSO Provider**: choose **Custom**.
* **Authentication Configuration**: select **SAML v2**.
Leave **Identity Provider Endpoint** and **X.509 Certificate** blank for now — you'll fill them in once Ping surfaces those values.
Click **Save**. TrueFoundry displays the values you need for Ping on the SSO configuration card:
| Ping field | Value from TrueFoundry |
| --------------------------------------- | ------------------------------- |
| **ACS URLs** / **Endpoint URL** | **Single Sign On URL** |
| **Entity ID** / **Partner's Entity ID** | **Audience URI (SP Entity ID)** |
| **Relay State** *(if used)* | **Relay URL** |
 ## Step 2 — Create the SAML application in Ping
Sign in to the [PingOne admin console](https://console.pingone.com/) as an administrator. In the left navigation, expand **Connections** and select **Applications**.
Click the **+** button at the top of the **Applications** list.
1. Enter an **Application Name** — for example, `TrueFoundry`.
2. Optionally add a description and upload an icon.
3. Choose **SAML Application** as the **Application Type**.
4. Click **Configure**.
On the **SAML Configuration** screen, select **Manually Enter** and fill the two fields with the values from TrueFoundry:
| PingOne field | Paste this value from TrueFoundry |
| ------------- | --------------------------------- |
| **ACS URLs** | **Single Sign On URL** |
| **Entity ID** | **Audience URI (SP Entity ID)** |
Click **Save**.
Sign in to the PingFederate administrative console. In the top navigation, select **Applications → SP Connections**, then click **Create Connection**.
* On **Connection Template**, select **Do not use a template for this connection** and click **Next**.
* On **Connection Type**, select **Browser SSO Profiles** with the **SAML 2.0** protocol and click **Next**.
* On **Connection Options**, select only **Browser SSO** and click **Next**.
* On **Import Metadata**, select **None** and click **Next**.
On **General Info**, paste TrueFoundry's **Audience URI (SP Entity ID)** into **Partner's Entity ID (Connection ID)** and enter a descriptive **Connection Name** such as `TrueFoundry`. Click **Next**.
Open **Browser SSO → Configure Browser SSO**:
* On **SAML Profiles**, select **SP-initiated SSO**.
* On **Assertion Lifetime**, accept the defaults or set a value appropriate for your policy.
* On **Protocol Settings → Assertion Consumer Service URL**, select a **Binding** of **POST**, paste TrueFoundry's **Single Sign On URL** into the **Endpoint URL** field, and click **Add**.
* On **Allowable SAML Bindings**, check at least **POST** and **REDIRECT**.
* On **Signature Policy**, select **Always Sign Assertion**.
* On **Encryption Policy**, select **None**.
Complete the wizard back to the connection summary.
## Step 3 — Map attributes and download the signing certificate
On the application's detail page, switch to the **Attribute Mappings** tab and click the pencil icon to edit.
Locate the row where **Attributes** is `saml_subject` and change the corresponding **PingOne Mappings** value to **Email Address**. This becomes the SAML `NameID` and is how TrueFoundry matches the SSO user to an account.
Optionally add additional mappings for richer user data:
| Application attribute | PingOne attribute |
| --------------------- | ----------------- |
| `email` | Email Address |
| `sub` | User ID |
| `firstName` | Given Name |
| `lastName` | Family Name |
Click **Save**.
Switch to the **Configuration** tab. Click **Download Signing Certificate** and choose **X509 PEM (.crt)**. Keep the file handy — you will paste its contents into TrueFoundry in the next step.
Still on the **Configuration** tab, copy these two values:
* **Issuer ID** — this is Ping's SAML Entity ID.
* **Single Signon Service** — this is the URL TrueFoundry will redirect users to.
At the top-right of the application page, flip the toggle from **off** to **on**.
PingOne applications are created in the disabled state. If you forget this toggle, users will see a generic Ping error page and never reach TrueFoundry.
From the connection's **Assertion Creation** screen:
* On **Identity Mapping**, select **Standard**.
* On **Attribute Contract**, ensure the SAML subject is delivered as the user's email. Extend the contract with `email`, `firstName`, and `lastName` (all `urn:oasis:names:tc:SAML:2.0:attrname-format:basic`) if you want richer attributes.
* On **Authentication Source Mapping**, map these attributes to your authentication policy or LDAP attributes.
Open **Credentials → Configure Credentials → Digital Signature Settings**, select a signing certificate, and pick the **RSA SHA256** signing algorithm. Save and activate the connection.
Back on **SP Connections**, locate your new connection, click **Select Action**, and choose **Export Metadata**. Open the downloaded XML file and extract two values:
* The `Location` of the `SingleSignOnService` element with `Binding="HTTP-Redirect"` — this is your **Identity Provider Endpoint**.
* The contents of the `X509Certificate` element under `KeyDescriptor use="signing"` — wrap it with `-----BEGIN CERTIFICATE-----` and `-----END CERTIFICATE-----` lines to get a PEM-formatted certificate.
## Step 4 — Paste Ping's values back into TrueFoundry
Return to **Settings → Security & Access → SSO** in TrueFoundry and edit the SSO configuration you created in Step 1.
* **Identity Provider Endpoint** → the **Single Signon Service** URL from PingOne (or the `SingleSignOnService` location from the PingFederate metadata).
* **X.509 Certificate** → the full PEM body of the signing certificate (including the `-----BEGIN CERTIFICATE-----` and `-----END CERTIFICATE-----` lines).
Click **Save**.
Expand **Show advanced fields** to set:
* **Button Text** — for example, `Login with PingOne`.
* **Button Image URL** — a public URL to your Ping or corporate logo.
* **Email Claim** / **Unique ID Claim** — leave these at the defaults; the `saml_subject` mapping you set in Step 3 already places the user's email into the SAML `NameID`.
## Step 5 — Test single sign-on
1. Open a private/incognito window and go to your TrueFoundry login page.
2. Click **Login with PingOne** (or the button label you chose).
3. Authenticate with a Ping user that has been assigned to the SAML application.
If sign-in succeeds you will land in the TrueFoundry dashboard. The user is created automatically when [JIT provisioning](/docs/platform/user-management#user-provisioning) is enabled; otherwise they must already exist in TrueFoundry or be invited first.
Ping admins must still assign users (or groups of users) to the application before they can sign in. In PingOne, this is done from the application's **Access** tab.
## Troubleshooting
The PingOne application is still toggled **off**. Open the application in the PingOne admin console and flip the toggle in the top-right corner to **on**.
Ping is not sending the email as the SAML subject. On the application's **Attribute Mappings** tab (PingOne) or **Assertion Creation** screen (PingFederate), confirm `saml_subject` is mapped to **Email Address**. Without this, the SAML `NameID` will contain a random Ping user identifier instead of an email and TrueFoundry cannot match the user to an account.
The certificate copied into TrueFoundry doesn't match Ping's active signing certificate (commonly after a Ping certificate rotation). Re-download the **X509 PEM (.crt)** from PingOne (or re-export the metadata from PingFederate) and paste the full PEM into the **X.509 Certificate** field.
The users are authenticated in Ping but not assigned to the application. In the PingOne admin console, open the application's **Access** tab and add the appropriate **Groups** or **Users**. In PingFederate, ensure the authentication policy includes the user's directory.
Expand **Show advanced fields** on the TrueFoundry SSO form and set:
* **Email Claim** → `email` (PingOne default) or the attribute name you mapped in Ping.
* **Unique ID Claim** → leave blank to use the SAML `NameID` (recommended when `saml_subject` is set to the user's email).
## Step 2 — Create the SAML application in Ping
Sign in to the [PingOne admin console](https://console.pingone.com/) as an administrator. In the left navigation, expand **Connections** and select **Applications**.
Click the **+** button at the top of the **Applications** list.
1. Enter an **Application Name** — for example, `TrueFoundry`.
2. Optionally add a description and upload an icon.
3. Choose **SAML Application** as the **Application Type**.
4. Click **Configure**.
On the **SAML Configuration** screen, select **Manually Enter** and fill the two fields with the values from TrueFoundry:
| PingOne field | Paste this value from TrueFoundry |
| ------------- | --------------------------------- |
| **ACS URLs** | **Single Sign On URL** |
| **Entity ID** | **Audience URI (SP Entity ID)** |
Click **Save**.
Sign in to the PingFederate administrative console. In the top navigation, select **Applications → SP Connections**, then click **Create Connection**.
* On **Connection Template**, select **Do not use a template for this connection** and click **Next**.
* On **Connection Type**, select **Browser SSO Profiles** with the **SAML 2.0** protocol and click **Next**.
* On **Connection Options**, select only **Browser SSO** and click **Next**.
* On **Import Metadata**, select **None** and click **Next**.
On **General Info**, paste TrueFoundry's **Audience URI (SP Entity ID)** into **Partner's Entity ID (Connection ID)** and enter a descriptive **Connection Name** such as `TrueFoundry`. Click **Next**.
Open **Browser SSO → Configure Browser SSO**:
* On **SAML Profiles**, select **SP-initiated SSO**.
* On **Assertion Lifetime**, accept the defaults or set a value appropriate for your policy.
* On **Protocol Settings → Assertion Consumer Service URL**, select a **Binding** of **POST**, paste TrueFoundry's **Single Sign On URL** into the **Endpoint URL** field, and click **Add**.
* On **Allowable SAML Bindings**, check at least **POST** and **REDIRECT**.
* On **Signature Policy**, select **Always Sign Assertion**.
* On **Encryption Policy**, select **None**.
Complete the wizard back to the connection summary.
## Step 3 — Map attributes and download the signing certificate
On the application's detail page, switch to the **Attribute Mappings** tab and click the pencil icon to edit.
Locate the row where **Attributes** is `saml_subject` and change the corresponding **PingOne Mappings** value to **Email Address**. This becomes the SAML `NameID` and is how TrueFoundry matches the SSO user to an account.
Optionally add additional mappings for richer user data:
| Application attribute | PingOne attribute |
| --------------------- | ----------------- |
| `email` | Email Address |
| `sub` | User ID |
| `firstName` | Given Name |
| `lastName` | Family Name |
Click **Save**.
Switch to the **Configuration** tab. Click **Download Signing Certificate** and choose **X509 PEM (.crt)**. Keep the file handy — you will paste its contents into TrueFoundry in the next step.
Still on the **Configuration** tab, copy these two values:
* **Issuer ID** — this is Ping's SAML Entity ID.
* **Single Signon Service** — this is the URL TrueFoundry will redirect users to.
At the top-right of the application page, flip the toggle from **off** to **on**.
PingOne applications are created in the disabled state. If you forget this toggle, users will see a generic Ping error page and never reach TrueFoundry.
From the connection's **Assertion Creation** screen:
* On **Identity Mapping**, select **Standard**.
* On **Attribute Contract**, ensure the SAML subject is delivered as the user's email. Extend the contract with `email`, `firstName`, and `lastName` (all `urn:oasis:names:tc:SAML:2.0:attrname-format:basic`) if you want richer attributes.
* On **Authentication Source Mapping**, map these attributes to your authentication policy or LDAP attributes.
Open **Credentials → Configure Credentials → Digital Signature Settings**, select a signing certificate, and pick the **RSA SHA256** signing algorithm. Save and activate the connection.
Back on **SP Connections**, locate your new connection, click **Select Action**, and choose **Export Metadata**. Open the downloaded XML file and extract two values:
* The `Location` of the `SingleSignOnService` element with `Binding="HTTP-Redirect"` — this is your **Identity Provider Endpoint**.
* The contents of the `X509Certificate` element under `KeyDescriptor use="signing"` — wrap it with `-----BEGIN CERTIFICATE-----` and `-----END CERTIFICATE-----` lines to get a PEM-formatted certificate.
## Step 4 — Paste Ping's values back into TrueFoundry
Return to **Settings → Security & Access → SSO** in TrueFoundry and edit the SSO configuration you created in Step 1.
* **Identity Provider Endpoint** → the **Single Signon Service** URL from PingOne (or the `SingleSignOnService` location from the PingFederate metadata).
* **X.509 Certificate** → the full PEM body of the signing certificate (including the `-----BEGIN CERTIFICATE-----` and `-----END CERTIFICATE-----` lines).
Click **Save**.
Expand **Show advanced fields** to set:
* **Button Text** — for example, `Login with PingOne`.
* **Button Image URL** — a public URL to your Ping or corporate logo.
* **Email Claim** / **Unique ID Claim** — leave these at the defaults; the `saml_subject` mapping you set in Step 3 already places the user's email into the SAML `NameID`.
## Step 5 — Test single sign-on
1. Open a private/incognito window and go to your TrueFoundry login page.
2. Click **Login with PingOne** (or the button label you chose).
3. Authenticate with a Ping user that has been assigned to the SAML application.
If sign-in succeeds you will land in the TrueFoundry dashboard. The user is created automatically when [JIT provisioning](/docs/platform/user-management#user-provisioning) is enabled; otherwise they must already exist in TrueFoundry or be invited first.
Ping admins must still assign users (or groups of users) to the application before they can sign in. In PingOne, this is done from the application's **Access** tab.
## Troubleshooting
The PingOne application is still toggled **off**. Open the application in the PingOne admin console and flip the toggle in the top-right corner to **on**.
Ping is not sending the email as the SAML subject. On the application's **Attribute Mappings** tab (PingOne) or **Assertion Creation** screen (PingFederate), confirm `saml_subject` is mapped to **Email Address**. Without this, the SAML `NameID` will contain a random Ping user identifier instead of an email and TrueFoundry cannot match the user to an account.
The certificate copied into TrueFoundry doesn't match Ping's active signing certificate (commonly after a Ping certificate rotation). Re-download the **X509 PEM (.crt)** from PingOne (or re-export the metadata from PingFederate) and paste the full PEM into the **X.509 Certificate** field.
The users are authenticated in Ping but not assigned to the application. In the PingOne admin console, open the application's **Access** tab and add the appropriate **Groups** or **Users**. In PingFederate, ensure the authentication policy includes the user's directory.
Expand **Show advanced fields** on the TrueFoundry SSO form and set:
* **Email Claim** → `email` (PingOne default) or the attribute name you mapped in Ping.
* **Unique ID Claim** → leave blank to use the SAML `NameID` (recommended when `saml_subject` is set to the user's email).