> ## Documentation Index
> Fetch the complete documentation index at: https://www.truefoundry.com/llms.txt
> Use this file to discover all available pages before exploring further.
# SCIM with OneLogin
> Automatically provision users and push groups from OneLogin into TrueFoundry using SCIM 2.0.
This guide explains how to push users and groups from OneLogin into TrueFoundry automatically using SCIM 2.0. With SCIM enabled, assigning a user to your OneLogin SCIM app creates them in TrueFoundry; unassigning them deactivates the user. OneLogin roles can be projected into TrueFoundry teams via the `Set Groups` rule.
## Prerequisites
* Single sign-on between TrueFoundry and OneLogin is already configured. Follow [SAML with OneLogin](/docs/platform/sso/onelogin/saml) first.
* You have **Admin** access in both TrueFoundry and OneLogin.
* You're on TrueFoundry **v0.143** or higher. (On earlier versions, SCIM is configured directly inside the SSO form.)
OneLogin's SCIM provisioner is a **separate app** from the SAML SSO app — you don't reuse the SAML Custom Connector you created for sign-in. Both apps coexist in the same OneLogin account and reference the same set of users and roles.
## Step 1 — Generate the SCIM credentials in TrueFoundry
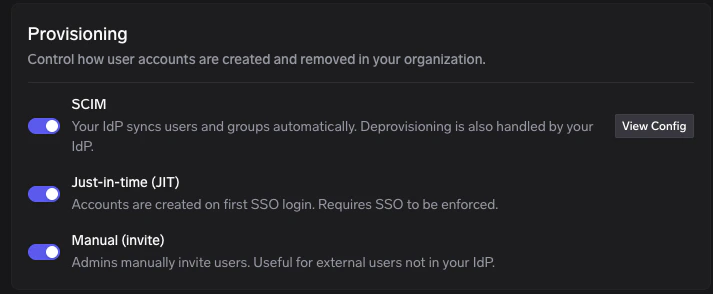
In TrueFoundry, go to **Settings → Security & Access → Provisioning** and turn on the **SCIM** toggle.
On the **Provisioning** page, click **View Config** on the **SCIM** row.
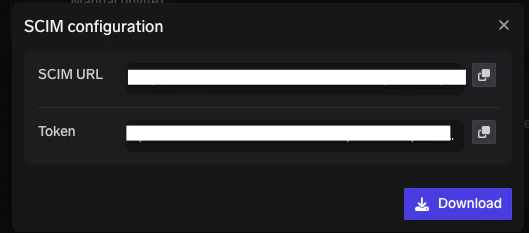
 In the **SCIM configuration** dialog, copy both values using the copy icons next to each field:
* **SCIM URL** — this is the value OneLogin calls the **SCIM Base URL**.
* **Token** — this is the value OneLogin calls the **SCIM Bearer Token**.
In the **SCIM configuration** dialog, copy both values using the copy icons next to each field:
* **SCIM URL** — this is the value OneLogin calls the **SCIM Base URL**.
* **Token** — this is the value OneLogin calls the **SCIM Bearer Token**.
 Store the token somewhere safe and treat it like a password. If you lose it, open **View Config** again to generate a new token — which invalidates the previous one.
## Step 2 — Create the SCIM app in OneLogin
In the OneLogin admin console, click **Applications → Applications**, then click **Add App** in the top right.
In the **Find Applications** search bar, type `SCIM`. From the list, choose **SCIM Provisioner with SAML (SCIM v2 Enterprise)**.
Even though you'll only use the SCIM half of this connector, OneLogin ships the SAML and SCIM components together. You can leave the SAML side of this app untouched — the actual sign-in flow is still handled by the SAML Custom Connector you set up in the [SAML guide](/docs/platform/sso/onelogin/saml).
Enter a **Display Name** such as `TrueFoundry SCIM` and click **Save**.
## Step 3 — Connect OneLogin to TrueFoundry's SCIM endpoint
On the SCIM app's detail page, click the **Configuration** tab on the left.
Enter the values you copied from TrueFoundry in Step 1:
| OneLogin field | Paste this value from TrueFoundry |
| --------------------- | ----------------------------------------------- |
| **SCIM Base URL** | TrueFoundry **SCIM URL** (from **View Config**) |
| **SCIM Bearer Token** | TrueFoundry **Token** (from **View Config**) |
Click **Enable** to verify the connection. OneLogin performs a quick probe against the SCIM endpoint and shows a green confirmation if the credentials work. Then click **Save** to persist the configuration.
If the **Enable** click returns a 401 error, your token is wrong or has been rotated. Open **View Config** on the **SCIM** row in TrueFoundry to generate a new token and paste it back into **SCIM Bearer Token**.
## Step 4 — Turn on provisioning
Click the **Provisioning** tab on the left of the SCIM app.
Check **Enable provisioning** and click **Save**.
Under **Require admin approval before this action is performed**, uncheck the boxes for any of:
* **Create user**
* **Delete user**
* **Update user**
Unchecking these lets OneLogin sync changes immediately without waiting for an admin to approve each event. Leave them checked if your security policy requires explicit approval.
Click **Save** at the top right of the Provisioning tab.
## Step 5 — Include groups in user provisioning
By default, OneLogin doesn't send a user's group memberships to SCIM apps. Flip that on so TrueFoundry can create teams.
From the SCIM app's left navigation, click **Parameters**.
Click the **Groups** row in the parameter table. In the popup window, check **Include in User Provisioning** and click **Save**.
## Step 6 — Assign users to the SCIM app
In the OneLogin top navigation, click **Users → Users** and select the user you want to provision into TrueFoundry.
From the user page, click the **Applications** tab on the left and click the **+** icon. Pick the SCIM app you created in Step 2 from the dropdown and click **Continue**, then **Save**.
Depending on whether you unchecked admin approval in Step 4, the assignment may show as **Pending**. Click the **Pending** text, then click **Approve** in the modal to push the user to TrueFoundry.
For bulk provisioning, assign the SCIM app to a OneLogin **Role** under **Users → Roles → Applications**. Every user in that role will be synced to TrueFoundry automatically.
## Step 7 — Push groups (roles) to TrueFoundry
OneLogin doesn't have a native concept of "groups" — instead, you use **Roles** plus a **Rule** that translates the user's roles into a `groups` attribute that the SCIM app sends to TrueFoundry.
In OneLogin's top navigation, click **Users → Roles** and click **New Role**. Give the role a meaningful name (e.g. `truefoundry-admins`), select the SCIM app you created in Step 2, and click **Save**.
On the role's detail page, open the **Users** tab. Search for the users you want in this team, click **Add To Role** for each, and click **Save**.
Go back to your SCIM app and click the **Rules** tab on the left. Click **Add Rule** and:
* **Name** — something like `Set Groups from Roles`.
* **Actions** — choose **Set Groups in ``** from the dropdown.
* Configure the action as **for each role with values that match ``**.
Click **Save**.
Return to the SCIM app's **Users** tab. If you see **Pending provisions**, click that text and **Approve** the changes. OneLogin pushes the new group memberships to TrueFoundry on the next sync.
In TrueFoundry, go to **Access → Users** to confirm the assigned users appear, and check **Access → Teams** to see the roles materialised as teams. See [Provision teams via SCIM](/docs/platform/team-management#provision-teams-via-scim) for how group names map to TrueFoundry team names.
## How SCIM behaves with OneLogin
* **Event-driven sync** — OneLogin pushes changes (create, update, delete, role/group changes) as they happen rather than on a polling schedule.
* **Deactivation vs deletion** — When you unassign a user from the SCIM app, OneLogin sends a SCIM delete or `active=false` patch. TrueFoundry deactivates the user instead of hard-deleting them.
* **Role → group naming** — A OneLogin **Role** assigned to the SCIM app surfaces as a `groups` value on each user; TrueFoundry uses that to populate team memberships.
## Troubleshooting
The **SCIM Bearer Token** is incorrect or has been rotated. Open **View Config** on the **SCIM** row in TrueFoundry to generate a new token, paste it into OneLogin's **SCIM Bearer Token** field, and click **Enable** again.
1. Check the SCIM app's **Users** tab — the row may say **Pending** if admin approval is required. Click **Pending** and **Approve** to push the change.
2. Confirm **Enable provisioning** is on under the **Provisioning** tab.
3. Confirm the user has an **email** address in OneLogin — TrueFoundry rejects SCIM users without an email.
1. Open the SCIM app's **Parameters** tab, click the **Groups** row, and confirm **Include in User Provisioning** is checked.
2. Open the SCIM app's **Rules** tab and confirm the **Set Groups** rule from Step 7 exists and references the SCIM app's name (not the SAML app's name).
3. The user must belong to a OneLogin **Role** that is itself assigned to the SCIM app, otherwise no `groups` value is sent.
This is a known limitation of OneLogin's SCIM client: OneLogin doesn't dispatch a `group.deleted` or `group.user_removed` event when a group (role) is deleted directly. To safely remove a team:
1. First **remove the users** from the OneLogin role — OneLogin emits user-level events that TrueFoundry honours.
2. Then delete the role itself in OneLogin.
3. If a stale team remains in TrueFoundry, an admin can delete it manually under **Access → Teams**.
Admin approval is still required for one or more of **Create user**, **Update user**, or **Delete user**. Either approve each event manually under the SCIM app's **Users** tab, or uncheck those approval boxes in **Provisioning → Require admin approval before this action is performed** (Step 4) for a fully automated flow.
Store the token somewhere safe and treat it like a password. If you lose it, open **View Config** again to generate a new token — which invalidates the previous one.
## Step 2 — Create the SCIM app in OneLogin
In the OneLogin admin console, click **Applications → Applications**, then click **Add App** in the top right.
In the **Find Applications** search bar, type `SCIM`. From the list, choose **SCIM Provisioner with SAML (SCIM v2 Enterprise)**.
Even though you'll only use the SCIM half of this connector, OneLogin ships the SAML and SCIM components together. You can leave the SAML side of this app untouched — the actual sign-in flow is still handled by the SAML Custom Connector you set up in the [SAML guide](/docs/platform/sso/onelogin/saml).
Enter a **Display Name** such as `TrueFoundry SCIM` and click **Save**.
## Step 3 — Connect OneLogin to TrueFoundry's SCIM endpoint
On the SCIM app's detail page, click the **Configuration** tab on the left.
Enter the values you copied from TrueFoundry in Step 1:
| OneLogin field | Paste this value from TrueFoundry |
| --------------------- | ----------------------------------------------- |
| **SCIM Base URL** | TrueFoundry **SCIM URL** (from **View Config**) |
| **SCIM Bearer Token** | TrueFoundry **Token** (from **View Config**) |
Click **Enable** to verify the connection. OneLogin performs a quick probe against the SCIM endpoint and shows a green confirmation if the credentials work. Then click **Save** to persist the configuration.
If the **Enable** click returns a 401 error, your token is wrong or has been rotated. Open **View Config** on the **SCIM** row in TrueFoundry to generate a new token and paste it back into **SCIM Bearer Token**.
## Step 4 — Turn on provisioning
Click the **Provisioning** tab on the left of the SCIM app.
Check **Enable provisioning** and click **Save**.
Under **Require admin approval before this action is performed**, uncheck the boxes for any of:
* **Create user**
* **Delete user**
* **Update user**
Unchecking these lets OneLogin sync changes immediately without waiting for an admin to approve each event. Leave them checked if your security policy requires explicit approval.
Click **Save** at the top right of the Provisioning tab.
## Step 5 — Include groups in user provisioning
By default, OneLogin doesn't send a user's group memberships to SCIM apps. Flip that on so TrueFoundry can create teams.
From the SCIM app's left navigation, click **Parameters**.
Click the **Groups** row in the parameter table. In the popup window, check **Include in User Provisioning** and click **Save**.
## Step 6 — Assign users to the SCIM app
In the OneLogin top navigation, click **Users → Users** and select the user you want to provision into TrueFoundry.
From the user page, click the **Applications** tab on the left and click the **+** icon. Pick the SCIM app you created in Step 2 from the dropdown and click **Continue**, then **Save**.
Depending on whether you unchecked admin approval in Step 4, the assignment may show as **Pending**. Click the **Pending** text, then click **Approve** in the modal to push the user to TrueFoundry.
For bulk provisioning, assign the SCIM app to a OneLogin **Role** under **Users → Roles → Applications**. Every user in that role will be synced to TrueFoundry automatically.
## Step 7 — Push groups (roles) to TrueFoundry
OneLogin doesn't have a native concept of "groups" — instead, you use **Roles** plus a **Rule** that translates the user's roles into a `groups` attribute that the SCIM app sends to TrueFoundry.
In OneLogin's top navigation, click **Users → Roles** and click **New Role**. Give the role a meaningful name (e.g. `truefoundry-admins`), select the SCIM app you created in Step 2, and click **Save**.
On the role's detail page, open the **Users** tab. Search for the users you want in this team, click **Add To Role** for each, and click **Save**.
Go back to your SCIM app and click the **Rules** tab on the left. Click **Add Rule** and:
* **Name** — something like `Set Groups from Roles`.
* **Actions** — choose **Set Groups in ``** from the dropdown.
* Configure the action as **for each role with values that match ``**.
Click **Save**.
Return to the SCIM app's **Users** tab. If you see **Pending provisions**, click that text and **Approve** the changes. OneLogin pushes the new group memberships to TrueFoundry on the next sync.
In TrueFoundry, go to **Access → Users** to confirm the assigned users appear, and check **Access → Teams** to see the roles materialised as teams. See [Provision teams via SCIM](/docs/platform/team-management#provision-teams-via-scim) for how group names map to TrueFoundry team names.
## How SCIM behaves with OneLogin
* **Event-driven sync** — OneLogin pushes changes (create, update, delete, role/group changes) as they happen rather than on a polling schedule.
* **Deactivation vs deletion** — When you unassign a user from the SCIM app, OneLogin sends a SCIM delete or `active=false` patch. TrueFoundry deactivates the user instead of hard-deleting them.
* **Role → group naming** — A OneLogin **Role** assigned to the SCIM app surfaces as a `groups` value on each user; TrueFoundry uses that to populate team memberships.
## Troubleshooting
The **SCIM Bearer Token** is incorrect or has been rotated. Open **View Config** on the **SCIM** row in TrueFoundry to generate a new token, paste it into OneLogin's **SCIM Bearer Token** field, and click **Enable** again.
1. Check the SCIM app's **Users** tab — the row may say **Pending** if admin approval is required. Click **Pending** and **Approve** to push the change.
2. Confirm **Enable provisioning** is on under the **Provisioning** tab.
3. Confirm the user has an **email** address in OneLogin — TrueFoundry rejects SCIM users without an email.
1. Open the SCIM app's **Parameters** tab, click the **Groups** row, and confirm **Include in User Provisioning** is checked.
2. Open the SCIM app's **Rules** tab and confirm the **Set Groups** rule from Step 7 exists and references the SCIM app's name (not the SAML app's name).
3. The user must belong to a OneLogin **Role** that is itself assigned to the SCIM app, otherwise no `groups` value is sent.
This is a known limitation of OneLogin's SCIM client: OneLogin doesn't dispatch a `group.deleted` or `group.user_removed` event when a group (role) is deleted directly. To safely remove a team:
1. First **remove the users** from the OneLogin role — OneLogin emits user-level events that TrueFoundry honours.
2. Then delete the role itself in OneLogin.
3. If a stale team remains in TrueFoundry, an admin can delete it manually under **Access → Teams**.
Admin approval is still required for one or more of **Create user**, **Update user**, or **Delete user**. Either approve each event manually under the SCIM app's **Users** tab, or uncheck those approval boxes in **Provisioning → Require admin approval before this action is performed** (Step 4) for a fully automated flow.