> ## Documentation Index
> Fetch the complete documentation index at: https://www.truefoundry.com/llms.txt
> Use this file to discover all available pages before exploring further.
# SAML with OneLogin
> Configure SAML 2.0 single sign-on between TrueFoundry and OneLogin using the SAML Custom Connector (Advanced).
This guide walks you through setting up SAML 2.0 single sign-on between TrueFoundry and OneLogin. OneLogin doesn't ship a TrueFoundry-specific connector, so you'll use the **SAML Custom Connector (Advanced)** app and wire it up manually. Once finished, members of your OneLogin account can sign in to TrueFoundry through a **Login with OneLogin** button.
## Prerequisites
* A TrueFoundry tenant with **Admin** access to **Settings → Security & Access → SSO**.
* A OneLogin account with permission to create new **Applications** (Super User or Admin).
You'll bounce between the **OneLogin admin console** and the **TrueFoundry SSO settings**. Keep both open in adjacent tabs to copy-paste values quickly.
## Configuration overview
Save a SAML SSO configuration in TrueFoundry to surface the **ACS URL**, **Audience (Entity ID)**, and **Relay URL**.
Add the **SAML Custom Connector (Advanced)** app — this is what TrueFoundry federates with.
Paste TrueFoundry's values into OneLogin, then paste OneLogin's IdP values back into TrueFoundry.
Add the `email` and `sub` attributes TrueFoundry needs and assign users to the OneLogin app.
## Step 1 — Create the SSO configuration in TrueFoundry
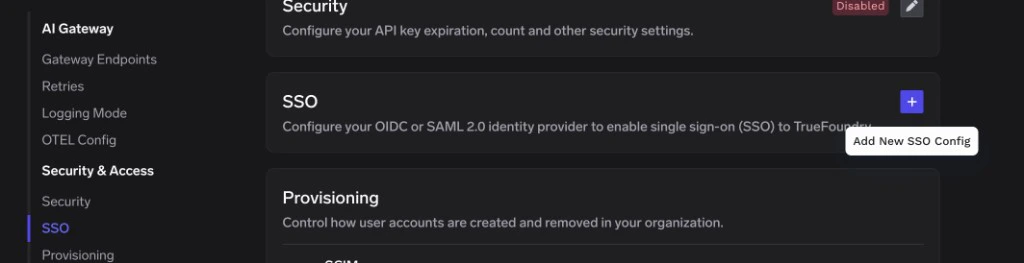
Go to **Settings → Security & Access → SSO**.
Click the **+** icon labeled **Add New SSO Config**.
 * **Enabled**: turn this on.
* **Name**: a lowercase alphanumeric label — for example, `oneloginsaml`.
* **SSO Provider**: choose **Custom**.
* **Authentication Configuration**: select **SAML v2**.
Leave **Identity Provider Endpoint** and **X.509 Certificate** blank for now — you'll fill them in once OneLogin surfaces those values.
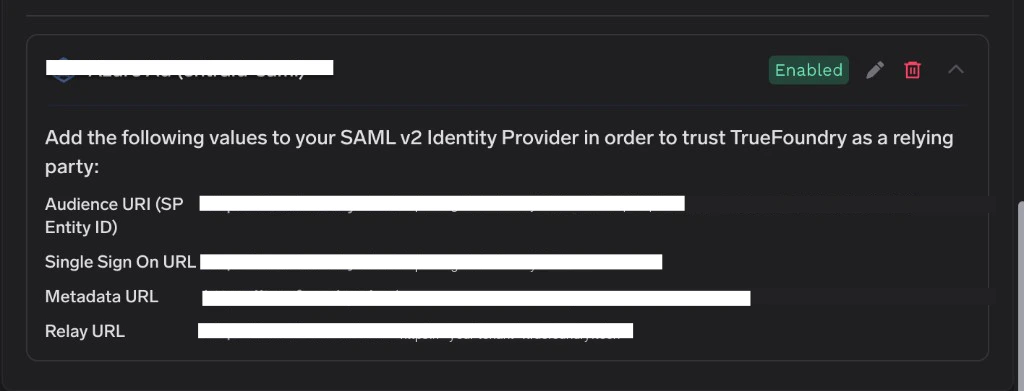
Click **Save**. TrueFoundry displays the values you need for OneLogin on the SSO configuration card:
| OneLogin field | Value from TrueFoundry |
| --------------------------- | ------------------------------- |
| **ACS (Consumer) URL** | **Single Sign On URL** |
| **Audience (Entity ID)** | **Audience URI (SP Entity ID)** |
| **Relay State** *(if used)* | **Relay URL** |
* **Enabled**: turn this on.
* **Name**: a lowercase alphanumeric label — for example, `oneloginsaml`.
* **SSO Provider**: choose **Custom**.
* **Authentication Configuration**: select **SAML v2**.
Leave **Identity Provider Endpoint** and **X.509 Certificate** blank for now — you'll fill them in once OneLogin surfaces those values.
Click **Save**. TrueFoundry displays the values you need for OneLogin on the SSO configuration card:
| OneLogin field | Value from TrueFoundry |
| --------------------------- | ------------------------------- |
| **ACS (Consumer) URL** | **Single Sign On URL** |
| **Audience (Entity ID)** | **Audience URI (SP Entity ID)** |
| **Relay State** *(if used)* | **Relay URL** |
 ## Step 2 — Create a SAML app in OneLogin
Sign in to the OneLogin admin console as an administrator. In the top navigation, click **Applications**, then click **Applications** again in the dropdown.
## Step 2 — Create a SAML app in OneLogin
Sign in to the OneLogin admin console as an administrator. In the top navigation, click **Applications**, then click **Applications** again in the dropdown.
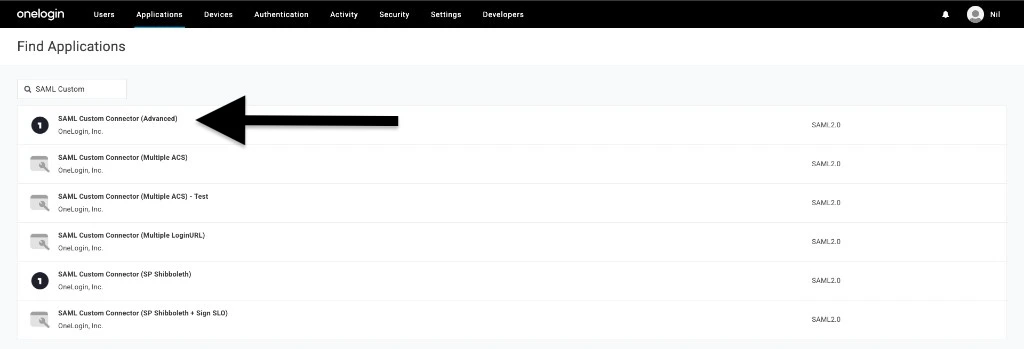
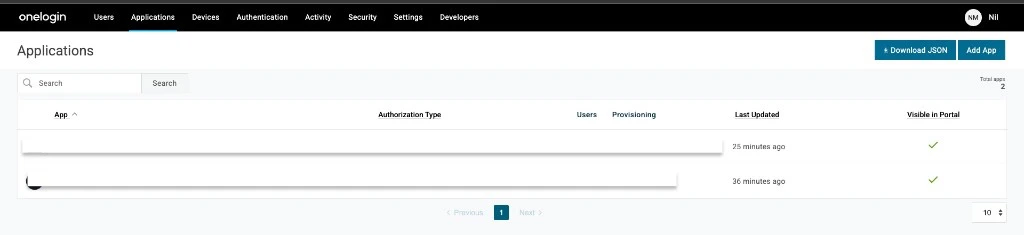 Click **Add App** in the top right corner. In the **Find Applications** search bar, type `SAML Custom` and select **SAML Custom Connector (Advanced)** from the results.
 Enter a **Display Name** such as `TrueFoundry`, optionally upload an app icon, and click **Save**.
OneLogin lands you on the application's detail page once it's saved.
## Step 3 — Enter TrueFoundry's details into OneLogin
Back in OneLogin's application detail page, switch to the **Configuration** tab on the left.
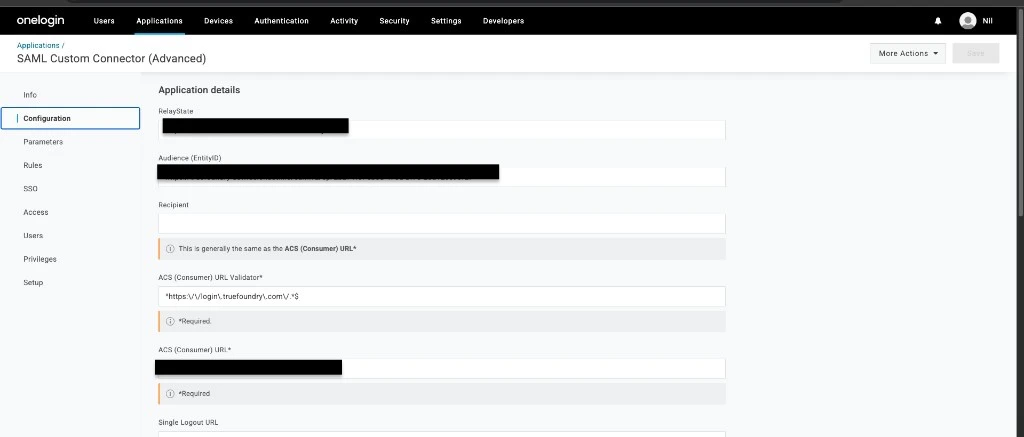
Paste the TrueFoundry values into the corresponding OneLogin fields:
| OneLogin field | Value to paste |
| -------------------------------- | -------------------------------------------------------------------------------------------------------------- |
| **Audience (Entity ID)** | TrueFoundry **Audience URI (SP Entity ID)** |
| **ACS (Consumer) URL Validator** | A regex that matches the TrueFoundry Single Sign On URL, for example `^https:\/\/login\.truefoundry\.com\/.*$` |
| **ACS (Consumer) URL** | TrueFoundry **Single Sign On URL** |
| **Relay State** | TrueFoundry **Relay URL** |
The **ACS (Consumer) URL Validator** is a regex, not a plain URL. OneLogin rejects the SAML response if the URL doesn't match this pattern. The example above accepts any path on `login.truefoundry.com`; tighten it if you prefer.
Enter a **Display Name** such as `TrueFoundry`, optionally upload an app icon, and click **Save**.
OneLogin lands you on the application's detail page once it's saved.
## Step 3 — Enter TrueFoundry's details into OneLogin
Back in OneLogin's application detail page, switch to the **Configuration** tab on the left.
Paste the TrueFoundry values into the corresponding OneLogin fields:
| OneLogin field | Value to paste |
| -------------------------------- | -------------------------------------------------------------------------------------------------------------- |
| **Audience (Entity ID)** | TrueFoundry **Audience URI (SP Entity ID)** |
| **ACS (Consumer) URL Validator** | A regex that matches the TrueFoundry Single Sign On URL, for example `^https:\/\/login\.truefoundry\.com\/.*$` |
| **ACS (Consumer) URL** | TrueFoundry **Single Sign On URL** |
| **Relay State** | TrueFoundry **Relay URL** |
The **ACS (Consumer) URL Validator** is a regex, not a plain URL. OneLogin rejects the SAML response if the URL doesn't match this pattern. The example above accepts any path on `login.truefoundry.com`; tighten it if you prefer.
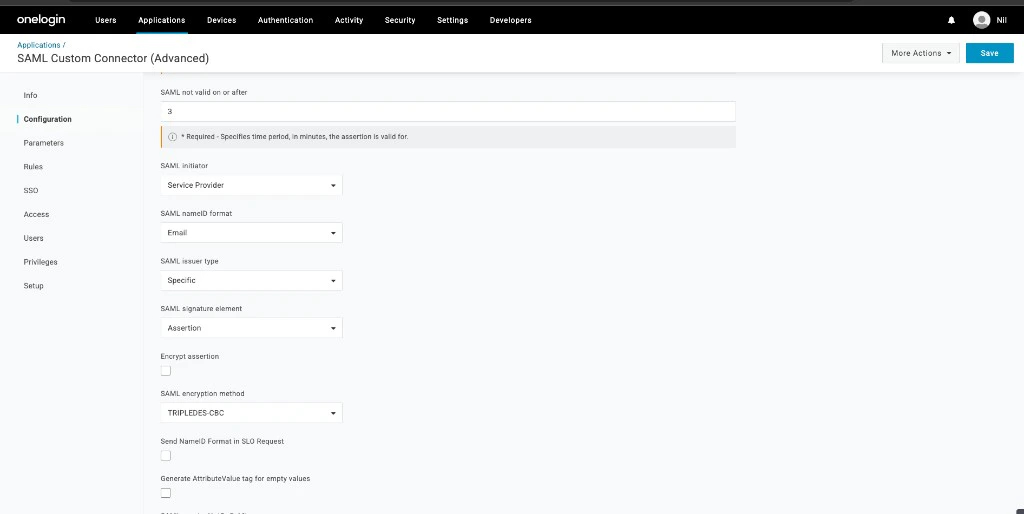
 Scroll down in the **Configuration** tab and set:
* **SAML initiator** → **Service Provider**.
* **SAML signature element** → **Assertion**.
* **SAML nameID format** → **Email**.
Leave the other defaults (encryption, etc.) in place unless you have a specific reason to change them.
Scroll down in the **Configuration** tab and set:
* **SAML initiator** → **Service Provider**.
* **SAML signature element** → **Assertion**.
* **SAML nameID format** → **Email**.
Leave the other defaults (encryption, etc.) in place unless you have a specific reason to change them.
 Click **Save** in the top right.
## Step 4 — Copy OneLogin's IdP details back to TrueFoundry
Switch to the **SSO** tab on the left side of the OneLogin application.
From the **SSO** tab, collect:
* **SAML 2.0 Endpoint (HTTP)** — this is the URL TrueFoundry uses to redirect users to OneLogin.
Click **Save** in the top right.
## Step 4 — Copy OneLogin's IdP details back to TrueFoundry
Switch to the **SSO** tab on the left side of the OneLogin application.
From the **SSO** tab, collect:
* **SAML 2.0 Endpoint (HTTP)** — this is the URL TrueFoundry uses to redirect users to OneLogin.
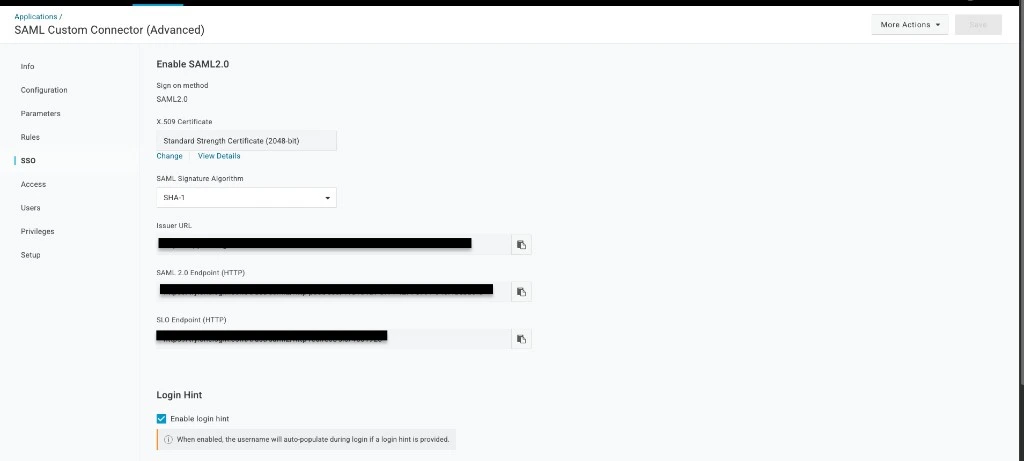 * **X.509 Certificate** — click **View Details** under the certificate, then copy the entire PEM, including the `-----BEGIN CERTIFICATE-----` and `-----END CERTIFICATE-----` lines.
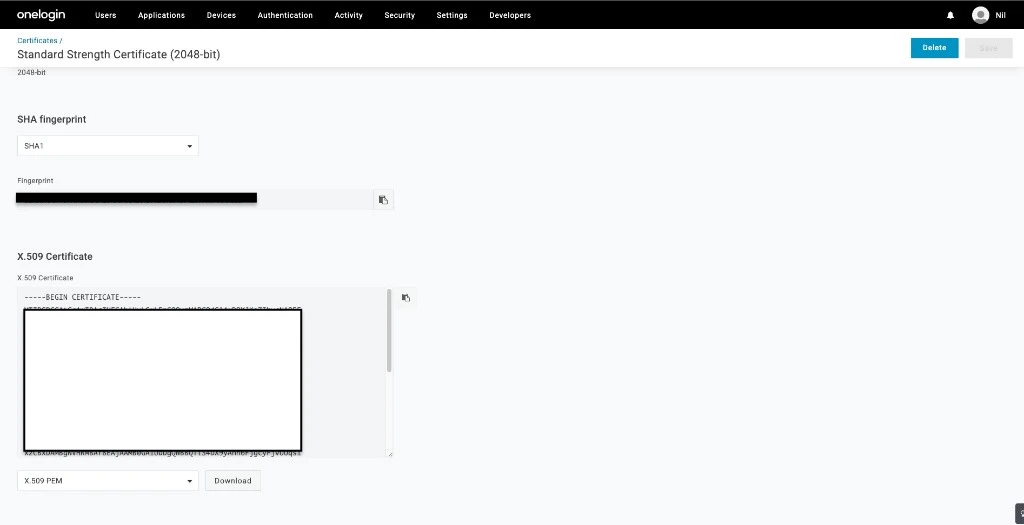 Return to **Settings → Security & Access → SSO** in TrueFoundry and edit the SSO configuration you created in Step 1. Set:
* **Identity Provider Endpoint** → the **SAML 2.0 Endpoint (HTTP)** from OneLogin.
* **X.509 Certificate** → the full PEM you copied from OneLogin.
Click **Save**.
## Step 5 — Map SAML parameters in OneLogin
OneLogin doesn't include user profile attributes in the SAML response by default. You need to add them under the **Parameters** tab so TrueFoundry can identify the user.
On the OneLogin application page, click the **Parameters** tab on the left.
Click the **+** icon to add each custom parameter. For every entry, set the **Field name**, check **Include in SAML assertion**, then on the next screen set the **Value** to the OneLogin user attribute listed below.
### Add the `email` parameter
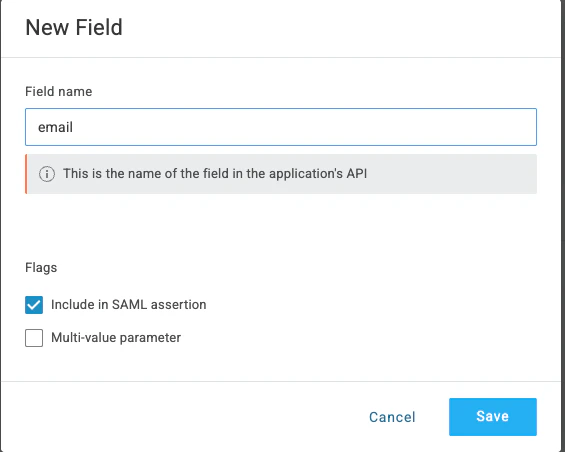
1. Click **+** and set **Field name** to `email`. Check **Include in SAML assertion**, then click **Save**.
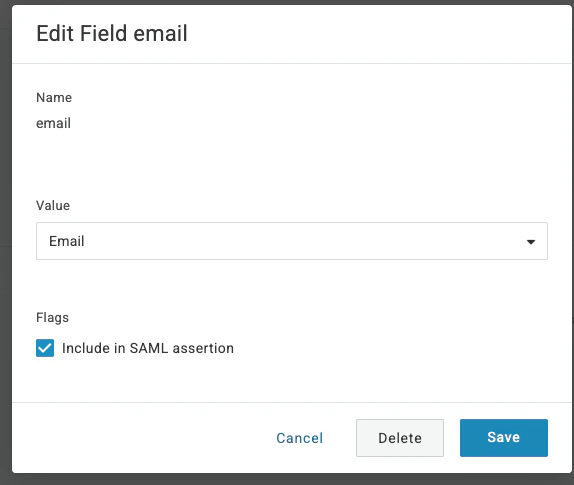
2. On the edit screen, set **Value** to **Email**. Confirm **Include in SAML assertion** is checked, then click **Save**.
Return to **Settings → Security & Access → SSO** in TrueFoundry and edit the SSO configuration you created in Step 1. Set:
* **Identity Provider Endpoint** → the **SAML 2.0 Endpoint (HTTP)** from OneLogin.
* **X.509 Certificate** → the full PEM you copied from OneLogin.
Click **Save**.
## Step 5 — Map SAML parameters in OneLogin
OneLogin doesn't include user profile attributes in the SAML response by default. You need to add them under the **Parameters** tab so TrueFoundry can identify the user.
On the OneLogin application page, click the **Parameters** tab on the left.
Click the **+** icon to add each custom parameter. For every entry, set the **Field name**, check **Include in SAML assertion**, then on the next screen set the **Value** to the OneLogin user attribute listed below.
### Add the `email` parameter
1. Click **+** and set **Field name** to `email`. Check **Include in SAML assertion**, then click **Save**.
2. On the edit screen, set **Value** to **Email**. Confirm **Include in SAML assertion** is checked, then click **Save**.
 ### Add the `sub` parameter
Repeat the same flow for `sub`:
1. Click **+** and set **Field name** to `sub`. Check **Include in SAML assertion**, then click **Save**.
2. On the edit screen, set **Value** to **OneLogin ID**. Confirm **Include in SAML assertion** is checked, then click **Save**.
When finished, your **Parameters** tab should look like this:
| Field name | Value (OneLogin attribute) |
| ---------- | -------------------------- |
| `email` | Email |
| `sub` | OneLogin ID |
### Add the `sub` parameter
Repeat the same flow for `sub`:
1. Click **+** and set **Field name** to `sub`. Check **Include in SAML assertion**, then click **Save**.
2. On the edit screen, set **Value** to **OneLogin ID**. Confirm **Include in SAML assertion** is checked, then click **Save**.
When finished, your **Parameters** tab should look like this:
| Field name | Value (OneLogin attribute) |
| ---------- | -------------------------- |
| `email` | Email |
| `sub` | OneLogin ID |
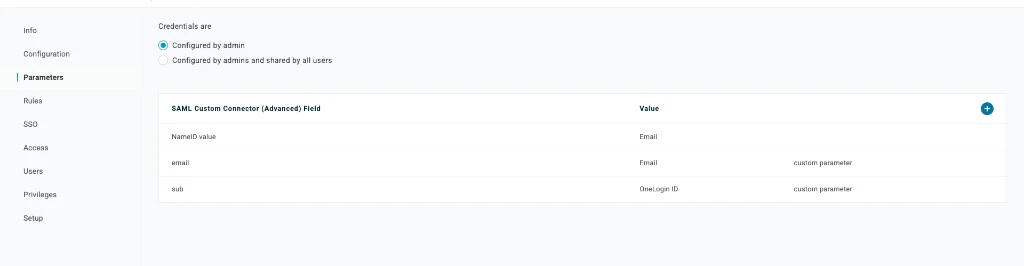 Confirm your **Parameters** tab matches the screenshot above — including **NameID value** set to **Email**, plus the `email` and `sub` custom parameters. That is the final configuration before you assign users.
## Step 6 — Assign users in OneLogin
OneLogin only sends SAML responses for users assigned to the application.
In the OneLogin top navigation, click **Users → Users**, then open the user you want to grant access to.
Click the **Applications** tab on the user page and click the **+** icon. In the popup, pick the TrueFoundry app you created and click **Continue**, then **Save**.
For bulk access, create a OneLogin **Role** that includes the TrueFoundry app and assign users to that role under **Users → Roles**. This pairs well with [SCIM with OneLogin](/docs/platform/sso/onelogin/scim).
Users who haven't been assigned to the OneLogin app — or whose assignment is still **Pending** approval — will see an "app not assigned" error when they click **Login with OneLogin** in TrueFoundry.
## Step 7 — Test single sign-on
1. Open a private/incognito window and go to your TrueFoundry login page.
2. Click **Login with OneLogin** (or whichever label you set under **Show advanced fields → Button Text**).
3. Authenticate with a OneLogin user that you assigned to the application.
If the sign-in succeeds you'll land in the TrueFoundry dashboard. The user is created automatically if [JIT provisioning](/docs/platform/user-management#user-provisioning) is on, otherwise they must already exist in TrueFoundry or be invited.
## Optional next steps
* **Automate user lifecycle with SCIM** — see [SCIM with OneLogin](/docs/platform/sso/onelogin/scim) to push users and groups from OneLogin into TrueFoundry automatically.
* **Customize the login button** — under **Show advanced fields**, set **Button Text** to `Login with OneLogin` and **Button Image URL** to a hosted logo if you'd like a branded button.
## Troubleshooting
The **ACS (Consumer) URL Validator** regex in OneLogin doesn't match the **ACS (Consumer) URL**. Re-open the **Configuration** tab and confirm that the validator pattern (for example `^https:\/\/login\.truefoundry\.com\/.*$`) genuinely matches the **Single Sign On URL** you copied from TrueFoundry. Don't forget to escape the slashes in the regex.
The `email` parameter isn't being sent. In OneLogin's **Parameters** tab, open the `email` row and make sure **Include in SAML assertion** is checked and the value is set to the user's **Email** attribute. The parameter name must be exactly `email` (lower-case) unless you've overridden **Email Claim** under TrueFoundry's **Show advanced fields**.
The certificate copied into TrueFoundry doesn't match OneLogin's active signing certificate. From OneLogin's **SSO** tab, click **View Details** on the certificate and copy the full PEM again, including the `-----BEGIN CERTIFICATE-----` and `-----END CERTIFICATE-----` lines, then paste it back into TrueFoundry's **X.509 Certificate** field.
Check the provisioning mode under **Settings → Security & Access → Provisioning**:
* **Invite-only** — the user must be invited from **Access → Users** first.
* **JIT** — the user is created on first login automatically.
* **SCIM** — the user must be synced from your IdP first. See [SCIM with OneLogin](/docs/platform/sso/onelogin/scim).
The **Audience (Entity ID)** in OneLogin doesn't match TrueFoundry's **Audience URI (SP Entity ID)**. Re-copy the value from the TrueFoundry SSO configuration card and paste it verbatim into OneLogin's **Audience (Entity ID)** field (no trailing slashes, no extra whitespace).
Confirm your **Parameters** tab matches the screenshot above — including **NameID value** set to **Email**, plus the `email` and `sub` custom parameters. That is the final configuration before you assign users.
## Step 6 — Assign users in OneLogin
OneLogin only sends SAML responses for users assigned to the application.
In the OneLogin top navigation, click **Users → Users**, then open the user you want to grant access to.
Click the **Applications** tab on the user page and click the **+** icon. In the popup, pick the TrueFoundry app you created and click **Continue**, then **Save**.
For bulk access, create a OneLogin **Role** that includes the TrueFoundry app and assign users to that role under **Users → Roles**. This pairs well with [SCIM with OneLogin](/docs/platform/sso/onelogin/scim).
Users who haven't been assigned to the OneLogin app — or whose assignment is still **Pending** approval — will see an "app not assigned" error when they click **Login with OneLogin** in TrueFoundry.
## Step 7 — Test single sign-on
1. Open a private/incognito window and go to your TrueFoundry login page.
2. Click **Login with OneLogin** (or whichever label you set under **Show advanced fields → Button Text**).
3. Authenticate with a OneLogin user that you assigned to the application.
If the sign-in succeeds you'll land in the TrueFoundry dashboard. The user is created automatically if [JIT provisioning](/docs/platform/user-management#user-provisioning) is on, otherwise they must already exist in TrueFoundry or be invited.
## Optional next steps
* **Automate user lifecycle with SCIM** — see [SCIM with OneLogin](/docs/platform/sso/onelogin/scim) to push users and groups from OneLogin into TrueFoundry automatically.
* **Customize the login button** — under **Show advanced fields**, set **Button Text** to `Login with OneLogin` and **Button Image URL** to a hosted logo if you'd like a branded button.
## Troubleshooting
The **ACS (Consumer) URL Validator** regex in OneLogin doesn't match the **ACS (Consumer) URL**. Re-open the **Configuration** tab and confirm that the validator pattern (for example `^https:\/\/login\.truefoundry\.com\/.*$`) genuinely matches the **Single Sign On URL** you copied from TrueFoundry. Don't forget to escape the slashes in the regex.
The `email` parameter isn't being sent. In OneLogin's **Parameters** tab, open the `email` row and make sure **Include in SAML assertion** is checked and the value is set to the user's **Email** attribute. The parameter name must be exactly `email` (lower-case) unless you've overridden **Email Claim** under TrueFoundry's **Show advanced fields**.
The certificate copied into TrueFoundry doesn't match OneLogin's active signing certificate. From OneLogin's **SSO** tab, click **View Details** on the certificate and copy the full PEM again, including the `-----BEGIN CERTIFICATE-----` and `-----END CERTIFICATE-----` lines, then paste it back into TrueFoundry's **X.509 Certificate** field.
Check the provisioning mode under **Settings → Security & Access → Provisioning**:
* **Invite-only** — the user must be invited from **Access → Users** first.
* **JIT** — the user is created on first login automatically.
* **SCIM** — the user must be synced from your IdP first. See [SCIM with OneLogin](/docs/platform/sso/onelogin/scim).
The **Audience (Entity ID)** in OneLogin doesn't match TrueFoundry's **Audience URI (SP Entity ID)**. Re-copy the value from the TrueFoundry SSO configuration card and paste it verbatim into OneLogin's **Audience (Entity ID)** field (no trailing slashes, no extra whitespace).