> ## Documentation Index
> Fetch the complete documentation index at: https://www.truefoundry.com/llms.txt
> Use this file to discover all available pages before exploring further.
# SAML with Okta
> Configure SAML 2.0 single sign-on between TrueFoundry and Okta.
This guide walks you through setting up SAML 2.0 single sign-on between TrueFoundry and Okta. Once finished, members of your Okta tenant can sign in to TrueFoundry through a **Login with Okta** button.
## Prerequisites
* A TrueFoundry tenant with **Admin** access to **Settings → Security & Access → SSO**.
* An Okta Workforce Identity Cloud tenant with permission to create new **Applications** (Super Admin or App Admin).
You'll bounce between the **Okta admin console** and the **TrueFoundry SSO settings**. Keep both open in adjacent tabs to copy-paste values quickly.
## Configuration overview
Save a SAML SSO configuration in TrueFoundry to surface the **Single sign-on URL**, **Audience URI (SP Entity ID)**, and **Relay URL**.
Register a custom SAML application in Okta that TrueFoundry will federate with.
Paste TrueFoundry's values into Okta, then paste Okta's IdP values back into TrueFoundry.
Assign people or groups to the Okta application and sign in to verify.
## Step 1 — Create the SSO configuration in TrueFoundry
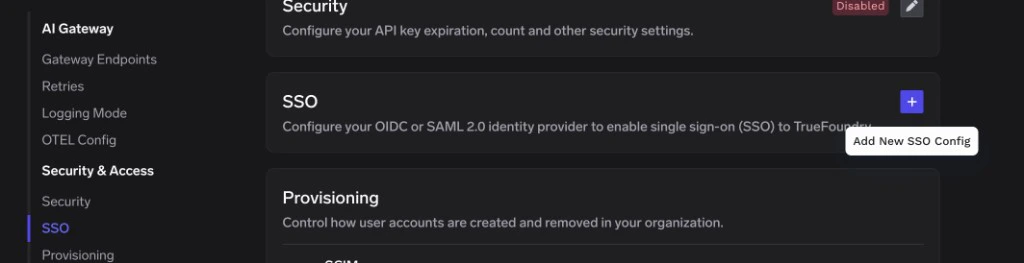
Go to **Settings → Security & Access → SSO**.
Click the **+** icon labeled **Add New SSO Config**.
 * **Enabled**: turn this on.
* **Name**: a lowercase alphanumeric label — for example, `oktasaml`.
* **SSO Provider**: choose **Okta**.
* **Authentication Configuration**: select **SAML v2**.
Leave **Identity Provider Endpoint** and **X.509 Certificate** blank for now — you'll fill them in once Okta surfaces those values.
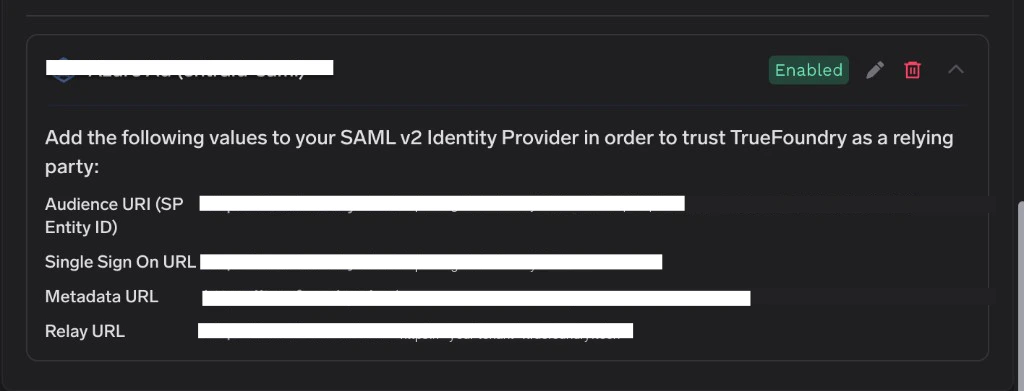
Click **Save**. TrueFoundry displays the values you need for Okta on the SSO configuration card:
* **Single sign-on URL** in Okta — **Single Sign On URL** in TrueFoundry.
* **Audience URI (SP Entity ID)** in Okta — **Audience URI (SP Entity ID)** in TrueFoundry.
* **Default RelayState** in Okta *(optional)* — **Relay URL** in TrueFoundry.
* **Enabled**: turn this on.
* **Name**: a lowercase alphanumeric label — for example, `oktasaml`.
* **SSO Provider**: choose **Okta**.
* **Authentication Configuration**: select **SAML v2**.
Leave **Identity Provider Endpoint** and **X.509 Certificate** blank for now — you'll fill them in once Okta surfaces those values.
Click **Save**. TrueFoundry displays the values you need for Okta on the SSO configuration card:
* **Single sign-on URL** in Okta — **Single Sign On URL** in TrueFoundry.
* **Audience URI (SP Entity ID)** in Okta — **Audience URI (SP Entity ID)** in TrueFoundry.
* **Default RelayState** in Okta *(optional)* — **Relay URL** in TrueFoundry.
 ## Step 2 — Create a SAML 2.0 application in Okta
Sign in to your Okta admin console (`https://-admin.okta.com`) as an administrator.
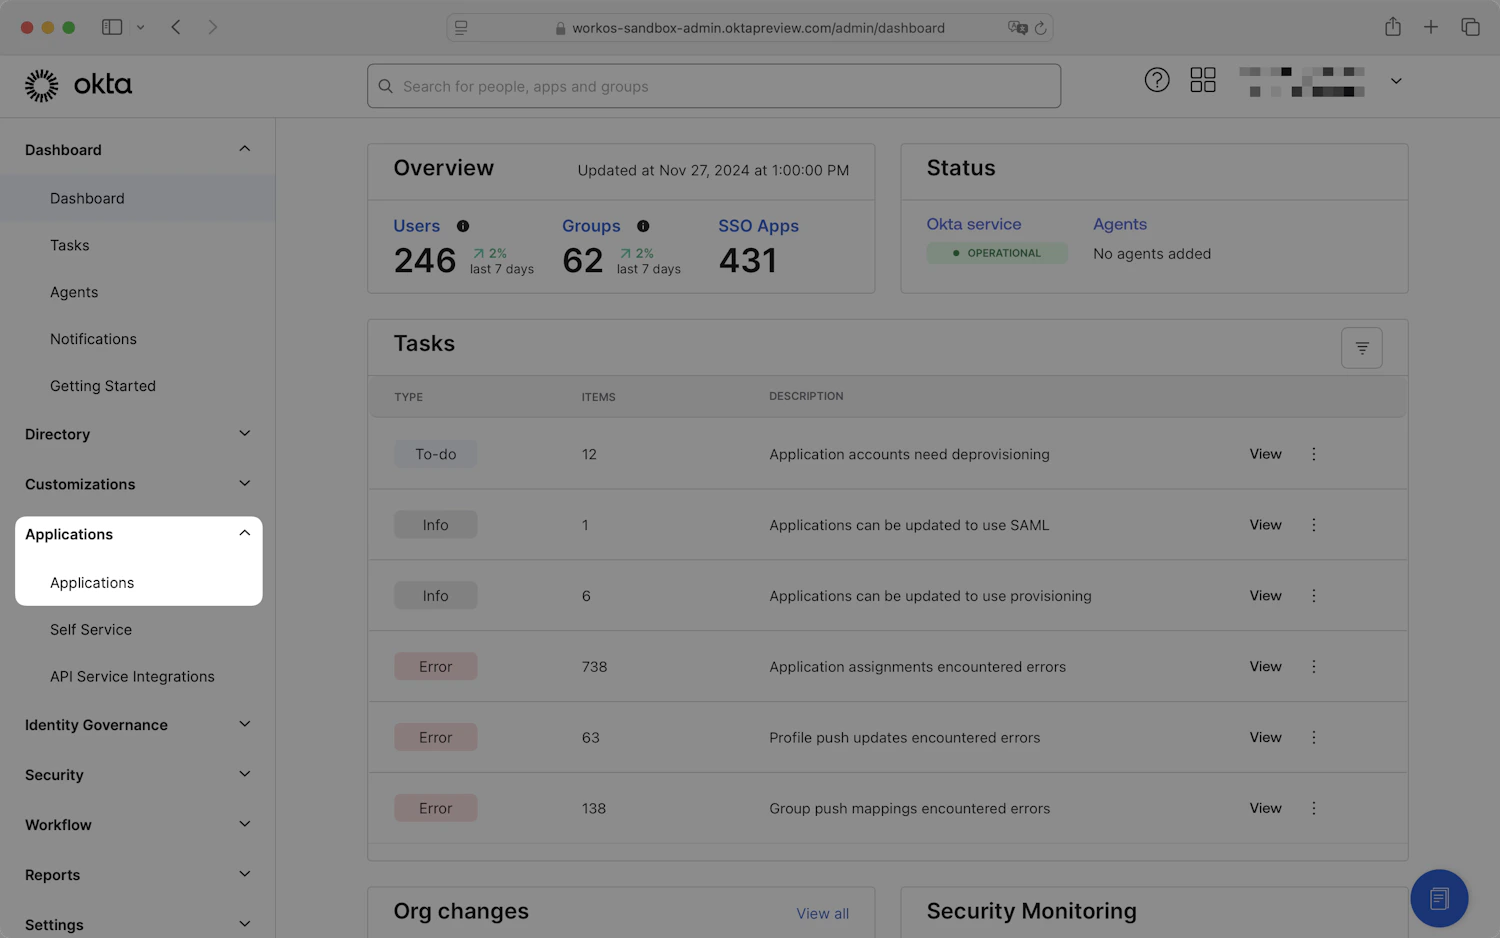
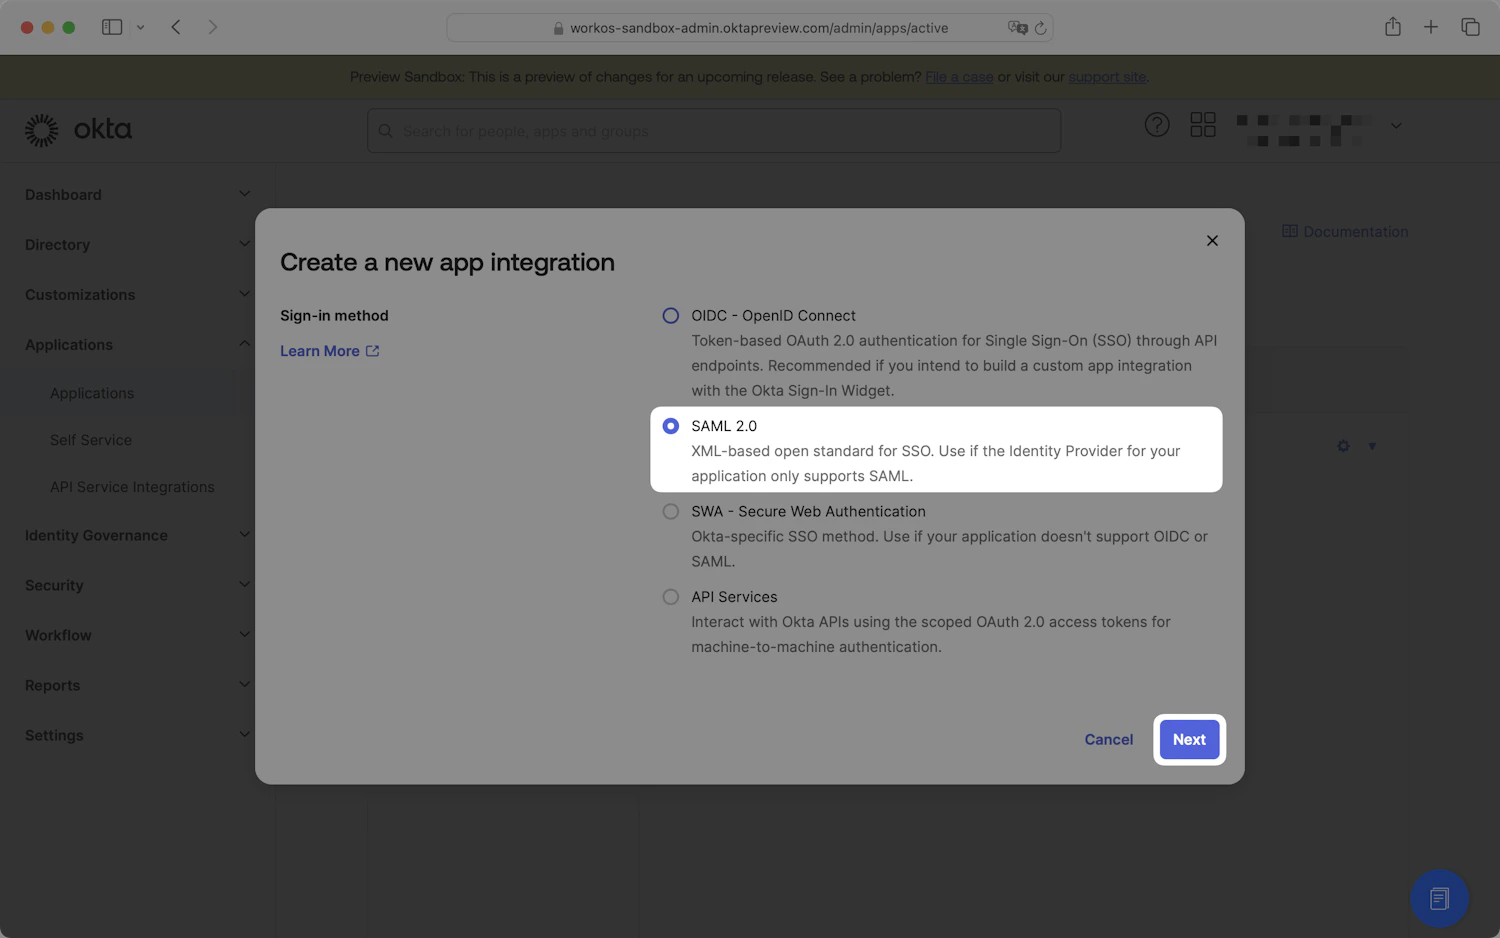
In the left navigation, expand **Applications → Applications** and click **Create App Integration**.
## Step 2 — Create a SAML 2.0 application in Okta
Sign in to your Okta admin console (`https://-admin.okta.com`) as an administrator.
In the left navigation, expand **Applications → Applications** and click **Create App Integration**.
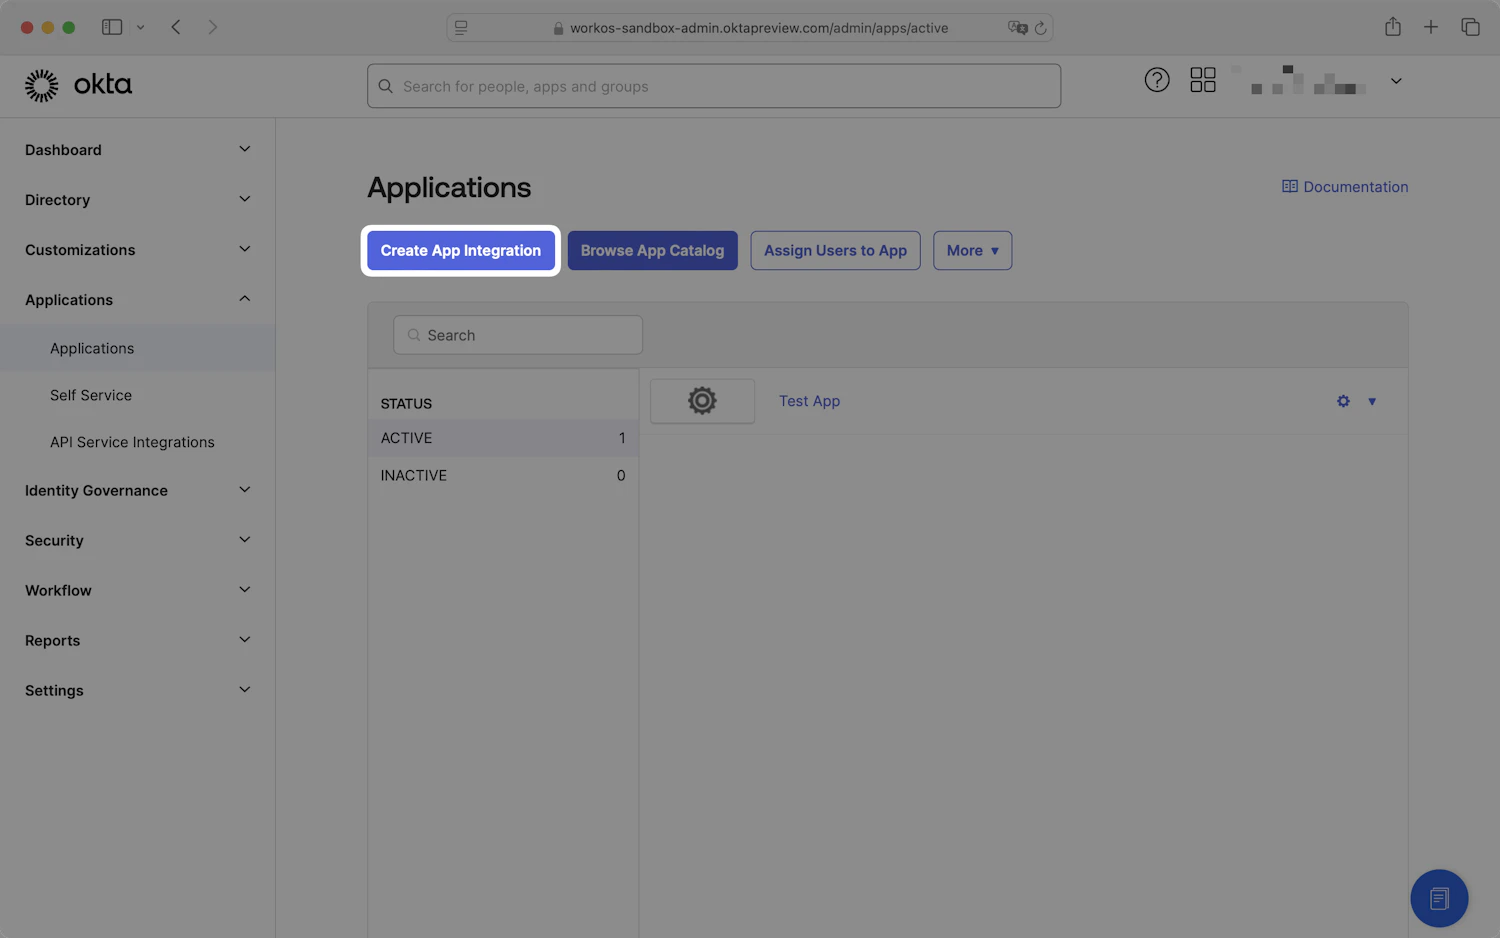 In the **Create a new app integration** dialog, select **SAML 2.0** and click **Next**.
 On the **General Settings** step, give the application a name such as `TrueFoundry`. Optionally upload an app logo.
Click **Next** to move on to the **Configure SAML** step.
## Step 3 — Enter TrueFoundry's details into Okta
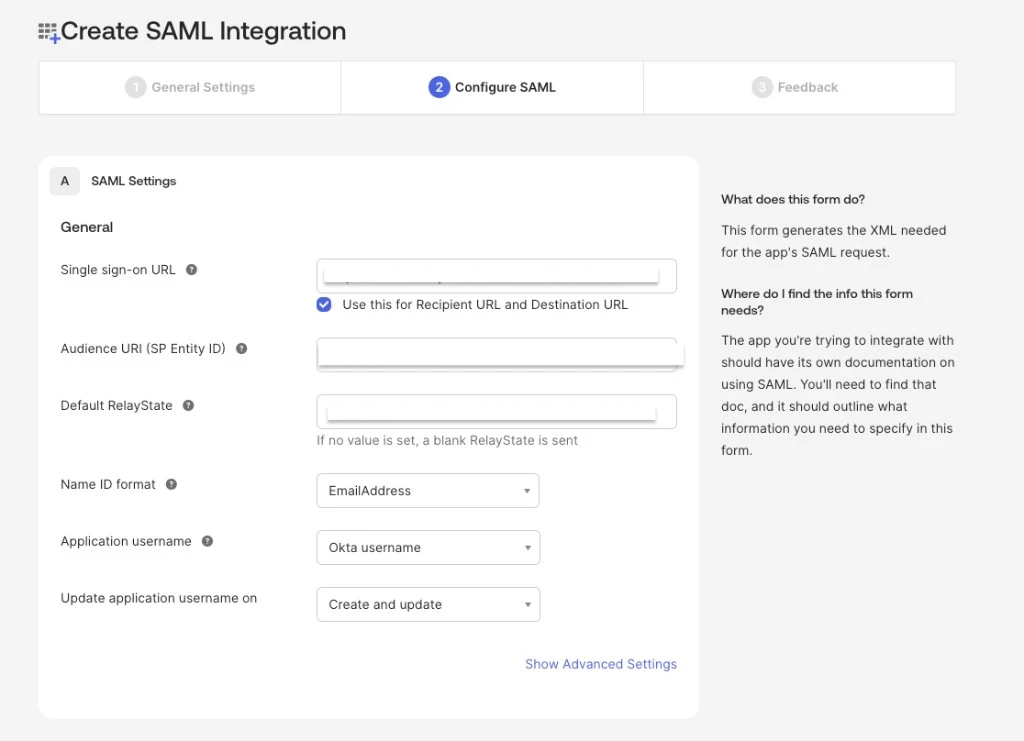
On the **Configure SAML** step of the application you created in Step 2, fill in the **SAML Settings** card using the values from Step 1.
On the **Configure SAML** step, fill in the **SAML Settings** section using the values from Step 1:
| Okta field | Value from TrueFoundry |
| ------------------------------- | ------------------------------- |
| **Single sign-on URL** | **Single Sign On URL** |
| **Audience URI (SP Entity ID)** | **Audience URI (SP Entity ID)** |
| **Default RelayState** | **Relay URL** |
Leave **Use this for Recipient URL and Destination URL** checked.
Set **Name ID format** to **EmailAddress** and leave **Application username** at the default of **Okta username**.
Click **Next**.
On the **General Settings** step, give the application a name such as `TrueFoundry`. Optionally upload an app logo.
Click **Next** to move on to the **Configure SAML** step.
## Step 3 — Enter TrueFoundry's details into Okta
On the **Configure SAML** step of the application you created in Step 2, fill in the **SAML Settings** card using the values from Step 1.
On the **Configure SAML** step, fill in the **SAML Settings** section using the values from Step 1:
| Okta field | Value from TrueFoundry |
| ------------------------------- | ------------------------------- |
| **Single sign-on URL** | **Single Sign On URL** |
| **Audience URI (SP Entity ID)** | **Audience URI (SP Entity ID)** |
| **Default RelayState** | **Relay URL** |
Leave **Use this for Recipient URL and Destination URL** checked.
Set **Name ID format** to **EmailAddress** and leave **Application username** at the default of **Okta username**.
Click **Next**.
 Okta requires a short feedback prompt. Select **I'm an Okta customer adding an internal app**, then scroll down and click **Finish**.
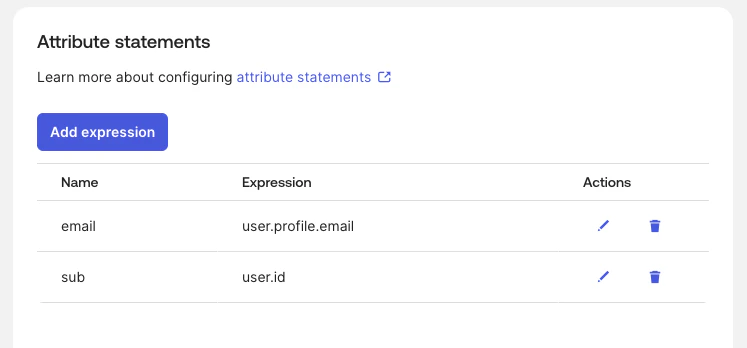
After the wizard completes, open your application and click the **Sign On** tab. Scroll to the **Attribute statements** section and click **Add expression** for each row below:
| Name | Expression |
| ------- | -------------------- |
| `email` | `user.profile.email` |
| `sub` | `user.id` |
Okta requires a short feedback prompt. Select **I'm an Okta customer adding an internal app**, then scroll down and click **Finish**.
After the wizard completes, open your application and click the **Sign On** tab. Scroll to the **Attribute statements** section and click **Add expression** for each row below:
| Name | Expression |
| ------- | -------------------- |
| `email` | `user.profile.email` |
| `sub` | `user.id` |
 ## Step 4 — Copy Okta's details back to TrueFoundry
Okta drops you on the application detail page once the wizard completes.
On the application page, click the **Sign On** tab. In the right sidebar under **SAML Setup**, click **View SAML setup instructions**.
## Step 4 — Copy Okta's details back to TrueFoundry
Okta drops you on the application detail page once the wizard completes.
On the application page, click the **Sign On** tab. In the right sidebar under **SAML Setup**, click **View SAML setup instructions**.
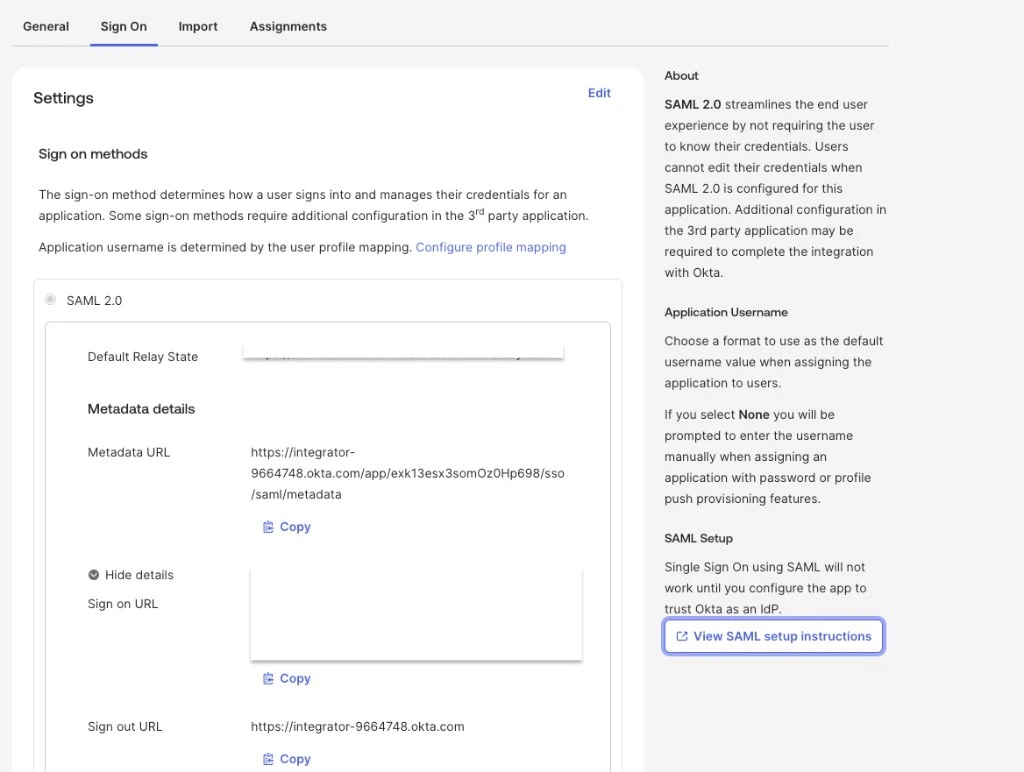 In the setup instructions panel, copy the values shown:
* **Identity Provider Single Sign-On URL** — you'll paste this into TrueFoundry as the **Identity Provider Endpoint**.
* **X.509 Certificate** — copy the full certificate from the text box, including the `-----BEGIN CERTIFICATE-----` and `-----END CERTIFICATE-----` lines. You can also use **Download certificate** and open the file in a text editor.
In the setup instructions panel, copy the values shown:
* **Identity Provider Single Sign-On URL** — you'll paste this into TrueFoundry as the **Identity Provider Endpoint**.
* **X.509 Certificate** — copy the full certificate from the text box, including the `-----BEGIN CERTIFICATE-----` and `-----END CERTIFICATE-----` lines. You can also use **Download certificate** and open the file in a text editor.
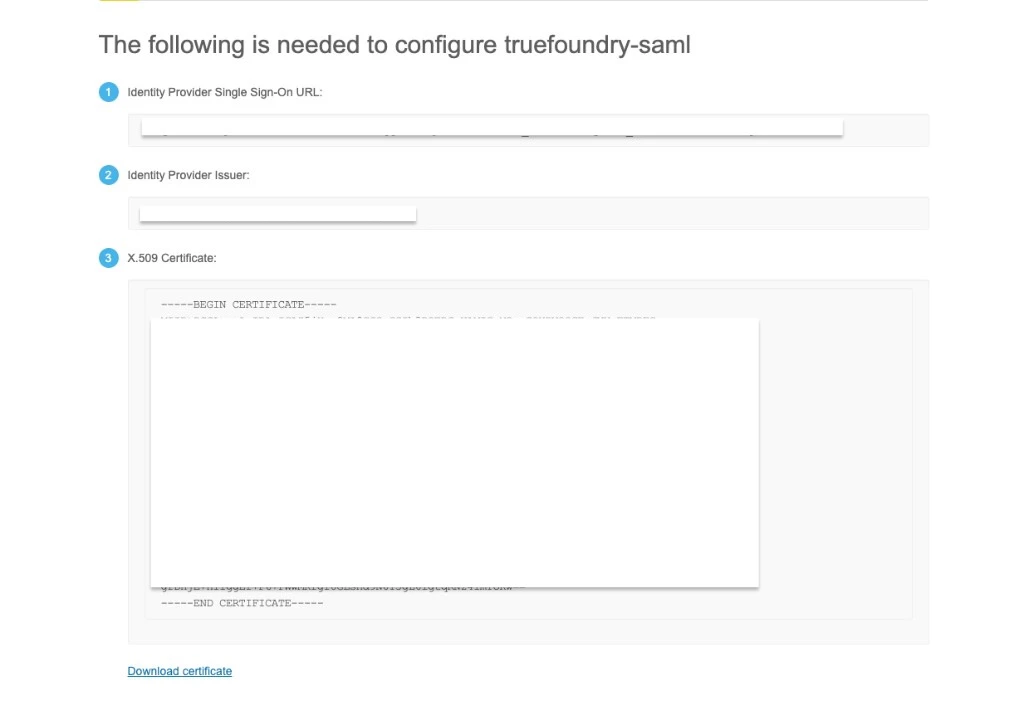 Return to **Settings → Security & Access → SSO** in TrueFoundry and edit the SSO configuration you created in Step 1. Set:
* **Identity Provider Endpoint** → **Identity Provider Single Sign-On URL** from Okta.
* **X.509 Certificate** → the certificate you copied from the setup instructions.
Click **Save**.
## Step 5 — Assign people in Okta
Okta only lets users sign in to applications they've been explicitly assigned to.
Inside your Okta application, click the **Assignments** tab and open the **Assign** dropdown.
Return to **Settings → Security & Access → SSO** in TrueFoundry and edit the SSO configuration you created in Step 1. Set:
* **Identity Provider Endpoint** → **Identity Provider Single Sign-On URL** from Okta.
* **X.509 Certificate** → the certificate you copied from the setup instructions.
Click **Save**.
## Step 5 — Assign people in Okta
Okta only lets users sign in to applications they've been explicitly assigned to.
Inside your Okta application, click the **Assignments** tab and open the **Assign** dropdown.
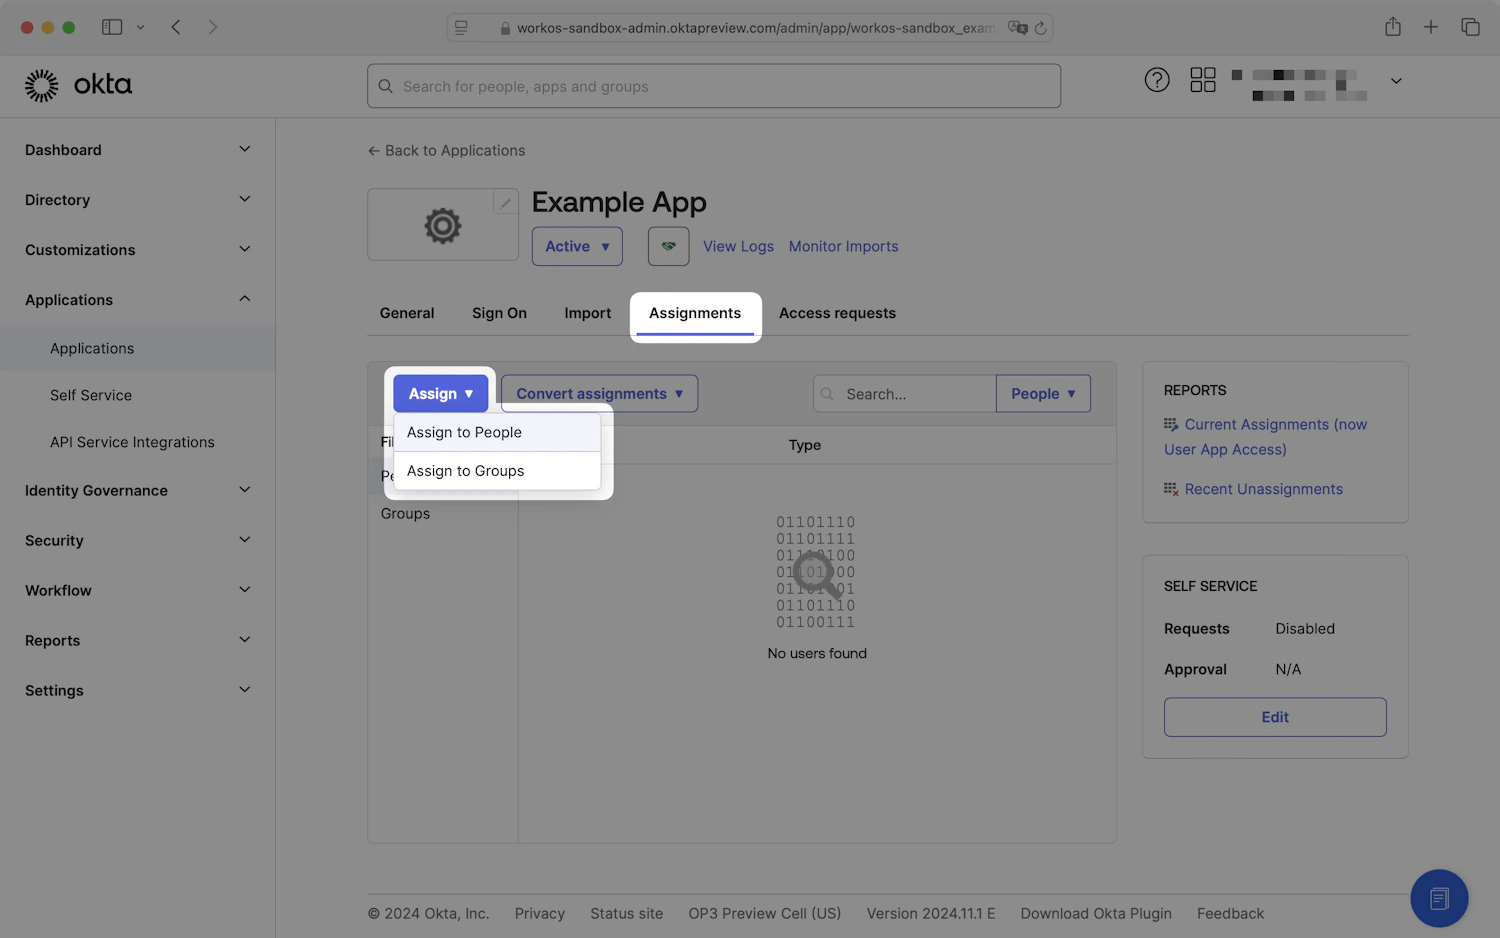 Choose **Assign to People** or **Assign to Groups**, select the users or groups that should have TrueFoundry access, and click **Assign** for each. When you're done, click **Done**.
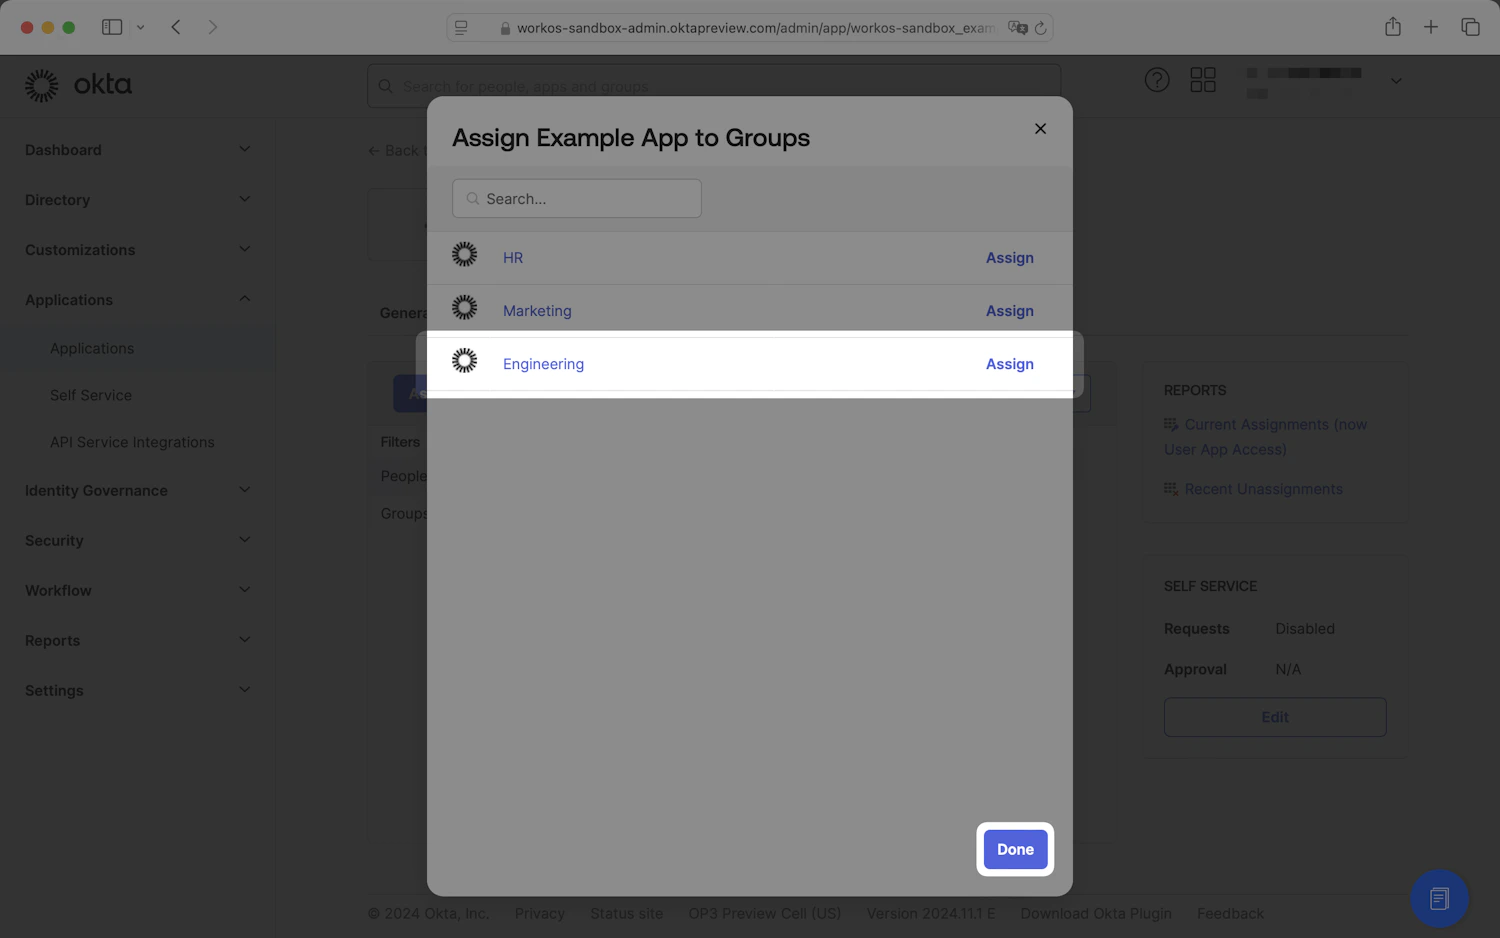 Prefer assigning **groups** when you can — it pairs well with [SCIM with Okta](/docs/platform/sso/okta/scim) for automated user lifecycle management.
Users who are not assigned to the Okta application will see an "app not assigned" error when they click **Login with Okta** in TrueFoundry.
## Step 6 — Test single sign-on
1. Open a private/incognito window and go to your TrueFoundry login page.
2. Click **Login with Okta** (or whichever label you set under **Show advanced fields → Button Text**).
3. Authenticate with an Okta user you assigned to the application.
If the sign-in succeeds you'll land in the TrueFoundry dashboard. The user is created automatically if [JIT provisioning](/docs/platform/user-management#user-provisioning) is on, otherwise they must already exist in TrueFoundry or be invited.
## Optional next steps
* **Automate user lifecycle with SCIM** — see [SCIM with Okta](/docs/platform/sso/okta/scim) to push users and groups from Okta into TrueFoundry automatically.
* **Use OIDC instead of SAML** — see [OIDC with Okta](/docs/platform/sso/okta/oidc) for the equivalent OpenID Connect flow.
## Troubleshooting
The Okta user isn't assigned to your application. Go back to **Step 5** and assign them under **Assignments**.
The certificate copied into TrueFoundry doesn't match Okta's active signing certificate. Open **Sign On → SAML Setup → View SAML setup instructions**, copy the **X.509 Certificate** again (or use **Download certificate**), and paste the full PEM (including the BEGIN/END lines) into TrueFoundry.
Check the provisioning mode under **Settings → Security & Access → Provisioning**:
* **Invite-only** — the user must be invited from **Access → Users** first.
* **JIT** — the user is created on first login automatically.
* **SCIM** — the user must be synced from your IdP first. See [SCIM with Okta](/docs/platform/sso/okta/scim).
Confirm **Name ID format** is set to **EmailAddress** and that **Attribute statements** on the **Sign On** tab includes `email` → `user.profile.email` and `sub` → `user.id` as described in Step 3. If you renamed attributes, expand **Show advanced fields** in TrueFoundry and set:
* **Email Claim** → the attribute name you used for email (defaults to `email`).
* **Unique ID Claim** → defaults to `sub`; on Okta the Name ID is typically the unique identifier, so you can usually leave this at the default.
The **Audience URI (SP Entity ID)** in Okta doesn't match TrueFoundry's **Audience URI (SP Entity ID)**. Re-copy the value from the TrueFoundry SSO configuration card and paste it verbatim into Okta (no trailing slashes, no extra whitespace).
Prefer assigning **groups** when you can — it pairs well with [SCIM with Okta](/docs/platform/sso/okta/scim) for automated user lifecycle management.
Users who are not assigned to the Okta application will see an "app not assigned" error when they click **Login with Okta** in TrueFoundry.
## Step 6 — Test single sign-on
1. Open a private/incognito window and go to your TrueFoundry login page.
2. Click **Login with Okta** (or whichever label you set under **Show advanced fields → Button Text**).
3. Authenticate with an Okta user you assigned to the application.
If the sign-in succeeds you'll land in the TrueFoundry dashboard. The user is created automatically if [JIT provisioning](/docs/platform/user-management#user-provisioning) is on, otherwise they must already exist in TrueFoundry or be invited.
## Optional next steps
* **Automate user lifecycle with SCIM** — see [SCIM with Okta](/docs/platform/sso/okta/scim) to push users and groups from Okta into TrueFoundry automatically.
* **Use OIDC instead of SAML** — see [OIDC with Okta](/docs/platform/sso/okta/oidc) for the equivalent OpenID Connect flow.
## Troubleshooting
The Okta user isn't assigned to your application. Go back to **Step 5** and assign them under **Assignments**.
The certificate copied into TrueFoundry doesn't match Okta's active signing certificate. Open **Sign On → SAML Setup → View SAML setup instructions**, copy the **X.509 Certificate** again (or use **Download certificate**), and paste the full PEM (including the BEGIN/END lines) into TrueFoundry.
Check the provisioning mode under **Settings → Security & Access → Provisioning**:
* **Invite-only** — the user must be invited from **Access → Users** first.
* **JIT** — the user is created on first login automatically.
* **SCIM** — the user must be synced from your IdP first. See [SCIM with Okta](/docs/platform/sso/okta/scim).
Confirm **Name ID format** is set to **EmailAddress** and that **Attribute statements** on the **Sign On** tab includes `email` → `user.profile.email` and `sub` → `user.id` as described in Step 3. If you renamed attributes, expand **Show advanced fields** in TrueFoundry and set:
* **Email Claim** → the attribute name you used for email (defaults to `email`).
* **Unique ID Claim** → defaults to `sub`; on Okta the Name ID is typically the unique identifier, so you can usually leave this at the default.
The **Audience URI (SP Entity ID)** in Okta doesn't match TrueFoundry's **Audience URI (SP Entity ID)**. Re-copy the value from the TrueFoundry SSO configuration card and paste it verbatim into Okta (no trailing slashes, no extra whitespace).