> ## Documentation Index
> Fetch the complete documentation index at: https://www.truefoundry.com/llms.txt
> Use this file to discover all available pages before exploring further.
# OIDC with Keycloak
> Configure OpenID Connect single sign-on between TrueFoundry and a Keycloak realm.
This guide walks you through setting up OpenID Connect (OIDC) single sign-on between TrueFoundry and a Keycloak realm. Once finished, members of the realm can sign in to TrueFoundry through a **Login with Keycloak** button.
## Prerequisites
* A TrueFoundry tenant with **Admin** access to **Settings → Security & Access → SSO**.
* A Keycloak deployment (self-hosted or managed) with admin access to the realm you want to federate.
* The Keycloak realm reachable from TrueFoundry's login service over HTTPS.
You'll bounce between the **Keycloak admin console** and the **TrueFoundry SSO settings**. Keep both open in adjacent tabs to copy-paste values quickly.
## Configuration overview
Register a confidential client in the realm you want users to sign in with.
Grab the Client ID and Client Secret that TrueFoundry will use.
Construct the OpenID issuer for your realm.
Paste everything into the TrueFoundry SSO form and sign in.
## Step 1 — Register a client in Keycloak
Sign in to the Keycloak admin console and select the realm you want to federate from the realm dropdown in the top-left.
In the left navigation, click **Clients**, then **Create client**.
On the **General settings** step:
* **Client type**: select **OpenID Connect**.
* **Client ID**: enter `truefoundry` (or any other identifier you prefer).
* **Name** *(optional)*: a display name such as `TrueFoundry`.
Click **Next**.
On the **Capability config** step:
* **Client authentication**: toggle **On** (this makes the client confidential and unlocks the Client Secret you'll need later).
* **Authorization**: leave **Off** unless you specifically use Keycloak Authorization Services.
* **Authentication flow**: check **Standard flow**, **Direct access grants**, and **OAuth 2.0 Device Authorization Grant**.
Click **Next**.
On the **Login settings** step:
* **Root URL** *(optional)*: set to your TrueFoundry control plane URL, for example `https://app.your-company.truefoundry.cloud`.
* **Valid Redirect URIs**: add
```
https://login.truefoundry.com/oauth2/callback
```
The redirect URI must match exactly — including the scheme (`https`) and trailing path. Wildcards (`*`) are not required and not recommended.
Click **Save**.
## Step 2 — Copy the Client Secret
Inside your new client, switch to the **Credentials** tab.
Click the copy icon next to **Client Secret** and store it somewhere safe — you'll paste it into TrueFoundry shortly.
If you ever need to rotate the secret, click **Regenerate** on this tab and update the value under **Settings → Security & Access → SSO** in TrueFoundry.
## Step 3 — Build the Issuer URL
Keycloak's OIDC discovery URL for a realm follows this pattern:
```
https:///realms/
```
For example, if your Keycloak runs at `https://sso.acme.com` and the realm is named `engineering`, the issuer is:
```
https://sso.acme.com/realms/engineering
```
On older Keycloak (≤ 17) the path was `/auth/realms/`. Newer versions drop the `/auth` prefix by default. Use whichever path your deployment actually serves — you can verify by opening `https:///realms//.well-known/openid-configuration` in a browser.
## Step 4 — Configure TrueFoundry
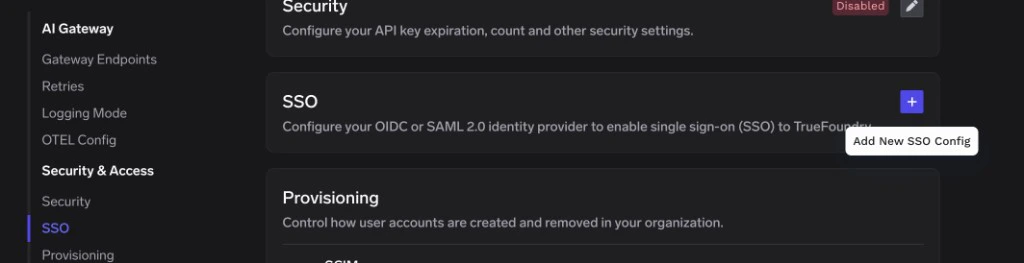
In TrueFoundry, go to **Settings → Security & Access → SSO**.
Click the **+** icon labeled **Add New SSO Config**.
 * **Enabled**: turn this on.
* **Name**: a lowercase alphanumeric label — for example, `keycloakoidc`.
* **SSO Provider**: select **Custom**.
* **Authentication Configuration**: choose **OIDC**.
* **Client ID**: the client ID you set in Keycloak (for example, `truefoundry`).
* **Client Secret**: the secret copied from the **Credentials** tab.
* **Discover endpoints**: leave enabled.
* **Issuer URL**: the value you built in Step 3, for example `https://sso.acme.com/realms/engineering`.
* **Scopes** *(optional)*: leave blank to use the default `openid email`. Add `profile` if you want first and last name in the token.
Click **Save**. TrueFoundry will fetch the realm's OpenID discovery document and store the credentials.
## Encryption algorithm restrictions
TrueFoundry does **not** support the **RSA-OAEP** encryption algorithm for ID tokens. If your Keycloak realm has an active key provider that uses `RSA-OAEP`, sign-in will fail with a token decryption error.
Supported algorithms:
`ES384`, `HS384`, `ES256`, `HS256`, `HS512`, `PS384`, `RS384`, `PS256`, `RS256`, `PS512`, `RS512`, `none`, `ES512`.
1. In the Keycloak admin console, open the realm you're federating and click **Realm settings** in the left navigation.
2. Switch to the **Keys** tab.
3. Click the **Providers** sub-tab.
4. Locate any provider whose **Algorithm** column shows `RSA-OAEP` (commonly named `rsa-enc-generated` or similar).
5. Click the provider, set **Enabled** to **Off**, and click **Save**.
Make sure at least one supported signing key remains **Enabled** and **Active** so Keycloak can still issue tokens.
## Step 5 — Test single sign-on
1. Open a private/incognito window and visit your TrueFoundry login page.
2. Click **Login with Keycloak** (or whichever button label you chose under **Show advanced fields → Button Text**).
3. Authenticate with a Keycloak user from the federated realm.
You should land in the TrueFoundry dashboard. New users are created automatically if [JIT provisioning](/docs/platform/user-management#user-provisioning) is enabled; otherwise the user must already exist in TrueFoundry or be invited.
## Troubleshooting
The realm name in the **Issuer URL** is wrong, or your Keycloak still uses the `/auth` prefix. Open `https:///realms//.well-known/openid-configuration` in a browser:
* If it returns JSON, copy the `issuer` field verbatim into TrueFoundry.
* If you get a 404, try `https:///auth/realms//.well-known/openid-configuration` and use that prefix instead.
The exact URL `https://login.truefoundry.com/oauth2/callback` is missing from **Valid Redirect URIs** on the Keycloak client. Add it under **Clients → your client → Settings**, save, and retry.
Your realm is issuing tokens encrypted with `RSA-OAEP`, which TrueFoundry does not support. Follow the steps in the [encryption algorithm restrictions](#encryption-algorithm-restrictions) section above to disable the `RSA-OAEP` key provider, leaving only supported algorithms enabled.
The **Client Secret** in TrueFoundry doesn't match Keycloak. Regenerate the secret on the client's **Credentials** tab, copy the new value, and update the SSO configuration under **Settings → Security & Access → SSO**.
Make sure the **email** scope is being requested and that the user has an email in Keycloak. In the TrueFoundry SSO form, set **Scopes** to `openid email profile` and re-test. If you map email under a non-standard claim, expand **Show advanced fields** and set **Email Claim** accordingly.
* **Enabled**: turn this on.
* **Name**: a lowercase alphanumeric label — for example, `keycloakoidc`.
* **SSO Provider**: select **Custom**.
* **Authentication Configuration**: choose **OIDC**.
* **Client ID**: the client ID you set in Keycloak (for example, `truefoundry`).
* **Client Secret**: the secret copied from the **Credentials** tab.
* **Discover endpoints**: leave enabled.
* **Issuer URL**: the value you built in Step 3, for example `https://sso.acme.com/realms/engineering`.
* **Scopes** *(optional)*: leave blank to use the default `openid email`. Add `profile` if you want first and last name in the token.
Click **Save**. TrueFoundry will fetch the realm's OpenID discovery document and store the credentials.
## Encryption algorithm restrictions
TrueFoundry does **not** support the **RSA-OAEP** encryption algorithm for ID tokens. If your Keycloak realm has an active key provider that uses `RSA-OAEP`, sign-in will fail with a token decryption error.
Supported algorithms:
`ES384`, `HS384`, `ES256`, `HS256`, `HS512`, `PS384`, `RS384`, `PS256`, `RS256`, `PS512`, `RS512`, `none`, `ES512`.
1. In the Keycloak admin console, open the realm you're federating and click **Realm settings** in the left navigation.
2. Switch to the **Keys** tab.
3. Click the **Providers** sub-tab.
4. Locate any provider whose **Algorithm** column shows `RSA-OAEP` (commonly named `rsa-enc-generated` or similar).
5. Click the provider, set **Enabled** to **Off**, and click **Save**.
Make sure at least one supported signing key remains **Enabled** and **Active** so Keycloak can still issue tokens.
## Step 5 — Test single sign-on
1. Open a private/incognito window and visit your TrueFoundry login page.
2. Click **Login with Keycloak** (or whichever button label you chose under **Show advanced fields → Button Text**).
3. Authenticate with a Keycloak user from the federated realm.
You should land in the TrueFoundry dashboard. New users are created automatically if [JIT provisioning](/docs/platform/user-management#user-provisioning) is enabled; otherwise the user must already exist in TrueFoundry or be invited.
## Troubleshooting
The realm name in the **Issuer URL** is wrong, or your Keycloak still uses the `/auth` prefix. Open `https:///realms//.well-known/openid-configuration` in a browser:
* If it returns JSON, copy the `issuer` field verbatim into TrueFoundry.
* If you get a 404, try `https:///auth/realms//.well-known/openid-configuration` and use that prefix instead.
The exact URL `https://login.truefoundry.com/oauth2/callback` is missing from **Valid Redirect URIs** on the Keycloak client. Add it under **Clients → your client → Settings**, save, and retry.
Your realm is issuing tokens encrypted with `RSA-OAEP`, which TrueFoundry does not support. Follow the steps in the [encryption algorithm restrictions](#encryption-algorithm-restrictions) section above to disable the `RSA-OAEP` key provider, leaving only supported algorithms enabled.
The **Client Secret** in TrueFoundry doesn't match Keycloak. Regenerate the secret on the client's **Credentials** tab, copy the new value, and update the SSO configuration under **Settings → Security & Access → SSO**.
Make sure the **email** scope is being requested and that the user has an email in Keycloak. In the TrueFoundry SSO form, set **Scopes** to `openid email profile` and re-test. If you map email under a non-standard claim, expand **Show advanced fields** and set **Email Claim** accordingly.