> ## Documentation Index
> Fetch the complete documentation index at: https://www.truefoundry.com/llms.txt
> Use this file to discover all available pages before exploring further.
# SCIM with JumpCloud
> Automatically provision users and groups from JumpCloud into TrueFoundry using SCIM 2.0.
This guide explains how to push users and groups from JumpCloud into TrueFoundry automatically using SCIM 2.0. With SCIM enabled, assigning a user group to your JumpCloud SAML application creates its members in TrueFoundry; removing a user from the group deactivates them. JumpCloud user groups sync as TrueFoundry teams.
## Prerequisites
* A JumpCloud **Custom SAML Application** for TrueFoundry already exists. JumpCloud requires SCIM to be configured **inside an existing SAML app** — there's no standalone SCIM application type. Follow [SAML with JumpCloud](/docs/platform/sso/jumpcloud/saml) first if you haven't already.
* **Admin** access in both TrueFoundry and JumpCloud.
* You're on TrueFoundry **v0.143** or higher. (On earlier versions, SCIM is configured directly inside the SSO form.)
JumpCloud's SCIM client only sends user updates for users who are members of a user group bound to the SAML application. Make sure the same user groups you use for SSO assignment are the ones you want synced.
## Step 1 — Generate the SCIM credentials in TrueFoundry
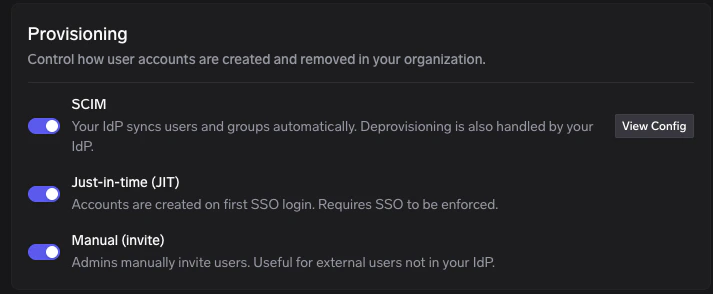
In TrueFoundry, go to **Settings → Security & Access → Provisioning** and turn on the **SCIM** toggle.
On the **Provisioning** page, click **View Config** on the **SCIM** row.
 In the **SCIM configuration** dialog, copy both values using the copy icons next to each field:
* **SCIM URL** — this is the value JumpCloud calls the **Base URL**.
* **Token** — this is the value JumpCloud calls the **Token Key**.
In the **SCIM configuration** dialog, copy both values using the copy icons next to each field:
* **SCIM URL** — this is the value JumpCloud calls the **Base URL**.
* **Token** — this is the value JumpCloud calls the **Token Key**.
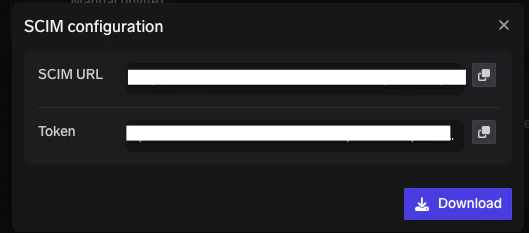 Store the token somewhere safe and treat it like a password. If you lose it, open **View Config** again to generate a new token — which invalidates the previous one.
## Step 2 — Open the JumpCloud SAML application
JumpCloud doesn't have a standalone SCIM application — provisioning lives inside the SAML app you created earlier.
Sign in to the [JumpCloud admin console](https://console.jumpcloud.com/) and click **SSO Applications** in the left navigation.
Click the row for the Custom SAML Application you created when [setting up SSO](/docs/platform/sso/jumpcloud/saml).
Click the **Identity Management** tab at the top of the application.
## Step 3 — Configure SCIM 2.0
Under **Configuration Settings**, find the **SCIM Version** selector and choose **SCIM 2.0**. JumpCloud expands the form below.
Fill in the following fields:
| JumpCloud field | Value |
| ------------------- | ------------------------------------------------------------------------------------------------------------ |
| **Base URL** | TrueFoundry **SCIM URL** (from **View Config**) |
| **Token Key** | TrueFoundry **Token** (from **View Config**) |
| **Test User Email** | The email of a real user that already exists in JumpCloud. JumpCloud uses this user for the connection test. |
The test user must be an active JumpCloud user. JumpCloud will issue a SCIM `GET /Users` filtered by this email during the connection test, so a typo or a deactivated account will cause the test to fail.
Click **Test Connection**. JumpCloud probes the TrueFoundry SCIM endpoint with the bearer token. A green confirmation toast appears when the credentials are valid.
If the test fails with a `401` response, open **View Config** on the **SCIM** row in TrueFoundry to generate a new token and re-paste it. If it fails with a `404`, double-check the **Base URL** for trailing whitespace or a missing path segment.
Click **Activate**, then click **Save** in the bottom-right corner. The **Identity Management** tab now shows SCIM as active.
## Step 4 — Push user groups to TrueFoundry
JumpCloud only sends SCIM updates for users in groups assigned to the application. After enabling SCIM you must explicitly choose which user groups to push.
Inside the same SAML application, click the **User Groups** tab at the top.
Tick each user group whose members should be provisioned into TrueFoundry. JumpCloud will push:
* The user objects (creating them in TrueFoundry).
* The group itself, which appears as a [team](/docs/platform/team-management) in TrueFoundry.
Click **Save** in the bottom-right corner.
If you don't yet have a group dedicated to TrueFoundry users:
1. In the JumpCloud left navigation, click **User Groups** and click the **+** icon to create a new group.
2. Give it a name — for example, `truefoundry-users`.
3. On the **Users** tab of the new group, add the users you want synced.
4. On the **Applications** tab of the new group, tick the TrueFoundry SAML application.
Then return to **Step 4** and confirm the new group is ticked.
## Step 5 — Verify the sync
JumpCloud queues a SCIM sync as soon as you save the SCIM configuration and group assignments. Subsequent changes (adding/removing users from a bound group) sync within a few minutes.
Go to **Access → Users** in TrueFoundry. Assigned JumpCloud users should appear within a few minutes, with their email and team memberships populated.
Go to **Access → Teams**. Each JumpCloud user group you assigned to the application appears as a TrueFoundry team, with members reflecting the JumpCloud group membership.
## How SCIM behaves with JumpCloud
* **Group-scoped** — JumpCloud only syncs users via groups bound to the SAML application. Direct user assignments without a group are not synced.
* **Deactivation** — Removing a user from every bound group sends a SCIM `PATCH active=false`, which deactivates the user in TrueFoundry rather than deleting them.
* **Group renames** — Renaming a JumpCloud user group renames the corresponding TrueFoundry team on the next sync.
* **Manual user updates** — Editing a user's first name, last name, or email in JumpCloud triggers a SCIM `PUT` and updates the user record in TrueFoundry.
## Troubleshooting
The bearer token is incorrect or expired. Open **View Config** on the **SCIM** row in TrueFoundry to generate a new token, paste it into JumpCloud's **Token Key** field, and click **Test Connection** again.
The **Test User Email** doesn't match a real JumpCloud user. JumpCloud queries its own directory before calling TrueFoundry — make sure the email is spelled correctly and belongs to an active user.
1. Confirm the user is a member of a **user group** that you ticked under the **User Groups** tab. JumpCloud doesn't sync users assigned to the application individually — only via groups.
2. Check the SCIM provisioning logs under **Identity Management → View Logs** in JumpCloud for any error messages on the user.
3. Force a manual sync by removing and re-adding the user to the group.
JumpCloud only pushes groups that are explicitly ticked on the **User Groups** tab of the SAML application. Confirm the group is selected and saved. If the group is selected but TrueFoundry doesn't show it, check **Identity Management → View Logs** for any group-level errors.
Generating a new token in TrueFoundry (**View Config** on the **SCIM** row) invalidates the previous one. Update the **Token Key** field on JumpCloud's **Identity Management** tab and click **Save** to resume sync.
Store the token somewhere safe and treat it like a password. If you lose it, open **View Config** again to generate a new token — which invalidates the previous one.
## Step 2 — Open the JumpCloud SAML application
JumpCloud doesn't have a standalone SCIM application — provisioning lives inside the SAML app you created earlier.
Sign in to the [JumpCloud admin console](https://console.jumpcloud.com/) and click **SSO Applications** in the left navigation.
Click the row for the Custom SAML Application you created when [setting up SSO](/docs/platform/sso/jumpcloud/saml).
Click the **Identity Management** tab at the top of the application.
## Step 3 — Configure SCIM 2.0
Under **Configuration Settings**, find the **SCIM Version** selector and choose **SCIM 2.0**. JumpCloud expands the form below.
Fill in the following fields:
| JumpCloud field | Value |
| ------------------- | ------------------------------------------------------------------------------------------------------------ |
| **Base URL** | TrueFoundry **SCIM URL** (from **View Config**) |
| **Token Key** | TrueFoundry **Token** (from **View Config**) |
| **Test User Email** | The email of a real user that already exists in JumpCloud. JumpCloud uses this user for the connection test. |
The test user must be an active JumpCloud user. JumpCloud will issue a SCIM `GET /Users` filtered by this email during the connection test, so a typo or a deactivated account will cause the test to fail.
Click **Test Connection**. JumpCloud probes the TrueFoundry SCIM endpoint with the bearer token. A green confirmation toast appears when the credentials are valid.
If the test fails with a `401` response, open **View Config** on the **SCIM** row in TrueFoundry to generate a new token and re-paste it. If it fails with a `404`, double-check the **Base URL** for trailing whitespace or a missing path segment.
Click **Activate**, then click **Save** in the bottom-right corner. The **Identity Management** tab now shows SCIM as active.
## Step 4 — Push user groups to TrueFoundry
JumpCloud only sends SCIM updates for users in groups assigned to the application. After enabling SCIM you must explicitly choose which user groups to push.
Inside the same SAML application, click the **User Groups** tab at the top.
Tick each user group whose members should be provisioned into TrueFoundry. JumpCloud will push:
* The user objects (creating them in TrueFoundry).
* The group itself, which appears as a [team](/docs/platform/team-management) in TrueFoundry.
Click **Save** in the bottom-right corner.
If you don't yet have a group dedicated to TrueFoundry users:
1. In the JumpCloud left navigation, click **User Groups** and click the **+** icon to create a new group.
2. Give it a name — for example, `truefoundry-users`.
3. On the **Users** tab of the new group, add the users you want synced.
4. On the **Applications** tab of the new group, tick the TrueFoundry SAML application.
Then return to **Step 4** and confirm the new group is ticked.
## Step 5 — Verify the sync
JumpCloud queues a SCIM sync as soon as you save the SCIM configuration and group assignments. Subsequent changes (adding/removing users from a bound group) sync within a few minutes.
Go to **Access → Users** in TrueFoundry. Assigned JumpCloud users should appear within a few minutes, with their email and team memberships populated.
Go to **Access → Teams**. Each JumpCloud user group you assigned to the application appears as a TrueFoundry team, with members reflecting the JumpCloud group membership.
## How SCIM behaves with JumpCloud
* **Group-scoped** — JumpCloud only syncs users via groups bound to the SAML application. Direct user assignments without a group are not synced.
* **Deactivation** — Removing a user from every bound group sends a SCIM `PATCH active=false`, which deactivates the user in TrueFoundry rather than deleting them.
* **Group renames** — Renaming a JumpCloud user group renames the corresponding TrueFoundry team on the next sync.
* **Manual user updates** — Editing a user's first name, last name, or email in JumpCloud triggers a SCIM `PUT` and updates the user record in TrueFoundry.
## Troubleshooting
The bearer token is incorrect or expired. Open **View Config** on the **SCIM** row in TrueFoundry to generate a new token, paste it into JumpCloud's **Token Key** field, and click **Test Connection** again.
The **Test User Email** doesn't match a real JumpCloud user. JumpCloud queries its own directory before calling TrueFoundry — make sure the email is spelled correctly and belongs to an active user.
1. Confirm the user is a member of a **user group** that you ticked under the **User Groups** tab. JumpCloud doesn't sync users assigned to the application individually — only via groups.
2. Check the SCIM provisioning logs under **Identity Management → View Logs** in JumpCloud for any error messages on the user.
3. Force a manual sync by removing and re-adding the user to the group.
JumpCloud only pushes groups that are explicitly ticked on the **User Groups** tab of the SAML application. Confirm the group is selected and saved. If the group is selected but TrueFoundry doesn't show it, check **Identity Management → View Logs** for any group-level errors.
Generating a new token in TrueFoundry (**View Config** on the **SCIM** row) invalidates the previous one. Update the **Token Key** field on JumpCloud's **Identity Management** tab and click **Save** to resume sync.