> ## Documentation Index
> Fetch the complete documentation index at: https://www.truefoundry.com/llms.txt
> Use this file to discover all available pages before exploring further.
# SAML with Google Workspace
> Configure SAML 2.0 single sign-on between TrueFoundry and Google Workspace using a custom SAML app.
This guide walks you through setting up SAML 2.0 single sign-on between TrueFoundry and Google Workspace. Once finished, members of your Workspace can sign in to TrueFoundry through a **Login with Google** button.
This guide configures **SAML SSO via Google Workspace** for an entire organisation. It is **not** the same as "Sign in with Google", which uses OAuth 2.0 / OIDC and authenticates individual Google consumer accounts. Confirm with your security team that you actually want SAML before continuing.
## Prerequisites
* A TrueFoundry tenant with **Admin** access to **Settings → Security & Access → SSO**.
* A Google Workspace account with **Super Admin** privileges on `admin.google.com` so you can create custom SAML apps.
You'll bounce between the **Google Admin Console** and the **TrueFoundry SSO settings**. Keep both open in adjacent tabs to copy-paste values quickly.
## Configuration overview
Save a SAML SSO configuration in TrueFoundry to surface the **ACS URL**, **Entity ID**, and **Start URL**.
Add a new custom SAML app under **Apps → Web and mobile apps** in the Google Admin Console.
Paste TrueFoundry's values into Google's Service Provider Details, then paste Google's IdP values back into TrueFoundry.
Turn the app **ON** for the right org units and verify sign-in.
## Step 1 — Create the SSO configuration in TrueFoundry
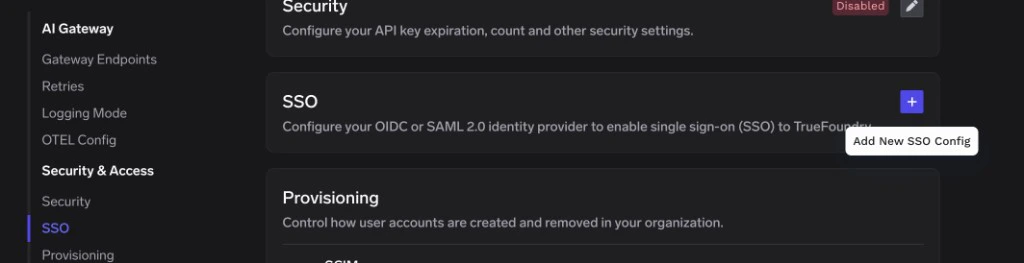
Go to **Settings → Security & Access → SSO**.
Click the **+** icon labeled **Add New SSO Config**.
 * **Enabled**: turn this on.
* **Name**: a lowercase alphanumeric label — for example, `googleworkspacesaml`.
* **SSO Provider**: select **Google**.
* **Authentication Configuration**: choose **SAML v2**.
Leave **Identity Provider Endpoint** and **X.509 Certificate** blank for now — you'll fill them in once Google surfaces those values.
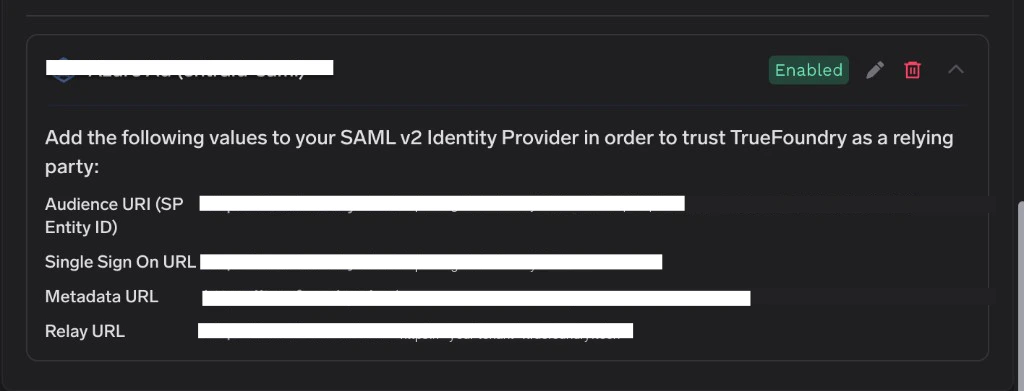
Click **Save**. TrueFoundry displays the values you need for Google on the SSO configuration card:
| Google field | Value from TrueFoundry |
| ------------------------------------------- | ------------------------------- |
| **ACS URL** | **Single Sign On URL** |
| **Entity ID** | **Audience URI (SP Entity ID)** |
| **Start URL** / **Relay State** *(if used)* | **Relay URL** |
* **Enabled**: turn this on.
* **Name**: a lowercase alphanumeric label — for example, `googleworkspacesaml`.
* **SSO Provider**: select **Google**.
* **Authentication Configuration**: choose **SAML v2**.
Leave **Identity Provider Endpoint** and **X.509 Certificate** blank for now — you'll fill them in once Google surfaces those values.
Click **Save**. TrueFoundry displays the values you need for Google on the SSO configuration card:
| Google field | Value from TrueFoundry |
| ------------------------------------------- | ------------------------------- |
| **ACS URL** | **Single Sign On URL** |
| **Entity ID** | **Audience URI (SP Entity ID)** |
| **Start URL** / **Relay State** *(if used)* | **Relay URL** |
 ## Step 2 — Create a custom SAML app in Google
Sign in to [admin.google.com](https://admin.google.com) as a Super Admin.
In the left sidebar, expand **Apps** and click **Web and mobile apps**.
Click **Add app → Add custom SAML app**.
On the **App details** screen, enter an **App name** (for example `TrueFoundry`). Optionally upload an app icon, then click **Continue**.
On the **Google Identity Provider details** screen, click **Continue** without copying anything yet — you'll paste the **SSO URL** and certificate into TrueFoundry in [Step 5](#step-5-paste-googles-idp-details-into-truefoundry).
## Step 3 — Enter TrueFoundry's details into Google
On the **Service Provider Details** step of the wizard, paste the values from Step 1.
| Google field | Value from TrueFoundry |
| ------------- | ------------------------------- |
| **ACS URL** | **Single Sign On URL** |
| **Entity ID** | **Audience URI (SP Entity ID)** |
Leave **Start URL** blank and leave **Signed response** unchecked unless your security policy requires it.
Configure the Name ID block:
* **Name ID format** — `EMAIL`.
* **Name ID** — `Basic Information > Primary email`.
Click **Continue**.
## Step 4 — Map directory attributes
On the **Attributes** step, add mappings for the claims TrueFoundry expects:
Under **Attributes**, click **Add mapping** for each row:
| Google directory attribute | App attribute |
| -------------------------- | ------------- |
| **Primary email** | `email` |
| **Primary email** | `sub` |
Google does not expose an Azure-style `objectId` in the custom SAML wizard. Mapping **Primary email** to both `email` and `sub` is the most common pattern. If your organisation populates **Employee ID** for every user, you can map that field to `sub` instead for a more stable identifier.
Click **Finish**. Google lands you on the new app's overview page — the SAML app exists but is **OFF for everyone** by default.
## Step 5 — Paste Google's IdP details into TrueFoundry
From the app's overview page, click **Download metadata** or open the SAML app setup flow again and navigate to **Google Identity Provider details**. Copy the **SSO URL** and click **Download** under **Certificate** to save the `.pem` file.
Return to **Settings → Security & Access → SSO** in TrueFoundry and edit the SSO configuration you created in Step 1. Set:
* **Identity Provider Endpoint** → Google's **SSO URL**.
* **X.509 Certificate** → the full contents of the downloaded `.pem` file, including the `-----BEGIN CERTIFICATE-----` and `-----END CERTIFICATE-----` lines.
Click **Save**.
## Step 6 — Enable user access in Google
Newly-created custom SAML apps are turned **OFF** for the entire Workspace. You must explicitly enable the app for the users who should be able to sign in.
From the new app's overview page, click the **User access** card on the right (it shows as **OFF for everyone**).
Either:
* Choose **ON for everyone** and click **Save**, or
* Select an organisational unit or group on the left and toggle **Service status** to **ON** for just that subset.
Google can take up to **24 hours** to propagate the **ON / OFF** change. Until propagation finishes, affected users will see `app_not_configured_for_user` when they try to sign in. This is a Google-side delay — there is nothing to fix in TrueFoundry.
## Step 7 — Test single sign-on
1. Open a private/incognito window and visit your TrueFoundry login page.
2. Click **Login with Google** (or whichever **Button Text** you chose under **Show advanced fields**).
3. Authenticate with a Google Workspace user that the app is enabled for.
If the sign-in succeeds you'll land in the TrueFoundry dashboard. New users are created automatically if [JIT provisioning](/docs/platform/user-management#user-provisioning) is enabled; otherwise the user must already exist in TrueFoundry or be invited.
## Optional next steps
* **Use OIDC instead** — if you don't need SAML, the OAuth 2.0 flow against Google is simpler. Configure a Google Cloud OAuth client and switch **Authentication Configuration** to **OIDC** in TrueFoundry.
* **Use a different IdP** — see [SAML with Microsoft Entra ID](/docs/platform/sso/entra/saml) for the equivalent flow against Entra.
## Troubleshooting
The certificate pasted into TrueFoundry doesn't match the active signing certificate on Google's app. Re-download the `.pem` from the **Google Identity Provider details** screen of your custom SAML app and paste the **entire** contents — including the `-----BEGIN CERTIFICATE-----` and `-----END CERTIFICATE-----` lines — into TrueFoundry's **X.509 Certificate** field.
The Google org unit they belong to isn't enabled for the SAML app yet, or Google hasn't finished propagating the change. Confirm under **Apps → Web and mobile apps → \ → User access** that the OU is **ON**, then wait up to 24 hours for propagation.
The `email` and `sub` attribute mappings weren't saved. Edit the SAML app in Google, open **Attribute mapping**, and confirm **Primary email** maps to both `email` and `sub` (or **Employee ID** → `sub` if you use that pattern).
Google signs SAML assertions by default but **does not** sign the SAML response envelope unless asked to. If your security policy requires a signed response, edit the SAML app in Google, return to **Service Provider Details**, and check **Signed response**. Then re-test.
## Step 2 — Create a custom SAML app in Google
Sign in to [admin.google.com](https://admin.google.com) as a Super Admin.
In the left sidebar, expand **Apps** and click **Web and mobile apps**.
Click **Add app → Add custom SAML app**.
On the **App details** screen, enter an **App name** (for example `TrueFoundry`). Optionally upload an app icon, then click **Continue**.
On the **Google Identity Provider details** screen, click **Continue** without copying anything yet — you'll paste the **SSO URL** and certificate into TrueFoundry in [Step 5](#step-5-paste-googles-idp-details-into-truefoundry).
## Step 3 — Enter TrueFoundry's details into Google
On the **Service Provider Details** step of the wizard, paste the values from Step 1.
| Google field | Value from TrueFoundry |
| ------------- | ------------------------------- |
| **ACS URL** | **Single Sign On URL** |
| **Entity ID** | **Audience URI (SP Entity ID)** |
Leave **Start URL** blank and leave **Signed response** unchecked unless your security policy requires it.
Configure the Name ID block:
* **Name ID format** — `EMAIL`.
* **Name ID** — `Basic Information > Primary email`.
Click **Continue**.
## Step 4 — Map directory attributes
On the **Attributes** step, add mappings for the claims TrueFoundry expects:
Under **Attributes**, click **Add mapping** for each row:
| Google directory attribute | App attribute |
| -------------------------- | ------------- |
| **Primary email** | `email` |
| **Primary email** | `sub` |
Google does not expose an Azure-style `objectId` in the custom SAML wizard. Mapping **Primary email** to both `email` and `sub` is the most common pattern. If your organisation populates **Employee ID** for every user, you can map that field to `sub` instead for a more stable identifier.
Click **Finish**. Google lands you on the new app's overview page — the SAML app exists but is **OFF for everyone** by default.
## Step 5 — Paste Google's IdP details into TrueFoundry
From the app's overview page, click **Download metadata** or open the SAML app setup flow again and navigate to **Google Identity Provider details**. Copy the **SSO URL** and click **Download** under **Certificate** to save the `.pem` file.
Return to **Settings → Security & Access → SSO** in TrueFoundry and edit the SSO configuration you created in Step 1. Set:
* **Identity Provider Endpoint** → Google's **SSO URL**.
* **X.509 Certificate** → the full contents of the downloaded `.pem` file, including the `-----BEGIN CERTIFICATE-----` and `-----END CERTIFICATE-----` lines.
Click **Save**.
## Step 6 — Enable user access in Google
Newly-created custom SAML apps are turned **OFF** for the entire Workspace. You must explicitly enable the app for the users who should be able to sign in.
From the new app's overview page, click the **User access** card on the right (it shows as **OFF for everyone**).
Either:
* Choose **ON for everyone** and click **Save**, or
* Select an organisational unit or group on the left and toggle **Service status** to **ON** for just that subset.
Google can take up to **24 hours** to propagate the **ON / OFF** change. Until propagation finishes, affected users will see `app_not_configured_for_user` when they try to sign in. This is a Google-side delay — there is nothing to fix in TrueFoundry.
## Step 7 — Test single sign-on
1. Open a private/incognito window and visit your TrueFoundry login page.
2. Click **Login with Google** (or whichever **Button Text** you chose under **Show advanced fields**).
3. Authenticate with a Google Workspace user that the app is enabled for.
If the sign-in succeeds you'll land in the TrueFoundry dashboard. New users are created automatically if [JIT provisioning](/docs/platform/user-management#user-provisioning) is enabled; otherwise the user must already exist in TrueFoundry or be invited.
## Optional next steps
* **Use OIDC instead** — if you don't need SAML, the OAuth 2.0 flow against Google is simpler. Configure a Google Cloud OAuth client and switch **Authentication Configuration** to **OIDC** in TrueFoundry.
* **Use a different IdP** — see [SAML with Microsoft Entra ID](/docs/platform/sso/entra/saml) for the equivalent flow against Entra.
## Troubleshooting
The certificate pasted into TrueFoundry doesn't match the active signing certificate on Google's app. Re-download the `.pem` from the **Google Identity Provider details** screen of your custom SAML app and paste the **entire** contents — including the `-----BEGIN CERTIFICATE-----` and `-----END CERTIFICATE-----` lines — into TrueFoundry's **X.509 Certificate** field.
The Google org unit they belong to isn't enabled for the SAML app yet, or Google hasn't finished propagating the change. Confirm under **Apps → Web and mobile apps → \ → User access** that the OU is **ON**, then wait up to 24 hours for propagation.
The `email` and `sub` attribute mappings weren't saved. Edit the SAML app in Google, open **Attribute mapping**, and confirm **Primary email** maps to both `email` and `sub` (or **Employee ID** → `sub` if you use that pattern).
Google signs SAML assertions by default but **does not** sign the SAML response envelope unless asked to. If your security policy requires a signed response, edit the SAML app in Google, return to **Service Provider Details**, and check **Signed response**. Then re-test.