> ## Documentation Index
> Fetch the complete documentation index at: https://www.truefoundry.com/llms.txt
> Use this file to discover all available pages before exploring further.
# OIDC with Microsoft Entra ID
> Configure OpenID Connect single sign-on between TrueFoundry and Microsoft Entra ID (formerly Azure AD).
This guide walks you through setting up OpenID Connect (OIDC) single sign-on between TrueFoundry and Microsoft Entra ID (formerly Azure Active Directory). Once finished, members of your Entra tenant can sign in to TrueFoundry through a **Login with Entra ID** button.
For SAML 2.0 instead of OIDC, see [SAML with Microsoft Entra ID](/docs/platform/sso/entra/saml).
## Prerequisites
* A TrueFoundry tenant with **Admin** access to **Settings → Security & Access → SSO**.
* A Microsoft Entra tenant with permission to create **App registrations**.
## Step 1 — Register an application in Entra
Sign in to the [Microsoft Entra admin center](https://entra.microsoft.com/) as an administrator.
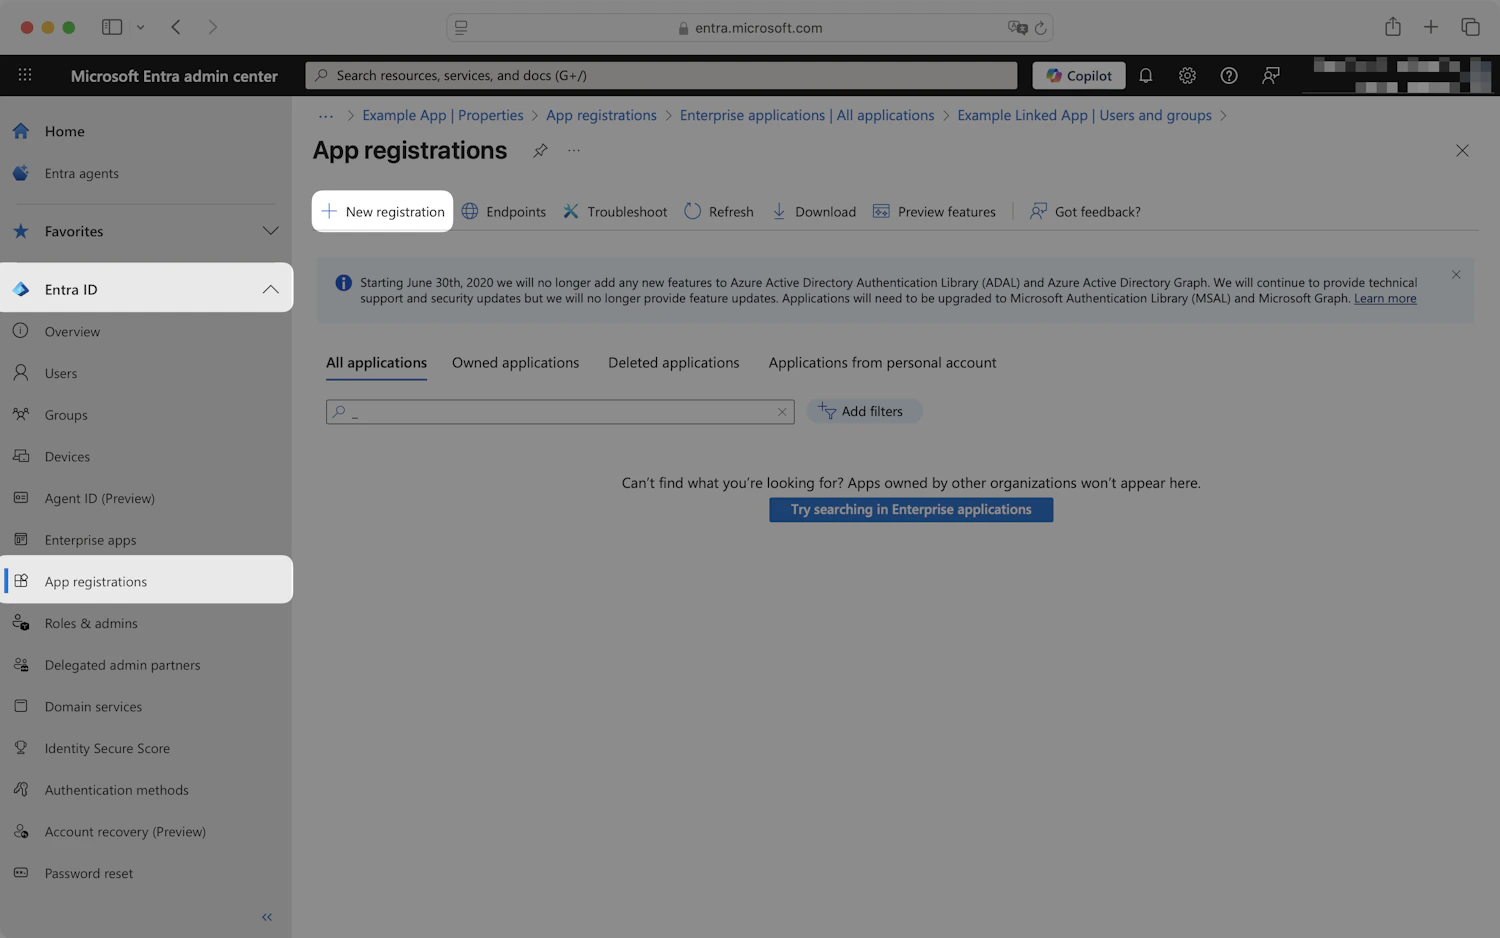
In the left navigation, expand **Identity → Applications**, select **App registrations**, then click **New registration**.
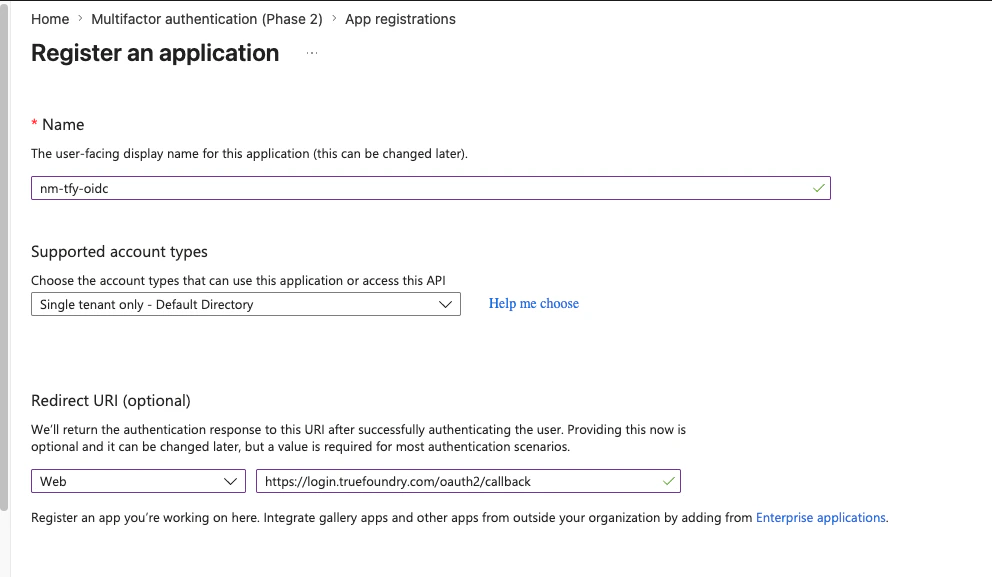
 Fill in:
* **Name** — a lowercase alphanumeric label, for example `truefoundry-oidc`.
* **Supported account types** — choose **Single tenant only**.
* **Redirect URI** — set the platform to **Web** and the URL to:
```
https://login.truefoundry.com/oauth2/callback
```
Click **Register**.
Fill in:
* **Name** — a lowercase alphanumeric label, for example `truefoundry-oidc`.
* **Supported account types** — choose **Single tenant only**.
* **Redirect URI** — set the platform to **Web** and the URL to:
```
https://login.truefoundry.com/oauth2/callback
```
Click **Register**.
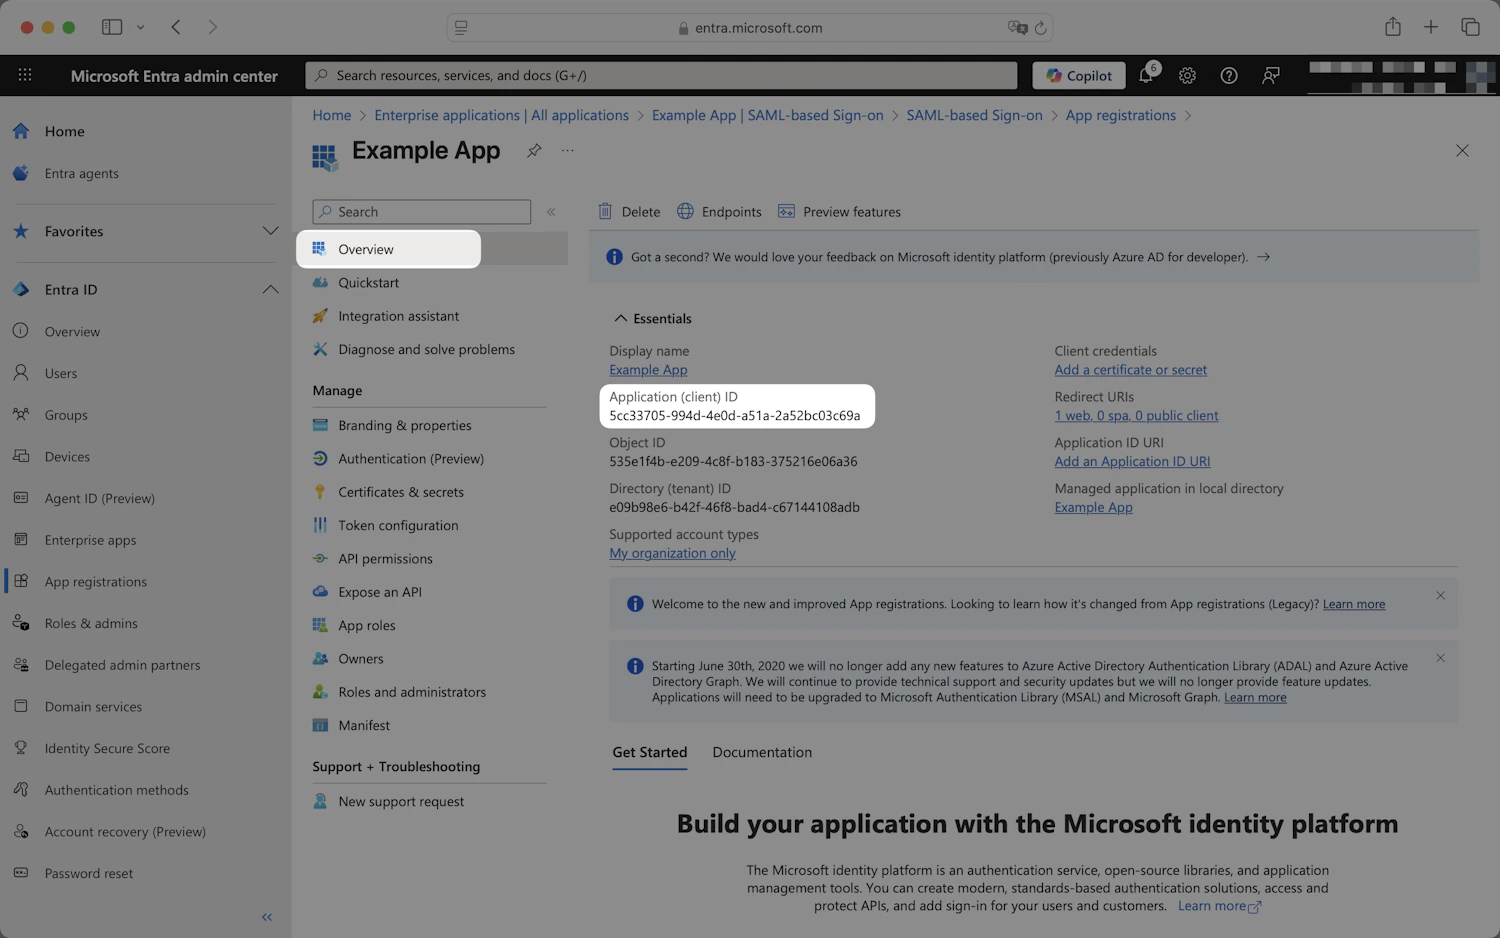
 On the application **Overview** page, copy the **Application (client) ID** and the **Directory (tenant) ID**. You'll use them in TrueFoundry.
 ## Step 2 — Create a client secret
From your app registration, click **Certificates & secrets** in the left sidebar, then click **New client secret** under **Client secrets**.
## Step 2 — Create a client secret
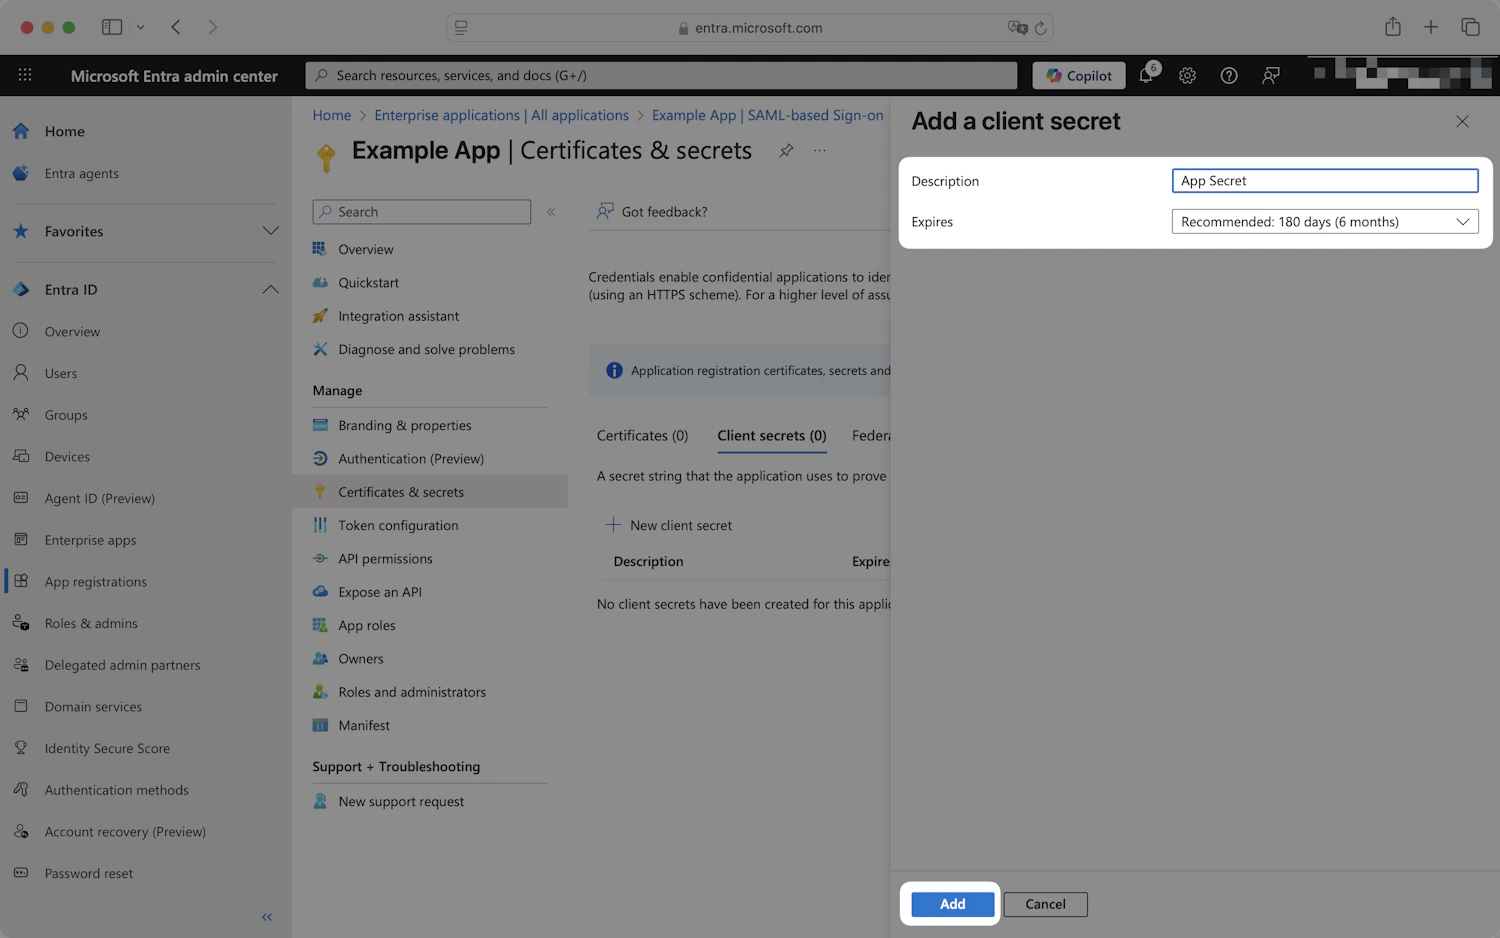
From your app registration, click **Certificates & secrets** in the left sidebar, then click **New client secret** under **Client secrets**.
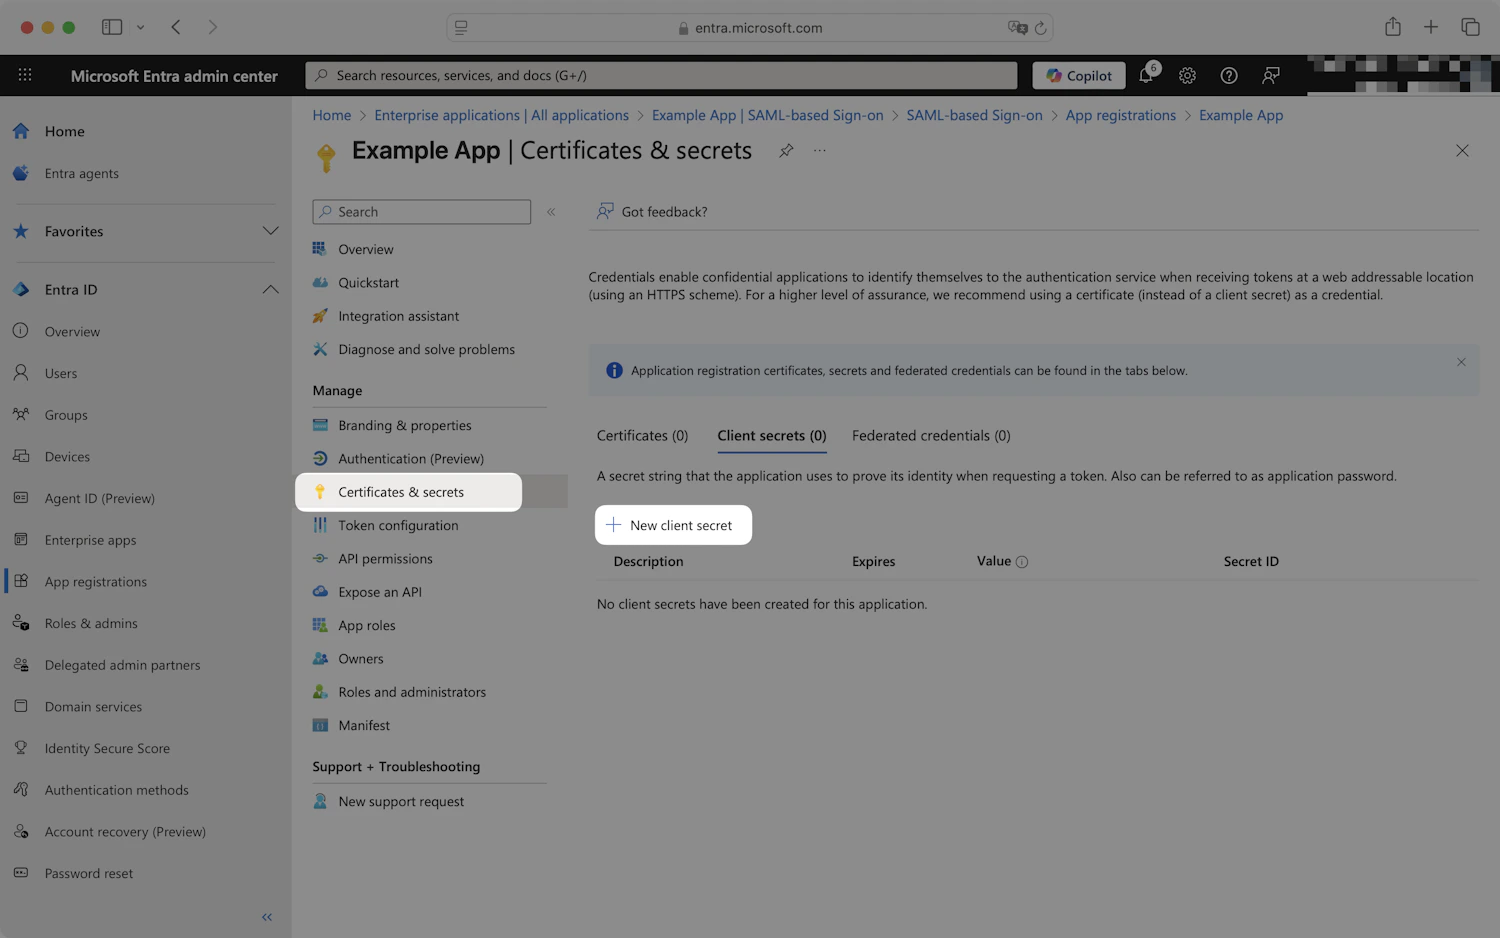 Add a description (for example `TrueFoundry SSO`), choose an expiry that matches your security policy, and click **Add**.
 Copy the secret's **Value** field — not the **Secret ID**. The value is only visible immediately after creation.
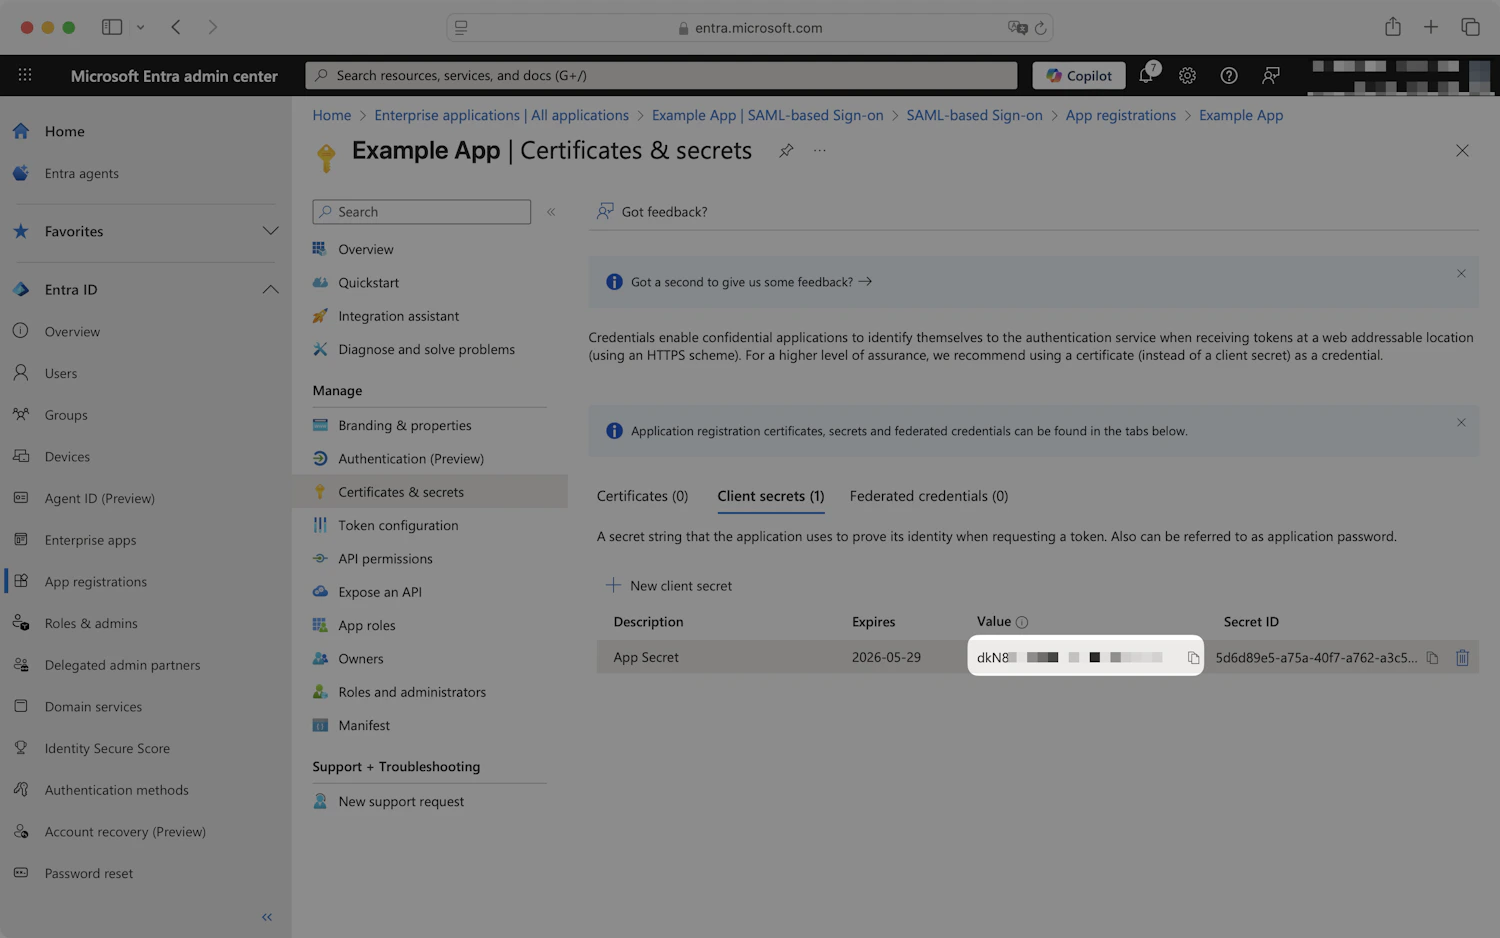 Once you leave this page, the secret value can never be displayed again. If you lose it you must create a new client secret.
## Step 3 — Configure token claims (recommended)
By default, Entra issues an ID token that doesn't include the user's email address. Adding the `email` claim lets TrueFoundry match the user to a TrueFoundry account.
From your app registration, click **Token configuration** in the left sidebar, then click **Add optional claim**.
Once you leave this page, the secret value can never be displayed again. If you lose it you must create a new client secret.
## Step 3 — Configure token claims (recommended)
By default, Entra issues an ID token that doesn't include the user's email address. Adding the `email` claim lets TrueFoundry match the user to a TrueFoundry account.
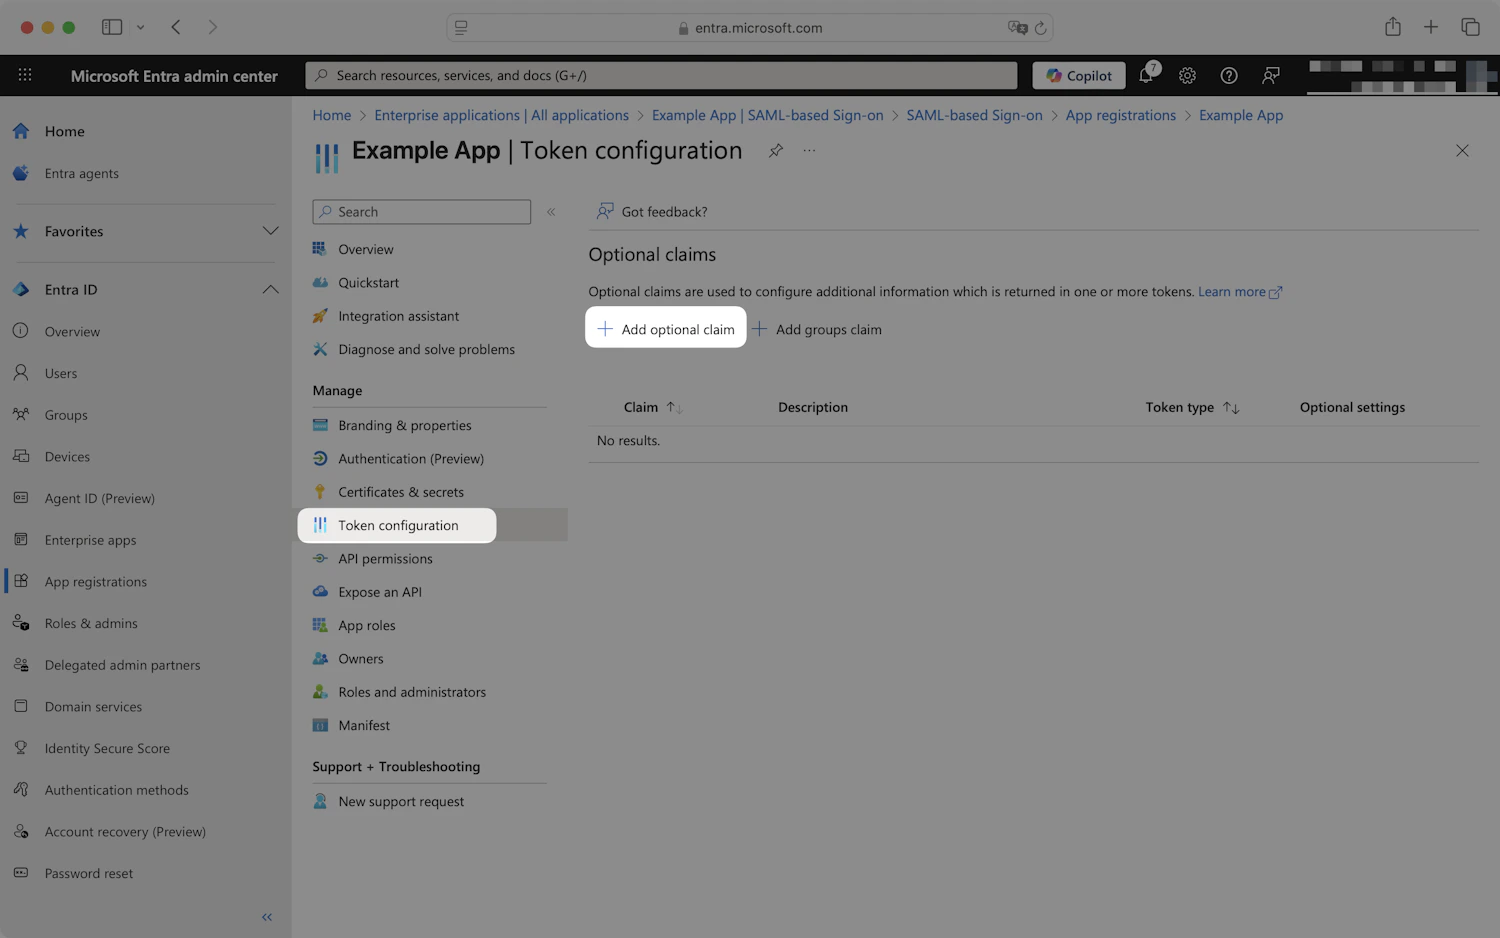
From your app registration, click **Token configuration** in the left sidebar, then click **Add optional claim**.
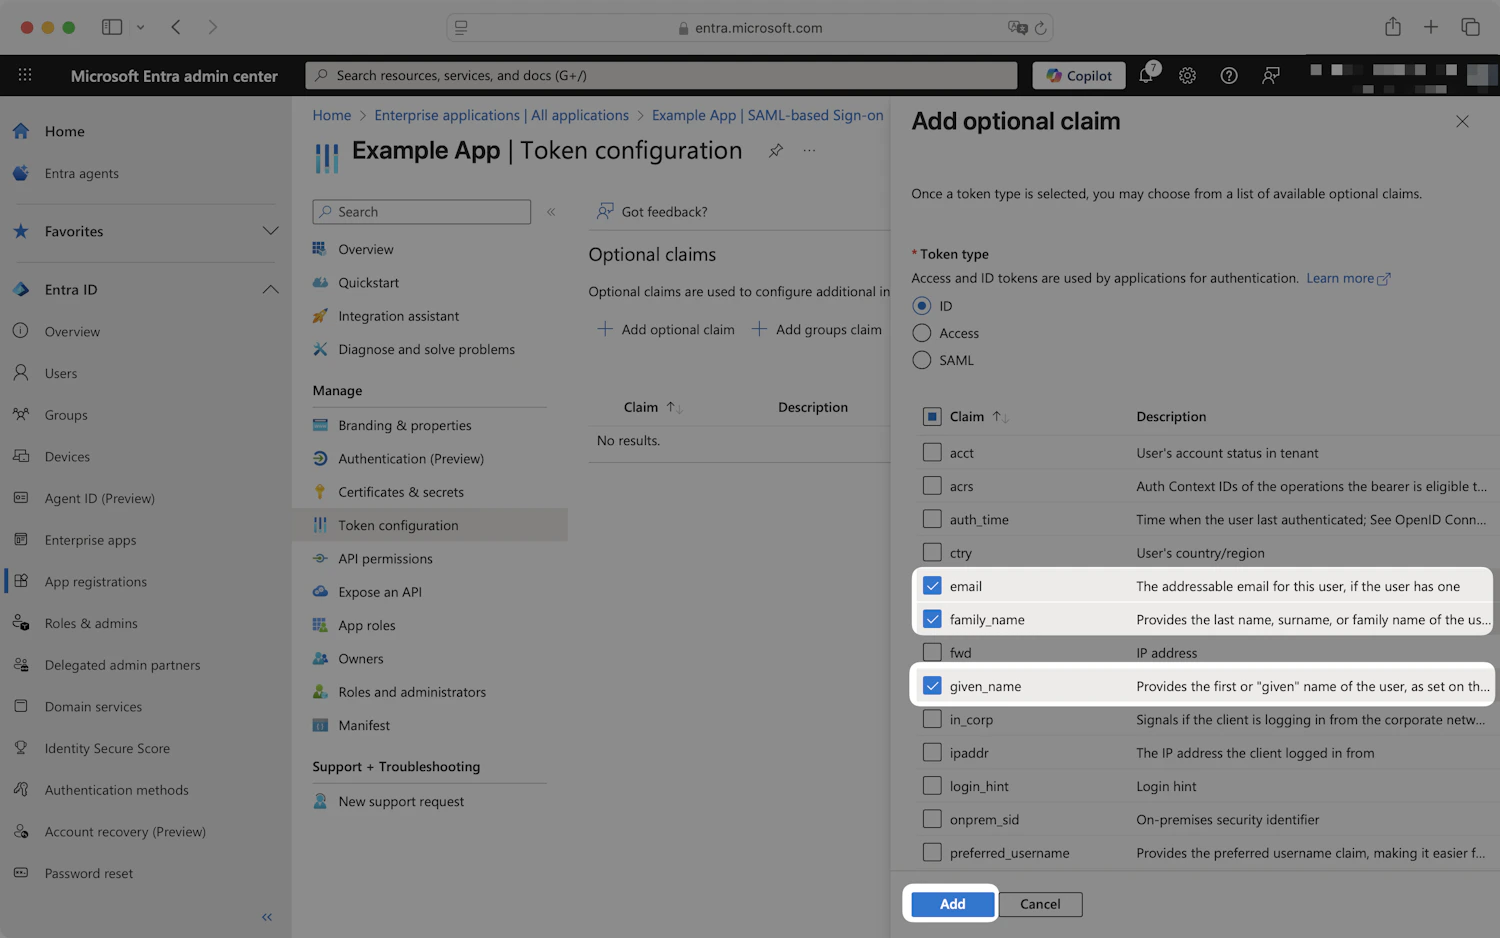
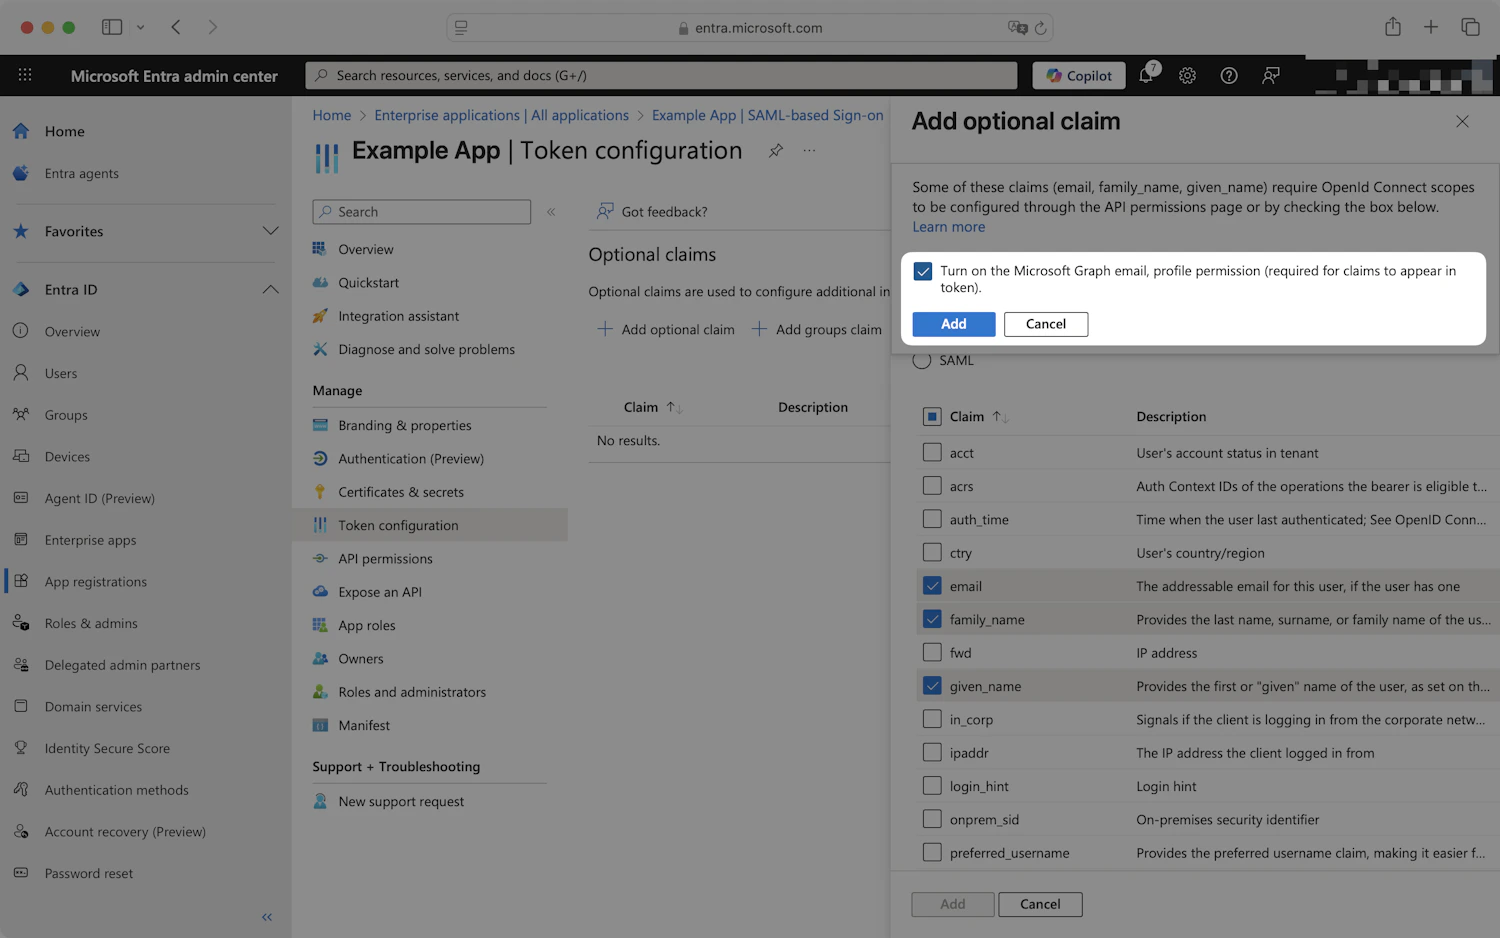
 Choose **ID** as the token type and select the following claims:
* `email`
* `family_name`
* `given_name`
Click **Add**. When prompted, enable **Turn on the Microsoft Graph email, profile permission** so the requested scopes have permission to return these claims.
Choose **ID** as the token type and select the following claims:
* `email`
* `family_name`
* `given_name`
Click **Add**. When prompted, enable **Turn on the Microsoft Graph email, profile permission** so the requested scopes have permission to return these claims.
 ## Step 4 — Add the redirect URI again on the Authentication page (if needed)
If you skipped setting **Redirect URI** during registration:
From the app registration, click **Authentication** in the left sidebar, then **Add a platform → Web**.
Set **Redirect URIs** to:
```
https://login.truefoundry.com/oauth2/callback
```
Click **Configure**.
To enable the **Device Code** sign-in flow (used by some CLIs that don't have access to a browser), expand **Advanced settings** on the **Authentication** page and toggle **Allow public client flows** on.
## Step 5 — Configure TrueFoundry
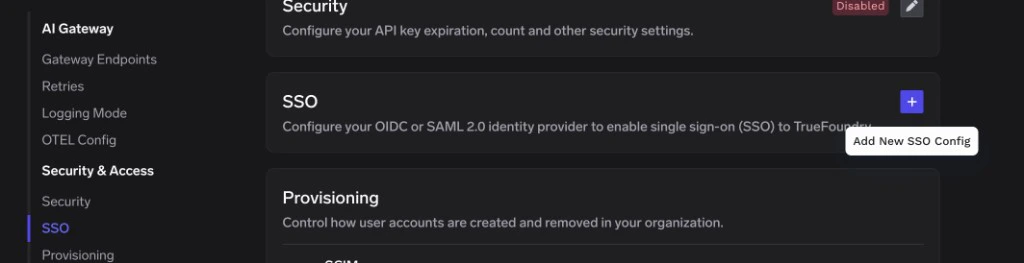
In TrueFoundry, go to **Settings → Security & Access → SSO**.
Click the **+** icon labeled **Add New SSO Config**.
## Step 4 — Add the redirect URI again on the Authentication page (if needed)
If you skipped setting **Redirect URI** during registration:
From the app registration, click **Authentication** in the left sidebar, then **Add a platform → Web**.
Set **Redirect URIs** to:
```
https://login.truefoundry.com/oauth2/callback
```
Click **Configure**.
To enable the **Device Code** sign-in flow (used by some CLIs that don't have access to a browser), expand **Advanced settings** on the **Authentication** page and toggle **Allow public client flows** on.
## Step 5 — Configure TrueFoundry
In TrueFoundry, go to **Settings → Security & Access → SSO**.
Click the **+** icon labeled **Add New SSO Config**.
 * **Enabled**: turn this on.
* **Name**: a lowercase alphanumeric label — for example, `entraoidc`.
* **SSO Provider**: select **Azure AD**.
* **Authentication Configuration**: choose **OIDC**.
* **Client ID**: the **Application (client) ID** from Entra.
* **Client Secret**: the client secret **Value** from Entra.
* **Discover endpoints**: leave enabled.
* **Issuer URL**:
```
https://login.microsoftonline.com//v2.0
```
Replace `` with the **Directory (tenant) ID** you copied in Step 1.
* **Scopes** *(optional)*: leave blank to use the default `openid email`. Add `profile` if you want first and last name in the token.
Click **Save**. TrueFoundry validates the issuer URL and stores the credentials.
## Step 6 — Assign users in Entra
For single-tenant configurations with **Assignment required** enabled, Entra only allows assigned users to sign in.
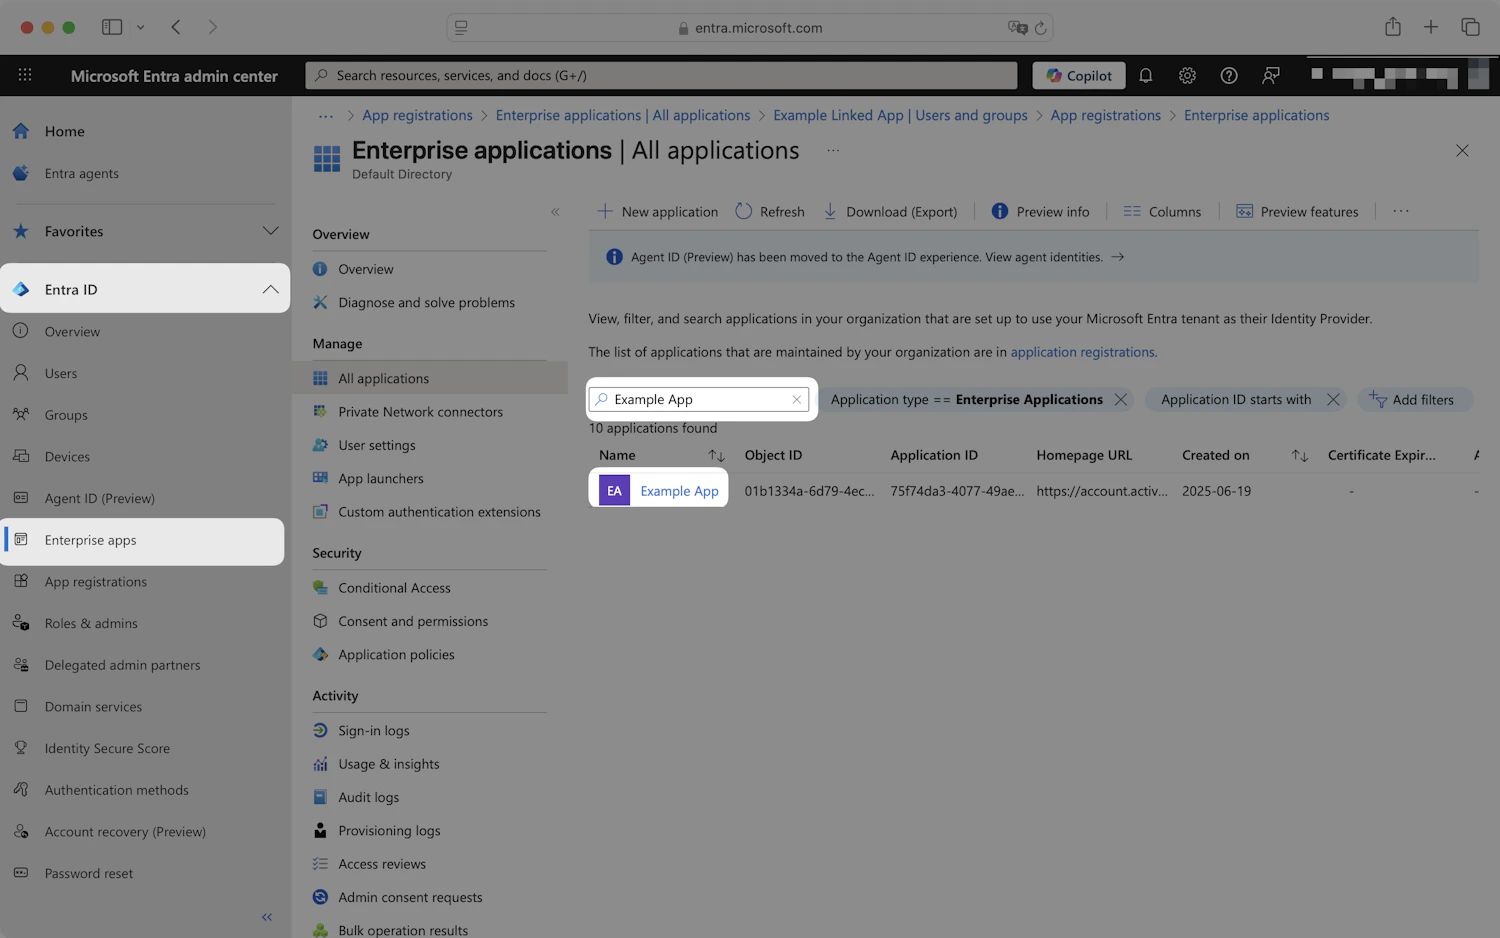
Back in the Entra admin center, navigate to **Enterprise applications** and select the app registration you created.
* **Enabled**: turn this on.
* **Name**: a lowercase alphanumeric label — for example, `entraoidc`.
* **SSO Provider**: select **Azure AD**.
* **Authentication Configuration**: choose **OIDC**.
* **Client ID**: the **Application (client) ID** from Entra.
* **Client Secret**: the client secret **Value** from Entra.
* **Discover endpoints**: leave enabled.
* **Issuer URL**:
```
https://login.microsoftonline.com//v2.0
```
Replace `` with the **Directory (tenant) ID** you copied in Step 1.
* **Scopes** *(optional)*: leave blank to use the default `openid email`. Add `profile` if you want first and last name in the token.
Click **Save**. TrueFoundry validates the issuer URL and stores the credentials.
## Step 6 — Assign users in Entra
For single-tenant configurations with **Assignment required** enabled, Entra only allows assigned users to sign in.
Back in the Entra admin center, navigate to **Enterprise applications** and select the app registration you created.
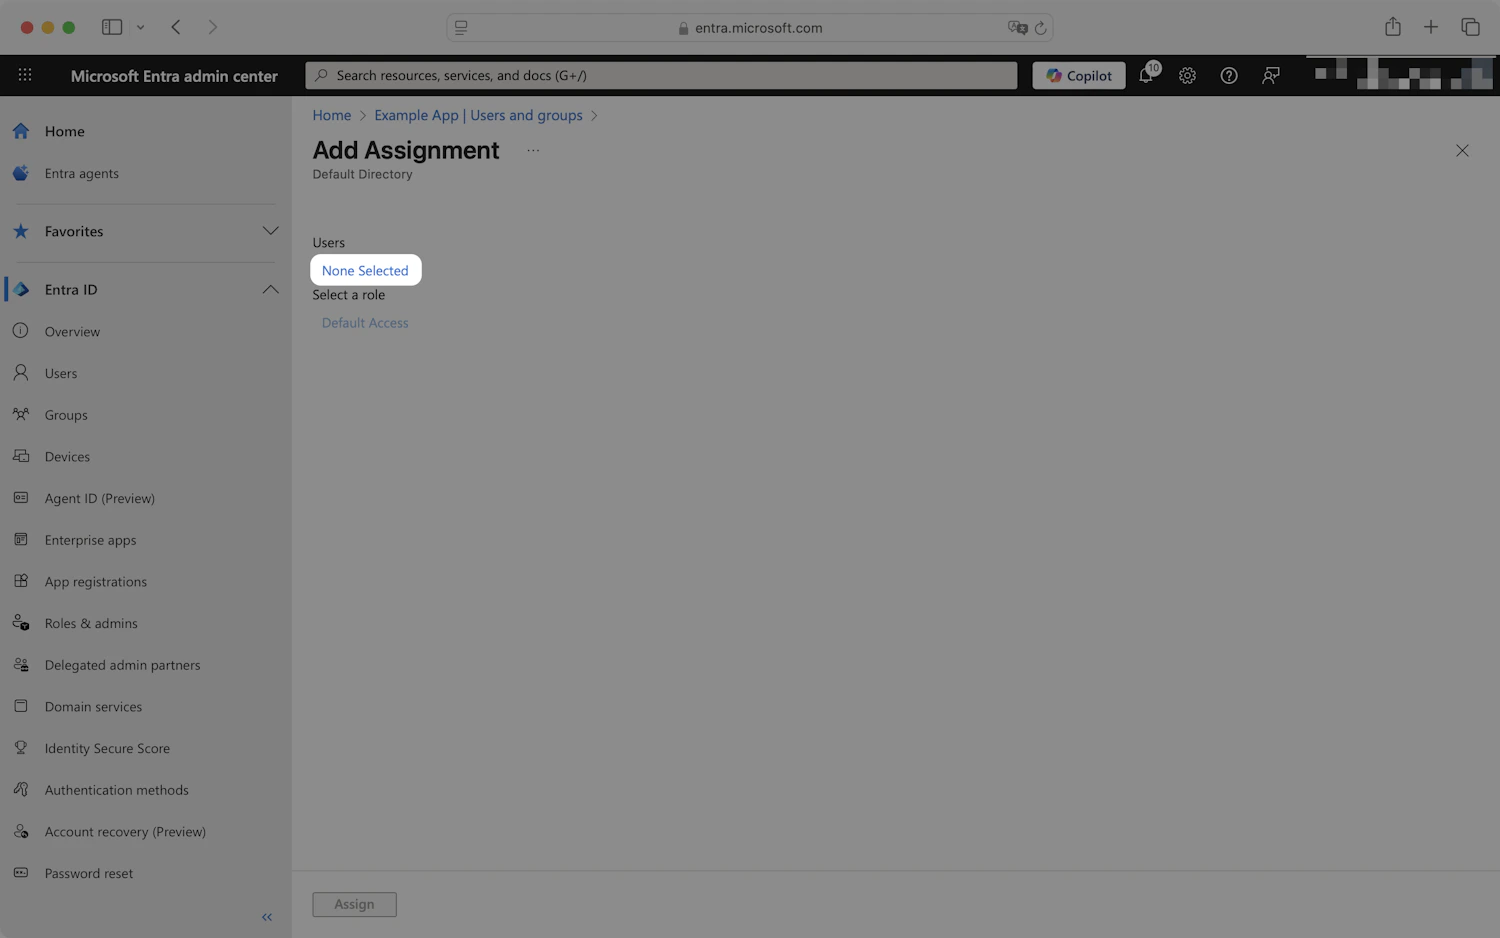
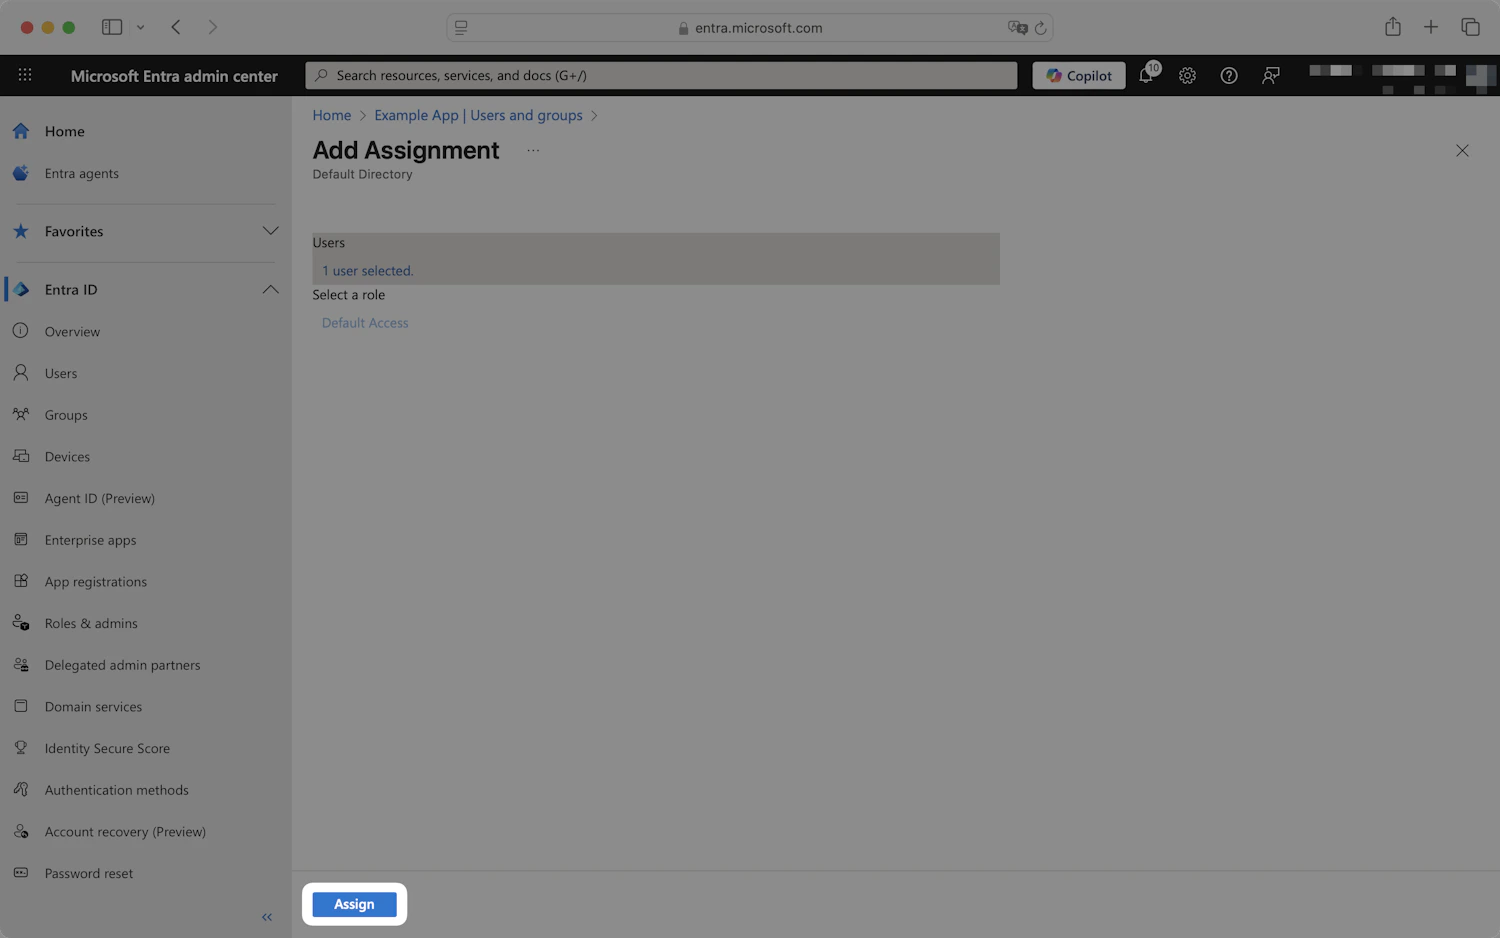
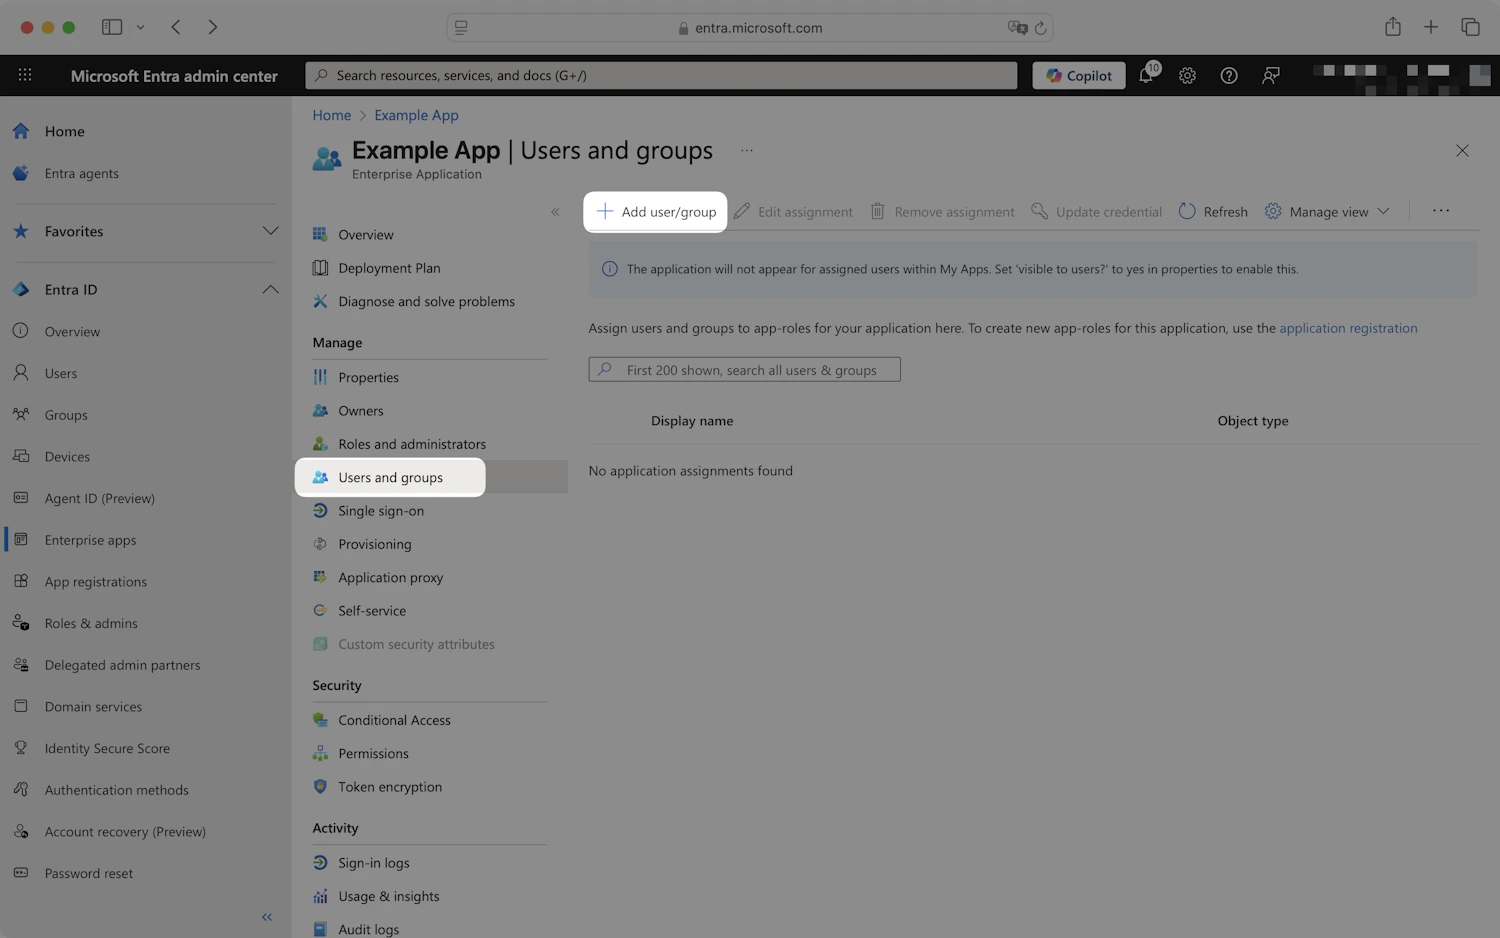 Click **Users and groups** → **Add user/group**, pick the users or security groups that should be able to sign in to TrueFoundry, and click **Assign**.
 ## Step 7 — Test single sign-on
1. Open a private/incognito window and visit your TrueFoundry login page.
2. Click **Login with Entra ID**.
3. Authenticate with an assigned user.
You should land in the TrueFoundry dashboard. New users are created automatically if [JIT provisioning](/docs/platform/user-management#user-provisioning) is enabled.
## Optional next steps
* **Sync users and groups automatically** — see [SCIM with Microsoft Entra ID](/docs/platform/sso/entra/scim).
* **Use SAML instead** — see [SAML with Microsoft Entra ID](/docs/platform/sso/entra/saml).
## Troubleshooting
The **Issuer URL** in TrueFoundry points to the wrong tenant. Double-check the **Directory (tenant) ID** and re-construct the issuer as `https://login.microsoftonline.com//v2.0`.
Either the secret expired or only the **Secret ID** was copied. Generate a new client secret in **Certificates & secrets**, copy the **Value** field immediately, and update TrueFoundry.
Make sure you added the `email` optional claim in **Token configuration** *and* enabled the **email, profile** Microsoft Graph permission when prompted. Then add `profile email` to **Scopes** on the TrueFoundry SSO form.
Either disable **Assignment required** on the Enterprise application's **Properties** page, or assign the user/group under **Users and groups**.
## Step 7 — Test single sign-on
1. Open a private/incognito window and visit your TrueFoundry login page.
2. Click **Login with Entra ID**.
3. Authenticate with an assigned user.
You should land in the TrueFoundry dashboard. New users are created automatically if [JIT provisioning](/docs/platform/user-management#user-provisioning) is enabled.
## Optional next steps
* **Sync users and groups automatically** — see [SCIM with Microsoft Entra ID](/docs/platform/sso/entra/scim).
* **Use SAML instead** — see [SAML with Microsoft Entra ID](/docs/platform/sso/entra/saml).
## Troubleshooting
The **Issuer URL** in TrueFoundry points to the wrong tenant. Double-check the **Directory (tenant) ID** and re-construct the issuer as `https://login.microsoftonline.com//v2.0`.
Either the secret expired or only the **Secret ID** was copied. Generate a new client secret in **Certificates & secrets**, copy the **Value** field immediately, and update TrueFoundry.
Make sure you added the `email` optional claim in **Token configuration** *and* enabled the **email, profile** Microsoft Graph permission when prompted. Then add `profile email` to **Scopes** on the TrueFoundry SSO form.
Either disable **Assignment required** on the Enterprise application's **Properties** page, or assign the user/group under **Users and groups**.