> ## Documentation Index
> Fetch the complete documentation index at: https://www.truefoundry.com/llms.txt
> Use this file to discover all available pages before exploring further.
# SAML with a Custom Identity Provider
> Configure SAML 2.0 single sign-on between TrueFoundry and any standards-compliant SAML 2.0 Identity Provider.
This guide explains how to wire up TrueFoundry SSO against any SAML 2.0 Identity Provider (IdP) — useful when there isn't a dedicated guide for your IdP yet. If your IdP is Microsoft Entra ID, Okta, Google, or another provider that already has a TrueFoundry guide, prefer that guide instead.
After you finish, members of your IdP can sign in to TrueFoundry through a customisable **Login with SSO** button.
## Prerequisites
* A TrueFoundry tenant with **Admin** access to **Settings → Security & Access → SSO**.
* Administrator access to your Identity Provider, with permission to create SAML applications / Service Provider entries.
* An IdP that implements **SAML 2.0** with **SP-initiated** login.
Keep the IdP admin console and TrueFoundry's **Settings → Security & Access → SSO** page open in side-by-side tabs. You'll bounce between them to copy SP metadata from TrueFoundry into the IdP, then bring the IdP's **Login URL** and **certificate** back into TrueFoundry.
## Configuration overview
Save a SAML SSO configuration in TrueFoundry to surface the **Single Sign On URL**, **Audience URI (SP Entity ID)**, and **Relay URL**.
Register TrueFoundry as a Service Provider using the values from the previous step.
Sign responses with RSA-SHA256 and emit the attributes TrueFoundry expects.
Save the IdP login URL and signing certificate in TrueFoundry.
Grant users access in your IdP and verify the end-to-end flow.
## Step 1 — Create the SSO configuration in TrueFoundry
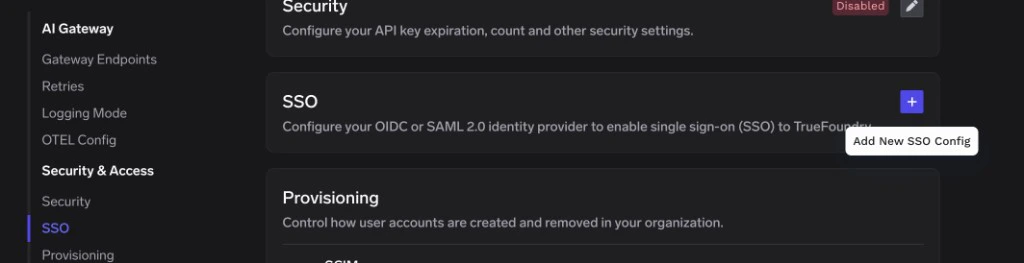
Go to **Settings → Security & Access → SSO**.
Click the **+** icon labeled **Add New SSO Config**.
 * **Enabled**: turn this on.
* **Name**: a lowercase alphanumeric label — for example, `companysso`.
* **SSO Provider**: choose **Custom**.
* **Authentication Configuration**: select **SAML v2**.
Leave **Identity Provider Endpoint** and **X.509 Certificate** blank for now — you'll fill them in once your IdP surfaces those values.
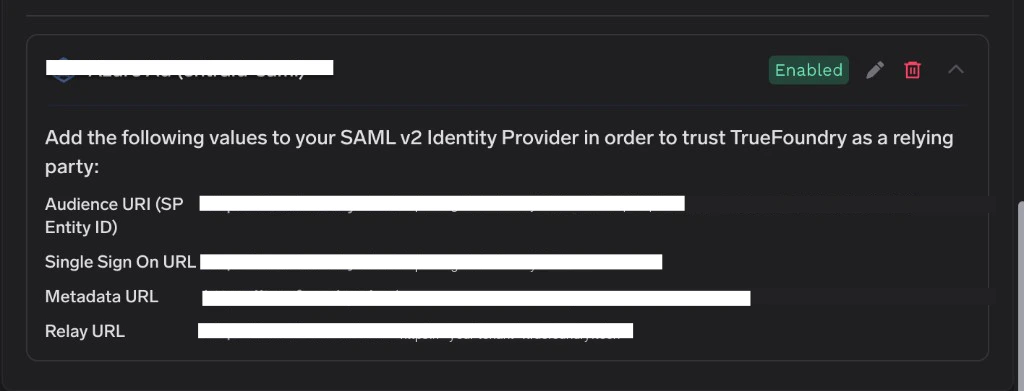
Click **Save**. TrueFoundry displays the values you need for your IdP on the SSO configuration card:
| IdP field (common names) | Value from TrueFoundry |
| ---------------------------------------------------- | ------------------------------- |
| **ACS URL** / **Reply URL** / **Single Sign-On URL** | **Single Sign On URL** |
| **Audience** / **SP Entity ID** / **Identifier** | **Audience URI (SP Entity ID)** |
| **Relay State** *(if used)* | **Relay URL** |
* **Enabled**: turn this on.
* **Name**: a lowercase alphanumeric label — for example, `companysso`.
* **SSO Provider**: choose **Custom**.
* **Authentication Configuration**: select **SAML v2**.
Leave **Identity Provider Endpoint** and **X.509 Certificate** blank for now — you'll fill them in once your IdP surfaces those values.
Click **Save**. TrueFoundry displays the values you need for your IdP on the SSO configuration card:
| IdP field (common names) | Value from TrueFoundry |
| ---------------------------------------------------- | ------------------------------- |
| **ACS URL** / **Reply URL** / **Single Sign-On URL** | **Single Sign On URL** |
| **Audience** / **SP Entity ID** / **Identifier** | **Audience URI (SP Entity ID)** |
| **Relay State** *(if used)* | **Relay URL** |
 Keep this TrueFoundry tab open. You'll come back here in [Step 4](#step-4-paste-the-idp-details-back-into-truefoundry) after you've configured the IdP side.
## Step 2 — Create a SAML service provider in your IdP
The exact wording varies by IdP, but every SAML 2.0 Identity Provider asks for the same set of inputs.
In your IdP admin console, create a new application (sometimes labelled **SAML application**, **Service Provider**, **Relying Party Trust**, or **Connected App**).
Enter the values from [Step 1](#step-1-create-the-sso-config-in-truefoundry):
| IdP field (common names) | Paste this value from TrueFoundry |
| ---------------------------------------------------- | ------------------------------------------- |
| **ACS URL** / **Single Sign-On URL** / **Reply URL** | TrueFoundry **Single Sign On URL** |
| **Audience** / **SP Entity ID** / **Identifier** | TrueFoundry **Audience URI (SP Entity ID)** |
Do not add a trailing slash to either URL. Many IdPs treat `https://login.truefoundry.com/...` and `https://login.truefoundry.com/.../` as different values and refuse to issue assertions for the wrong one.
Set the **NameID format** to **Email Address** (`urn:oasis:names:tc:SAML:1.1:nameid-format:emailAddress`) and map the NameID value to the user's primary email address. This makes TrueFoundry's email matching work out of the box.
If your IdP only supports persistent or unspecified NameID formats, that's fine — just make sure you emit a separate `email` attribute, as described in [Step 3](#step-3-configure-saml-signing-and-attributes).
## Step 3 — Configure SAML signing and attributes
### Signing options
TrueFoundry validates the signature on every SAML response, so the IdP-side signing options must be enabled.
| Setting | Recommended value |
| -------------------- | ----------------- |
| Sign SAML Response | Enabled |
| Sign Assertion | Enabled |
| Signature Algorithm | `RSA-SHA256` |
| Assertion Encryption | Not required |
TrueFoundry rejects unsigned SAML responses. If you see a "signature missing" error on sign-in, double-check that response signing is turned on in your IdP.
### Attribute mapping
Configure your IdP to emit at least the following attributes. Standard, simple names map to TrueFoundry's defaults without any extra configuration.
| TrueFoundry expects | Maps from |
| ------------------- | ---------------------------------------------------------------------- |
| `email` | The user's primary email address |
| `sub` | A stable, unique identifier for the user (directory ID, user ID, etc.) |
Some IdPs ship default attribute names following the long `http://schemas.xmlsoap.org/...` URI scheme — for example `http://schemas.xmlsoap.org/ws/2005/05/identity/claims/emailaddress`. The cleanest approach is to also emit short attribute names (`email`, `sub`) so that TrueFoundry's defaults work. If you can't change the IdP-side names, see [Optional: mapping legacy attribute names](#optional-mapping-legacy-attribute-names) below.
## Step 4 — Paste the IdP details back into TrueFoundry
Once the IdP application is created, the IdP will publish two values that TrueFoundry needs.
Download the IdP's signing certificate in **Base64 / PEM** form. Open the file in a text editor and copy the entire contents, including the surrounding lines:
```
-----BEGIN CERTIFICATE-----
MIIDdz...
-----END CERTIFICATE-----
```
If your IdP gives you raw certificate bytes or only a SHA-1 fingerprint, you'll need to convert it to PEM. Most IdPs offer a **Download Certificate (Base64)** button — prefer that.
Copy the **SAML SSO URL** / **IdP Login URL** / **SSO endpoint** from your IdP. This is the URL TrueFoundry redirects the browser to when a user starts the SSO flow.
Return to **Settings → Security & Access → SSO** in TrueFoundry, edit the SSO configuration you created in Step 1, and fill in:
* **Identity Provider Endpoint** → the **SAML SSO URL** from your IdP.
* **X.509 Certificate** → the PEM certificate text (including the `BEGIN`/`END` lines).
Click **Save**.
## Step 5 — Assign users and test sign-in
Depending on your IdP, you'll either grant users access by assigning them to the application directly, by adding them to a group that's assigned to the application, or by making the application available to all users in the tenant. Follow your IdP's documentation.
Users who haven't been assigned to the application will see an "access denied" or "user not authorised" error when they try to sign in.
1. Open a private/incognito window and visit your TrueFoundry login page.
2. Click **Login with SSO** (or whichever button label you chose under **Show advanced fields → Button Text**).
3. Authenticate as an assigned user.
If the sign-in succeeds you'll land in the TrueFoundry dashboard. The user is created automatically if [JIT provisioning](/docs/platform/user-management#user-provisioning) is on; otherwise the user must already exist in TrueFoundry or be invited.
## Optional: mapping legacy attribute names
Some IdPs only emit attributes under long URI names like `http://schemas.xmlsoap.org/ws/2005/05/identity/claims/emailaddress`. You have two options:
* **Recommended:** add short aliases (`email`, `sub`) on the IdP side so TrueFoundry's defaults work.
* **Alternative:** keep the long names on the IdP and override TrueFoundry's claim configuration. On the TrueFoundry SSO form, expand **Show advanced fields** and set:
| TrueFoundry field | Set to |
| ------------------- | ---------------------------------------------------------------------- |
| **Email Claim** | `http://schemas.xmlsoap.org/ws/2005/05/identity/claims/emailaddress` |
| **Unique ID Claim** | `http://schemas.xmlsoap.org/ws/2005/05/identity/claims/nameidentifier` |
## Optional customizations
The fields below live under **Show advanced fields** on the SSO form and apply to both OIDC and SAML.
| Field | What it does | Default |
| -------------------- | -------------------------------------------------- | ---------------- |
| **Button Text** | Label shown on the SSO login button. | `Login with SSO` |
| **Button Image URL** | Icon shown next to the button label. | None |
| **Email Claim** | SAML attribute carrying the user's email. | `email` |
| **Unique ID Claim** | SAML attribute used as the stable user identifier. | `sub` |
## Troubleshooting
The certificate pasted into TrueFoundry doesn't match the IdP's active signing certificate. Re-download the **Base64 / PEM** certificate from your IdP and paste the full content (including the `BEGIN`/`END` lines) into the **X.509 Certificate** field.
If your IdP rotated its signing key recently, TrueFoundry needs the new certificate — old keys are rejected.
The IdP refused TrueFoundry's NameID format request. In the IdP application, set the **NameID format** to **Email Address** (`urn:oasis:names:tc:SAML:1.1:nameid-format:emailAddress`) and map it to the user's primary email.
The SAML assertion is missing the `email` attribute (or it has a non-standard name).
* Add an `email` attribute on the IdP side, mapped to the user's primary email.
* Or expand **Show advanced fields** on the TrueFoundry SSO form and set **Email Claim** to the exact attribute name your IdP emits (for example `http://schemas.xmlsoap.org/ws/2005/05/identity/claims/emailaddress`).
The **Audience / SP Entity ID** value configured in your IdP does not match TrueFoundry's **Audience URI (SP Entity ID)**. Re-copy the value from the TrueFoundry SSO configuration card, paste it into the IdP's audience field with no trailing slash, and re-save the IdP application.
Same root cause as the audience mismatch, but for the **ACS URL**. The IdP must send the assertion to TrueFoundry's **Single Sign On URL** — copy it again from the SSO configuration card, paste it into the IdP's **ACS / Single Sign-On URL** field, and re-save.
Confirm your IdP emits `email` and `sub` as described in [Step 3](#step-3-configure-saml-signing-and-attributes). If you renamed attributes, expand **Show advanced fields** in TrueFoundry and set **Email Claim** and **Unique ID Claim** accordingly.
The TrueFoundry Auth Server enforces the `NotBefore` / `NotOnOrAfter` conditions in the SAML response. If the IdP host clock drifts more than a few seconds from real time, assertions are rejected. Sync the IdP host's clock with an authoritative NTP source.
Check the provisioning mode under **Settings → Security & Access → Provisioning**:
* **Invite-only** — the user must be invited from **Access → Users** first.
* **JIT** — the user is created on first login automatically.
* **SCIM** — the user must be synced from your IdP first.
See [Manage Users](/docs/platform/user-management#user-provisioning) for details.
## Optional next steps
* **Use OIDC instead** — see [OIDC with a Custom Identity Provider](/docs/platform/sso/custom-oidc).
* **Automate user provisioning** — see [Manage Users](/docs/platform/user-management#user-provisioning) for SCIM, JIT, and Invite-only options.
Keep this TrueFoundry tab open. You'll come back here in [Step 4](#step-4-paste-the-idp-details-back-into-truefoundry) after you've configured the IdP side.
## Step 2 — Create a SAML service provider in your IdP
The exact wording varies by IdP, but every SAML 2.0 Identity Provider asks for the same set of inputs.
In your IdP admin console, create a new application (sometimes labelled **SAML application**, **Service Provider**, **Relying Party Trust**, or **Connected App**).
Enter the values from [Step 1](#step-1-create-the-sso-config-in-truefoundry):
| IdP field (common names) | Paste this value from TrueFoundry |
| ---------------------------------------------------- | ------------------------------------------- |
| **ACS URL** / **Single Sign-On URL** / **Reply URL** | TrueFoundry **Single Sign On URL** |
| **Audience** / **SP Entity ID** / **Identifier** | TrueFoundry **Audience URI (SP Entity ID)** |
Do not add a trailing slash to either URL. Many IdPs treat `https://login.truefoundry.com/...` and `https://login.truefoundry.com/.../` as different values and refuse to issue assertions for the wrong one.
Set the **NameID format** to **Email Address** (`urn:oasis:names:tc:SAML:1.1:nameid-format:emailAddress`) and map the NameID value to the user's primary email address. This makes TrueFoundry's email matching work out of the box.
If your IdP only supports persistent or unspecified NameID formats, that's fine — just make sure you emit a separate `email` attribute, as described in [Step 3](#step-3-configure-saml-signing-and-attributes).
## Step 3 — Configure SAML signing and attributes
### Signing options
TrueFoundry validates the signature on every SAML response, so the IdP-side signing options must be enabled.
| Setting | Recommended value |
| -------------------- | ----------------- |
| Sign SAML Response | Enabled |
| Sign Assertion | Enabled |
| Signature Algorithm | `RSA-SHA256` |
| Assertion Encryption | Not required |
TrueFoundry rejects unsigned SAML responses. If you see a "signature missing" error on sign-in, double-check that response signing is turned on in your IdP.
### Attribute mapping
Configure your IdP to emit at least the following attributes. Standard, simple names map to TrueFoundry's defaults without any extra configuration.
| TrueFoundry expects | Maps from |
| ------------------- | ---------------------------------------------------------------------- |
| `email` | The user's primary email address |
| `sub` | A stable, unique identifier for the user (directory ID, user ID, etc.) |
Some IdPs ship default attribute names following the long `http://schemas.xmlsoap.org/...` URI scheme — for example `http://schemas.xmlsoap.org/ws/2005/05/identity/claims/emailaddress`. The cleanest approach is to also emit short attribute names (`email`, `sub`) so that TrueFoundry's defaults work. If you can't change the IdP-side names, see [Optional: mapping legacy attribute names](#optional-mapping-legacy-attribute-names) below.
## Step 4 — Paste the IdP details back into TrueFoundry
Once the IdP application is created, the IdP will publish two values that TrueFoundry needs.
Download the IdP's signing certificate in **Base64 / PEM** form. Open the file in a text editor and copy the entire contents, including the surrounding lines:
```
-----BEGIN CERTIFICATE-----
MIIDdz...
-----END CERTIFICATE-----
```
If your IdP gives you raw certificate bytes or only a SHA-1 fingerprint, you'll need to convert it to PEM. Most IdPs offer a **Download Certificate (Base64)** button — prefer that.
Copy the **SAML SSO URL** / **IdP Login URL** / **SSO endpoint** from your IdP. This is the URL TrueFoundry redirects the browser to when a user starts the SSO flow.
Return to **Settings → Security & Access → SSO** in TrueFoundry, edit the SSO configuration you created in Step 1, and fill in:
* **Identity Provider Endpoint** → the **SAML SSO URL** from your IdP.
* **X.509 Certificate** → the PEM certificate text (including the `BEGIN`/`END` lines).
Click **Save**.
## Step 5 — Assign users and test sign-in
Depending on your IdP, you'll either grant users access by assigning them to the application directly, by adding them to a group that's assigned to the application, or by making the application available to all users in the tenant. Follow your IdP's documentation.
Users who haven't been assigned to the application will see an "access denied" or "user not authorised" error when they try to sign in.
1. Open a private/incognito window and visit your TrueFoundry login page.
2. Click **Login with SSO** (or whichever button label you chose under **Show advanced fields → Button Text**).
3. Authenticate as an assigned user.
If the sign-in succeeds you'll land in the TrueFoundry dashboard. The user is created automatically if [JIT provisioning](/docs/platform/user-management#user-provisioning) is on; otherwise the user must already exist in TrueFoundry or be invited.
## Optional: mapping legacy attribute names
Some IdPs only emit attributes under long URI names like `http://schemas.xmlsoap.org/ws/2005/05/identity/claims/emailaddress`. You have two options:
* **Recommended:** add short aliases (`email`, `sub`) on the IdP side so TrueFoundry's defaults work.
* **Alternative:** keep the long names on the IdP and override TrueFoundry's claim configuration. On the TrueFoundry SSO form, expand **Show advanced fields** and set:
| TrueFoundry field | Set to |
| ------------------- | ---------------------------------------------------------------------- |
| **Email Claim** | `http://schemas.xmlsoap.org/ws/2005/05/identity/claims/emailaddress` |
| **Unique ID Claim** | `http://schemas.xmlsoap.org/ws/2005/05/identity/claims/nameidentifier` |
## Optional customizations
The fields below live under **Show advanced fields** on the SSO form and apply to both OIDC and SAML.
| Field | What it does | Default |
| -------------------- | -------------------------------------------------- | ---------------- |
| **Button Text** | Label shown on the SSO login button. | `Login with SSO` |
| **Button Image URL** | Icon shown next to the button label. | None |
| **Email Claim** | SAML attribute carrying the user's email. | `email` |
| **Unique ID Claim** | SAML attribute used as the stable user identifier. | `sub` |
## Troubleshooting
The certificate pasted into TrueFoundry doesn't match the IdP's active signing certificate. Re-download the **Base64 / PEM** certificate from your IdP and paste the full content (including the `BEGIN`/`END` lines) into the **X.509 Certificate** field.
If your IdP rotated its signing key recently, TrueFoundry needs the new certificate — old keys are rejected.
The IdP refused TrueFoundry's NameID format request. In the IdP application, set the **NameID format** to **Email Address** (`urn:oasis:names:tc:SAML:1.1:nameid-format:emailAddress`) and map it to the user's primary email.
The SAML assertion is missing the `email` attribute (or it has a non-standard name).
* Add an `email` attribute on the IdP side, mapped to the user's primary email.
* Or expand **Show advanced fields** on the TrueFoundry SSO form and set **Email Claim** to the exact attribute name your IdP emits (for example `http://schemas.xmlsoap.org/ws/2005/05/identity/claims/emailaddress`).
The **Audience / SP Entity ID** value configured in your IdP does not match TrueFoundry's **Audience URI (SP Entity ID)**. Re-copy the value from the TrueFoundry SSO configuration card, paste it into the IdP's audience field with no trailing slash, and re-save the IdP application.
Same root cause as the audience mismatch, but for the **ACS URL**. The IdP must send the assertion to TrueFoundry's **Single Sign On URL** — copy it again from the SSO configuration card, paste it into the IdP's **ACS / Single Sign-On URL** field, and re-save.
Confirm your IdP emits `email` and `sub` as described in [Step 3](#step-3-configure-saml-signing-and-attributes). If you renamed attributes, expand **Show advanced fields** in TrueFoundry and set **Email Claim** and **Unique ID Claim** accordingly.
The TrueFoundry Auth Server enforces the `NotBefore` / `NotOnOrAfter` conditions in the SAML response. If the IdP host clock drifts more than a few seconds from real time, assertions are rejected. Sync the IdP host's clock with an authoritative NTP source.
Check the provisioning mode under **Settings → Security & Access → Provisioning**:
* **Invite-only** — the user must be invited from **Access → Users** first.
* **JIT** — the user is created on first login automatically.
* **SCIM** — the user must be synced from your IdP first.
See [Manage Users](/docs/platform/user-management#user-provisioning) for details.
## Optional next steps
* **Use OIDC instead** — see [OIDC with a Custom Identity Provider](/docs/platform/sso/custom-oidc).
* **Automate user provisioning** — see [Manage Users](/docs/platform/user-management#user-provisioning) for SCIM, JIT, and Invite-only options.