> ## Documentation Index
> Fetch the complete documentation index at: https://www.truefoundry.com/llms.txt
> Use this file to discover all available pages before exploring further.
# SAML with Auth0
> Configure SAML 2.0 single sign-on between TrueFoundry and Auth0 using the SAML2 Web App addon.
This guide walks you through setting up SAML 2.0 single sign-on between TrueFoundry and Auth0. Once finished, members of your Auth0 tenant can sign in to TrueFoundry through a **Login with Auth0** button.
For OpenID Connect instead of SAML, see [OIDC with Auth0](/docs/platform/sso/auth0/oidc).
## Prerequisites
* A TrueFoundry tenant with **Admin** access to **Settings → Security & Access → SSO**.
* An Auth0 tenant with permission to create **Applications** and configure **Addons**.
You'll bounce between the **Auth0 dashboard** and the **TrueFoundry SSO settings**. Keep both open in adjacent tabs to copy-paste values quickly.
## Configuration overview
Save a SAML SSO configuration in TrueFoundry to surface the **Application Callback URL** and **audience** values Auth0 needs.
Register a new application in your Auth0 tenant that TrueFoundry will federate with.
Point the addon at TrueFoundry's SP metadata and map `email` and `sub`.
Copy the Identity Provider Login URL and signing certificate into the TrueFoundry SSO form.
Verify that an Auth0 user can complete a SAML round-trip.
## Step 1 — Create the SSO configuration in TrueFoundry
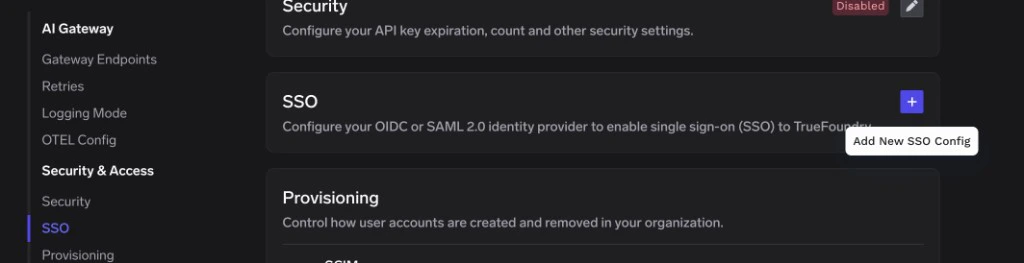
Go to **Settings → Security & Access → SSO**.
Click the **+** icon labeled **Add New SSO Config**.
 * **Enabled**: turn this on.
* **Name**: a lowercase alphanumeric label — for example, `auth0saml`.
* **SSO Provider**: choose **Custom**.
* **Authentication Configuration**: select **SAML v2**.
Leave **Identity Provider Endpoint** and **X.509 Certificate** blank for now — you'll fill them in once Auth0 surfaces those values.
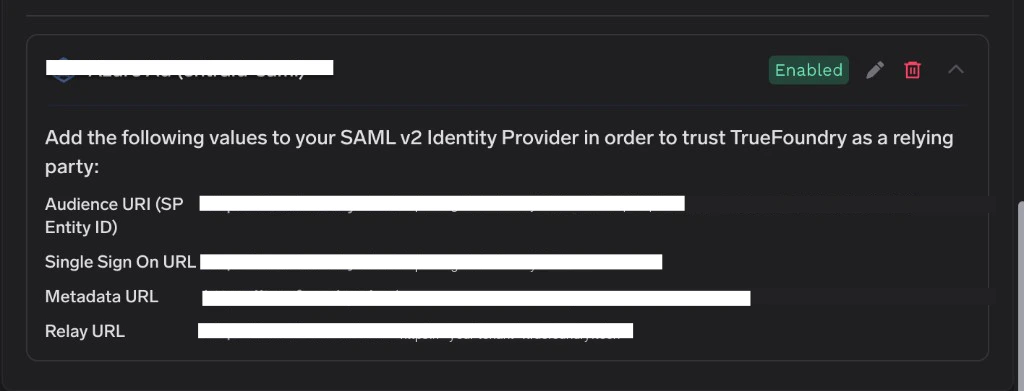
Click **Save**. TrueFoundry displays the values you need for Auth0 on the SSO configuration card:
| Auth0 field | Value from TrueFoundry |
| ------------------------------------- | ------------------------------- |
| **Application Callback URL** | **Single Sign On URL** |
| `audience` in addon **Settings** JSON | **Audience URI (SP Entity ID)** |
| **Relay State** *(if used)* | **Relay URL** |
* **Enabled**: turn this on.
* **Name**: a lowercase alphanumeric label — for example, `auth0saml`.
* **SSO Provider**: choose **Custom**.
* **Authentication Configuration**: select **SAML v2**.
Leave **Identity Provider Endpoint** and **X.509 Certificate** blank for now — you'll fill them in once Auth0 surfaces those values.
Click **Save**. TrueFoundry displays the values you need for Auth0 on the SSO configuration card:
| Auth0 field | Value from TrueFoundry |
| ------------------------------------- | ------------------------------- |
| **Application Callback URL** | **Single Sign On URL** |
| `audience` in addon **Settings** JSON | **Audience URI (SP Entity ID)** |
| **Relay State** *(if used)* | **Relay URL** |
 ## Step 2 — Create an Auth0 application
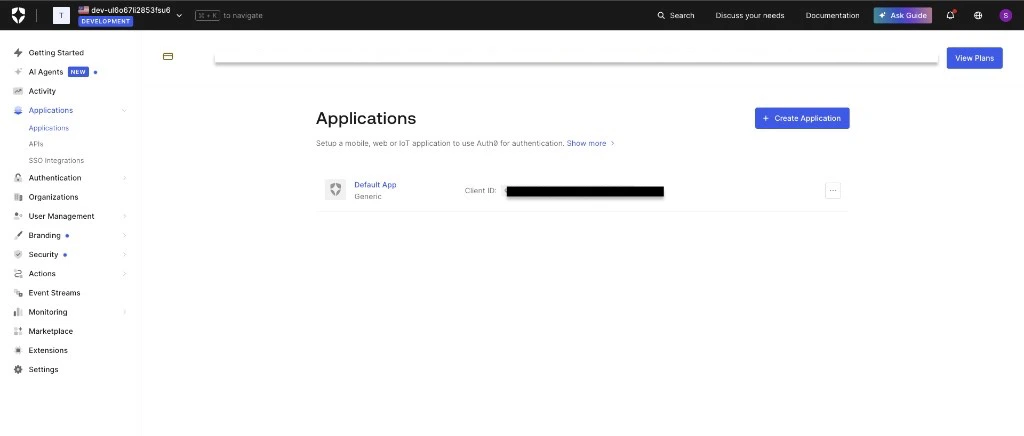
Sign in to the [Auth0 dashboard](https://manage.auth0.com/) and click **Applications → Applications** in the left navigation.
Click **+ Create Application**. Enter a **Name** such as `TrueFoundry`, select **Regular Web Applications**, and click **Create**.
## Step 2 — Create an Auth0 application
Sign in to the [Auth0 dashboard](https://manage.auth0.com/) and click **Applications → Applications** in the left navigation.
Click **+ Create Application**. Enter a **Name** such as `TrueFoundry`, select **Regular Web Applications**, and click **Create**.
 ## Step 3 — Enable the SAML2 Web App addon
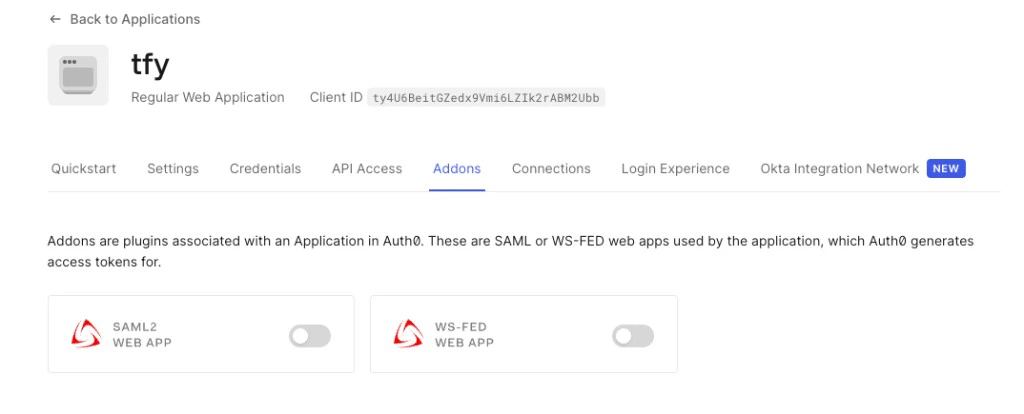
Back in your Auth0 application, open the **Addons** tab.
Locate the **SAML2 WEB APP** tile and click it. The **Addon: SAML2 Web App** dialog opens on the **Settings** tab.
## Step 3 — Enable the SAML2 Web App addon
Back in your Auth0 application, open the **Addons** tab.
Locate the **SAML2 WEB APP** tile and click it. The **Addon: SAML2 Web App** dialog opens on the **Settings** tab.
 In the **Application Callback URL** field, paste the **Single Sign On URL** from TrueFoundry (from Step 1).
Below the callback URL is a **Settings** code editor that accepts a JSON object. Paste the snippet below, replacing the `audience` value with the **Audience URI (SP Entity ID)** from TrueFoundry:
```json theme={"dark"}
{
"audience": "",
"mappings": {
"email": "email",
"sub": "user_id",
"given_name": "given_name",
"family_name": "family_name",
"name": "name"
},
"nameIdentifierFormat": "urn:oasis:names:tc:SAML:1.1:nameid-format:emailAddress",
"nameIdentifierProbes": [
"http://schemas.xmlsoap.org/ws/2005/05/identity/claims/emailaddress"
]
}
```
The defaults work for most setups. The `mappings` block above renames the SAML attributes to match what TrueFoundry looks for out of the box, and forces `email` to be the SAML `NameID`.
In the **Application Callback URL** field, paste the **Single Sign On URL** from TrueFoundry (from Step 1).
Below the callback URL is a **Settings** code editor that accepts a JSON object. Paste the snippet below, replacing the `audience` value with the **Audience URI (SP Entity ID)** from TrueFoundry:
```json theme={"dark"}
{
"audience": "",
"mappings": {
"email": "email",
"sub": "user_id",
"given_name": "given_name",
"family_name": "family_name",
"name": "name"
},
"nameIdentifierFormat": "urn:oasis:names:tc:SAML:1.1:nameid-format:emailAddress",
"nameIdentifierProbes": [
"http://schemas.xmlsoap.org/ws/2005/05/identity/claims/emailaddress"
]
}
```
The defaults work for most setups. The `mappings` block above renames the SAML attributes to match what TrueFoundry looks for out of the box, and forces `email` to be the SAML `NameID`.
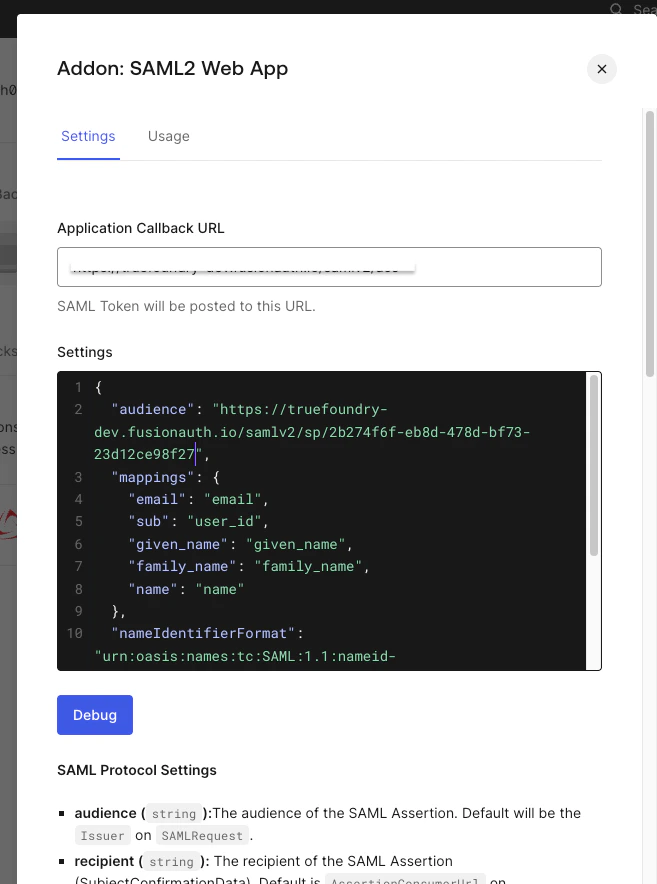 Scroll to the bottom of the dialog and click **Enable**, then **Save**.
## Step 4 — Copy Auth0's IdP details into TrueFoundry
Re-open the **Addon: SAML2 Web App** dialog and switch to the **Usage** tab.
From the **Usage** tab, copy the **Identity Provider Login URL**. This is the SSO endpoint TrueFoundry will redirect to.
Click **Download** next to **Identity Provider Certificate** (or copy the `` block from the metadata XML).
Open the downloaded `.pem` file in a text editor and copy the entire contents — including the `-----BEGIN CERTIFICATE-----` and `-----END CERTIFICATE-----` lines.
Scroll to the bottom of the dialog and click **Enable**, then **Save**.
## Step 4 — Copy Auth0's IdP details into TrueFoundry
Re-open the **Addon: SAML2 Web App** dialog and switch to the **Usage** tab.
From the **Usage** tab, copy the **Identity Provider Login URL**. This is the SSO endpoint TrueFoundry will redirect to.
Click **Download** next to **Identity Provider Certificate** (or copy the `` block from the metadata XML).
Open the downloaded `.pem` file in a text editor and copy the entire contents — including the `-----BEGIN CERTIFICATE-----` and `-----END CERTIFICATE-----` lines.
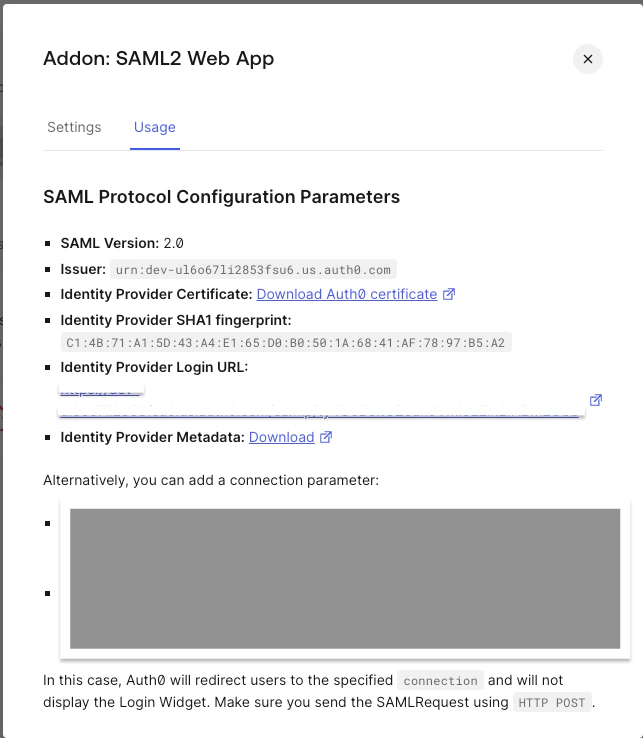 Return to **Settings → Security & Access → SSO** in TrueFoundry, edit the SSO configuration you created in Step 1, and set:
* **Identity Provider Endpoint** → the **Identity Provider Login URL** from Auth0.
* **X.509 Certificate** → the certificate text you copied from the `.pem` file.
Click **Save**.
## Step 5 — Test single sign-on
1. Open a private/incognito window and go to your TrueFoundry login page.
2. Click **Login with Auth0** (or whichever button label you chose under **Show advanced fields → Button Text**).
3. Authenticate with an Auth0 user.
If sign-in succeeds you'll land in the TrueFoundry dashboard. New users are created automatically if [JIT provisioning](/docs/platform/user-management#user-provisioning) is enabled; otherwise the user must already exist in TrueFoundry or be invited.
## Optional next steps
* **Use OIDC instead of SAML** — see [OIDC with Auth0](/docs/platform/sso/auth0/oidc) for the equivalent OpenID Connect flow.
## Troubleshooting
The certificate copied into TrueFoundry doesn't match Auth0's signing certificate. Re-download the **Identity Provider Certificate** from the addon's **Usage** tab and paste the full PEM (including the `-----BEGIN CERTIFICATE-----` and `-----END CERTIFICATE-----` lines) into TrueFoundry.
If you're pasting from the metadata XML directly, wrap the bare base64 inside the BEGIN/END markers before saving.
The `audience` value inside the Auth0 addon's **Settings** JSON must exactly match TrueFoundry's **Audience URI (SP Entity ID)**. Re-copy the value from the TrueFoundry SSO configuration card and update the addon settings.
Auth0's default SAML mappings emit `http://schemas.xmlsoap.org/ws/2005/05/identity/claims/emailaddress` rather than `email`. Either:
* Keep the `mappings` block from Step 3 (which renames the attribute to `email`), or
* Expand **Show advanced fields** in TrueFoundry and set **Email Claim** to `http://schemas.xmlsoap.org/ws/2005/05/identity/claims/emailaddress`.
Check the provisioning mode under **Settings → Security & Access → Provisioning**:
* **Invite-only** — the user must be invited from **Access → Users** first.
* **JIT** — the user is created on first login automatically.
Return to **Settings → Security & Access → SSO** in TrueFoundry, edit the SSO configuration you created in Step 1, and set:
* **Identity Provider Endpoint** → the **Identity Provider Login URL** from Auth0.
* **X.509 Certificate** → the certificate text you copied from the `.pem` file.
Click **Save**.
## Step 5 — Test single sign-on
1. Open a private/incognito window and go to your TrueFoundry login page.
2. Click **Login with Auth0** (or whichever button label you chose under **Show advanced fields → Button Text**).
3. Authenticate with an Auth0 user.
If sign-in succeeds you'll land in the TrueFoundry dashboard. New users are created automatically if [JIT provisioning](/docs/platform/user-management#user-provisioning) is enabled; otherwise the user must already exist in TrueFoundry or be invited.
## Optional next steps
* **Use OIDC instead of SAML** — see [OIDC with Auth0](/docs/platform/sso/auth0/oidc) for the equivalent OpenID Connect flow.
## Troubleshooting
The certificate copied into TrueFoundry doesn't match Auth0's signing certificate. Re-download the **Identity Provider Certificate** from the addon's **Usage** tab and paste the full PEM (including the `-----BEGIN CERTIFICATE-----` and `-----END CERTIFICATE-----` lines) into TrueFoundry.
If you're pasting from the metadata XML directly, wrap the bare base64 inside the BEGIN/END markers before saving.
The `audience` value inside the Auth0 addon's **Settings** JSON must exactly match TrueFoundry's **Audience URI (SP Entity ID)**. Re-copy the value from the TrueFoundry SSO configuration card and update the addon settings.
Auth0's default SAML mappings emit `http://schemas.xmlsoap.org/ws/2005/05/identity/claims/emailaddress` rather than `email`. Either:
* Keep the `mappings` block from Step 3 (which renames the attribute to `email`), or
* Expand **Show advanced fields** in TrueFoundry and set **Email Claim** to `http://schemas.xmlsoap.org/ws/2005/05/identity/claims/emailaddress`.
Check the provisioning mode under **Settings → Security & Access → Provisioning**:
* **Invite-only** — the user must be invited from **Access → Users** first.
* **JIT** — the user is created on first login automatically.