> ## Documentation Index
> Fetch the complete documentation index at: https://www.truefoundry.com/llms.txt
> Use this file to discover all available pages before exploring further.
# OIDC with Auth0
> Configure OpenID Connect single sign-on between TrueFoundry and Auth0.
This guide walks you through setting up OpenID Connect (OIDC) single sign-on between TrueFoundry and Auth0. Once finished, members of your Auth0 tenant can sign in to TrueFoundry through a **Login with Auth0** button.
For SAML 2.0 instead of OIDC, see [SAML with Auth0](/docs/platform/sso/auth0/saml).
## Prerequisites
* A TrueFoundry tenant with **Admin** access to **Settings → Security & Access → SSO**.
* An Auth0 tenant with permission to create **Applications** (Administrator role on the tenant).
You'll bounce between the **Auth0 dashboard** and the **TrueFoundry SSO settings**. Keep both open in adjacent tabs to copy-paste values quickly.
## Configuration overview
Register a new application in your Auth0 tenant that TrueFoundry will federate with.
Whitelist TrueFoundry's redirect URI on the Auth0 application.
Paste the Auth0 Domain, Client ID, and Client Secret into the TrueFoundry SSO form.
Verify that an Auth0 user can sign in to TrueFoundry end-to-end.
## Step 1 — Create an application in Auth0
Sign in to the [Auth0 dashboard](https://manage.auth0.com/) as an administrator.
In the left navigation, expand **Applications** and click **Applications**, then click **Create Application** in the top-right.
Fill in:
* **Name** — a label such as `TrueFoundry`.
* **Application type** — choose **Regular Web Applications**.
Click **Create**.
On the new application page, click the **Settings** tab. You'll use this tab in the next step to register TrueFoundry's callback URL and copy the credentials.
## Step 2 — Add TrueFoundry's callback URL
On the **Settings** tab, scroll down to **Application URIs** and set **Allowed Callback URLs** to:
```
https://login.truefoundry.com/oauth2/callback
```
If you already have other callback URLs registered, append the TrueFoundry URL with a comma — Auth0 accepts a comma-separated list.
Scroll to the bottom of the page and click **Save Changes**.
## Step 3 — Copy the OIDC credentials
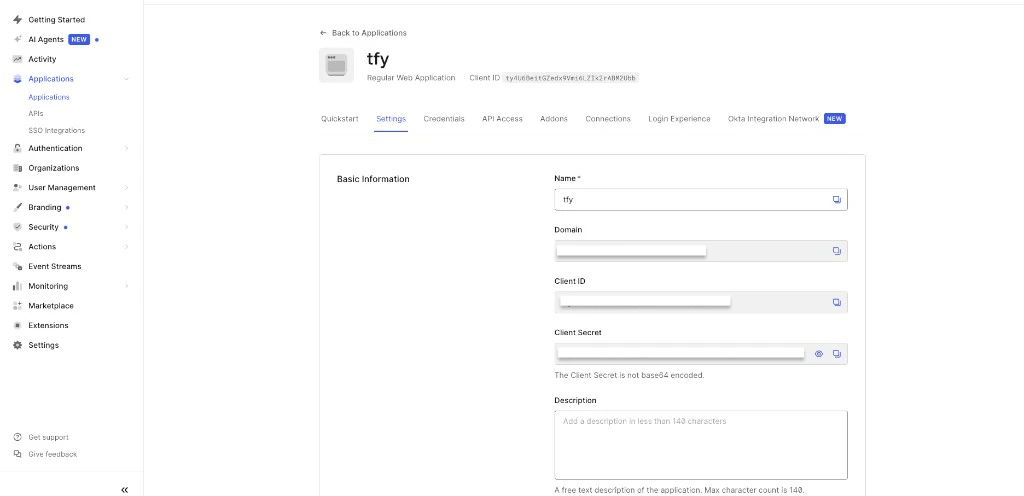
Still on the **Settings** tab, scroll up to the **Basic Information** section.
| Auth0 field | Where you'll paste it in TrueFoundry |
| ----------------- | ------------------------------------ |
| **Domain** | Used to build the **Issuer URL** |
| **Client ID** | **Client ID** |
| **Client Secret** | **Client Secret** |
Click the eye icon next to **Client Secret** to reveal it, then copy all three values.
 ## Step 4 — Configure TrueFoundry
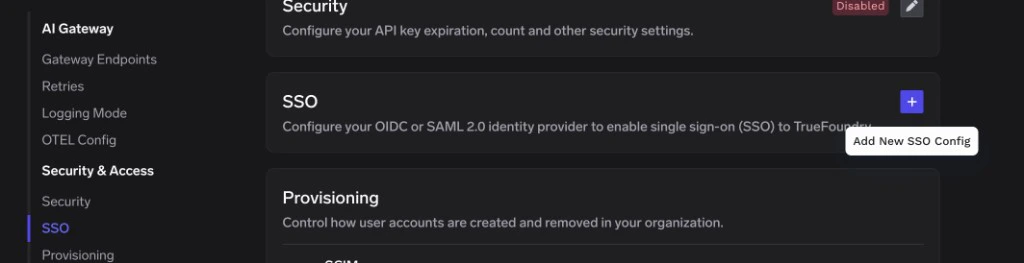
In TrueFoundry, go to **Settings → Security & Access → SSO**.
Click the **+** icon labeled **Add New SSO Config**.
## Step 4 — Configure TrueFoundry
In TrueFoundry, go to **Settings → Security & Access → SSO**.
Click the **+** icon labeled **Add New SSO Config**.
 * **Enabled**: turn this on.
* **Name**: a lowercase alphanumeric label — for example, `auth0oidc`.
* **SSO Provider**: select **Custom**.
* **Authentication Configuration**: choose **OIDC**.
* **Client ID**: the **Client ID** from Auth0.
* **Client Secret**: the **Client Secret** from Auth0.
* **Discover endpoints**: leave enabled.
* **Issuer URL**:
```
https://.auth0.com/
```
Replace `` with the **Domain** from your Auth0 application — for example, `https://acme.us.auth0.com/`. If you use a custom Auth0 domain, use that instead (for example, `https://auth.acme.com/`).
Auth0 issuers **must** end with a trailing slash. `https://acme.us.auth0.com` (no slash) will fail validation; `https://acme.us.auth0.com/` works.
* **Scopes** *(optional)*: leave blank to use the default `openid email`. Add `profile` if you want first and last name in the token.
Click **Save**. TrueFoundry validates the issuer URL and stores the credentials.
## Step 5 — Test single sign-on
1. Open a private/incognito window and visit your TrueFoundry login page.
2. Click **Login with Auth0** (or whichever button label you chose under **Show advanced fields → Button Text**).
3. Authenticate with an Auth0 user.
You should land in the TrueFoundry dashboard. New users are created automatically if [JIT provisioning](/docs/platform/user-management#user-provisioning) is enabled; otherwise the user must already exist in TrueFoundry or be invited.
## Optional next steps
* **Use SAML instead** — see [SAML with Auth0](/docs/platform/sso/auth0/saml) for the equivalent SAML 2.0 flow.
## Troubleshooting
Almost always a trailing-slash problem. The Auth0 issuer **must** end with `/` — use `https://.auth0.com/`, not `https://.auth0.com`. Update the **Issuer URL** in TrueFoundry and save again.
The exact URL `https://login.truefoundry.com/oauth2/callback` is missing from **Allowed Callback URLs** on the Auth0 application. Add it (comma-separated if other URLs already exist), save changes, and retry.
Auth0 only emits the `email` claim when the application requests the `email` scope. The TrueFoundry default already includes it, but if you overrode **Scopes**, make sure `email` is in the list — for example, `openid email profile`.
If you still see an empty value, expand **Show advanced fields** in TrueFoundry and set **Email Claim** to the claim name Auth0 emits (usually `email`).
* **Enabled**: turn this on.
* **Name**: a lowercase alphanumeric label — for example, `auth0oidc`.
* **SSO Provider**: select **Custom**.
* **Authentication Configuration**: choose **OIDC**.
* **Client ID**: the **Client ID** from Auth0.
* **Client Secret**: the **Client Secret** from Auth0.
* **Discover endpoints**: leave enabled.
* **Issuer URL**:
```
https://.auth0.com/
```
Replace `` with the **Domain** from your Auth0 application — for example, `https://acme.us.auth0.com/`. If you use a custom Auth0 domain, use that instead (for example, `https://auth.acme.com/`).
Auth0 issuers **must** end with a trailing slash. `https://acme.us.auth0.com` (no slash) will fail validation; `https://acme.us.auth0.com/` works.
* **Scopes** *(optional)*: leave blank to use the default `openid email`. Add `profile` if you want first and last name in the token.
Click **Save**. TrueFoundry validates the issuer URL and stores the credentials.
## Step 5 — Test single sign-on
1. Open a private/incognito window and visit your TrueFoundry login page.
2. Click **Login with Auth0** (or whichever button label you chose under **Show advanced fields → Button Text**).
3. Authenticate with an Auth0 user.
You should land in the TrueFoundry dashboard. New users are created automatically if [JIT provisioning](/docs/platform/user-management#user-provisioning) is enabled; otherwise the user must already exist in TrueFoundry or be invited.
## Optional next steps
* **Use SAML instead** — see [SAML with Auth0](/docs/platform/sso/auth0/saml) for the equivalent SAML 2.0 flow.
## Troubleshooting
Almost always a trailing-slash problem. The Auth0 issuer **must** end with `/` — use `https://.auth0.com/`, not `https://.auth0.com`. Update the **Issuer URL** in TrueFoundry and save again.
The exact URL `https://login.truefoundry.com/oauth2/callback` is missing from **Allowed Callback URLs** on the Auth0 application. Add it (comma-separated if other URLs already exist), save changes, and retry.
Auth0 only emits the `email` claim when the application requests the `email` scope. The TrueFoundry default already includes it, but if you overrode **Scopes**, make sure `email` is in the list — for example, `openid email profile`.
If you still see an empty value, expand **Show advanced fields** in TrueFoundry and set **Email Claim** to the claim name Auth0 emits (usually `email`).