> ## Documentation Index
> Fetch the complete documentation index at: https://www.truefoundry.com/llms.txt
> Use this file to discover all available pages before exploring further.
# TensorFlow Serve (TFServe)
> Deploying sample MNIST model with TensorFlow Serve.
[TensorFlow Serving](https://www.tensorflow.org/tfx/guide/serving) is a flexible, high-performance serving system for machine learning models, designed for production environments. TensorFlow Serving makes it easy to deploy new algorithms and experiments, while keeping the same server architecture and APIs. TensorFlow Serving provides out-of-the-box integration with TensorFlow models, but can be easily extended to serve other types of models and data.
In this example, we will deploy a simple MNIST model using TensorFlow Serving. You can find the code for this example [here](https://github.com/truefoundry/getting-started-examples/tree/main/deploy-model-with-tfserve).
**Live Demo**
You can view this example deployed [here](https://platform.live-demo.truefoundry.cloud/deployments/cmbltl1g1f86m01rj09pf110i?tab=pods).
The key files are:
* `train.py`: Trains the model and exports it in `SavedModel` format.
* `batching.config`: Contains dynamic batching configuration.
* `requirements.txt`: Contains the dependencies.
Usually the `SavedModel` format checkpoint is self contained and can be deployed without writing any extra code.
### Exporting the model in SavedModel format
```python lines theme={"dark"}
...
model.fit(train_images, train_labels, epochs=epochs)
version = 1
export_path = os.path.join("./models", "mnist", str(version))
print("export_path = {}\n".format(export_path))
model.export(export_path)
print("\nSaved model to", export_path)
```
### Running the server locally
1. Install the dependencies
```shell Shell lines theme={"dark"}
pip install -r requirements.txt
```
2. Run the server
```shell Shell lines theme={"dark"}
export MODEL_DIR="$(pwd)/models/mnist"
tensorflow_model_server --model_name=mnist --model_base_path=$MODEL_DIR --enable_batching --batching_parameters_file=./batching.config --rest_api_port=8000 --rest_api_timeout_in_ms=10000 --enable_model_warmup
```
3. Test the server
```shell Shell lines theme={"dark"}
curl -X POST -H "Content-Type: application/json" --data @./example.json http://0.0.0.0:8000/v1/models/mnist/versions/1:predict
```
The output should look like this:
```json lines theme={"dark"}
{
"predictions": [
[
0.999824345,
5.03408815e-10,
2.40962e-05,
5.19650811e-08,
1.13485561e-10,
5.45465309e-06,
3.39081362e-06,
1.45393031e-09,
0.000138094867,
4.5494553e-06
]
]
}
```
### Deploying the model with TrueFoundry
To deploy the model, we need to package both the model file and the code. To do this, we can follow the steps below:
Log the saved model to the registry. You can follow the guide [here](/docs/model-registry) to log the model to the registry.
```python Log Model lines theme={"dark"}
from truefoundry.ml import get_client, TensorflowFramework
client = get_client()
model_version = client.log_model(
ml_repo="demo-models",
name="mnist-tensorflow",
model_file_or_folder="./models/mnist/",
description="MNIST model in Tensorflow saved format",
framework=TensorflowFramework()
)
print("Model version FQN:", model_version.fqn)
```
Make sure to log the parent directory containing the model version.
```
.
└── model/
└── mnist/ # Log this directory containing the model version
└── 1/
```
Once you have tested your code locally, we highly recommend pushing the code a Git repository. This allows you to version control the code and also makes the deployment process much easier. However, if you don't have access to a Git repository, or the Git repositories are not integrated with TrueFoundry, you can directly deploy from local laptop.
You can follow the guide [here](/docs/deploy-first-service) to deploy your code.
Configure the source code and build settings as follows:
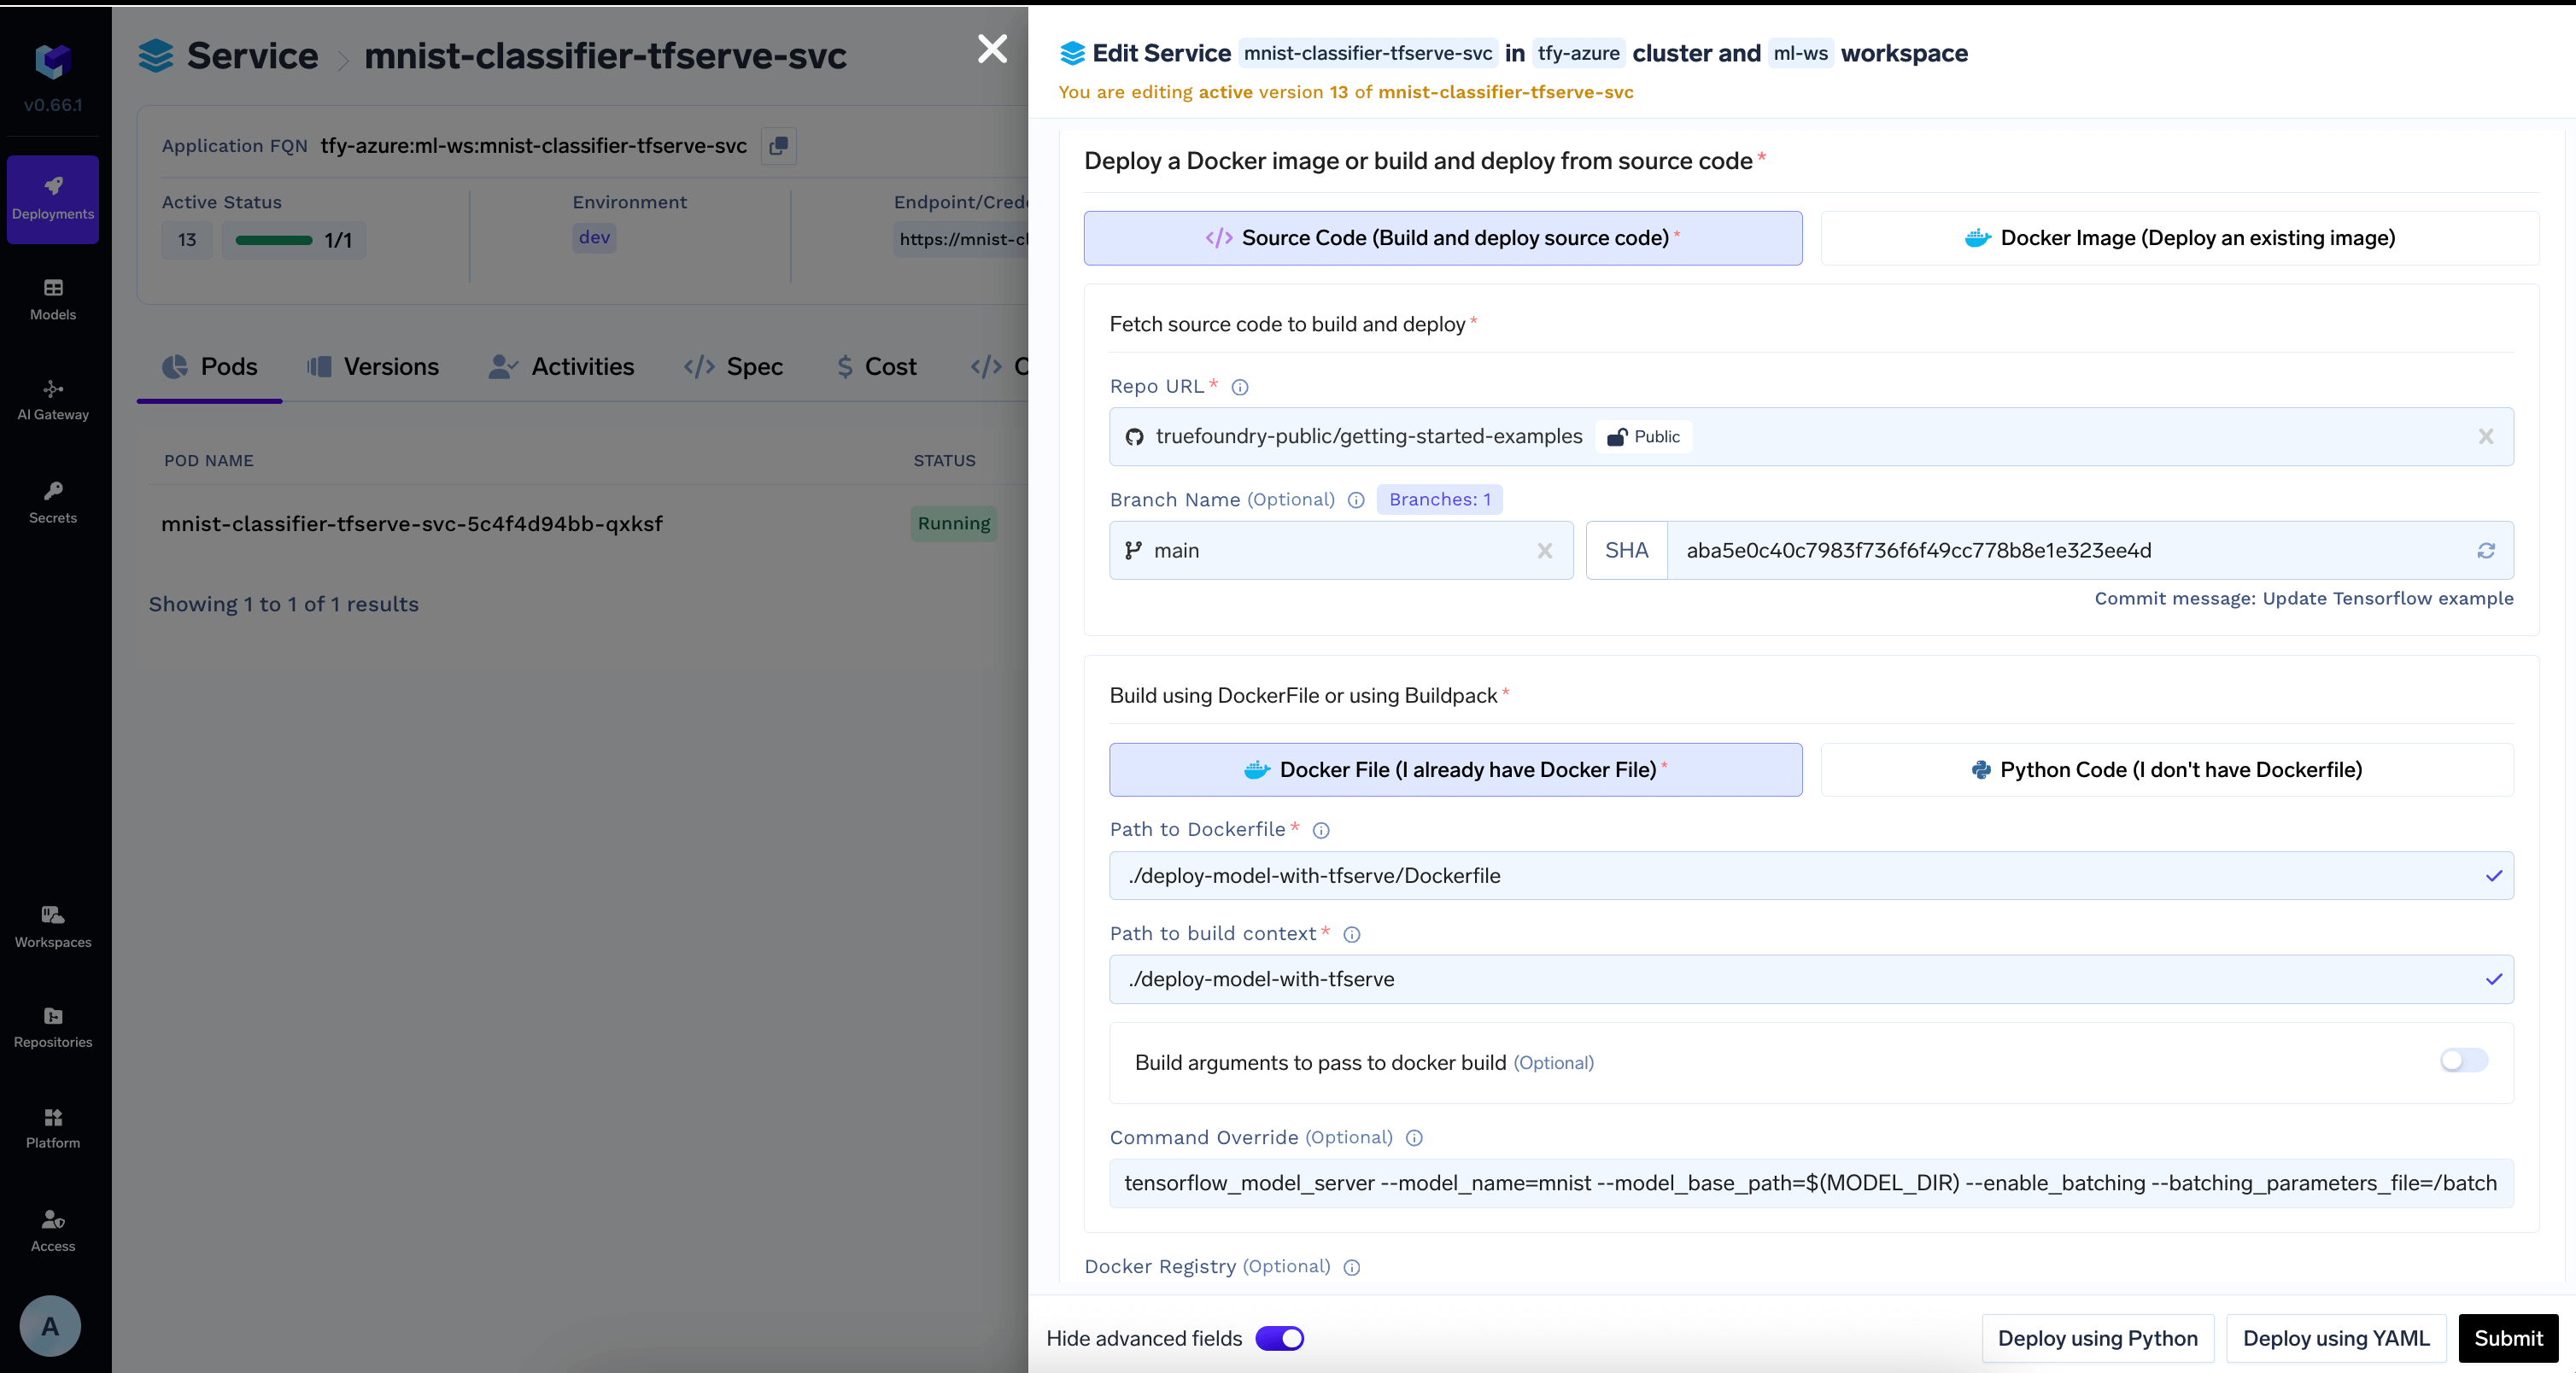 The command looks like this which references the `MODEL_DIR` environment variable where the model will be downloaded to.
```shell lines theme={"dark"}
tensorflow_model_server --model_name=mnist --model_base_path=$(MODEL_DIR) --enable_batching --batching_parameters_file=/batching.config --rest_api_port=8000 --rest_api_timeout_in_ms=10000 --enable_model_warmup
```
TrueFoundry can automatically download the model at the path specified in the `MODEL_DIR` environment variable to the deployed service.
Add the model id and revision from HuggingFace Hub in `Artifacts Download` section
The command looks like this which references the `MODEL_DIR` environment variable where the model will be downloaded to.
```shell lines theme={"dark"}
tensorflow_model_server --model_name=mnist --model_base_path=$(MODEL_DIR) --enable_batching --batching_parameters_file=/batching.config --rest_api_port=8000 --rest_api_timeout_in_ms=10000 --enable_model_warmup
```
TrueFoundry can automatically download the model at the path specified in the `MODEL_DIR` environment variable to the deployed service.
Add the model id and revision from HuggingFace Hub in `Artifacts Download` section
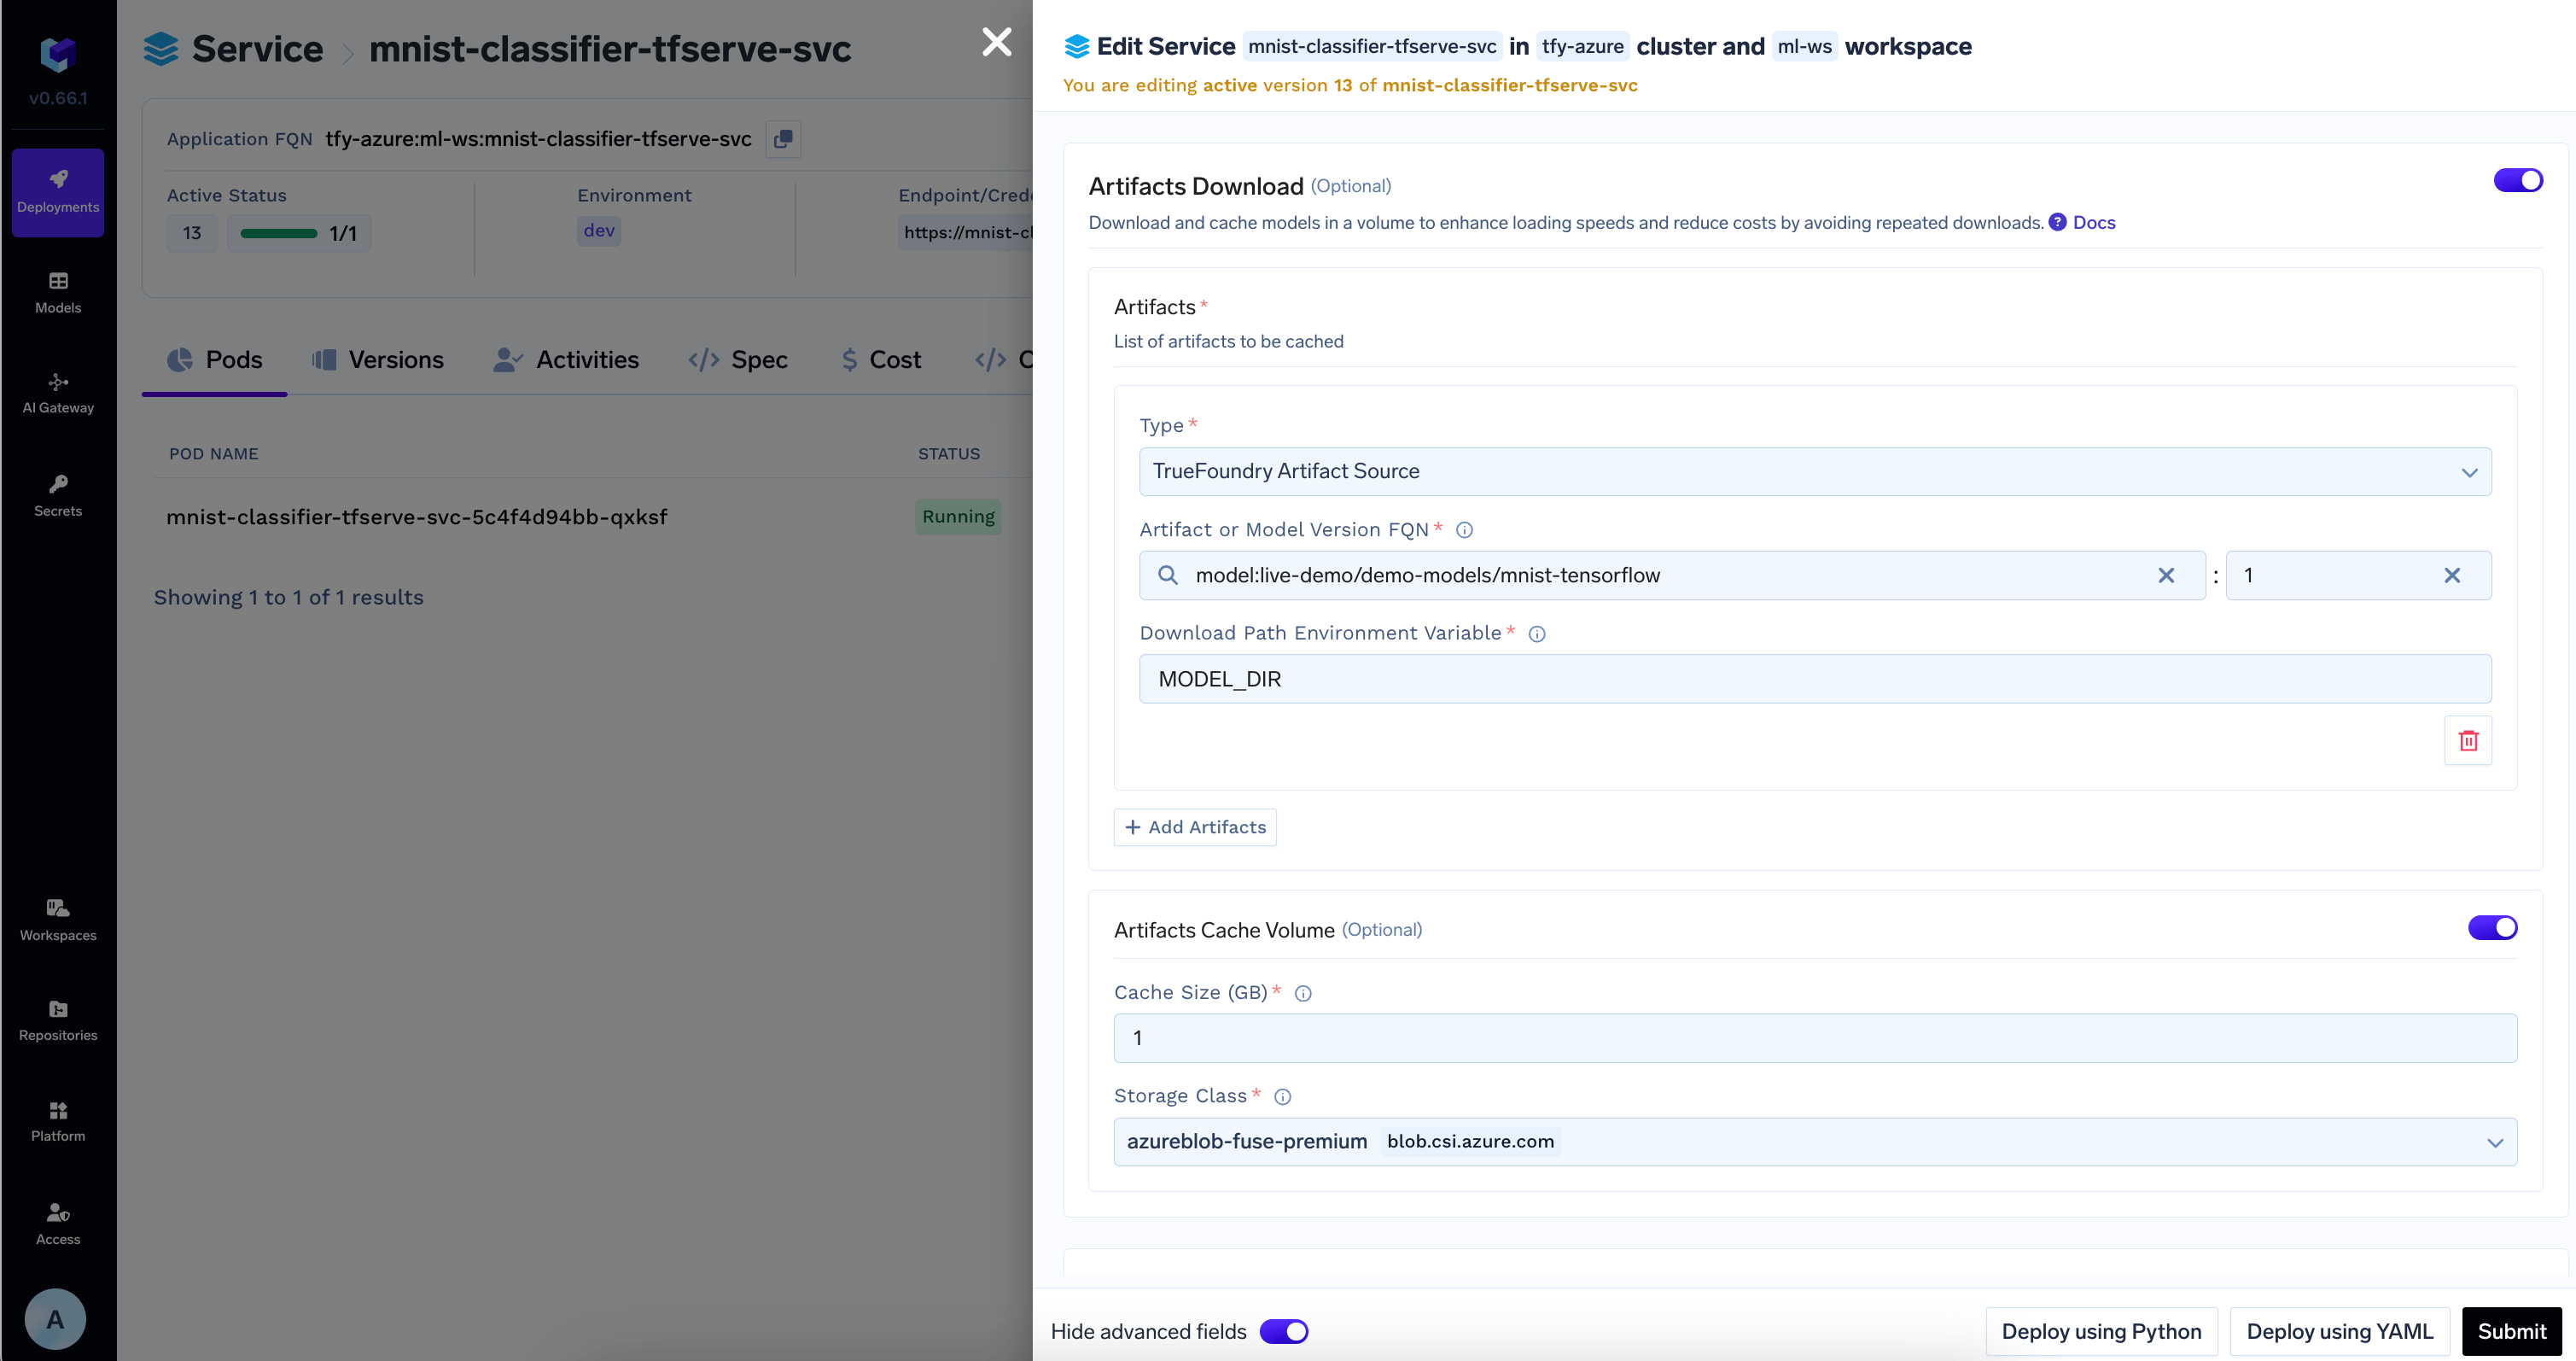 Once the deployment goes through, you can view the deployment, the pods, logs, metrics and events to debug any issues.