> ## Documentation Index
> Fetch the complete documentation index at: https://www.truefoundry.com/llms.txt
> Use this file to discover all available pages before exploring further.
# LoadBalancer/Ingress
> Set up load balancers to distribute traffic efficiently.
Truefoundry uses Istio as the ingress controller. It, by default, provisions a single external load-balancer for one Kubernetes cluster. The load-balancer is provisioned automatically by the tfy-istio-ingress helm chart installed by TrueFoundry which creates a Kubernetes service of type `LoadBalancer`. This is fundamentally an ingress gateway which automatically brings up the load balancer in the respective cloud provider.
Istio is currently mandatory for the Truefoundry components to work. We will be adding support for other ingress controllers in the future.
You can find the configuration of the tfy-ingress-gateway in **Deployments > Helm > tfy-istio-ingress (Make sure you are filtering for the desired cluster)**
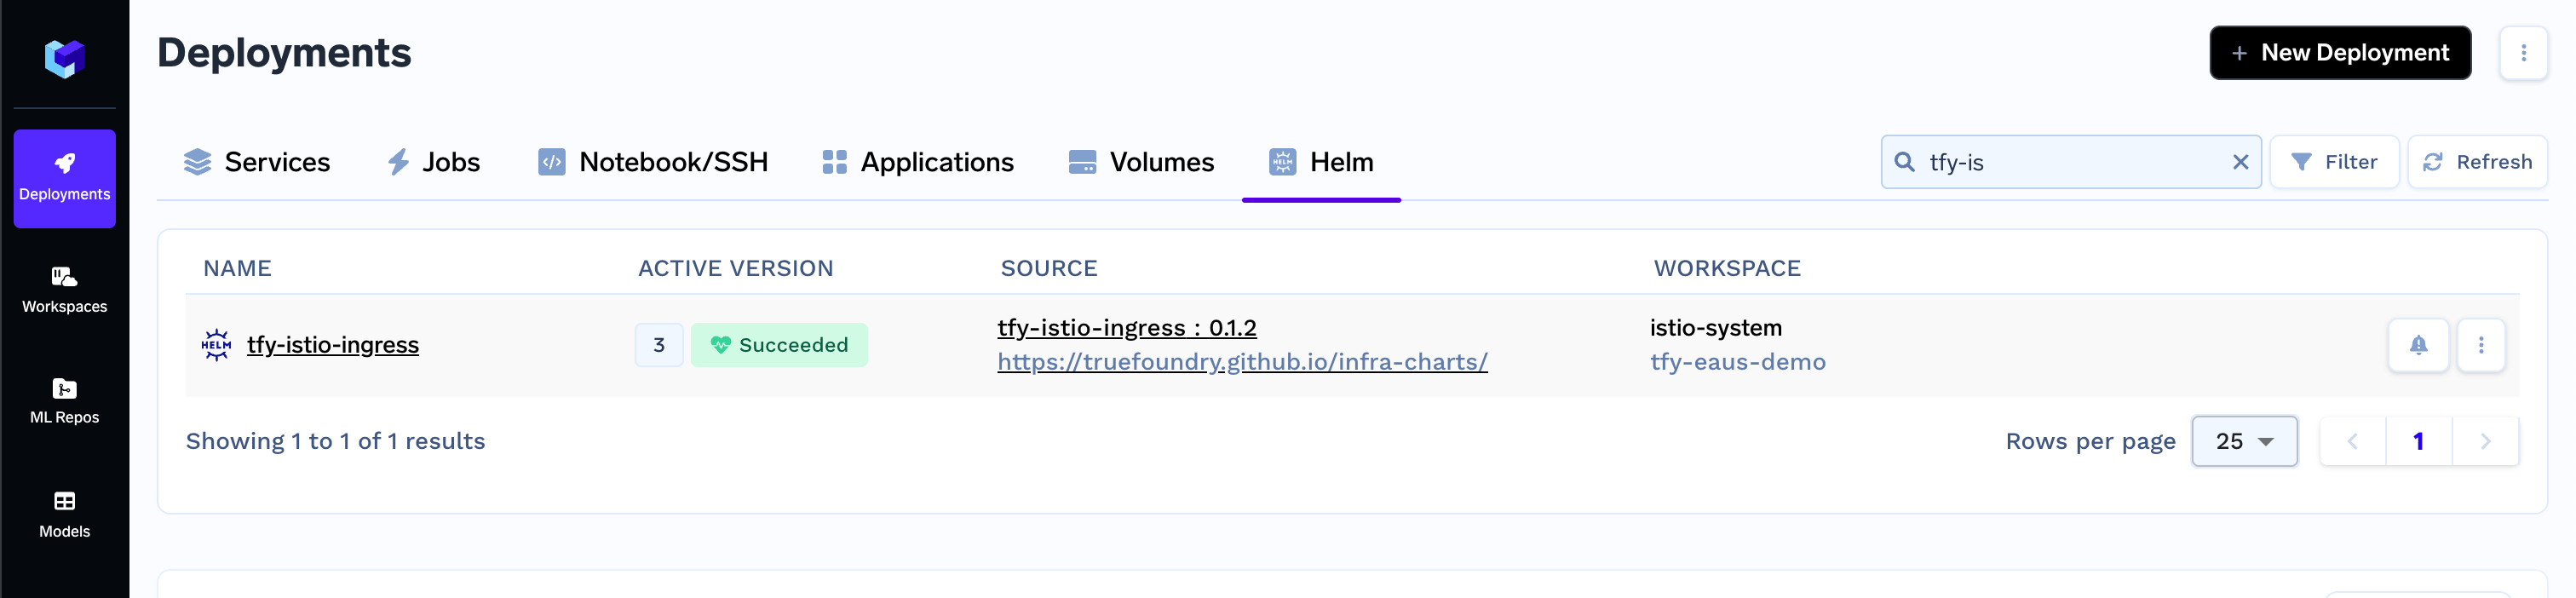 You can click on the three dots to understand the configuration.
 If you want to modify any of your load-balancer settings, you will have to edit this configuration and deploy the helm chart. The load-balancer settings are configured using the annotations on the gateway object. The annotations vary based on the cloud provider and you can find the corresponding cloud specific documentation below.
Changing some of the settings might cause the load balancer to be recreated and you will have to remap your DNS. This can bring down the services temporarily - so be careful with the changes you make or consult with the Truefoundry team.
## Getting the load balancer IP address
Using the below command you can get the load balancer IP address. You need to point this IP address to your domain in your DNS provider as an A record. For AWS - this will be a CNAME record.
```bash lines theme={"dark"}
kubectl get svc -n istio-system tfy-istio-ingress
```
## Modifying your load balancer configuration
Below are the condiguration for the loadbalancers for the different cloud providers.
Below are the various load balancer types that are supported for AWS.
By default, the istio gateway creates a [network load balancer](https://docs.aws.amazon.com/elasticloadbalancing/latest/network/introduction.html) for the ingress traffic. Functionality of the load balancer can be modified using the NLB annotations listed [here](https://kubernetes-sigs.github.io/aws-load-balancer-controller/v2.12/guide/service/annotations/)
Default annotations for the NLB are as follows:
```yaml lines theme={"dark"}
"service.beta.kubernetes.io/aws-load-balancer-ssl-negotiation-policy": "ELBSecurityPolicy-TLS13-1-2-2021-06"
"service.beta.kubernetes.io/aws-load-balancer-name": "CLUSTER_NAME"
"service.beta.kubernetes.io/aws-load-balancer-type": "external"
"service.beta.kubernetes.io/aws-load-balancer-scheme": "internet-facing"
"service.beta.kubernetes.io/aws-load-balancer-ssl-ports": "https"
"service.beta.kubernetes.io/aws-load-balancer-alpn-policy": "HTTP2Preferred"
"service.beta.kubernetes.io/aws-load-balancer-backend-protocol": "tcp"
"service.beta.kubernetes.io/aws-load-balancer-additional-resource-tags":
cluster-name=CLUSTER_NAME, truefoundry.com/managed=true,
owner=Truefoundry, application=tfy-istio-ingress
"service.beta.kubernetes.io/aws-load-balancer-cross-zone-load-balancing-enabled": "true"
```
### Making the load balancer internal
Switching from public to internal load balancer will cause the load balancer to be recreated and you will have to remap your DNS.
To make the load balancer internal, add the following annotation:
```yaml lines theme={"dark"}
"service.beta.kubernetes.io/aws-load-balancer-scheme": "internal"
```
### Restricting the access to the load balancer to a specific IP address
To restrict the access to the load balancer to a specific IP address, add the following annotation:
```yaml lines theme={"dark"}
"service.beta.kubernetes.io/aws-load-balancer-source-ranges": "10.10.0.0/16","10.11.0.0/16"
```
### Adding multiple certificates to the load balancer
To add multiple certificates to the load balancer, add the following annotation:
```yaml lines theme={"dark"}
"service.beta.kubernetes.io/aws-load-balancer-ssl-cert": "arn:aws:acm:us-east-2:XXXXXXX:certificate/XXXXX-XXXXX-XXXXXX,arn:aws:acm:us-east-2:XXXXXXX:certificate/XXXXX-XXXXX-XXXXXX"
```
To add multiple domains to the load Balancer, just add it in the hosts section. You can also use `*` to match all subdomains.
```yaml lines theme={"dark"}
hosts:
- '*.tfy.example.com'
- '*.ml.example.com'
```
To use an application load balancer for the ingress traffic, make the following changes in the tfy-istio-ingress helm chart values. Ensure you have replaced cluster name, load balancer name, certificate arn and ingress class name is `alb`. Functionality of the load balancer can be modified using the ALB annotations listed [here](https://kubernetes-sigs.github.io/aws-load-balancer-controller/v2.12/guide/ingress/annotations/)
ALB doesn't support [SSH servers](/docs/launch-an-ssh-server) in the platform.
Replacing the load balancer from NLB to ALB will cause the load balancer to be recreated and you will have to remap your DNS.
```yaml lines theme={"dark"}
alb:
ingress:
enabled: true
annotations:
alb.ingress.kubernetes.io/tags: cluster-name=CLUSTER_NAME, name=LOAD_BALANCER_NAME
alb.ingress.kubernetes.io/scheme: internet-facing
alb.ingress.kubernetes.io/certificate-arn: >-
CERTIFICATE_ARN
alb.ingress.kubernetes.io/load-balancer-name: LOAD_BALANCER_NAME
ingressClassName: alb
gateway:
service:
type: NodePort
tfyGateway:
name: tfy-wildcard
spec:
servers:
- port:
name: http-tfy-wildcard
number: 80
protocol: HTTP
hosts:
- '*'
selector:
istio: tfy-istio-ingress
```
### Making the load balancer internal
Switching from public to internal load balancer will cause the load balancer to be recreated and you will have to remap your DNS.
To make the load balancer internal, add the following annotation:
```yaml lines theme={"dark"}
"alb.ingress.kubernetes.io/scheme": "internal"
```
### Restricting the access to the load balancer to a specific IP address
To restrict the access to the load balancer to a specific IP address, add the following annotation:
```yaml lines theme={"dark"}
"alb.ingress.kubernetes.io/source-ranges": "10.10.0.0/16","10.11.0.0/16"
```
### Adding multiple certificates to the load balancer
To add multiple certificates to the load balancer, add the following annotation:
```yaml lines theme={"dark"}
"alb.ingress.kubernetes.io/certificate-arn": "arn:aws:acm:us-east-2:XXXXXXX:certificate/XXXXX-XXXXX-XXXXXX,arn:aws:acm:us-east-2:XXXXXXX:certificate/XXXXX-XXXXX-XXXXXX"
```
### Adding WAF to the load balancer
To add WAF ARN to the load balancer, add the following annotation:
```yaml lines theme={"dark"}
"aalb.ingress.kubernetes.io/wafv2-acl-arn": "arn:aws:wafv2:us-east-2:XXXXXXX:regional/webacl/XXXXX-XXXXX-XXXXXX/XXXXX-XXXXX-XXXXXX"
```
To add WAF ID to the load balancer, add the following annotation:
```yaml lines theme={"dark"}
"alb.ingress.kubernetes.io/waf-acl-id": "XXXXX-XXXXX-XXXXXX"
```
To add multiple domains to the load Balancer, just add it in the hosts section. You can also use `*` to match all subdomains.
```yaml lines theme={"dark"}
hosts:
- '*.tfy.example.com'
- '*.ml.example.com'
```
When running TrueFoundry on GCP, istio creates a [network load balancer](https://cloud.google.com/load-balancing/docs/load-balancing-overview#network-load-balancer) for the ingress traffic. Functionality of the load balancer can be modified using the network load balancer annotations listed [here](https://cloud.google.com/kubernetes-engine/docs/concepts/service-load-balancer-parameters)
By default no annotations are added to the load balancer gateway in GCP.
### Making the loadbalancer internal
```yaml YAML lines theme={"dark"}
gateway:
annotations:
networking.gke.io/load-balancer-type: "Internal"
```
To add multiple domains to the load Balancer, just add it in the hosts section. You can also use `*` to match all subdomains.
```yaml lines theme={"dark"}
hosts:
- '*.tfy.example.com'
- '*.ml.example.com'
```
To restrict the access to the load balancer to a specific IP address, you need to modify the `gateway.service` spec
```yaml lines theme={"dark"}
gateway:
service:
loadBalancerSourceRanges:
- 10.20.0.0/16
- 10.10.0.0/16
```
When running TrueFoundry on Azure, istio creates a [load balancer](https://learn.microsoft.com/en-us/azure/aks/concepts-network-services#loadbalancer) for the ingress traffic. Functionality of the load balancer can be modified using the load balancer annotations listed [here](https://cloud-provider-azure.sigs.k8s.io/topics/loadbalancer/#loadbalancer-annotations)
By default no annotations are added to the load balancer gateway in Azure.
### Making the load balancer internal
```yaml YAML lines theme={"dark"}
gateway:
annotations:
service.beta.kubernetes.io/azure-load-balancer-internal: "true"
```
To add multiple domains to the load Balancer, just add it in the hosts section. You can also use `*` to match all subdomains.
```yaml lines theme={"dark"}
hosts:
- '*.tfy.example.com'
- '*.ml.example.com'
```
To restrict the access to the load balancer to a specific IP address, you need to modify the `gateway.service` spec
```yaml lines theme={"dark"}
gateway:
service:
loadBalancerSourceRanges:
- 10.20.0.0/16
- 10.10.0.0/16
```
When running TrueFoundry on On-Prem, istio creates a load balancer for the ingress traffic. There are two ways to run this mode.
1. By default load balancer will be created without an external IP address in the case of generic cluster.
2. Run [metalLB](https://metallb.universe.tf/installation/) to assign an IP address to the load balancer.
3. Ensure that load balancer has an external IP address in its status. You can check that by running the following command:
```bash lines theme={"dark"}
kubectl get svc -n istio-system tfy-istio-ingress
```
4. Once the load balancer gets the IP address assign in its status, modify your DNS to point to the IP address.
1. If you already have provisioned a load balancer outside of the k8s cluster, you can use istio gateway as a backend to route traffic.
2. Modify the gateway configuration to use nodeport service type.
```yaml lines theme={"dark"}
gateway:
service:
type: NodePort
```
3. Modify your external load balancer to point to all (or few) nodes at the port that comes up in the nodeport service. You can check that by running the following command:
```bash lines theme={"dark"}
kubectl get svc -n istio-system tfy-istio-ingress
```
4. If you want to terminate TLS at the istio layer you can use the port 443 as the backend port otherwise use the port 80.
To add multiple domains to the load Balancer, just add it in the hosts section. You can also use `*` to match all subdomains.
```yaml lines theme={"dark"}
hosts:
- '*.tfy.example.com'
- '*.ml.example.com'
```
To restrict the access to the load balancer to a specific IP address, you need to modify the `gateway.service` spec
```yaml lines theme={"dark"}
gateway:
service:
loadBalancerSourceRanges:
- 10.20.0.0/16
- 10.10.0.0/16
```
If you have your own certificate files (for example, from another certificate provider or self-signed), you can use them directly with TrueFoundry.
1. Create a Kubernetes secret with your certificate and key, or create a self-signed certificate:
```shell Shell lines theme={"dark"}
# Generate a self-signed certificate
openssl req -x509 -nodes -days 365 -newkey rsa:2048 \
-keyout tls.key -out tls.crt \
-subj "/CN=*.example.com" \
-addext "subjectAltName = DNS:example.com,DNS:*.example.com"
```
```shell Shell lines theme={"dark"}
# Create secret from local certificate files
kubectl create secret tls example-com-tls \
--cert=path/to/cert/file \
--key=path/to/key/file \
-n istio-system
```
2. Once the secret is created, head over to the cluster page and navigate to the `tfy-istio-ingress` add-on. Add the secret name in the `tfyGateway.spec.servers[1].tls.credentialName` section and ensure that `tfyGateway.spec.servers[1].port.protocol` is set to `HTTPS`. Here we are using `example-com-tls` as the secret name, which contains the certificate and key.
```yaml YAML lines theme={"dark"}
servers:
-
- hosts:
- "*.example.com"
port:
name: https-tfy-wildcard
number: 443
protocol: HTTPS
tls:
mode: SIMPLE
credentialName: example-com-tls
```
Self-signed certificates will cause browser warnings. They should only be used for testing or internal systems. To connect to services with self-signed certificates, you have to pass the CA certificate to verify the SSL certificate.
## Adding base domain to the TrueFoundry platform
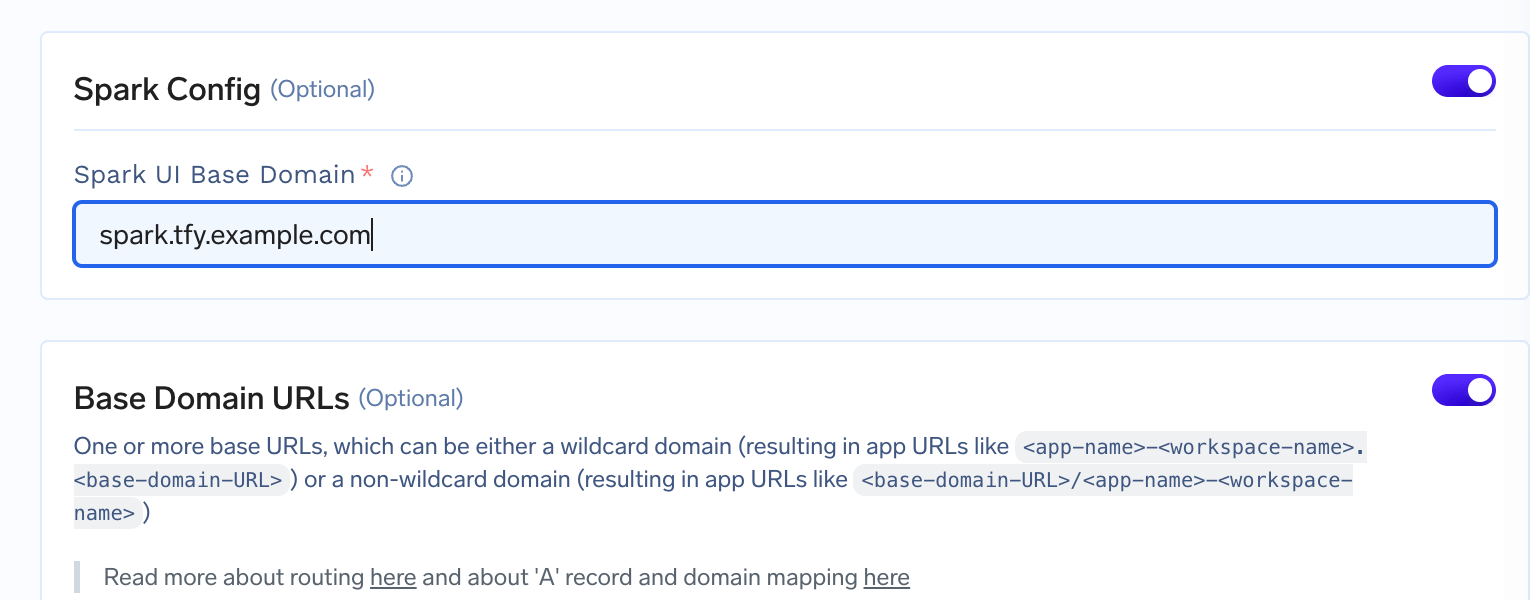
If you want to add the base domain(s) to the TrueFoundry platform to expose your services via your domain, you can do so by editing the `Cluster` Page from the `Platform` section and adding the domain in the `Base Domain URLs` field. You can also add multiple domains.
If you want to use notebooks and SSH servers, you need to add the domain URL for them in the cluster's page by enabling workbench config toggle.
If you want to modify any of your load-balancer settings, you will have to edit this configuration and deploy the helm chart. The load-balancer settings are configured using the annotations on the gateway object. The annotations vary based on the cloud provider and you can find the corresponding cloud specific documentation below.
Changing some of the settings might cause the load balancer to be recreated and you will have to remap your DNS. This can bring down the services temporarily - so be careful with the changes you make or consult with the Truefoundry team.
## Getting the load balancer IP address
Using the below command you can get the load balancer IP address. You need to point this IP address to your domain in your DNS provider as an A record. For AWS - this will be a CNAME record.
```bash lines theme={"dark"}
kubectl get svc -n istio-system tfy-istio-ingress
```
## Modifying your load balancer configuration
Below are the condiguration for the loadbalancers for the different cloud providers.
Below are the various load balancer types that are supported for AWS.
By default, the istio gateway creates a [network load balancer](https://docs.aws.amazon.com/elasticloadbalancing/latest/network/introduction.html) for the ingress traffic. Functionality of the load balancer can be modified using the NLB annotations listed [here](https://kubernetes-sigs.github.io/aws-load-balancer-controller/v2.12/guide/service/annotations/)
Default annotations for the NLB are as follows:
```yaml lines theme={"dark"}
"service.beta.kubernetes.io/aws-load-balancer-ssl-negotiation-policy": "ELBSecurityPolicy-TLS13-1-2-2021-06"
"service.beta.kubernetes.io/aws-load-balancer-name": "CLUSTER_NAME"
"service.beta.kubernetes.io/aws-load-balancer-type": "external"
"service.beta.kubernetes.io/aws-load-balancer-scheme": "internet-facing"
"service.beta.kubernetes.io/aws-load-balancer-ssl-ports": "https"
"service.beta.kubernetes.io/aws-load-balancer-alpn-policy": "HTTP2Preferred"
"service.beta.kubernetes.io/aws-load-balancer-backend-protocol": "tcp"
"service.beta.kubernetes.io/aws-load-balancer-additional-resource-tags":
cluster-name=CLUSTER_NAME, truefoundry.com/managed=true,
owner=Truefoundry, application=tfy-istio-ingress
"service.beta.kubernetes.io/aws-load-balancer-cross-zone-load-balancing-enabled": "true"
```
### Making the load balancer internal
Switching from public to internal load balancer will cause the load balancer to be recreated and you will have to remap your DNS.
To make the load balancer internal, add the following annotation:
```yaml lines theme={"dark"}
"service.beta.kubernetes.io/aws-load-balancer-scheme": "internal"
```
### Restricting the access to the load balancer to a specific IP address
To restrict the access to the load balancer to a specific IP address, add the following annotation:
```yaml lines theme={"dark"}
"service.beta.kubernetes.io/aws-load-balancer-source-ranges": "10.10.0.0/16","10.11.0.0/16"
```
### Adding multiple certificates to the load balancer
To add multiple certificates to the load balancer, add the following annotation:
```yaml lines theme={"dark"}
"service.beta.kubernetes.io/aws-load-balancer-ssl-cert": "arn:aws:acm:us-east-2:XXXXXXX:certificate/XXXXX-XXXXX-XXXXXX,arn:aws:acm:us-east-2:XXXXXXX:certificate/XXXXX-XXXXX-XXXXXX"
```
To add multiple domains to the load Balancer, just add it in the hosts section. You can also use `*` to match all subdomains.
```yaml lines theme={"dark"}
hosts:
- '*.tfy.example.com'
- '*.ml.example.com'
```
To use an application load balancer for the ingress traffic, make the following changes in the tfy-istio-ingress helm chart values. Ensure you have replaced cluster name, load balancer name, certificate arn and ingress class name is `alb`. Functionality of the load balancer can be modified using the ALB annotations listed [here](https://kubernetes-sigs.github.io/aws-load-balancer-controller/v2.12/guide/ingress/annotations/)
ALB doesn't support [SSH servers](/docs/launch-an-ssh-server) in the platform.
Replacing the load balancer from NLB to ALB will cause the load balancer to be recreated and you will have to remap your DNS.
```yaml lines theme={"dark"}
alb:
ingress:
enabled: true
annotations:
alb.ingress.kubernetes.io/tags: cluster-name=CLUSTER_NAME, name=LOAD_BALANCER_NAME
alb.ingress.kubernetes.io/scheme: internet-facing
alb.ingress.kubernetes.io/certificate-arn: >-
CERTIFICATE_ARN
alb.ingress.kubernetes.io/load-balancer-name: LOAD_BALANCER_NAME
ingressClassName: alb
gateway:
service:
type: NodePort
tfyGateway:
name: tfy-wildcard
spec:
servers:
- port:
name: http-tfy-wildcard
number: 80
protocol: HTTP
hosts:
- '*'
selector:
istio: tfy-istio-ingress
```
### Making the load balancer internal
Switching from public to internal load balancer will cause the load balancer to be recreated and you will have to remap your DNS.
To make the load balancer internal, add the following annotation:
```yaml lines theme={"dark"}
"alb.ingress.kubernetes.io/scheme": "internal"
```
### Restricting the access to the load balancer to a specific IP address
To restrict the access to the load balancer to a specific IP address, add the following annotation:
```yaml lines theme={"dark"}
"alb.ingress.kubernetes.io/source-ranges": "10.10.0.0/16","10.11.0.0/16"
```
### Adding multiple certificates to the load balancer
To add multiple certificates to the load balancer, add the following annotation:
```yaml lines theme={"dark"}
"alb.ingress.kubernetes.io/certificate-arn": "arn:aws:acm:us-east-2:XXXXXXX:certificate/XXXXX-XXXXX-XXXXXX,arn:aws:acm:us-east-2:XXXXXXX:certificate/XXXXX-XXXXX-XXXXXX"
```
### Adding WAF to the load balancer
To add WAF ARN to the load balancer, add the following annotation:
```yaml lines theme={"dark"}
"aalb.ingress.kubernetes.io/wafv2-acl-arn": "arn:aws:wafv2:us-east-2:XXXXXXX:regional/webacl/XXXXX-XXXXX-XXXXXX/XXXXX-XXXXX-XXXXXX"
```
To add WAF ID to the load balancer, add the following annotation:
```yaml lines theme={"dark"}
"alb.ingress.kubernetes.io/waf-acl-id": "XXXXX-XXXXX-XXXXXX"
```
To add multiple domains to the load Balancer, just add it in the hosts section. You can also use `*` to match all subdomains.
```yaml lines theme={"dark"}
hosts:
- '*.tfy.example.com'
- '*.ml.example.com'
```
When running TrueFoundry on GCP, istio creates a [network load balancer](https://cloud.google.com/load-balancing/docs/load-balancing-overview#network-load-balancer) for the ingress traffic. Functionality of the load balancer can be modified using the network load balancer annotations listed [here](https://cloud.google.com/kubernetes-engine/docs/concepts/service-load-balancer-parameters)
By default no annotations are added to the load balancer gateway in GCP.
### Making the loadbalancer internal
```yaml YAML lines theme={"dark"}
gateway:
annotations:
networking.gke.io/load-balancer-type: "Internal"
```
To add multiple domains to the load Balancer, just add it in the hosts section. You can also use `*` to match all subdomains.
```yaml lines theme={"dark"}
hosts:
- '*.tfy.example.com'
- '*.ml.example.com'
```
To restrict the access to the load balancer to a specific IP address, you need to modify the `gateway.service` spec
```yaml lines theme={"dark"}
gateway:
service:
loadBalancerSourceRanges:
- 10.20.0.0/16
- 10.10.0.0/16
```
When running TrueFoundry on Azure, istio creates a [load balancer](https://learn.microsoft.com/en-us/azure/aks/concepts-network-services#loadbalancer) for the ingress traffic. Functionality of the load balancer can be modified using the load balancer annotations listed [here](https://cloud-provider-azure.sigs.k8s.io/topics/loadbalancer/#loadbalancer-annotations)
By default no annotations are added to the load balancer gateway in Azure.
### Making the load balancer internal
```yaml YAML lines theme={"dark"}
gateway:
annotations:
service.beta.kubernetes.io/azure-load-balancer-internal: "true"
```
To add multiple domains to the load Balancer, just add it in the hosts section. You can also use `*` to match all subdomains.
```yaml lines theme={"dark"}
hosts:
- '*.tfy.example.com'
- '*.ml.example.com'
```
To restrict the access to the load balancer to a specific IP address, you need to modify the `gateway.service` spec
```yaml lines theme={"dark"}
gateway:
service:
loadBalancerSourceRanges:
- 10.20.0.0/16
- 10.10.0.0/16
```
When running TrueFoundry on On-Prem, istio creates a load balancer for the ingress traffic. There are two ways to run this mode.
1. By default load balancer will be created without an external IP address in the case of generic cluster.
2. Run [metalLB](https://metallb.universe.tf/installation/) to assign an IP address to the load balancer.
3. Ensure that load balancer has an external IP address in its status. You can check that by running the following command:
```bash lines theme={"dark"}
kubectl get svc -n istio-system tfy-istio-ingress
```
4. Once the load balancer gets the IP address assign in its status, modify your DNS to point to the IP address.
1. If you already have provisioned a load balancer outside of the k8s cluster, you can use istio gateway as a backend to route traffic.
2. Modify the gateway configuration to use nodeport service type.
```yaml lines theme={"dark"}
gateway:
service:
type: NodePort
```
3. Modify your external load balancer to point to all (or few) nodes at the port that comes up in the nodeport service. You can check that by running the following command:
```bash lines theme={"dark"}
kubectl get svc -n istio-system tfy-istio-ingress
```
4. If you want to terminate TLS at the istio layer you can use the port 443 as the backend port otherwise use the port 80.
To add multiple domains to the load Balancer, just add it in the hosts section. You can also use `*` to match all subdomains.
```yaml lines theme={"dark"}
hosts:
- '*.tfy.example.com'
- '*.ml.example.com'
```
To restrict the access to the load balancer to a specific IP address, you need to modify the `gateway.service` spec
```yaml lines theme={"dark"}
gateway:
service:
loadBalancerSourceRanges:
- 10.20.0.0/16
- 10.10.0.0/16
```
If you have your own certificate files (for example, from another certificate provider or self-signed), you can use them directly with TrueFoundry.
1. Create a Kubernetes secret with your certificate and key, or create a self-signed certificate:
```shell Shell lines theme={"dark"}
# Generate a self-signed certificate
openssl req -x509 -nodes -days 365 -newkey rsa:2048 \
-keyout tls.key -out tls.crt \
-subj "/CN=*.example.com" \
-addext "subjectAltName = DNS:example.com,DNS:*.example.com"
```
```shell Shell lines theme={"dark"}
# Create secret from local certificate files
kubectl create secret tls example-com-tls \
--cert=path/to/cert/file \
--key=path/to/key/file \
-n istio-system
```
2. Once the secret is created, head over to the cluster page and navigate to the `tfy-istio-ingress` add-on. Add the secret name in the `tfyGateway.spec.servers[1].tls.credentialName` section and ensure that `tfyGateway.spec.servers[1].port.protocol` is set to `HTTPS`. Here we are using `example-com-tls` as the secret name, which contains the certificate and key.
```yaml YAML lines theme={"dark"}
servers:
-
- hosts:
- "*.example.com"
port:
name: https-tfy-wildcard
number: 443
protocol: HTTPS
tls:
mode: SIMPLE
credentialName: example-com-tls
```
Self-signed certificates will cause browser warnings. They should only be used for testing or internal systems. To connect to services with self-signed certificates, you have to pass the CA certificate to verify the SSL certificate.
## Adding base domain to the TrueFoundry platform
If you want to add the base domain(s) to the TrueFoundry platform to expose your services via your domain, you can do so by editing the `Cluster` Page from the `Platform` section and adding the domain in the `Base Domain URLs` field. You can also add multiple domains.
If you want to use notebooks and SSH servers, you need to add the domain URL for them in the cluster's page by enabling workbench config toggle.
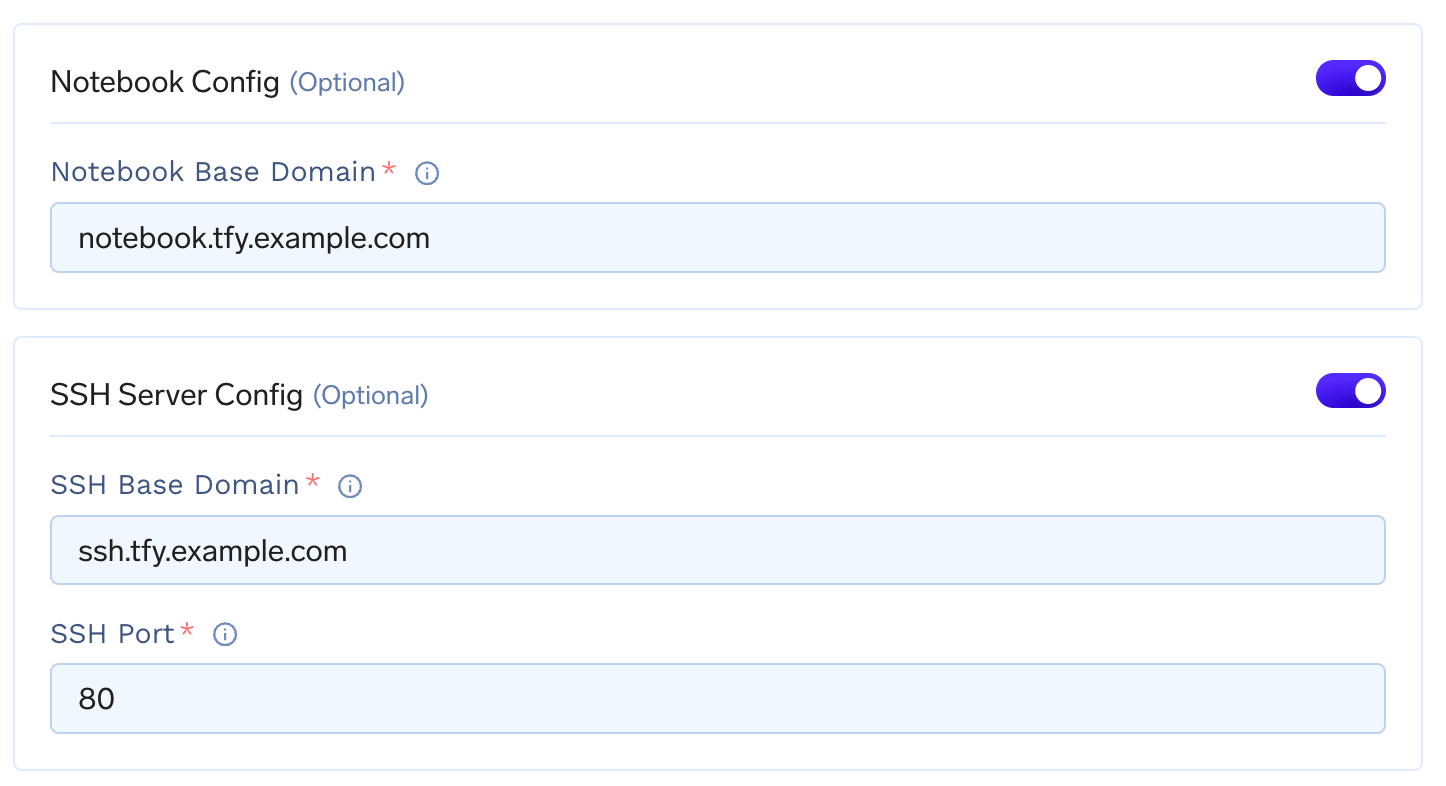 If you have a wildcard domain, you can add the base domain as `notebook.tfy.example.com` and `ssh.tfy.example.com` with port 80 if `*.tfy.example.com` is your base domain. Feel free to customize the domain names as per your needs.
If you want to expose your spark job, you need to add the domain URL in the cluster's page by enabling spark config toggle.
If you have a wildcard domain, you can add the base domain as `notebook.tfy.example.com` and `ssh.tfy.example.com` with port 80 if `*.tfy.example.com` is your base domain. Feel free to customize the domain names as per your needs.
If you want to expose your spark job, you need to add the domain URL in the cluster's page by enabling spark config toggle.
 ## Deploy multiple load balancers
Each installation of `tfy-istio-ingress` creates a load balancer. If you want to deploy multiple multiple load-balancers, for e.g. one internal and one external, you can clone the current `tfy-istio-ingress` application in the same namespace `istio-system`, change the `tfyGateway.Name` to something else other then default `tfy-wildcard` and update the `tfyGateway.spec.Selector` with the new name of the application.
For e.g. if you clone the `tfy-istio-ingress` a new application with the name `tfy-istio-ingress-1` will be created , update the `tfyGateway.Name` to a new name and the `tfyGateway.spec.Selector` to
```yaml YAML lines theme={"dark"}
tfyGateway:
spec:
selector:
app: "tfy-istio-ingress-1"
```
Once the ingress is installed, it will automatically create another loadbalancer whose IP you can get using
```bash lines theme={"dark"}
kubectl get svc -n istio-system
```
## Add authentication to all services behind a load balancer
We can configure Istio to apply authentication at a gateway level. This will work only if you are accessing the service using the DNS provided in Istio and not access the service directly from within the cluster. This process is a bit complicated, and you should only do this if you really want to enable authentication at an istio gateway level.
### Istio will validate if the JWT is valid. If not valid, it will return an Unauthorized Error.
1. Create a RequestAuthentication resource to ensure that the JWT issuer and Audience are correct.
1. Authentication will be only done if there is an Authorization header. This is pass-through if no Authorization header is present in the Request or it gets an empty string after removing the prefix.
```yaml lines theme={"dark"}
apiVersion: security.istio.io/v1beta1
kind: RequestAuthentication
metadata:
name: tfy-oauth2
namespace: istio-system
spec:
selector:
matchLabels:
istio: tfy-istio-ingress
jwtRules:
- issuer: "truefoundry.com"
fromHeaders:
- name: Authorization
prefix: "Bearer "
audiences:
-
jwksUri: https://login.truefoundry.com/.well-known/jwks.json
forwardOriginalToken: true
```
2. Create an AuthorizationPolicy that will reject any requests with an empty JWT.
```yaml lines theme={"dark"}
apiVersion: security.istio.io/v1beta1
kind: AuthorizationPolicy
metadata:
name: tfy-oauth2
namespace: istio-system
spec:
selector:
matchLabels:
istio: tfy-istio-ingress
action: DENY
rules:
- from:
- source:
notRequestPrincipals: ["*"]
to:
- operation:
ports:
- "443"
```
You can read the Istio docs: [https://istio.io/latest/docs/reference/config/security/request\_authentication/](https://istio.io/latest/docs/reference/config/security/request_authentication/) for further customization or making it work with your own IdP.
***
## Deploy multiple load balancers
Each installation of `tfy-istio-ingress` creates a load balancer. If you want to deploy multiple multiple load-balancers, for e.g. one internal and one external, you can clone the current `tfy-istio-ingress` application in the same namespace `istio-system`, change the `tfyGateway.Name` to something else other then default `tfy-wildcard` and update the `tfyGateway.spec.Selector` with the new name of the application.
For e.g. if you clone the `tfy-istio-ingress` a new application with the name `tfy-istio-ingress-1` will be created , update the `tfyGateway.Name` to a new name and the `tfyGateway.spec.Selector` to
```yaml YAML lines theme={"dark"}
tfyGateway:
spec:
selector:
app: "tfy-istio-ingress-1"
```
Once the ingress is installed, it will automatically create another loadbalancer whose IP you can get using
```bash lines theme={"dark"}
kubectl get svc -n istio-system
```
## Add authentication to all services behind a load balancer
We can configure Istio to apply authentication at a gateway level. This will work only if you are accessing the service using the DNS provided in Istio and not access the service directly from within the cluster. This process is a bit complicated, and you should only do this if you really want to enable authentication at an istio gateway level.
### Istio will validate if the JWT is valid. If not valid, it will return an Unauthorized Error.
1. Create a RequestAuthentication resource to ensure that the JWT issuer and Audience are correct.
1. Authentication will be only done if there is an Authorization header. This is pass-through if no Authorization header is present in the Request or it gets an empty string after removing the prefix.
```yaml lines theme={"dark"}
apiVersion: security.istio.io/v1beta1
kind: RequestAuthentication
metadata:
name: tfy-oauth2
namespace: istio-system
spec:
selector:
matchLabels:
istio: tfy-istio-ingress
jwtRules:
- issuer: "truefoundry.com"
fromHeaders:
- name: Authorization
prefix: "Bearer "
audiences:
-
jwksUri: https://login.truefoundry.com/.well-known/jwks.json
forwardOriginalToken: true
```
2. Create an AuthorizationPolicy that will reject any requests with an empty JWT.
```yaml lines theme={"dark"}
apiVersion: security.istio.io/v1beta1
kind: AuthorizationPolicy
metadata:
name: tfy-oauth2
namespace: istio-system
spec:
selector:
matchLabels:
istio: tfy-istio-ingress
action: DENY
rules:
- from:
- source:
notRequestPrincipals: ["*"]
to:
- operation:
ports:
- "443"
```
You can read the Istio docs: [https://istio.io/latest/docs/reference/config/security/request\_authentication/](https://istio.io/latest/docs/reference/config/security/request_authentication/) for further customization or making it work with your own IdP.
***