> ## Documentation Index
> Fetch the complete documentation index at: https://www.truefoundry.com/llms.txt
> Use this file to discover all available pages before exploring further.
# HashiCorp Vault
> Integrate HashiCorp tools for secrets and infrastructure management.
To integrate with HashiCorp Vault for secret management in TrueFoundry, you need to set up a HashiCorp Vault integration. This guide walks you through adding HashiCorp Vault integration, describing each field in the forms, and providing helpful links for setup.
## HashiCorp Vault Integration
To add a HashiCorp Vault integration:
1. **Go to the Platform > Integration Providers page** in the TrueFoundry UI.
2. **Click on 'Add Integration Provider'.**
3. **Select 'HashiCorp' as the provider type.**
4. **Choose 'HashiCorp Vault Integration'** in the integrations section.
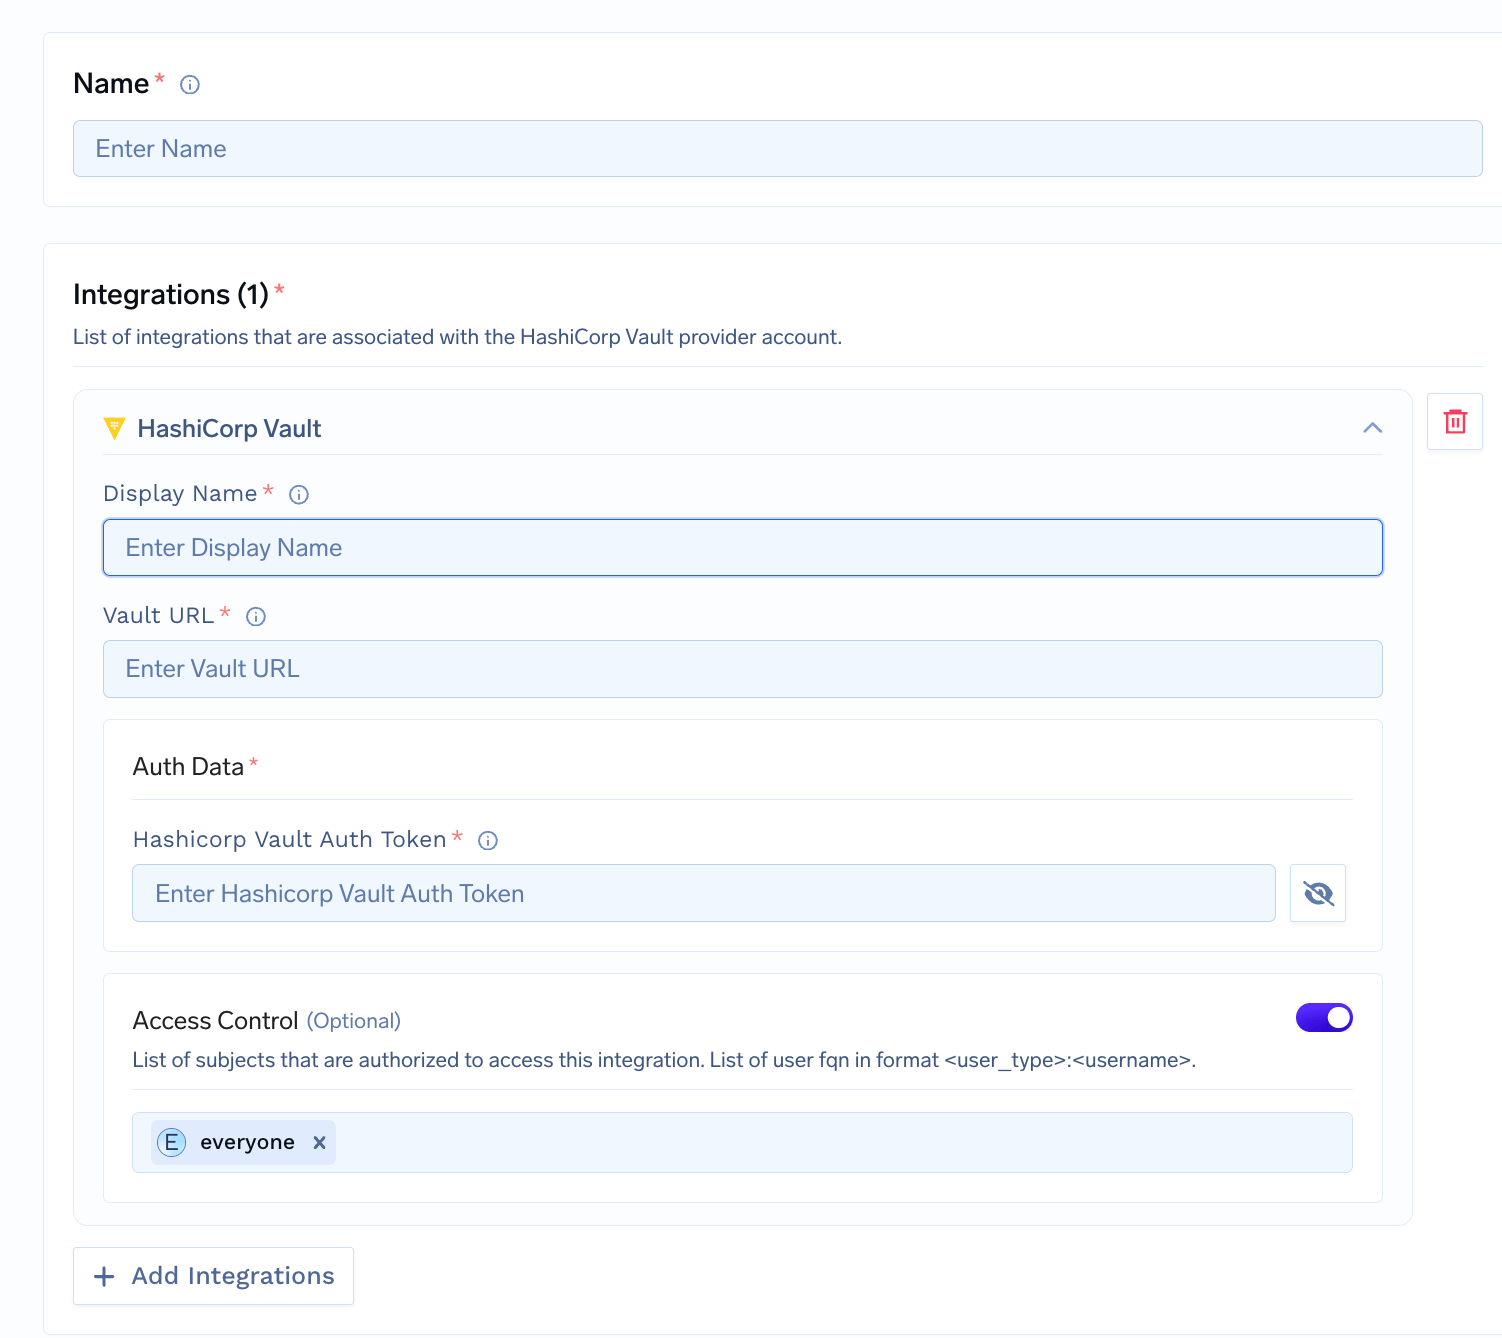
5. **Fill out the form fields as shown below:**
 ### Field Descriptions
* **Name**: The name of the HashiCorp Vault provider account. Must be 3 to 32 lowercase alphanumeric characters, may contain hyphens, and cannot start with a number.
* **Display Name**: The name of the integration that will be displayed in the TrueFoundry UI. Again, it must be 3 to 32 lowercase alphanumeric characters, may contain hyphens, and cannot start with a number.
* **Vault URL**: The URL of your HashiCorp Vault server (e.g., `https://vault.example.com:8200`).
* **Auth Data**: Authentication data for the Vault integration. Choose one of the following auth methods:
Authenticate using a Vault token.
* **Auth Token**: The Vault authentication token used for authentication. This is required for the integration to access your Vault instance. You can either paste the token directly or reference a mounted Kubernetes secret key using the format `tfy-k8s-secret://HASHICORP`. Here, `HASHICORP` is the key inside the Kubernetes secret, not the secret name.
> **How to get a HashiCorp Vault auth token:**
>
> 1. Access your HashiCorp Vault instance through the CLI or UI.
> 2. Authenticate using your preferred method (e.g., `vault auth-method=userpass username=myuser`).
> 3. You can copy the token by clicking on the profile on UI and click on copy token.
> 4. For more details, see the [HashiCorp Vault Authentication documentation](https://developer.hashicorp.com/vault/docs/auth).
Authenticate using AppRole credentials. Role ID and secret ID come from your AppRole. Token policies must allow KV v2 data and metadata on this mount for your root path, secret paths, and the connection check.
### Field Descriptions
* **Name**: The name of the HashiCorp Vault provider account. Must be 3 to 32 lowercase alphanumeric characters, may contain hyphens, and cannot start with a number.
* **Display Name**: The name of the integration that will be displayed in the TrueFoundry UI. Again, it must be 3 to 32 lowercase alphanumeric characters, may contain hyphens, and cannot start with a number.
* **Vault URL**: The URL of your HashiCorp Vault server (e.g., `https://vault.example.com:8200`).
* **Auth Data**: Authentication data for the Vault integration. Choose one of the following auth methods:
Authenticate using a Vault token.
* **Auth Token**: The Vault authentication token used for authentication. This is required for the integration to access your Vault instance. You can either paste the token directly or reference a mounted Kubernetes secret key using the format `tfy-k8s-secret://HASHICORP`. Here, `HASHICORP` is the key inside the Kubernetes secret, not the secret name.
> **How to get a HashiCorp Vault auth token:**
>
> 1. Access your HashiCorp Vault instance through the CLI or UI.
> 2. Authenticate using your preferred method (e.g., `vault auth-method=userpass username=myuser`).
> 3. You can copy the token by clicking on the profile on UI and click on copy token.
> 4. For more details, see the [HashiCorp Vault Authentication documentation](https://developer.hashicorp.com/vault/docs/auth).
Authenticate using AppRole credentials. Role ID and secret ID come from your AppRole. Token policies must allow KV v2 data and metadata on this mount for your root path, secret paths, and the connection check.
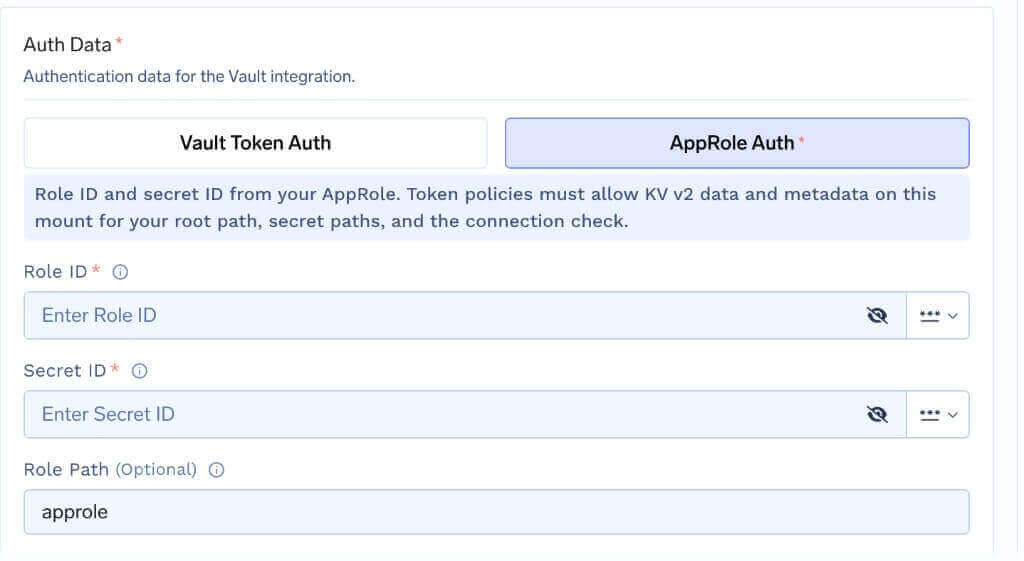 * **Role ID**: The AppRole role ID for Vault authentication.
* **Secret ID**: The AppRole secret ID for Vault authentication. You can paste the secret ID directly or reference a mounted Kubernetes secret key using the format `tfy-k8s-secret://HASHICORP`.
* **Role Path** (Optional): The path where the AppRole auth method is mounted in Vault. Defaults to `approle`.
> **How to get AppRole credentials:**
>
> 1. Enable the AppRole auth method in Vault if it is not already enabled.
> 2. Create a policy with the required KV v2 permissions (see below), then create an AppRole bound to that policy.
> 3. Retrieve the Role ID and generate a Secret ID for the AppRole.
> 4. For more details, see the [HashiCorp Vault AppRole documentation](https://developer.hashicorp.com/vault/docs/auth/approle).
The credentials you use (token or AppRole) must have the following permissions for the KV path. For example, if the KV path is `tfy-secrets`, the policy should include:
```hcl theme={"dark"}
path "tfy-secrets/data/*" {
capabilities = ["create", "read", "update", "patch", "delete", "list"]
}
path "tfy-secrets/metadata/*" {
capabilities = ["read"]
}
```
You can refer to the [HashiCorp Vault Permissions documentation](https://developer.hashicorp.com/vault/docs/secrets/kv/kv-v2/setup#step-2-create-an-acl-policy-file) for more details.
* **Access Control (Optional)**: List of users or groups fqn in format `:` allowed to use this integration. By default, set to `everyone`.
## Final Steps
* After filling all required fields, click **Add Integration Provider** to save your integration.
* You can now use this integration as a secret store when configuring your applications to securely manage secrets through HashiCorp Vault.
***
With this integration in place, you can securely manage and access secrets stored in your HashiCorp Vault instance directly from TrueFoundry!
* **Role ID**: The AppRole role ID for Vault authentication.
* **Secret ID**: The AppRole secret ID for Vault authentication. You can paste the secret ID directly or reference a mounted Kubernetes secret key using the format `tfy-k8s-secret://HASHICORP`.
* **Role Path** (Optional): The path where the AppRole auth method is mounted in Vault. Defaults to `approle`.
> **How to get AppRole credentials:**
>
> 1. Enable the AppRole auth method in Vault if it is not already enabled.
> 2. Create a policy with the required KV v2 permissions (see below), then create an AppRole bound to that policy.
> 3. Retrieve the Role ID and generate a Secret ID for the AppRole.
> 4. For more details, see the [HashiCorp Vault AppRole documentation](https://developer.hashicorp.com/vault/docs/auth/approle).
The credentials you use (token or AppRole) must have the following permissions for the KV path. For example, if the KV path is `tfy-secrets`, the policy should include:
```hcl theme={"dark"}
path "tfy-secrets/data/*" {
capabilities = ["create", "read", "update", "patch", "delete", "list"]
}
path "tfy-secrets/metadata/*" {
capabilities = ["read"]
}
```
You can refer to the [HashiCorp Vault Permissions documentation](https://developer.hashicorp.com/vault/docs/secrets/kv/kv-v2/setup#step-2-create-an-acl-policy-file) for more details.
* **Access Control (Optional)**: List of users or groups fqn in format `:` allowed to use this integration. By default, set to `everyone`.
## Final Steps
* After filling all required fields, click **Add Integration Provider** to save your integration.
* You can now use this integration as a secret store when configuring your applications to securely manage secrets through HashiCorp Vault.
***
With this integration in place, you can securely manage and access secrets stored in your HashiCorp Vault instance directly from TrueFoundry!