> ## Documentation Index
> Fetch the complete documentation index at: https://www.truefoundry.com/llms.txt
> Use this file to discover all available pages before exploring further.
# Authenticate To GCP Using IAM Serviceaccount
> Step-by-step guide for authenticate to gcp using iam serviceaccount, explaining configuration, best practices, and real-world usage on…
In Google Kubernetes Engine (GKE), applications leverage Workload Identity to securely connect with Google Cloud Platform (GCP) services through IAM service accounts. This seamless integration enables fine-grained access control and eliminates the need for managing credentials within the application code, enhancing both security and operational efficiency in the GKE environment.
## Step 1 (A) - Pre-requisites
1. Export important variables
```shell Shell lines theme={"dark"}
export PROJECT_ID=""
export CLUSTER_NAME=""
export GKE_REGION=""
```
2. Authenticate using `gcloud`
```shell Shell lines theme={"dark"}
gcloud auth login
```
3. Set your project ID
```shell Shell lines theme={"dark"}
gcloud config set project $PROJECT_ID
```
## Step 1 (B) - Enabling workload identity for your cluster
Workload identity needs to be enabled for your GKE cluster so that pods can leverage this to authenticate to GCP services without credentials.
1. If workload identity is not enabled for your GKE cluster, run the below command to enable it
```shell Shell lines theme={"dark"}
gcloud container clusters update $CLUSTER_NAME \
--region=$GKE_REGION \
--workload-pool=$PROJECT_ID.svc.id.goog
```
2. The above step will enable workload identity only in the new node pool. To enable the workload identity in the existing node pool
```shell Shell lines theme={"dark"}
gcloud container node-pools create \
--cluster=$CLUSTER_NAME \
--region=$GKE_REGION \
--workload-metadata=GKE_METADATA
```
## Step 2 - Create a kubernetes workspace
1. Export the namespace and the `serviceaccount `. TrueFoundry's workspace is analogous to Kubernetes namespace.
```shell Shell lines theme={"dark"}
export APP_NS=""
export APP_SA=""
```
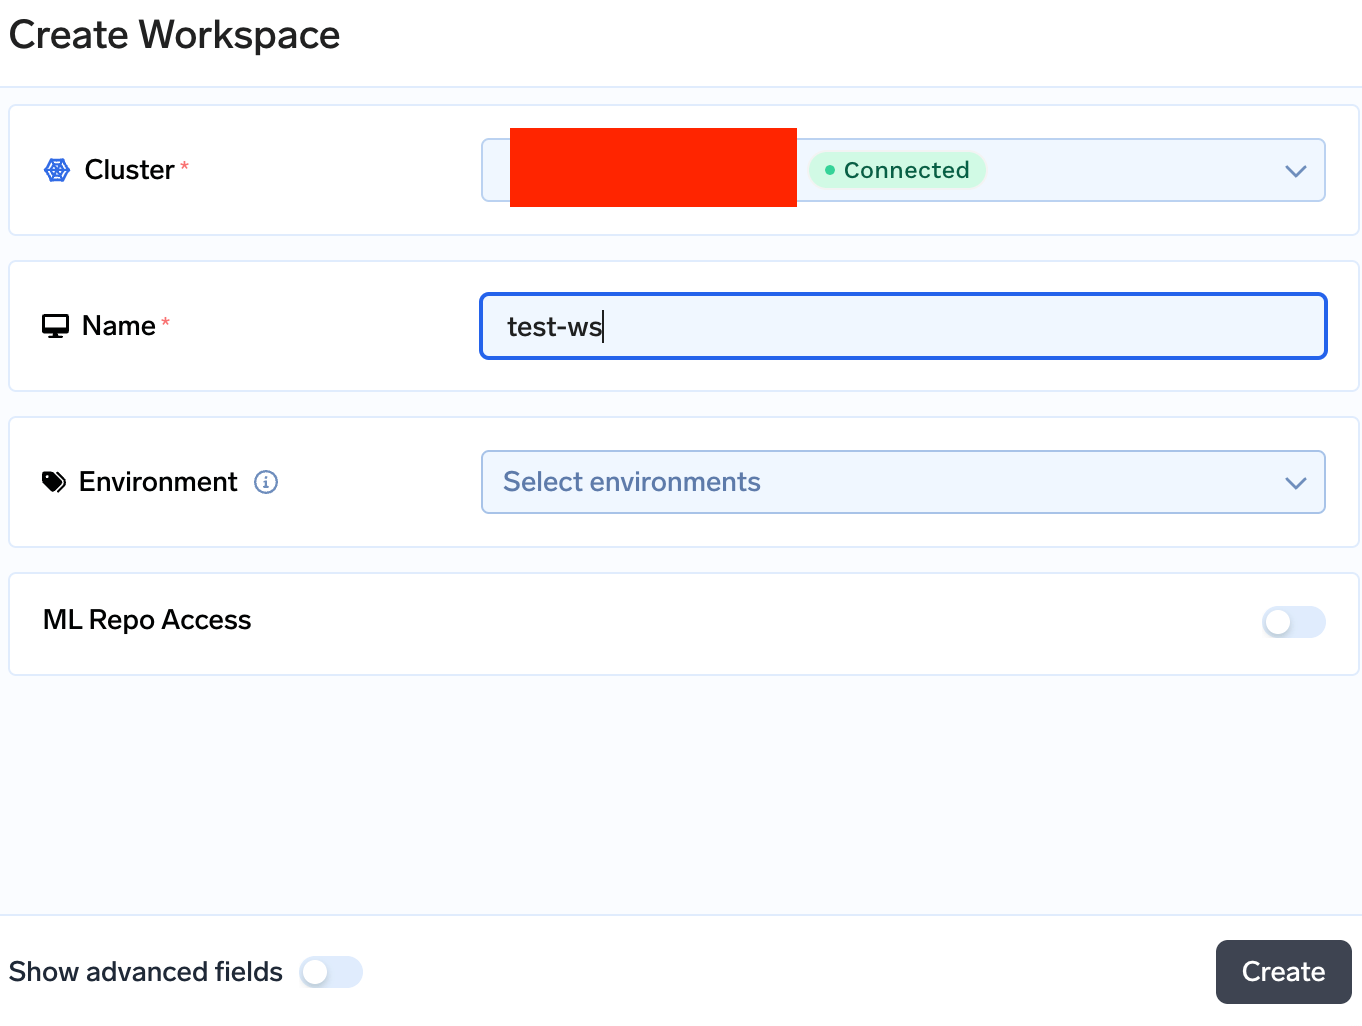
2. Go to Workspaces tab from the left panel of the portal and create the workspace with same name as of your namespace \$APP\_NS
1. Click on `+ New Workspace` to create a new workspace. If you already have a workspace created click on the **Edit** section from the right side of the workspace card.
2. Select the cluster where you want to create the serviceaccount and enter the name of the workspace (namespace).
 ## Step 3 - Create IAM serviceaccount in GCP
In this section we will create an IAM `serviceaccount` which has access to buckets. We will try to use this to access the bucket files in GCP
1. Export these variables and enter the name of the google serviceaccount you want to give in the variable `GSA_NAME`. We are assigning this serviceaccount Storage admin permission. You can assign the permissions that you want for accessing your GCP application.
```shell Shell lines theme={"dark"}
# google serviceaccount
export GSA_NAME=""
export ROLE_NAME="roles/storage.admin"
```
2. Create the IAM serviceaccount and assign the role using the below command. We are also assigning `roles/iam.workloadIdentityUser` role to the IAM serviceaccount on itself so that it can be accessed from inside GKE.
```powershell Shell lines theme={"dark"}
# creating the IAM serviceaccount
gcloud iam service-accounts create $GSA_NAME \
--project=$PROJECT_ID
# assigning the role
gcloud projects add-iam-policy-binding $PROJECT_ID \
--member "serviceAccount:$GSA_NAME@$PROJECT_ID.iam.gserviceaccount.com" \
--role "$ROLE_NAME"
# assign the roles/iam.workloadIdentityUser
gcloud iam service-accounts add-iam-policy-binding $GSA_NAME@$PROJECT_ID.iam.gserviceaccount.com \
--role roles/iam.workloadIdentityUser \
--member "serviceAccount:$PROJECT_ID.svc.id.goog[$APP_NS/$APP_SA]"
```
### The policy contains bindings with conditions
When you are trying to run the command `gcloud projects add-iam-policy-binding` you might get the below output
```shell Shell lines theme={"dark"}
Created service account [test-iam-sa].
[1] EXPRESSION=resource.name.startsWith("projects/_/buckets/xxxxxxxx"), TITLE=xxxxxxx Admin
[2] None
[3] Specify a new condition
The policy contains bindings with conditions, so specifying a condition is required when adding a binding. Please specify a condition.:
```
You can enter a condition if you want to restrict the GCP IAM serviceaccount to a certain bucket or you can use option 2 and continue.
## Step 4 - Create Kubernetes Serviceaccount in your workspace
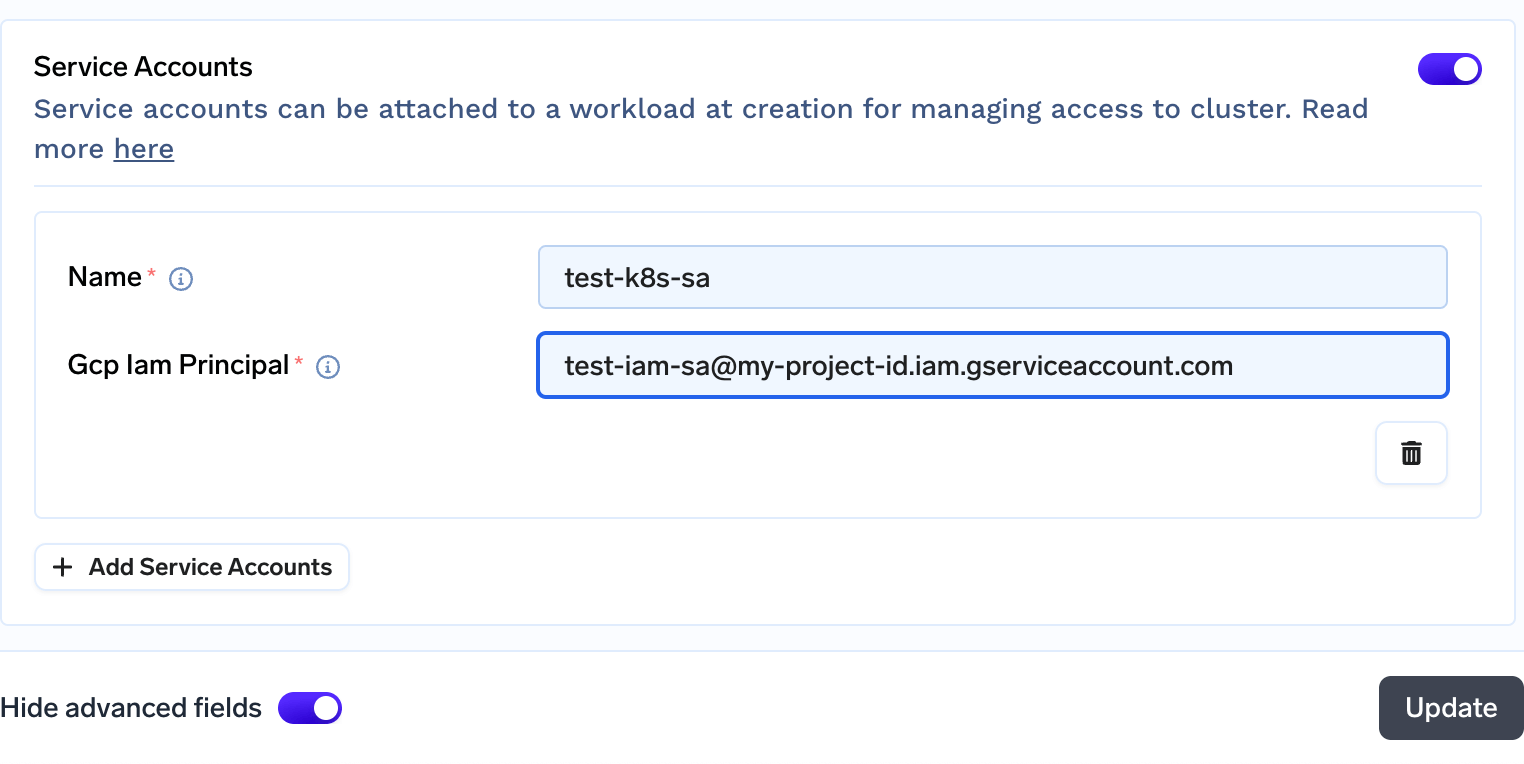
1. Go to Workspaces tab from the left panel of the portal and click on the pencil icon to edit your workspace.
2. Click on `Show Advanced fields` on bottom of the screen and enable `Service accounts` field.
3. Click on `+ Add Service Accounts` to add a Serviceaccount
1. Enter the name of your Kubernetes Serviceaccount which is in the variable \$APP\_SA
2. Enter the IAM Serviceaccount name which will be `$GSA_NAME@$PROJECT_ID.iam.gserviceaccount.com`
```shell Shell lines theme={"dark"}
# run this command to get your IAM serviceaccount name
echo $GSA_NAME@$PROJECT_ID.iam.gserviceaccount.com
```
4. Click on update to continue\\
## Step 3 - Create IAM serviceaccount in GCP
In this section we will create an IAM `serviceaccount` which has access to buckets. We will try to use this to access the bucket files in GCP
1. Export these variables and enter the name of the google serviceaccount you want to give in the variable `GSA_NAME`. We are assigning this serviceaccount Storage admin permission. You can assign the permissions that you want for accessing your GCP application.
```shell Shell lines theme={"dark"}
# google serviceaccount
export GSA_NAME=""
export ROLE_NAME="roles/storage.admin"
```
2. Create the IAM serviceaccount and assign the role using the below command. We are also assigning `roles/iam.workloadIdentityUser` role to the IAM serviceaccount on itself so that it can be accessed from inside GKE.
```powershell Shell lines theme={"dark"}
# creating the IAM serviceaccount
gcloud iam service-accounts create $GSA_NAME \
--project=$PROJECT_ID
# assigning the role
gcloud projects add-iam-policy-binding $PROJECT_ID \
--member "serviceAccount:$GSA_NAME@$PROJECT_ID.iam.gserviceaccount.com" \
--role "$ROLE_NAME"
# assign the roles/iam.workloadIdentityUser
gcloud iam service-accounts add-iam-policy-binding $GSA_NAME@$PROJECT_ID.iam.gserviceaccount.com \
--role roles/iam.workloadIdentityUser \
--member "serviceAccount:$PROJECT_ID.svc.id.goog[$APP_NS/$APP_SA]"
```
### The policy contains bindings with conditions
When you are trying to run the command `gcloud projects add-iam-policy-binding` you might get the below output
```shell Shell lines theme={"dark"}
Created service account [test-iam-sa].
[1] EXPRESSION=resource.name.startsWith("projects/_/buckets/xxxxxxxx"), TITLE=xxxxxxx Admin
[2] None
[3] Specify a new condition
The policy contains bindings with conditions, so specifying a condition is required when adding a binding. Please specify a condition.:
```
You can enter a condition if you want to restrict the GCP IAM serviceaccount to a certain bucket or you can use option 2 and continue.
## Step 4 - Create Kubernetes Serviceaccount in your workspace
1. Go to Workspaces tab from the left panel of the portal and click on the pencil icon to edit your workspace.
2. Click on `Show Advanced fields` on bottom of the screen and enable `Service accounts` field.
3. Click on `+ Add Service Accounts` to add a Serviceaccount
1. Enter the name of your Kubernetes Serviceaccount which is in the variable \$APP\_SA
2. Enter the IAM Serviceaccount name which will be `$GSA_NAME@$PROJECT_ID.iam.gserviceaccount.com`
```shell Shell lines theme={"dark"}
# run this command to get your IAM serviceaccount name
echo $GSA_NAME@$PROJECT_ID.iam.gserviceaccount.com
```
4. Click on update to continue\\
 ## Test the `serviceaccount`
1. Create the below pod
```powershell Shell lines theme={"dark"}
kubectl apply -f -<
2. Check if you are able to list buckets without passing creds
```bash Shell lines theme={"dark"}
kubectl exec -it workload-identity-test -n $APP_NS -- gcloud storage ls
```
## Test the `serviceaccount`
1. Create the below pod
```powershell Shell lines theme={"dark"}
kubectl apply -f -<
2. Check if you are able to list buckets without passing creds
```bash Shell lines theme={"dark"}
kubectl exec -it workload-identity-test -n $APP_NS -- gcloud storage ls
```