> ## Documentation Index
> Fetch the complete documentation index at: https://www.truefoundry.com/llms.txt
> Use this file to discover all available pages before exploring further.
# Setup AI Gateway in Your Organization
> Configure AI Gateway operations for your organization: enable SSO, manage access, and control how users sign in and use the gateway.
This guide walks organization admins through setting up and governing AI Gateway operations. Completing these steps ensures users can sign in securely and access the gateway according to your organization's policies.
## Step 1: Setup SSO
Enabling Single Sign-On (SSO) lets your users log in with your Identity Provider (IdP) instead of separate credentials. Once SSO is configured, the gateway login page shows a **Login with SSO** button so users can authenticate through your IdP (e.g., Google, Okta, Azure AD, Keycloak).
In the TrueFoundry platform, go to **Platform → Settings → SSO**.
Toggle **Enabled** on, then select your **SSO Provider** (Okta, Google, Azure AD, or Custom). Under **Authentication Configuration**, choose **OIDC** or **SAML v2** depending on what your IdP supports.
Fill in the required fields (e.g., client ID, client secret, issuer URL for OIDC, or SAML metadata for SAML). Set the redirect/callback URL to `https://login.truefoundry.com/oauth2/callback` when configuring your IdP.
Save the SSO settings. The next time users open the gateway login page, they will see the **Login with SSO** option and can sign in with your organization's IdP.
For detailed SSO flow and provider-specific setup (Azure AD, Okta, Keycloak, SAML), see the [SSO Overview](/docs/sso) and the linked OIDC/SAML guides (e.g., [OIDC with Azure AD](/docs/openid-connect-with-azure-ad), [OIDC with Okta](/docs/openid-connect-with-okta), [OIDC with Keycloak](/docs/openid-connect-with-keycloak)).
If your IdP is not listed, it can still work as long as it supports **OpenID Connect (OIDC)** or **SAML**. Use the **Custom** provider option and follow the [SSO configuration steps](/docs/sso#configure-sso-in-truefoundry) for OIDC or SAML.
## Step 2: Create and Manage Teams
Teams group users and simplify access control: you grant models and MCP servers to teams instead of individual users. You can set up teams in two ways:
Create teams manually and assign **managers** so they can add and remove members without admin involvement.
Go to **Access → Teams**, create a new team, and add initial members as needed.
In the team's settings, add one or more **managers**. Any tenant admin is a team manager by default. Managers can add and remove members for that team.
See [Manage Teams](/docs/platform/team-management) for the full flow and [Create a team manually](/docs/platform/team-management#create-a-team-manually).
With **SCIM (System for Cross-domain Identity Management)**, teams are created and updated automatically from your Identity Provider (IdP). When you add or remove users or groups in the IdP, TrueFoundry syncs those changes—no manual team membership updates.
SCIM is available for **SAML v2** SSO. If you use OIDC, consider Option A (manual teams and managers) or [manage teams via GitOps](/docs/platform/team-management#manage-teams-via-gitops).
In **Platform → Settings → SSO**, when creating or editing a SAML v2 provider, check **Enable SCIM** in the authentication configuration.
Get the SCIM URL and SCIM token from TrueFoundry, then set the SCIM base URL and Bearer token in your IdP's SCIM provisioning settings.
For full steps and screenshots, see [Enable SCIM Provisioning](/docs/sso#enable-scim-provisioning).
## Step 3: Virtual Account Creation
Virtual accounts are used by applications and services to call the AI Gateway (and other TrueFoundry APIs) without using a user’s token. You need to decide who can create and manage them.
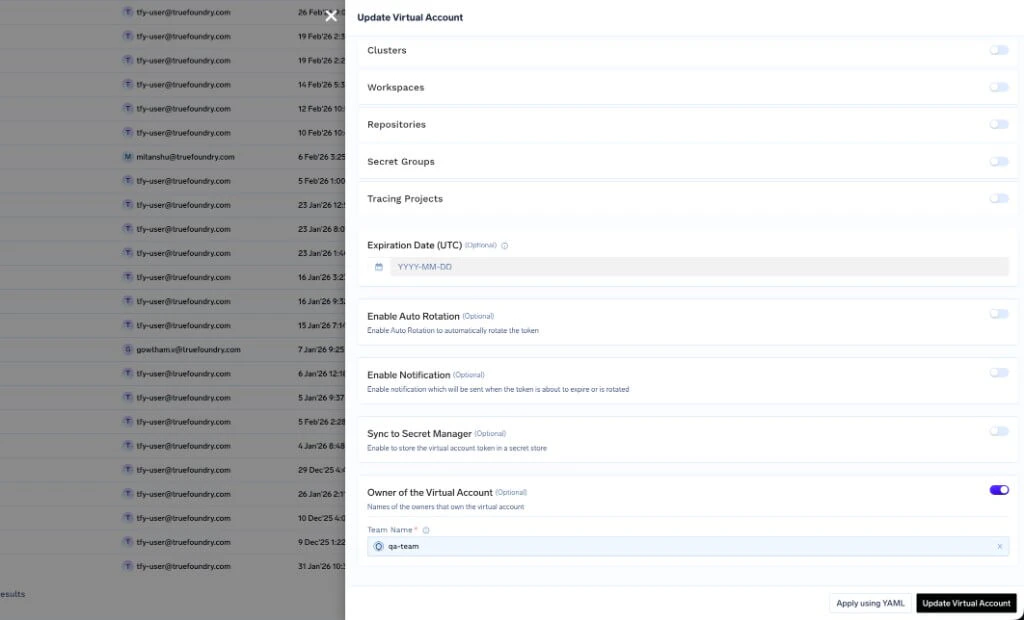
### Mark teams as owners (recommended)
When creating or updating a virtual account, we recommend enabling **Owner of the Virtual Account** and adding one or more **teams** as owners. Team members can then see that virtual account's data in observability—request logs, metrics, and traces—according to your [Data Access](/docs/ai-gateway/request-logging#data-access-rules-for-request-logs-and-metrics) rules. For example, the default `default-everyone-team-data` rule lets team members see data for virtual accounts owned by their team.
 ### Who can create a virtual account?
Keep virtual account creation **central**: only tenant admins (or a central platform team) create and manage virtual accounts. This gives maximum control and consistency.
* Create virtual accounts under **Access → Virtual Account Tokens** (or [Manage Virtual Accounts](/docs/platform/virtual-account-management)).
* Assign each virtual account to the right team and grant access to the models/MCP servers that application needs.
* Use this when you want a single team to own all service identities and tokens.
Allow **team managers** to create and manage virtual accounts for their own teams. Managers can add/remove members and create virtual accounts scoped to their team without being full admins.
Go to **Access → Roles → Default Roles**, edit the default **Team Manager** role, and enable **Create Virtual Account** and/or **Manage Virtual Account** (and **Read** / **Delete** as needed).
Team managers can then create and manage virtual accounts owned by their team from the [Virtual Account management](/docs/platform/virtual-account-management) flow.
Details: [How to allow Teams create and manage their Virtual Accounts without making them Admin](/docs/platform/manage-user-roles-and-permissions#how-to-allow-teams-create-and-manage-their-virtual-accounts-without-making-them-admin).
Use **GitOps** so anyone can propose new virtual accounts via pull requests; a central team approves and applies changes. This gives auditability and a single source of truth in Git.
* Store virtual account specs in a `virtualaccounts/` folder in your Git repo (see [Setup GitOps](/docs/setup-gitops-using-truefoundry) and the [sample repo](https://github.com/truefoundry/truefoundry-gitops-sample-repository) structure).
* Copy the YAML from the UI (**Edit → Apply Using YAML**) for an existing virtual account, then add new specs and apply via `tfy apply` or your CI/CD pipeline.
* Use your normal PR/review process: developers raise PRs, central team approves and merges; automation applies to TrueFoundry.
### Saving the virtual account token in a secret manager
After creating a virtual account, you can sync its token to your secret store so applications read it from there instead of the UI.
* **Auto-rotation**: You can enable [auto-rotation](/docs/platform/virtual-account-management#configure-auto-rotation-of-virtual-account-tokens) and [notifications on rotation](/docs/platform/virtual-account-management#configure-notification-on-token-rotation).
* **Secret store sync**: Configure [secret store sync](/docs/platform/virtual-account-management#configure-secret-store-sync-for-virtual-account-tokens) so the token is written to a path in your chosen secret manager (e.g. AWS Secrets Manager, HashiCorp Vault, Google Secret Manager, Azure Vault). The token is kept in sync when it rotates. First [integrate a secret store](/docs/integrations-secret-store) with TrueFoundry, then set the sync path for the virtual account.
## Step 4: Add Models and MCP Servers and Control Team Access
Add the models and MCP servers your organization needs to the gateway, then decide **which teams (or users) can use which**.
1. **Add provider accounts and models**\
Add provider accounts (e.g. OpenAI, Anthropic, AWS Bedrock) and their models via the UI or the [Apply API](/docs/apply-api-create-models). Models are grouped under provider accounts.
2. **Add MCP servers**\
Register [MCP servers](/docs/ai-gateway/mcp/mcp-overview) in the gateway so teams can use tools and data sources through a single gateway endpoint.
3. **Assign access per team**\
For each provider account (and thus its models), grant:
* **Provider Account Manager**: can change provider settings, add/remove models, and manage who has access.
* **Provider Account User**: can use all models in that account but cannot change settings or permissions.
Assign these to **teams** (or individual users) so that gateway access follows your team structure. Tenant admins have access to all models by default.
Full flow: [Access Control](/docs/ai-gateway/gateway-access-control).
## Step 5: Get Tokens (Per User and Per Virtual Account)
Users and applications need a token to call the AI Gateway.
| Who / What | Token type | How to get it |
| ------------------------------------------ | ------------------------------- | ------------------------------------------------------------------------------------------------------------------------------------------------------------------------------------------------------------------------------------------------------------------ |
| **Individual users** (developers, testing) | **Personal Access Token (PAT)** | **Access → Personal Access Tokens** in the platform. A PAT has the same access as the user. See [Personal Access Tokens](/docs/generating-truefoundry-api-keys#personal-access-tokens-pats). |
| **Applications / services** | **Virtual Account Token (VAT)** | Create a [virtual account](/docs/platform/virtual-account-management), then use **Get Token** for that account. Optionally [sync the token to a secret manager](/docs/platform/virtual-account-management#configure-secret-store-sync-for-virtual-account-tokens). |
Usage: set the token in the `Authorization: Bearer ` header (or as `OPENAI_API_KEY` when using the OpenAI-compatible base URL). See [Authentication for AI Gateway](/docs/ai-gateway/authentication).
## Step 6: Govern Who Can See Observability Data (Data Access)
Request logs and metrics in the AI Gateway are sensitive. Use **Data Access** rules to control who can see what.
Go to **AI Gateway → Controls → Data Access**. You can manage rules in the UI or via [YAML config](/docs/ai-gateway/request-logging#data-access-rules-for-request-logs-and-metrics).
### Three default rules (cover most use cases)
TrueFoundry ships with three default rules that fit most organizations:
1. **`default-everyone-team-data`** — Team members can see their **team’s** data (including virtual accounts owned by the team).
* Subjects: `team:everyone` · Scope: `team_data`
2. **`default-everyone-own-data`** — Users can see **only their own** request logs and metrics.
* Subjects: `team:everyone` · Scope: `own_data`
3. **`default-tenant-admin-all-data`** — **Tenant admins** can see all data.
* Subjects: `role:tenant-admin` · Scope: `all_data`
Together, these give: per-user visibility, team-level visibility, and full visibility for admins. For most setups, keeping these defaults is enough.
### When you need custom rules
Add more rules if you need:
* A specific team to see only a subset of all data (e.g. by metadata or `created_by`).
* Multiple teams or users with different scopes.
* Stricter or looser access than the defaults.
You can add rules in the Data Access UI or via the same YAML config type (`gateway-data-access-config`). Full reference and examples: [Data Access Rules for Request Logs and Metrics](/docs/ai-gateway/request-logging#data-access-rules-for-request-logs-and-metrics).
### Who can create a virtual account?
Keep virtual account creation **central**: only tenant admins (or a central platform team) create and manage virtual accounts. This gives maximum control and consistency.
* Create virtual accounts under **Access → Virtual Account Tokens** (or [Manage Virtual Accounts](/docs/platform/virtual-account-management)).
* Assign each virtual account to the right team and grant access to the models/MCP servers that application needs.
* Use this when you want a single team to own all service identities and tokens.
Allow **team managers** to create and manage virtual accounts for their own teams. Managers can add/remove members and create virtual accounts scoped to their team without being full admins.
Go to **Access → Roles → Default Roles**, edit the default **Team Manager** role, and enable **Create Virtual Account** and/or **Manage Virtual Account** (and **Read** / **Delete** as needed).
Team managers can then create and manage virtual accounts owned by their team from the [Virtual Account management](/docs/platform/virtual-account-management) flow.
Details: [How to allow Teams create and manage their Virtual Accounts without making them Admin](/docs/platform/manage-user-roles-and-permissions#how-to-allow-teams-create-and-manage-their-virtual-accounts-without-making-them-admin).
Use **GitOps** so anyone can propose new virtual accounts via pull requests; a central team approves and applies changes. This gives auditability and a single source of truth in Git.
* Store virtual account specs in a `virtualaccounts/` folder in your Git repo (see [Setup GitOps](/docs/setup-gitops-using-truefoundry) and the [sample repo](https://github.com/truefoundry/truefoundry-gitops-sample-repository) structure).
* Copy the YAML from the UI (**Edit → Apply Using YAML**) for an existing virtual account, then add new specs and apply via `tfy apply` or your CI/CD pipeline.
* Use your normal PR/review process: developers raise PRs, central team approves and merges; automation applies to TrueFoundry.
### Saving the virtual account token in a secret manager
After creating a virtual account, you can sync its token to your secret store so applications read it from there instead of the UI.
* **Auto-rotation**: You can enable [auto-rotation](/docs/platform/virtual-account-management#configure-auto-rotation-of-virtual-account-tokens) and [notifications on rotation](/docs/platform/virtual-account-management#configure-notification-on-token-rotation).
* **Secret store sync**: Configure [secret store sync](/docs/platform/virtual-account-management#configure-secret-store-sync-for-virtual-account-tokens) so the token is written to a path in your chosen secret manager (e.g. AWS Secrets Manager, HashiCorp Vault, Google Secret Manager, Azure Vault). The token is kept in sync when it rotates. First [integrate a secret store](/docs/integrations-secret-store) with TrueFoundry, then set the sync path for the virtual account.
## Step 4: Add Models and MCP Servers and Control Team Access
Add the models and MCP servers your organization needs to the gateway, then decide **which teams (or users) can use which**.
1. **Add provider accounts and models**\
Add provider accounts (e.g. OpenAI, Anthropic, AWS Bedrock) and their models via the UI or the [Apply API](/docs/apply-api-create-models). Models are grouped under provider accounts.
2. **Add MCP servers**\
Register [MCP servers](/docs/ai-gateway/mcp/mcp-overview) in the gateway so teams can use tools and data sources through a single gateway endpoint.
3. **Assign access per team**\
For each provider account (and thus its models), grant:
* **Provider Account Manager**: can change provider settings, add/remove models, and manage who has access.
* **Provider Account User**: can use all models in that account but cannot change settings or permissions.
Assign these to **teams** (or individual users) so that gateway access follows your team structure. Tenant admins have access to all models by default.
Full flow: [Access Control](/docs/ai-gateway/gateway-access-control).
## Step 5: Get Tokens (Per User and Per Virtual Account)
Users and applications need a token to call the AI Gateway.
| Who / What | Token type | How to get it |
| ------------------------------------------ | ------------------------------- | ------------------------------------------------------------------------------------------------------------------------------------------------------------------------------------------------------------------------------------------------------------------ |
| **Individual users** (developers, testing) | **Personal Access Token (PAT)** | **Access → Personal Access Tokens** in the platform. A PAT has the same access as the user. See [Personal Access Tokens](/docs/generating-truefoundry-api-keys#personal-access-tokens-pats). |
| **Applications / services** | **Virtual Account Token (VAT)** | Create a [virtual account](/docs/platform/virtual-account-management), then use **Get Token** for that account. Optionally [sync the token to a secret manager](/docs/platform/virtual-account-management#configure-secret-store-sync-for-virtual-account-tokens). |
Usage: set the token in the `Authorization: Bearer ` header (or as `OPENAI_API_KEY` when using the OpenAI-compatible base URL). See [Authentication for AI Gateway](/docs/ai-gateway/authentication).
## Step 6: Govern Who Can See Observability Data (Data Access)
Request logs and metrics in the AI Gateway are sensitive. Use **Data Access** rules to control who can see what.
Go to **AI Gateway → Controls → Data Access**. You can manage rules in the UI or via [YAML config](/docs/ai-gateway/request-logging#data-access-rules-for-request-logs-and-metrics).
### Three default rules (cover most use cases)
TrueFoundry ships with three default rules that fit most organizations:
1. **`default-everyone-team-data`** — Team members can see their **team’s** data (including virtual accounts owned by the team).
* Subjects: `team:everyone` · Scope: `team_data`
2. **`default-everyone-own-data`** — Users can see **only their own** request logs and metrics.
* Subjects: `team:everyone` · Scope: `own_data`
3. **`default-tenant-admin-all-data`** — **Tenant admins** can see all data.
* Subjects: `role:tenant-admin` · Scope: `all_data`
Together, these give: per-user visibility, team-level visibility, and full visibility for admins. For most setups, keeping these defaults is enough.
### When you need custom rules
Add more rules if you need:
* A specific team to see only a subset of all data (e.g. by metadata or `created_by`).
* Multiple teams or users with different scopes.
* Stricter or looser access than the defaults.
You can add rules in the Data Access UI or via the same YAML config type (`gateway-data-access-config`). Full reference and examples: [Data Access Rules for Request Logs and Metrics](/docs/ai-gateway/request-logging#data-access-rules-for-request-logs-and-metrics).