> ## Documentation Index
> Fetch the complete documentation index at: https://www.truefoundry.com/llms.txt
> Use this file to discover all available pages before exploring further.
# Prompt Management
> Create, save, version, and use prompts in TrueFoundry's AI Gateway.
TrueFoundry's Prompt Management lets you create, save, version, and reuse prompts in a single place — the **Prompt Registry**. Define your system message, user message, input variables, guardrails, and structured output once, then run those prompts from your apps via the AI Gateway or SDK.
Prompts are stored inside **Repositories**. Access to create, view, edit, or use a prompt is governed by the access control on its parent Repository, so you do not need to configure separate permissions for each prompt. See [Repositories](/docs/platform/repositories) for the shared repository concept, storage backing, and access control.
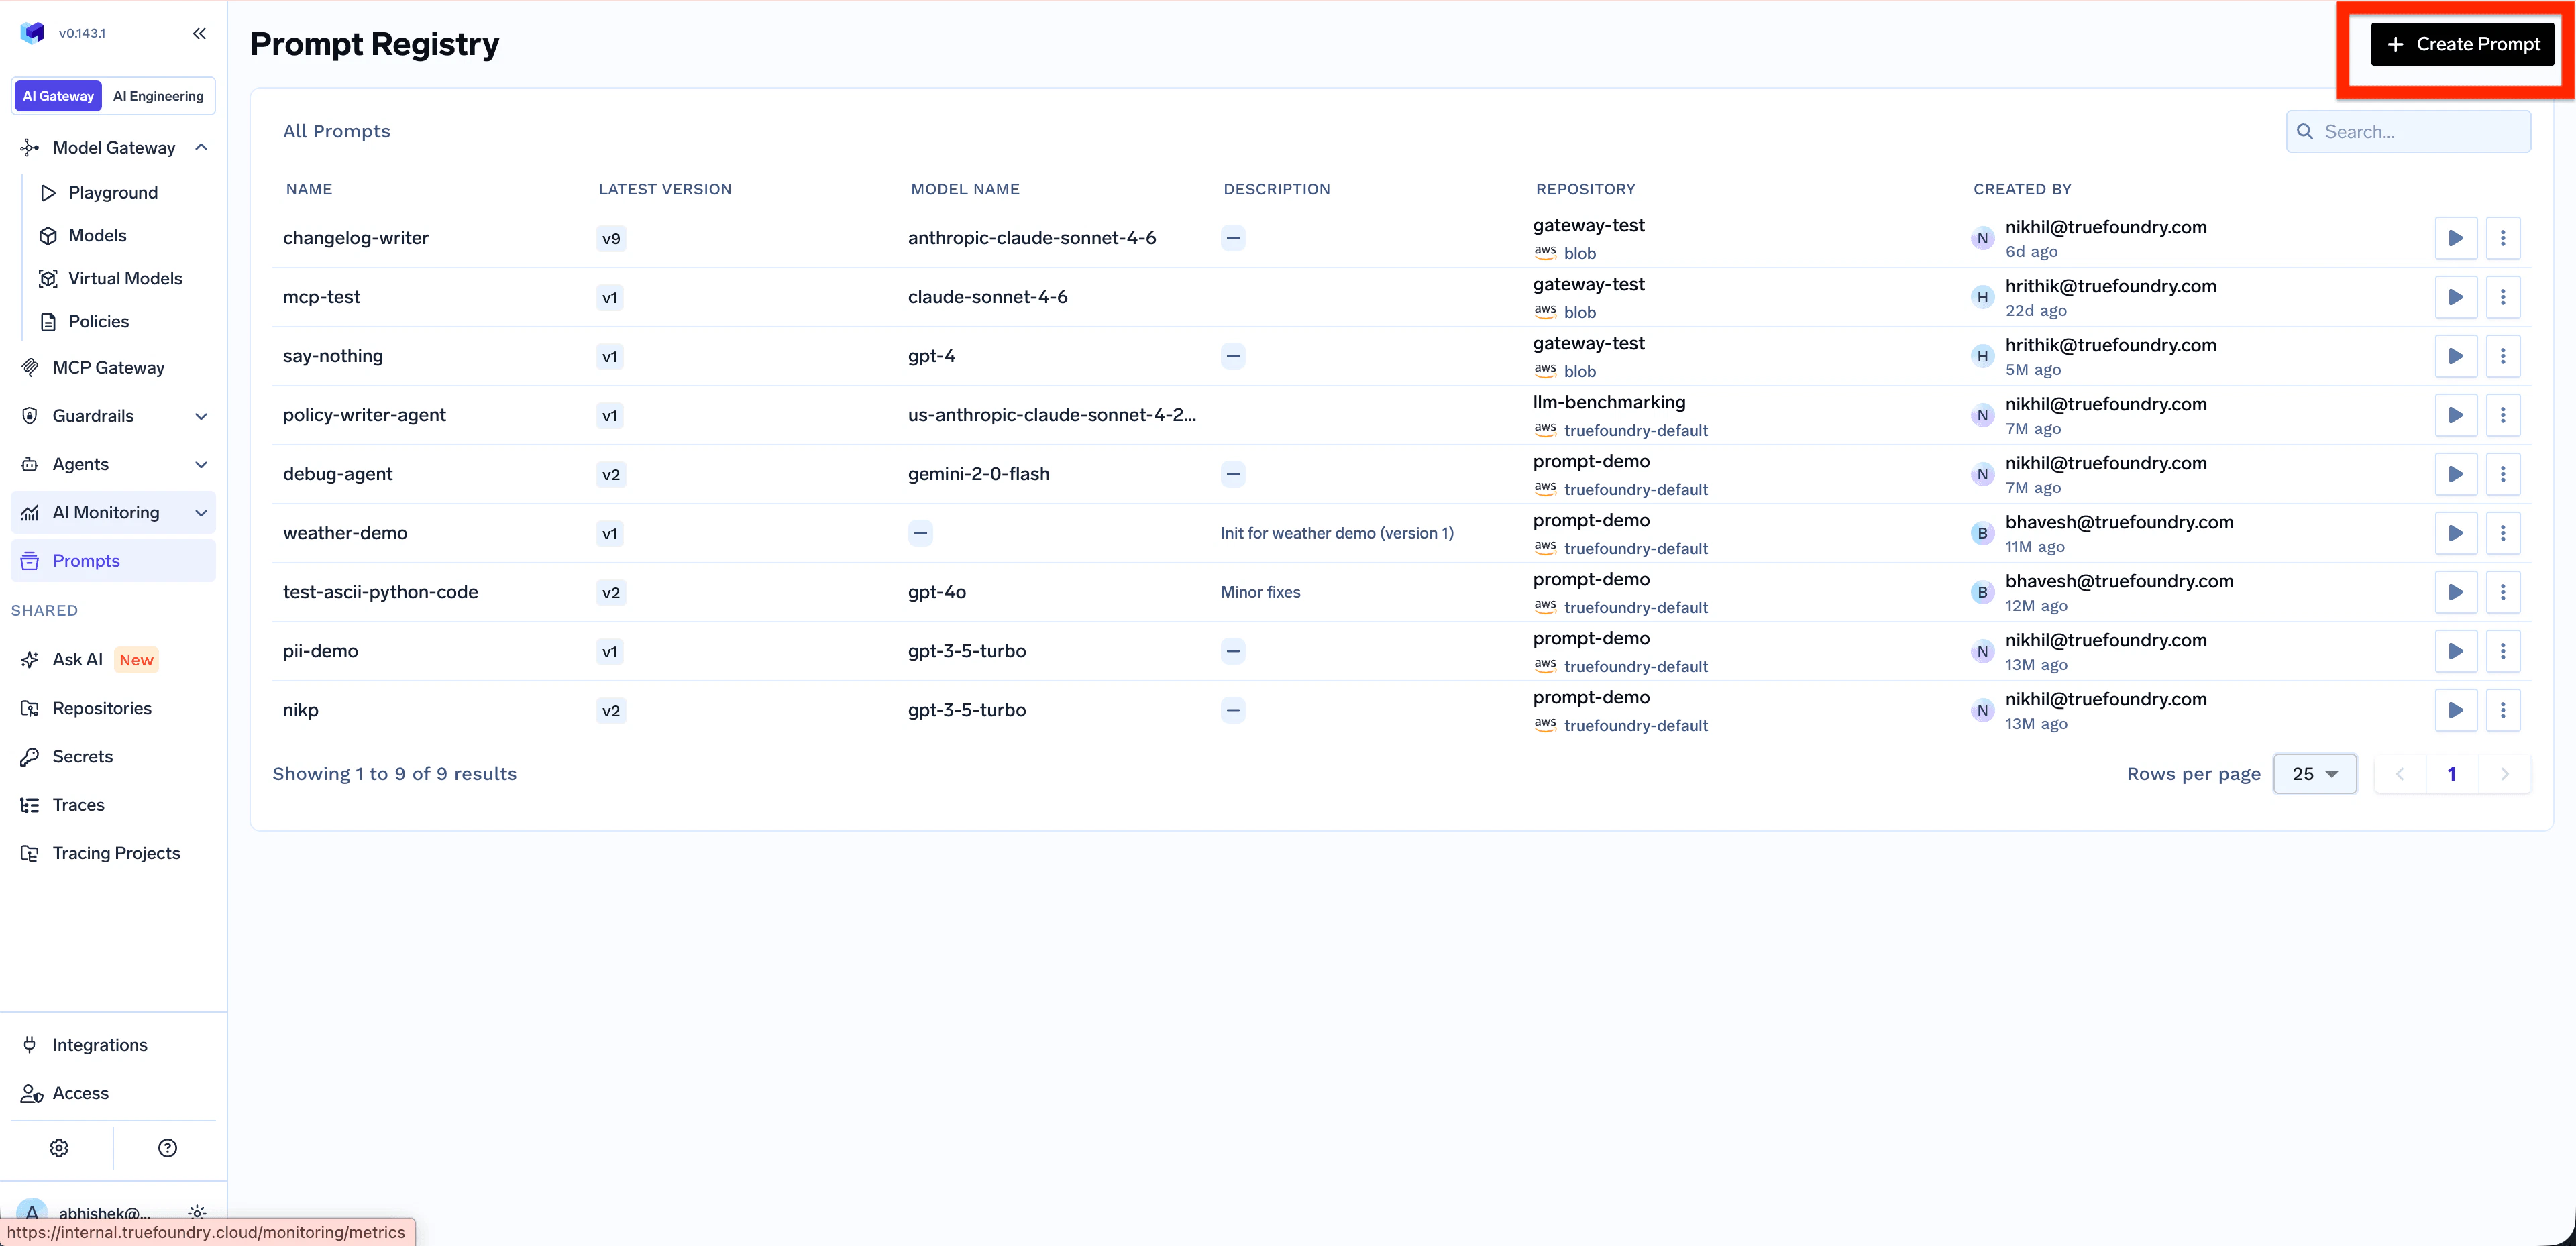
## Creating a Prompt
Go to **Prompts** in the left navigation and click **+ Create Prompt** in the top right.
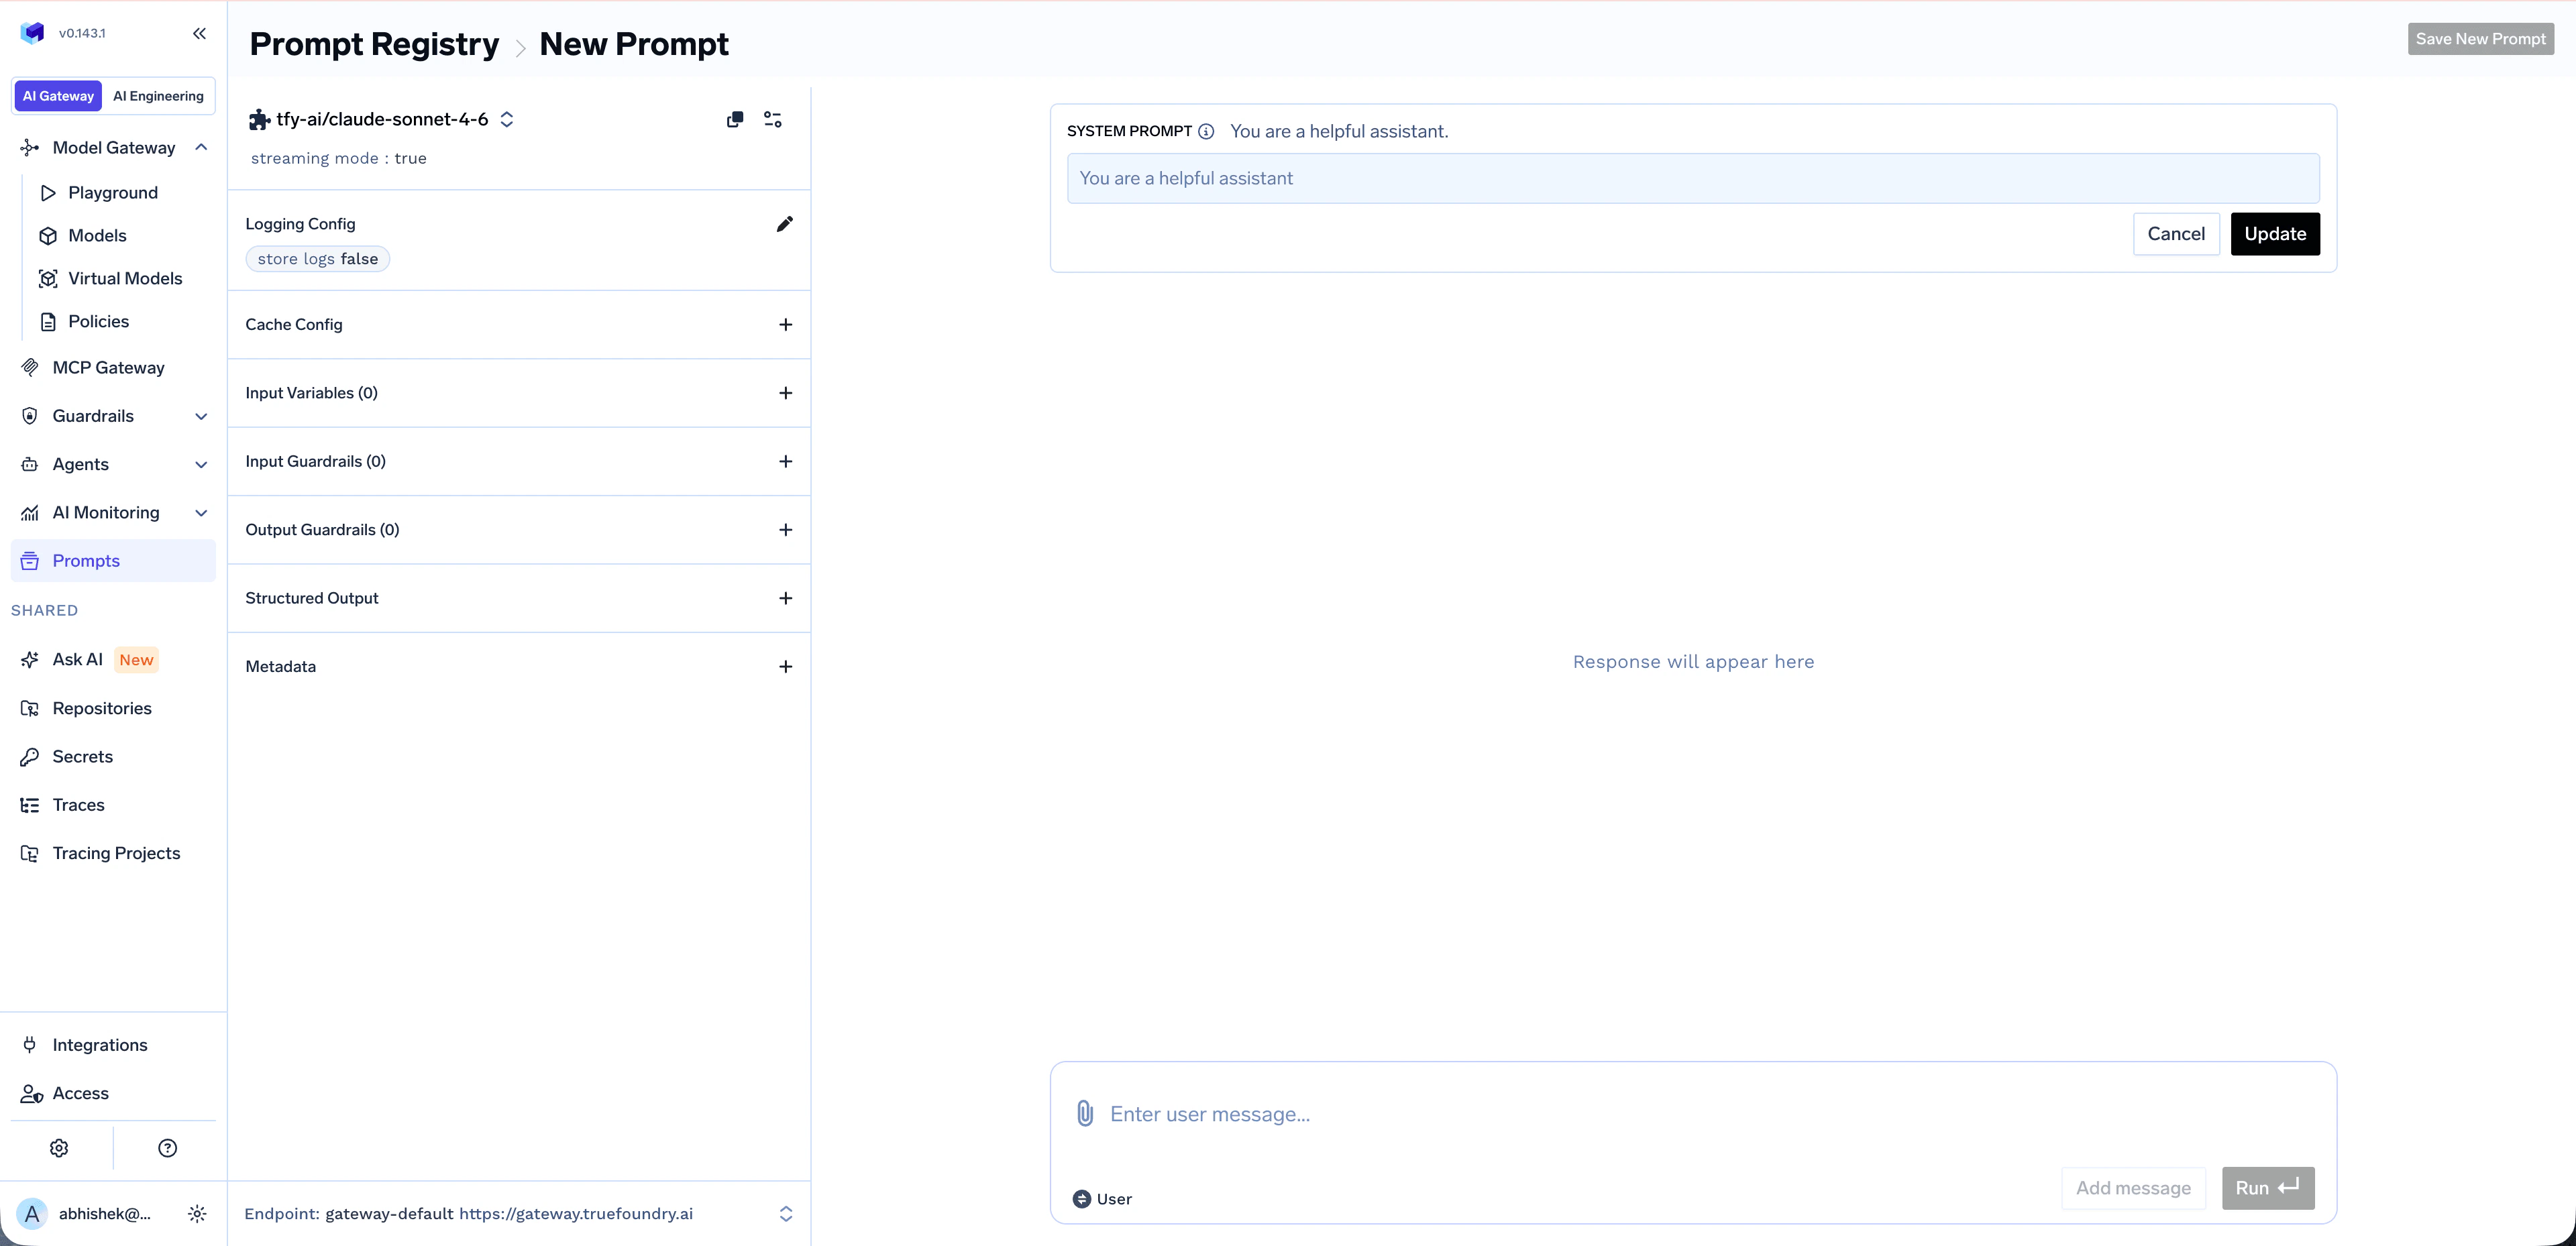
 The **New Prompt** screen opens with a chat-style editor. Configure your prompt by:
* **Choosing a model** from the model selector (supports virtual models for load balancing and fallback)
* **Editing the System prompt** to define the AI's role and behavior
* **Adding a User message** to provide the input or query
* *(Optional)* Configuring **Logging Config**, **Cache Config**, **Input/Output Guardrails**, **Structured Output**, and **Metadata** from the left panel
The **New Prompt** screen opens with a chat-style editor. Configure your prompt by:
* **Choosing a model** from the model selector (supports virtual models for load balancing and fallback)
* **Editing the System prompt** to define the AI's role and behavior
* **Adding a User message** to provide the input or query
* *(Optional)* Configuring **Logging Config**, **Cache Config**, **Input/Output Guardrails**, **Structured Output**, and **Metadata** from the left panel
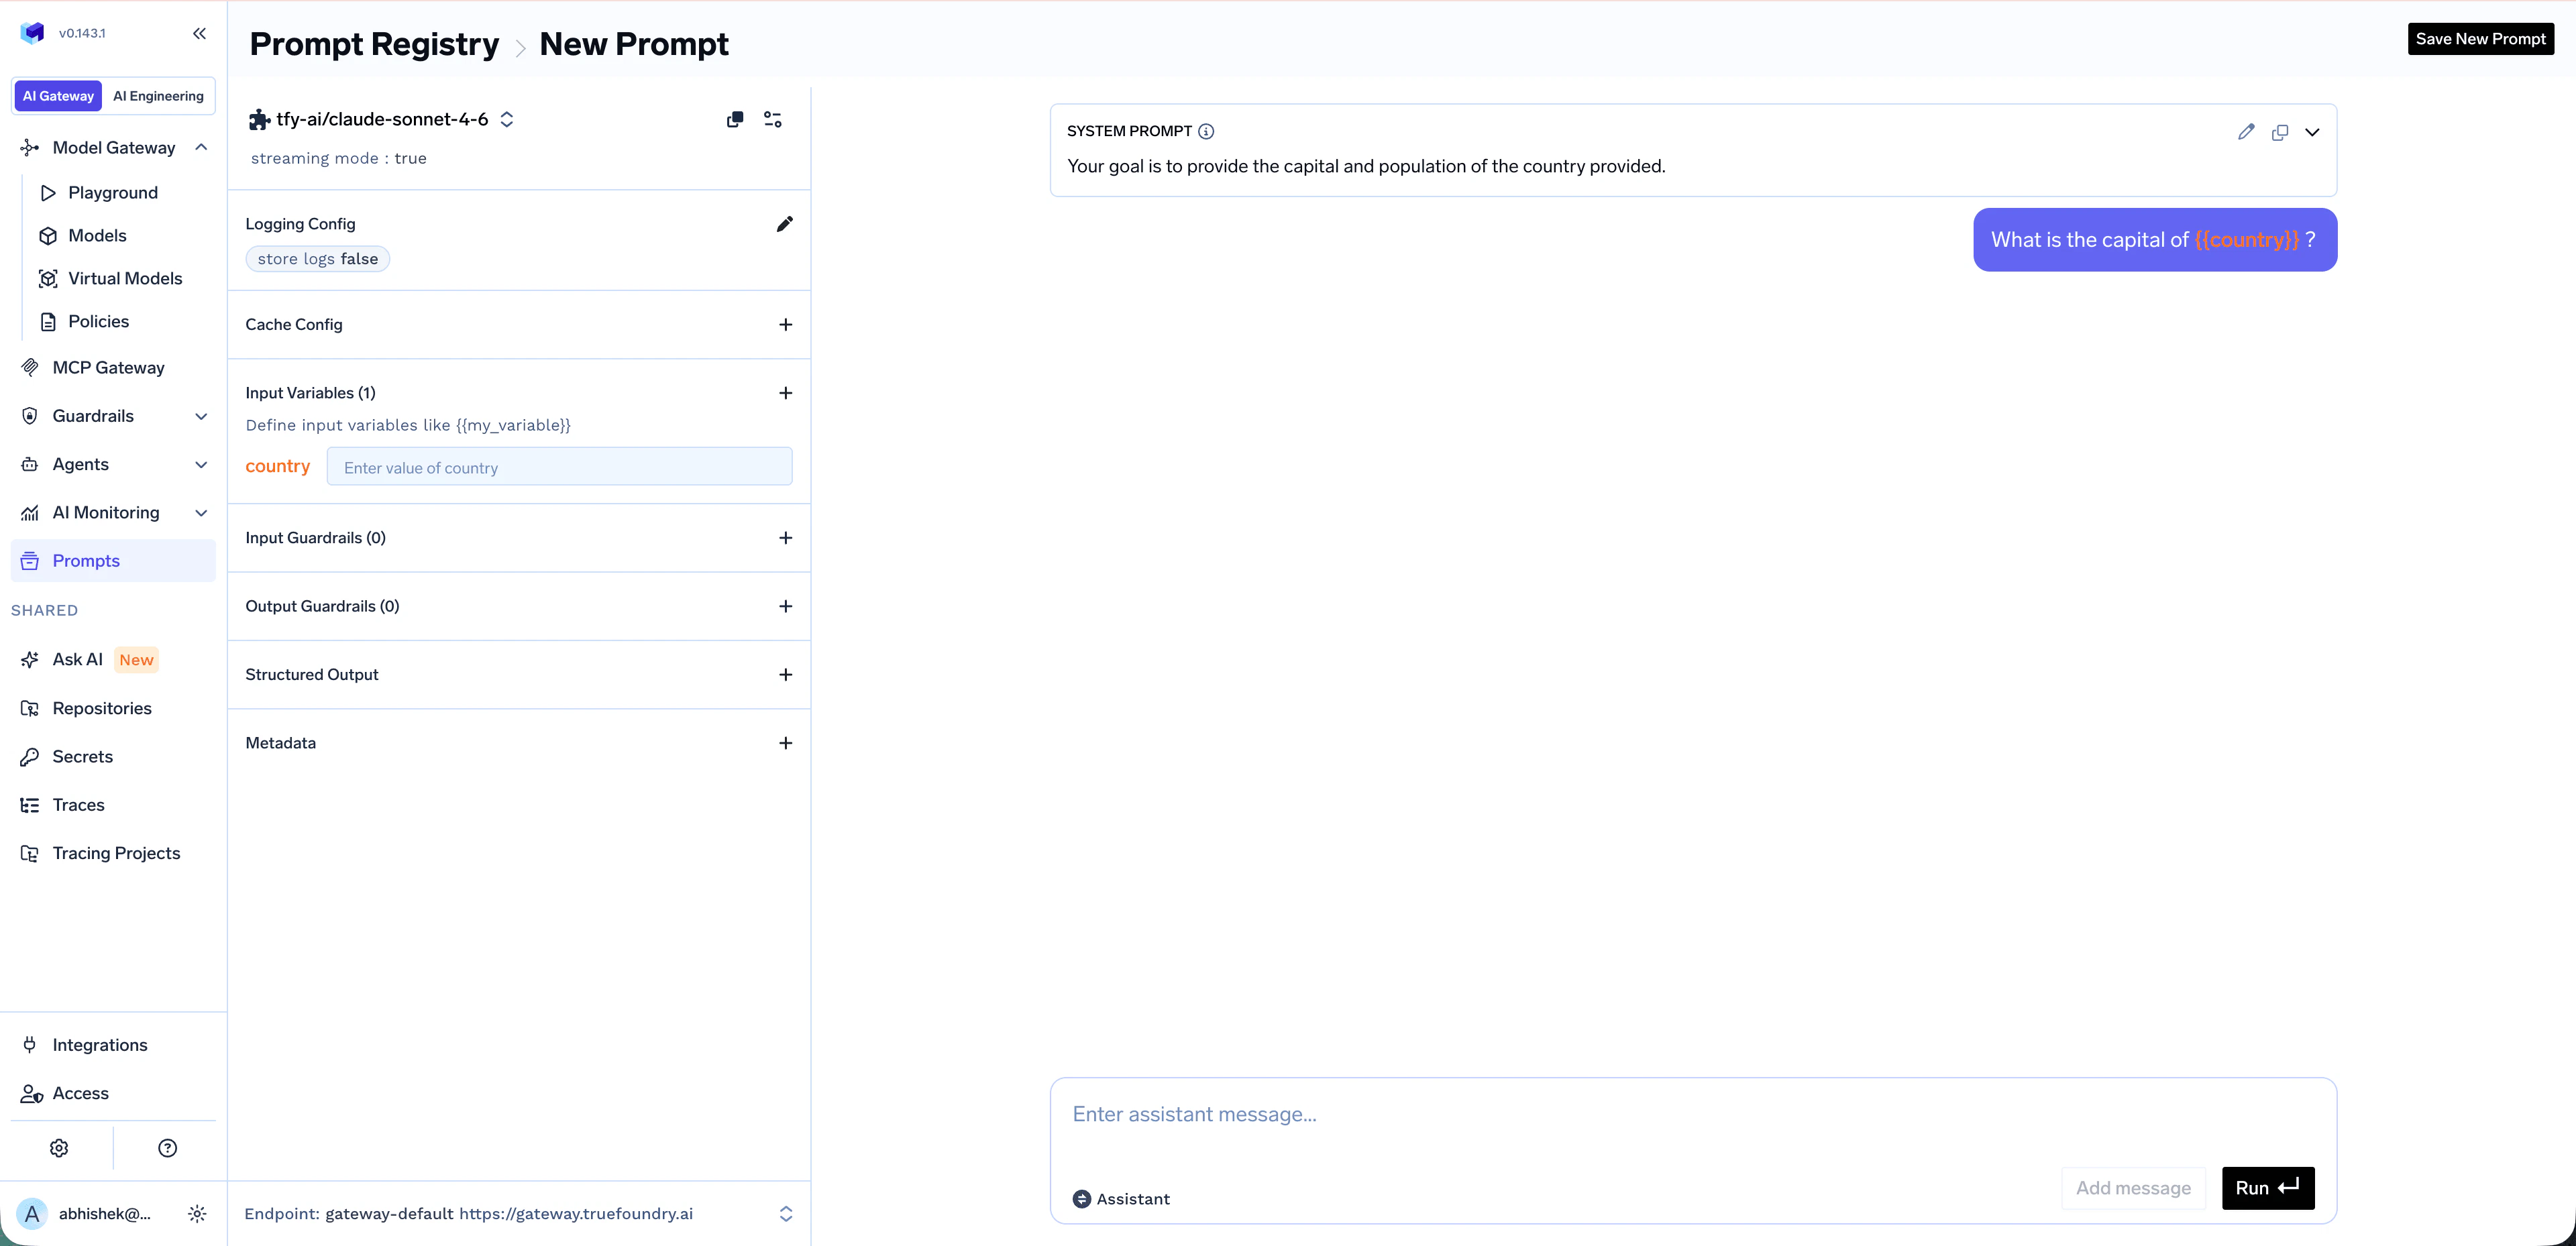
 Make prompts reusable by referencing template variables with the `{{variable_name}}` syntax inside your messages. Variables are auto-detected and appear under **Input Variables** in the left panel, where you can preview them with sample values before saving.
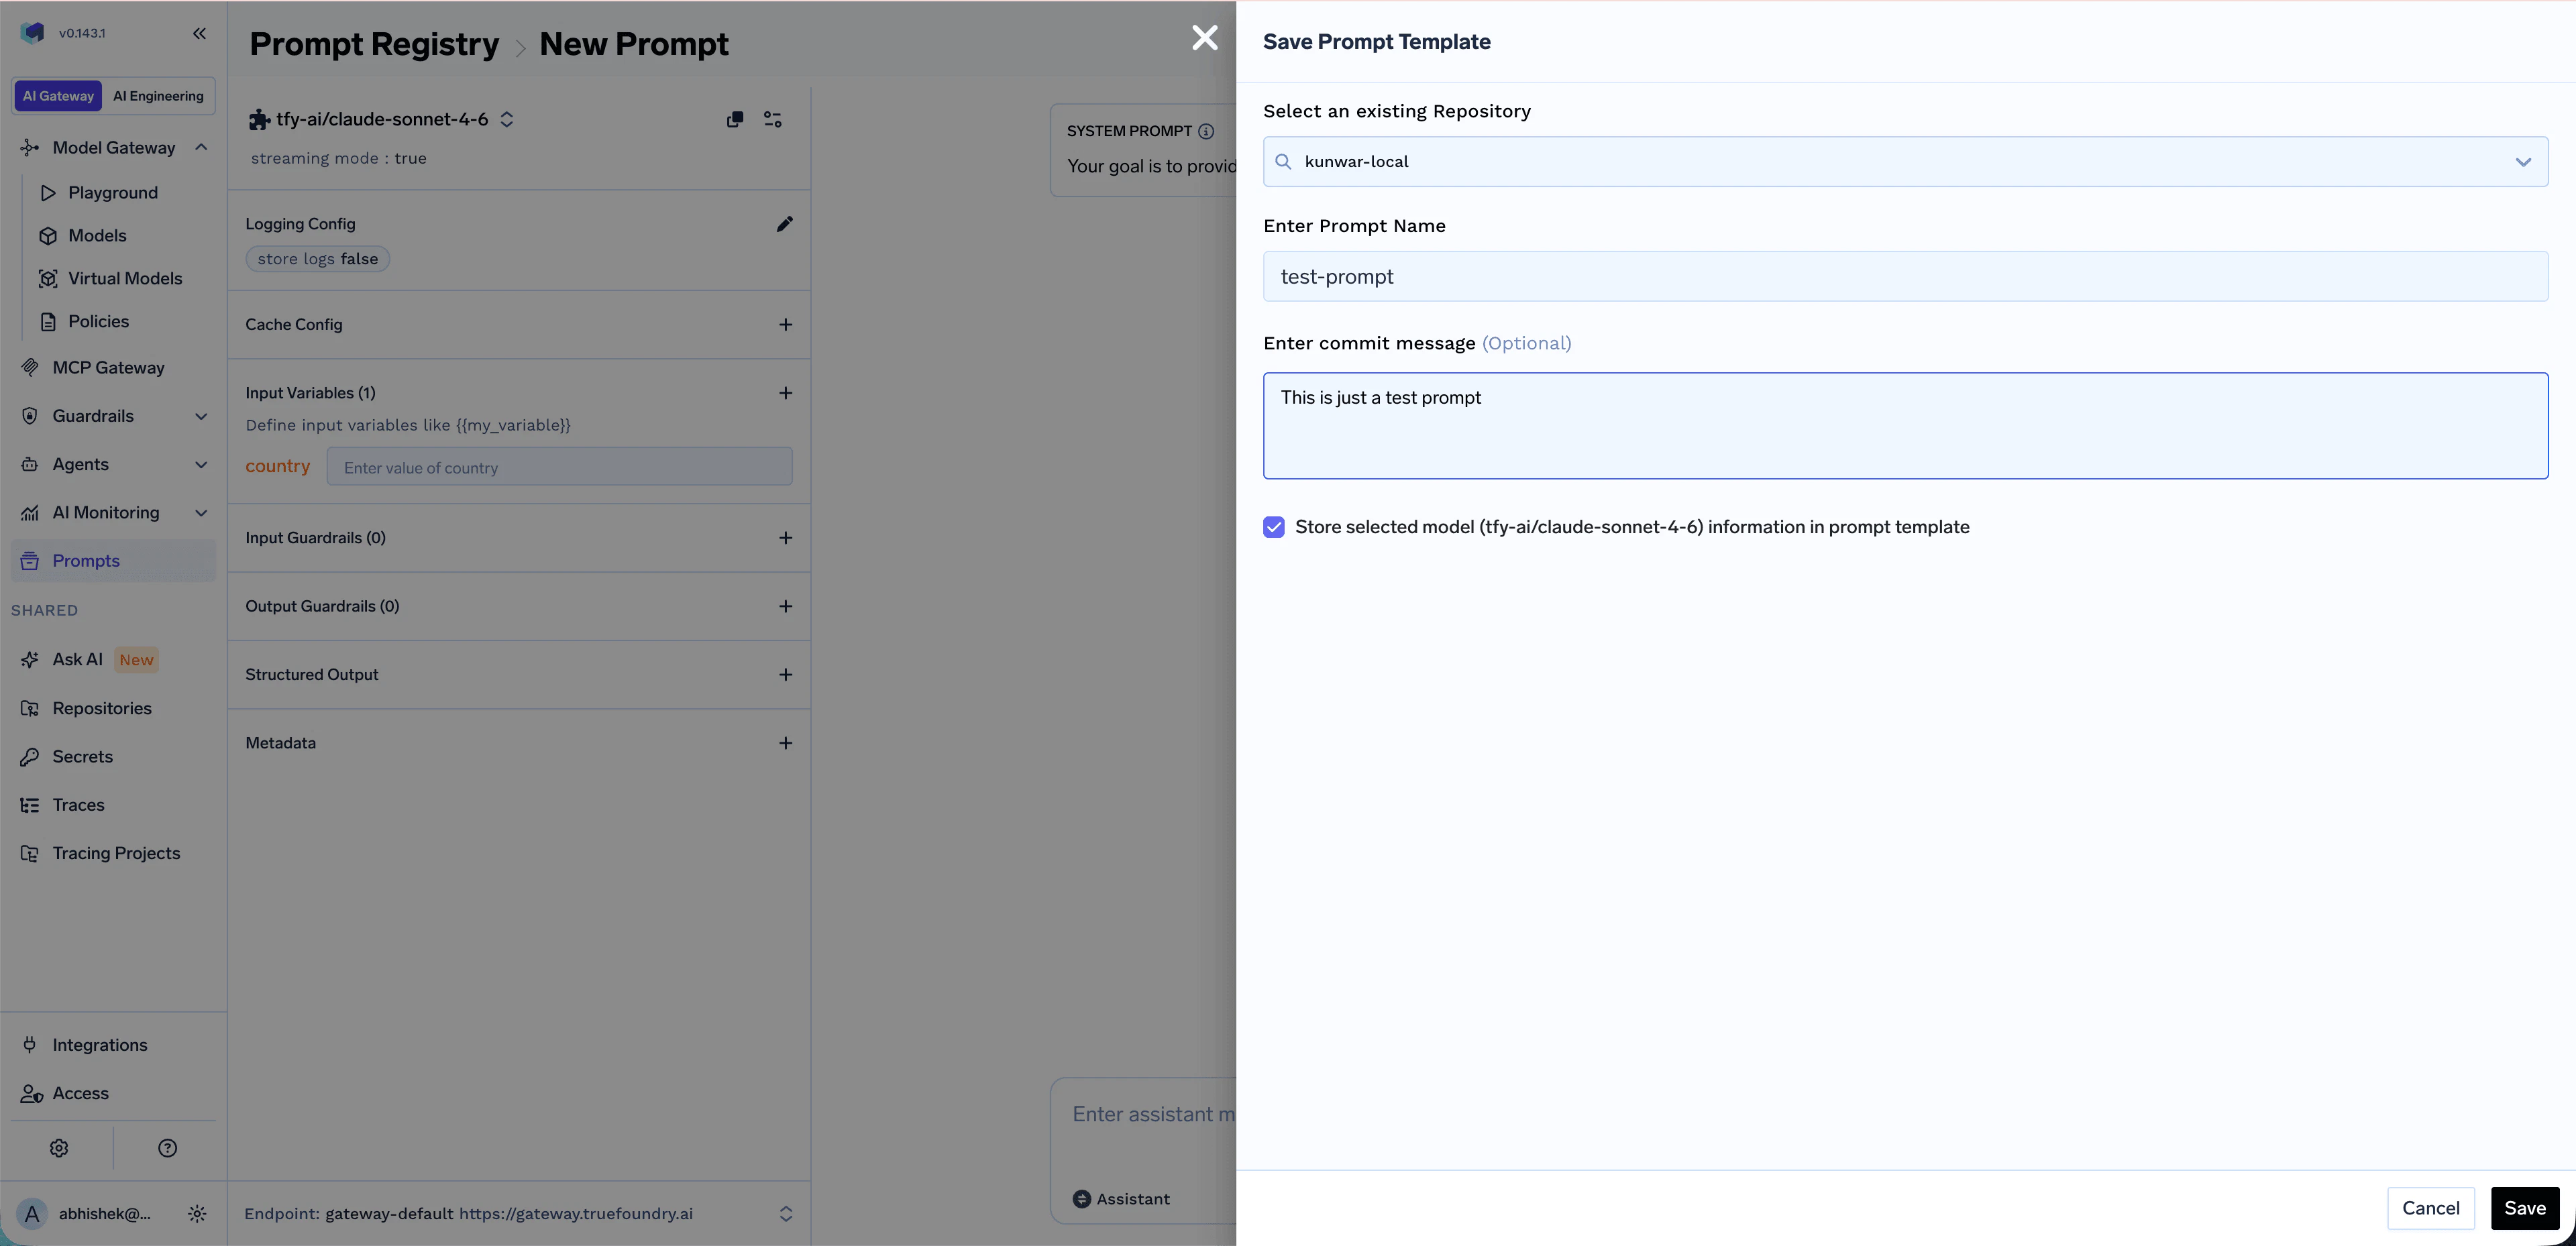
 When you're happy with the prompt, click **Save New Prompt** in the top right. A side panel opens — fill in:
* **Repository** — Select an existing repository where the prompt will be saved. Repository access controls who can view, edit, and use the prompt. See [Repositories](/docs/platform/repositories).
* **Prompt Name** — Give your prompt a descriptive name
* **Commit message** *(optional)* — Brief description of the change
* **Store selected model in prompt template** — Keep this enabled if you want the prompt to remember its chosen model
When you're happy with the prompt, click **Save New Prompt** in the top right. A side panel opens — fill in:
* **Repository** — Select an existing repository where the prompt will be saved. Repository access controls who can view, edit, and use the prompt. See [Repositories](/docs/platform/repositories).
* **Prompt Name** — Give your prompt a descriptive name
* **Commit message** *(optional)* — Brief description of the change
* **Store selected model in prompt template** — Keep this enabled if you want the prompt to remember its chosen model
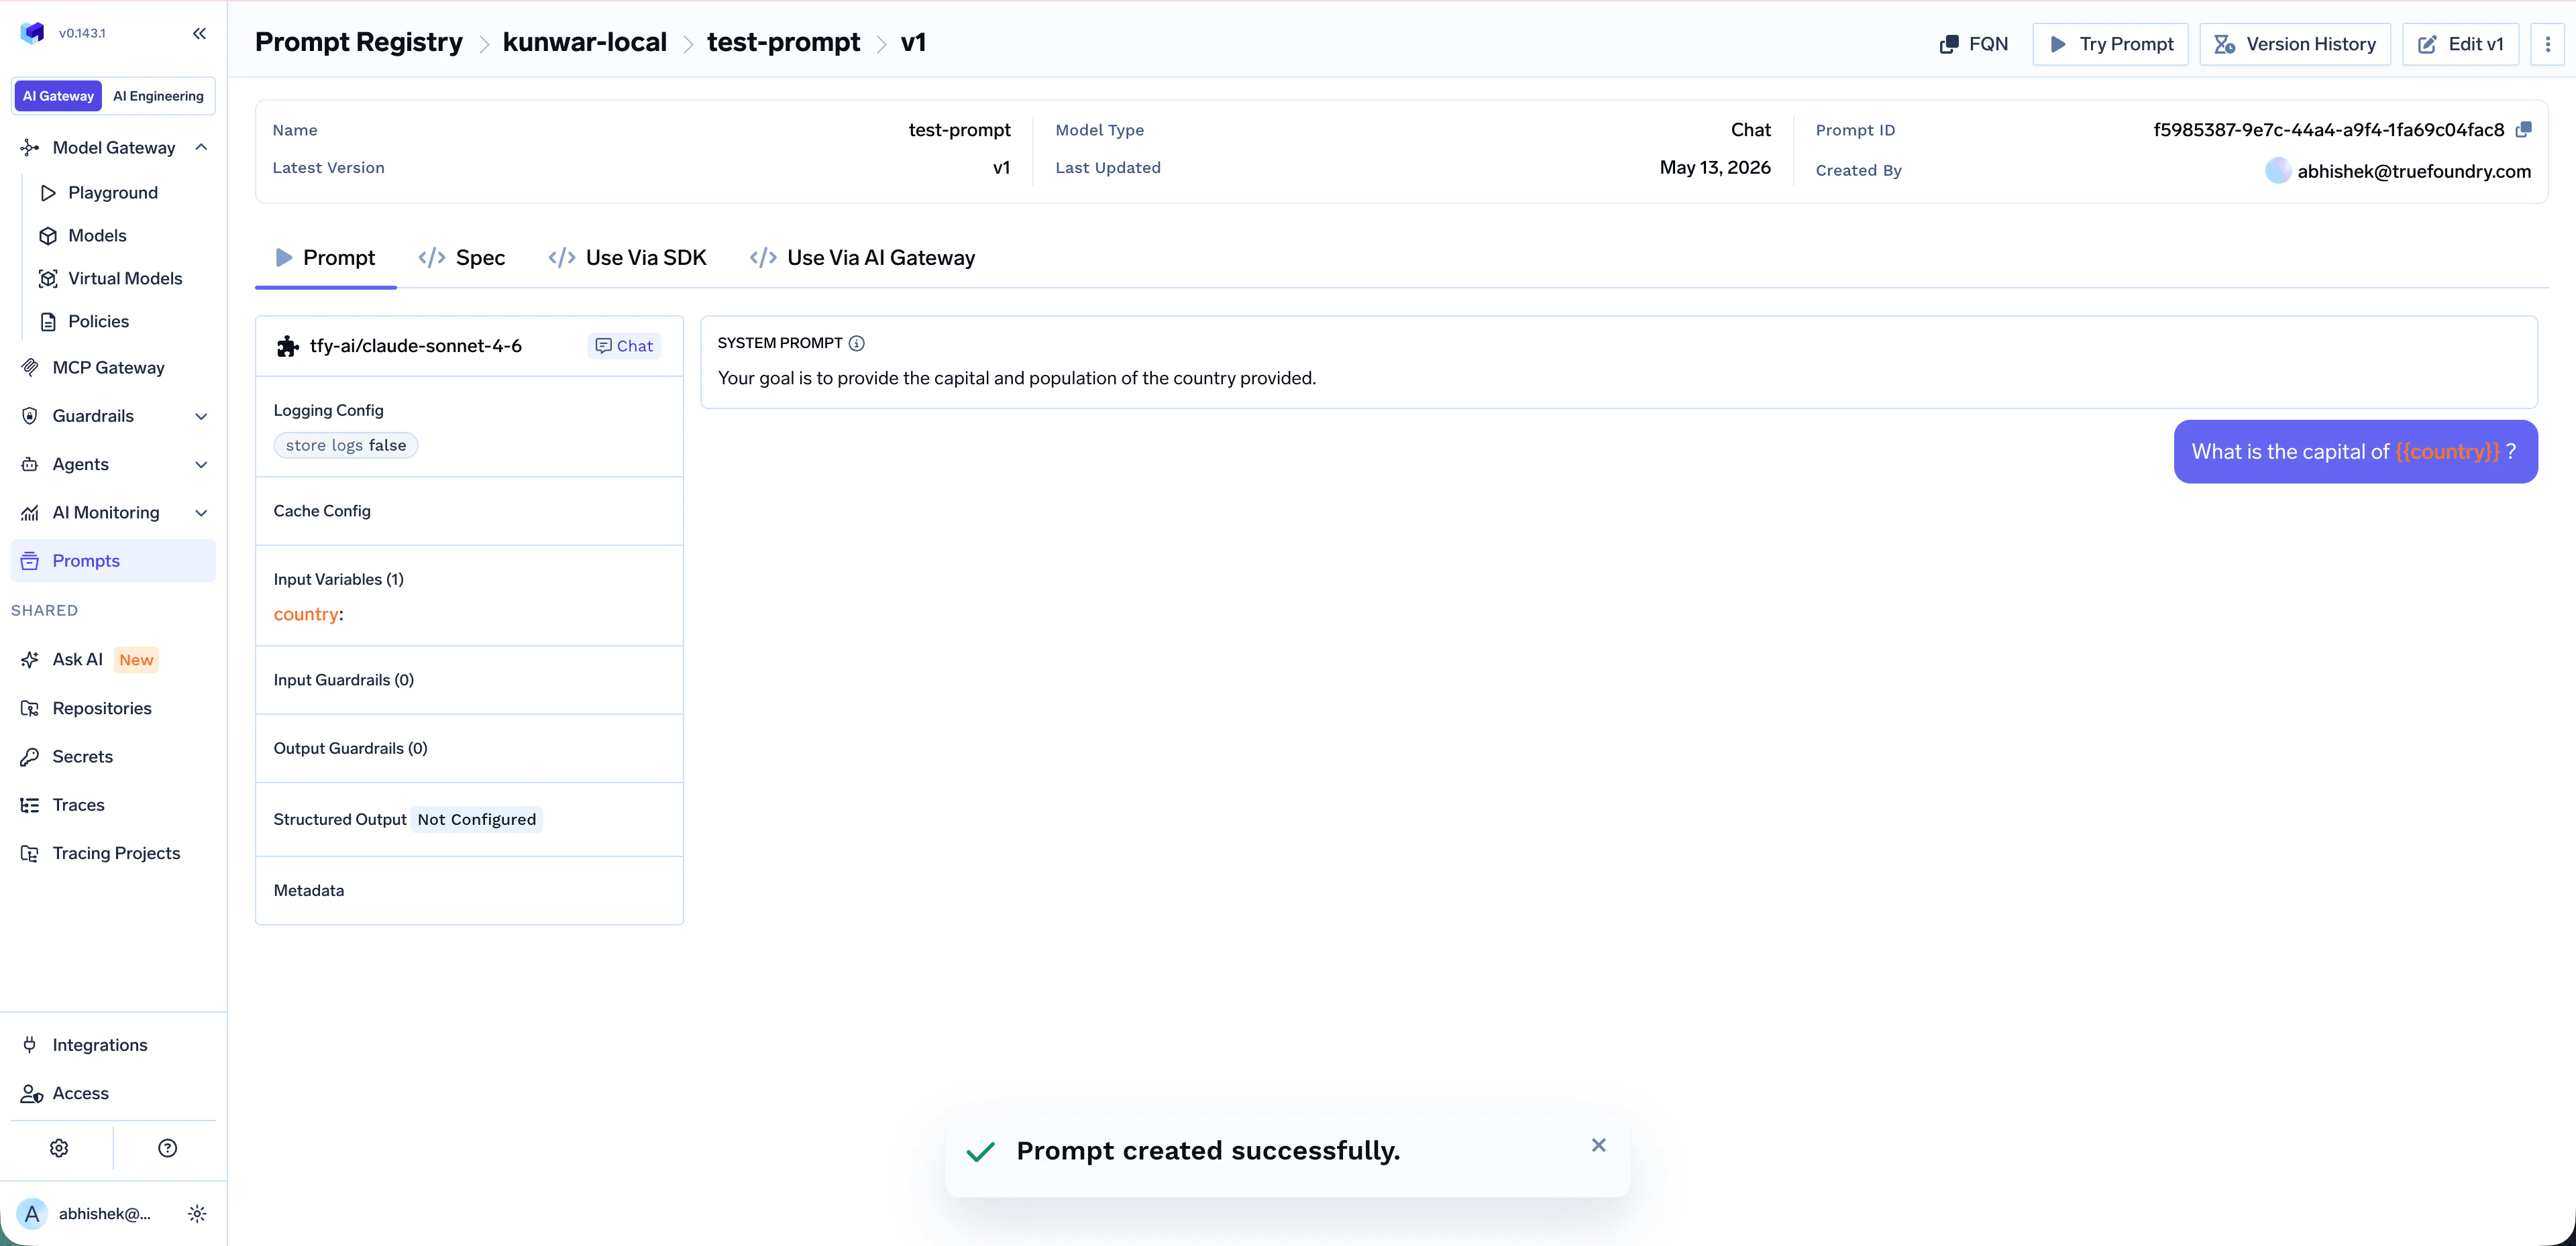
 ## Viewing Your Prompt
Once saved, you land on the prompt detail page at `Prompt Registry > {repository} > {prompt-name} > v{version}`. From here you can:
* **Prompt / Spec** — View the prompt content and its full configuration
* **Try Prompt** — Open the prompt in a runnable view to test it interactively
* **Edit v\** — Make changes; saving produces a new version
* **Version History** — Browse and diff previous versions
* **FQN** — Copy the prompt-version FQN (needed when calling the prompt from code)
* **Use Via SDK / Use Via AI Gateway** — Get ready-made code snippets for using the prompt in production
## Viewing Your Prompt
Once saved, you land on the prompt detail page at `Prompt Registry > {repository} > {prompt-name} > v{version}`. From here you can:
* **Prompt / Spec** — View the prompt content and its full configuration
* **Try Prompt** — Open the prompt in a runnable view to test it interactively
* **Edit v\** — Make changes; saving produces a new version
* **Version History** — Browse and diff previous versions
* **FQN** — Copy the prompt-version FQN (needed when calling the prompt from code)
* **Use Via SDK / Use Via AI Gateway** — Get ready-made code snippets for using the prompt in production
 ## Advanced Configuration
Each prompt template can be configured with the same controls as a regular Gateway request:
Reference variables in system or user messages using `{{variable_name}}` syntax. Pass values at runtime via `prompt_variables` (Gateway) or as `variables` to `render_prompt` (SDK). See [Using the Prompt](#using-the-prompt) below.
Attach **Input Guardrails** and **Output Guardrails** to enforce safety, PII redaction, content moderation, or custom checks on every run of the saved prompt. Learn more: [Guardrails Overview](/docs/ai-gateway/guardrails-overview).
Bind the prompt to a [Virtual Model](/docs/ai-gateway/virtual-model) to get load balancing, fallback, and retries across multiple gateway targets when running the saved prompt.
Force the model to respond in a specific JSON schema. Useful when downstream code needs to parse the response programmatically.
## Versioning
TrueFoundry automatically creates a new version every time you edit and save a prompt. Versioning lets you:
* Roll forward and roll back across versions
* Compare exact changes between any two versions
* Pin specific versions to specific apps or environments
Open any prompt and click **Edit v\** to make changes. Saving the edited prompt produces a new version (e.g. `v2`).
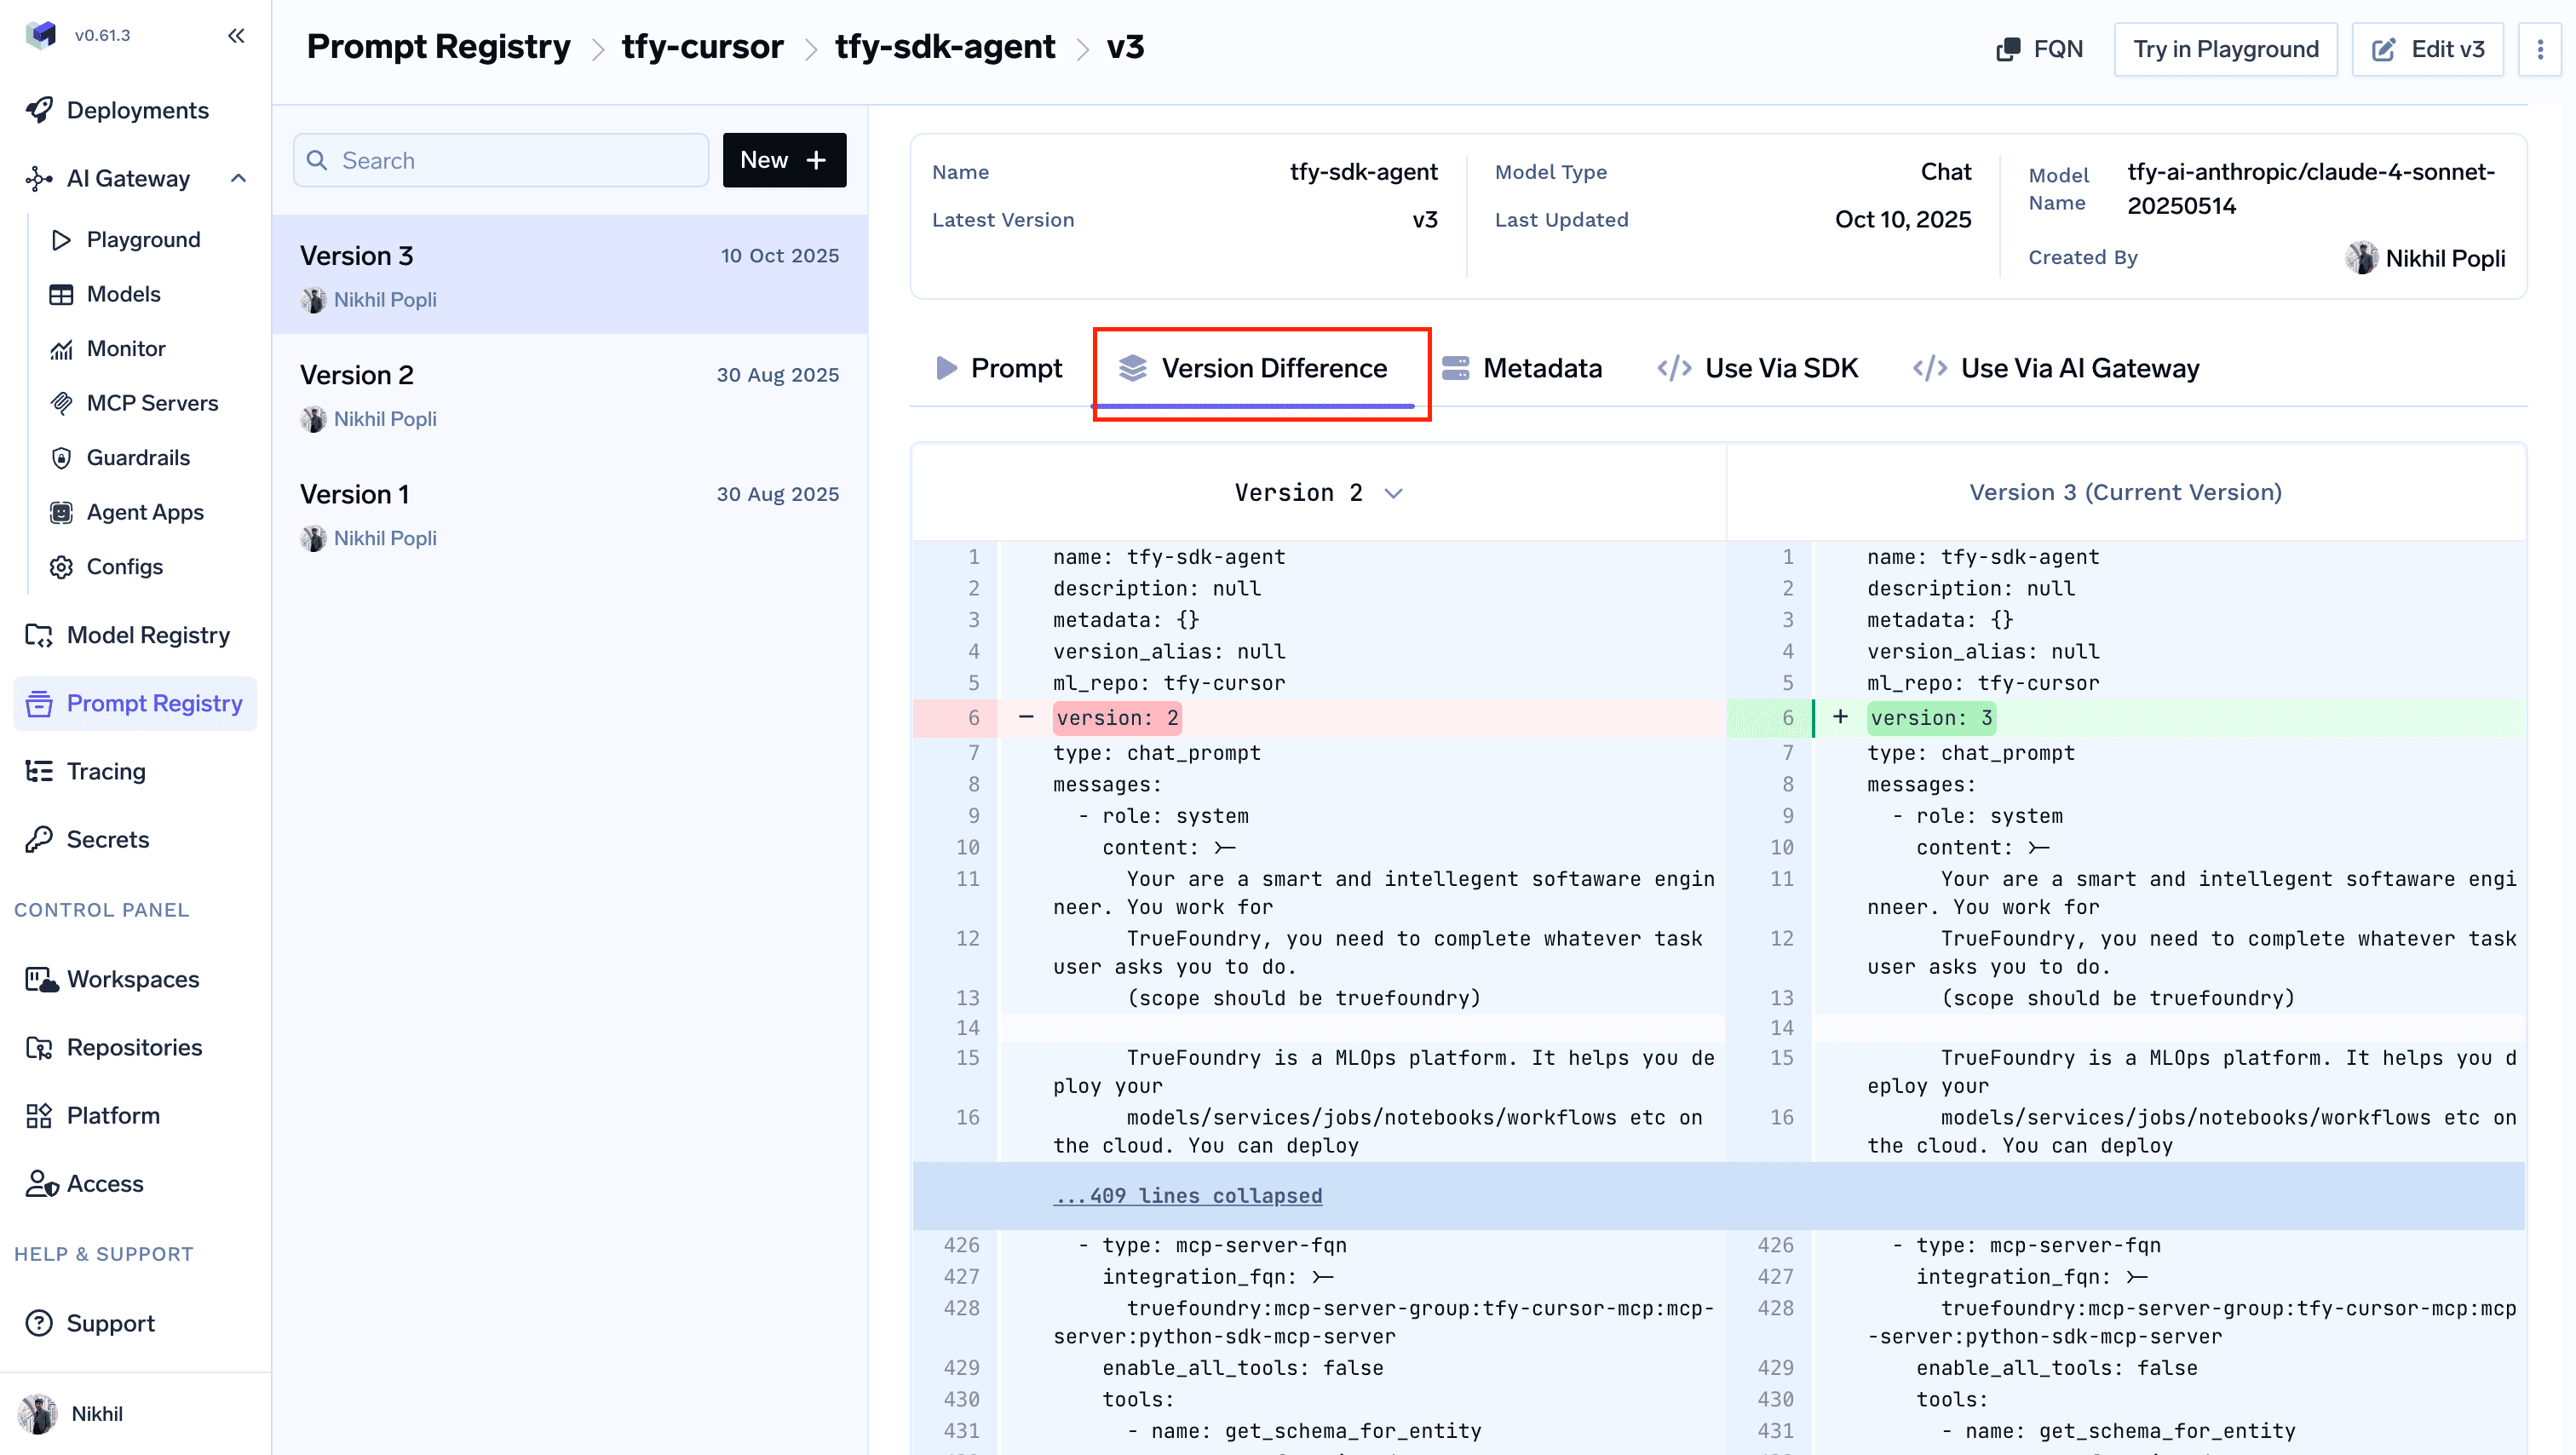
Click **Version History** on the prompt detail page to see all versions of the prompt with their commit messages and authors.
Inside Version History, switch to the **Version Difference** tab to see exactly what changed between two versions in a GitHub-style diff view.
## Advanced Configuration
Each prompt template can be configured with the same controls as a regular Gateway request:
Reference variables in system or user messages using `{{variable_name}}` syntax. Pass values at runtime via `prompt_variables` (Gateway) or as `variables` to `render_prompt` (SDK). See [Using the Prompt](#using-the-prompt) below.
Attach **Input Guardrails** and **Output Guardrails** to enforce safety, PII redaction, content moderation, or custom checks on every run of the saved prompt. Learn more: [Guardrails Overview](/docs/ai-gateway/guardrails-overview).
Bind the prompt to a [Virtual Model](/docs/ai-gateway/virtual-model) to get load balancing, fallback, and retries across multiple gateway targets when running the saved prompt.
Force the model to respond in a specific JSON schema. Useful when downstream code needs to parse the response programmatically.
## Versioning
TrueFoundry automatically creates a new version every time you edit and save a prompt. Versioning lets you:
* Roll forward and roll back across versions
* Compare exact changes between any two versions
* Pin specific versions to specific apps or environments
Open any prompt and click **Edit v\** to make changes. Saving the edited prompt produces a new version (e.g. `v2`).
Click **Version History** on the prompt detail page to see all versions of the prompt with their commit messages and authors.
Inside Version History, switch to the **Version Difference** tab to see exactly what changed between two versions in a GitHub-style diff view.
 ## Using the Prompt
There are two ways to consume a saved prompt from your application:
| Method | When to use |
| ------------------------------------------------ | ----------------------------------------------------------------------------------- |
| **Use Via AI Gateway** *(server-side rendering)* | The Gateway renders the prompt and runs it — simplest setup, no extra dependencies. |
| **Use Via SDK** *(client-side rendering)* | Fetch the template and render it locally — full control over message construction. |
In both cases you need the prompt version's **FQN**, which you can copy from the **FQN** button on the prompt detail page.
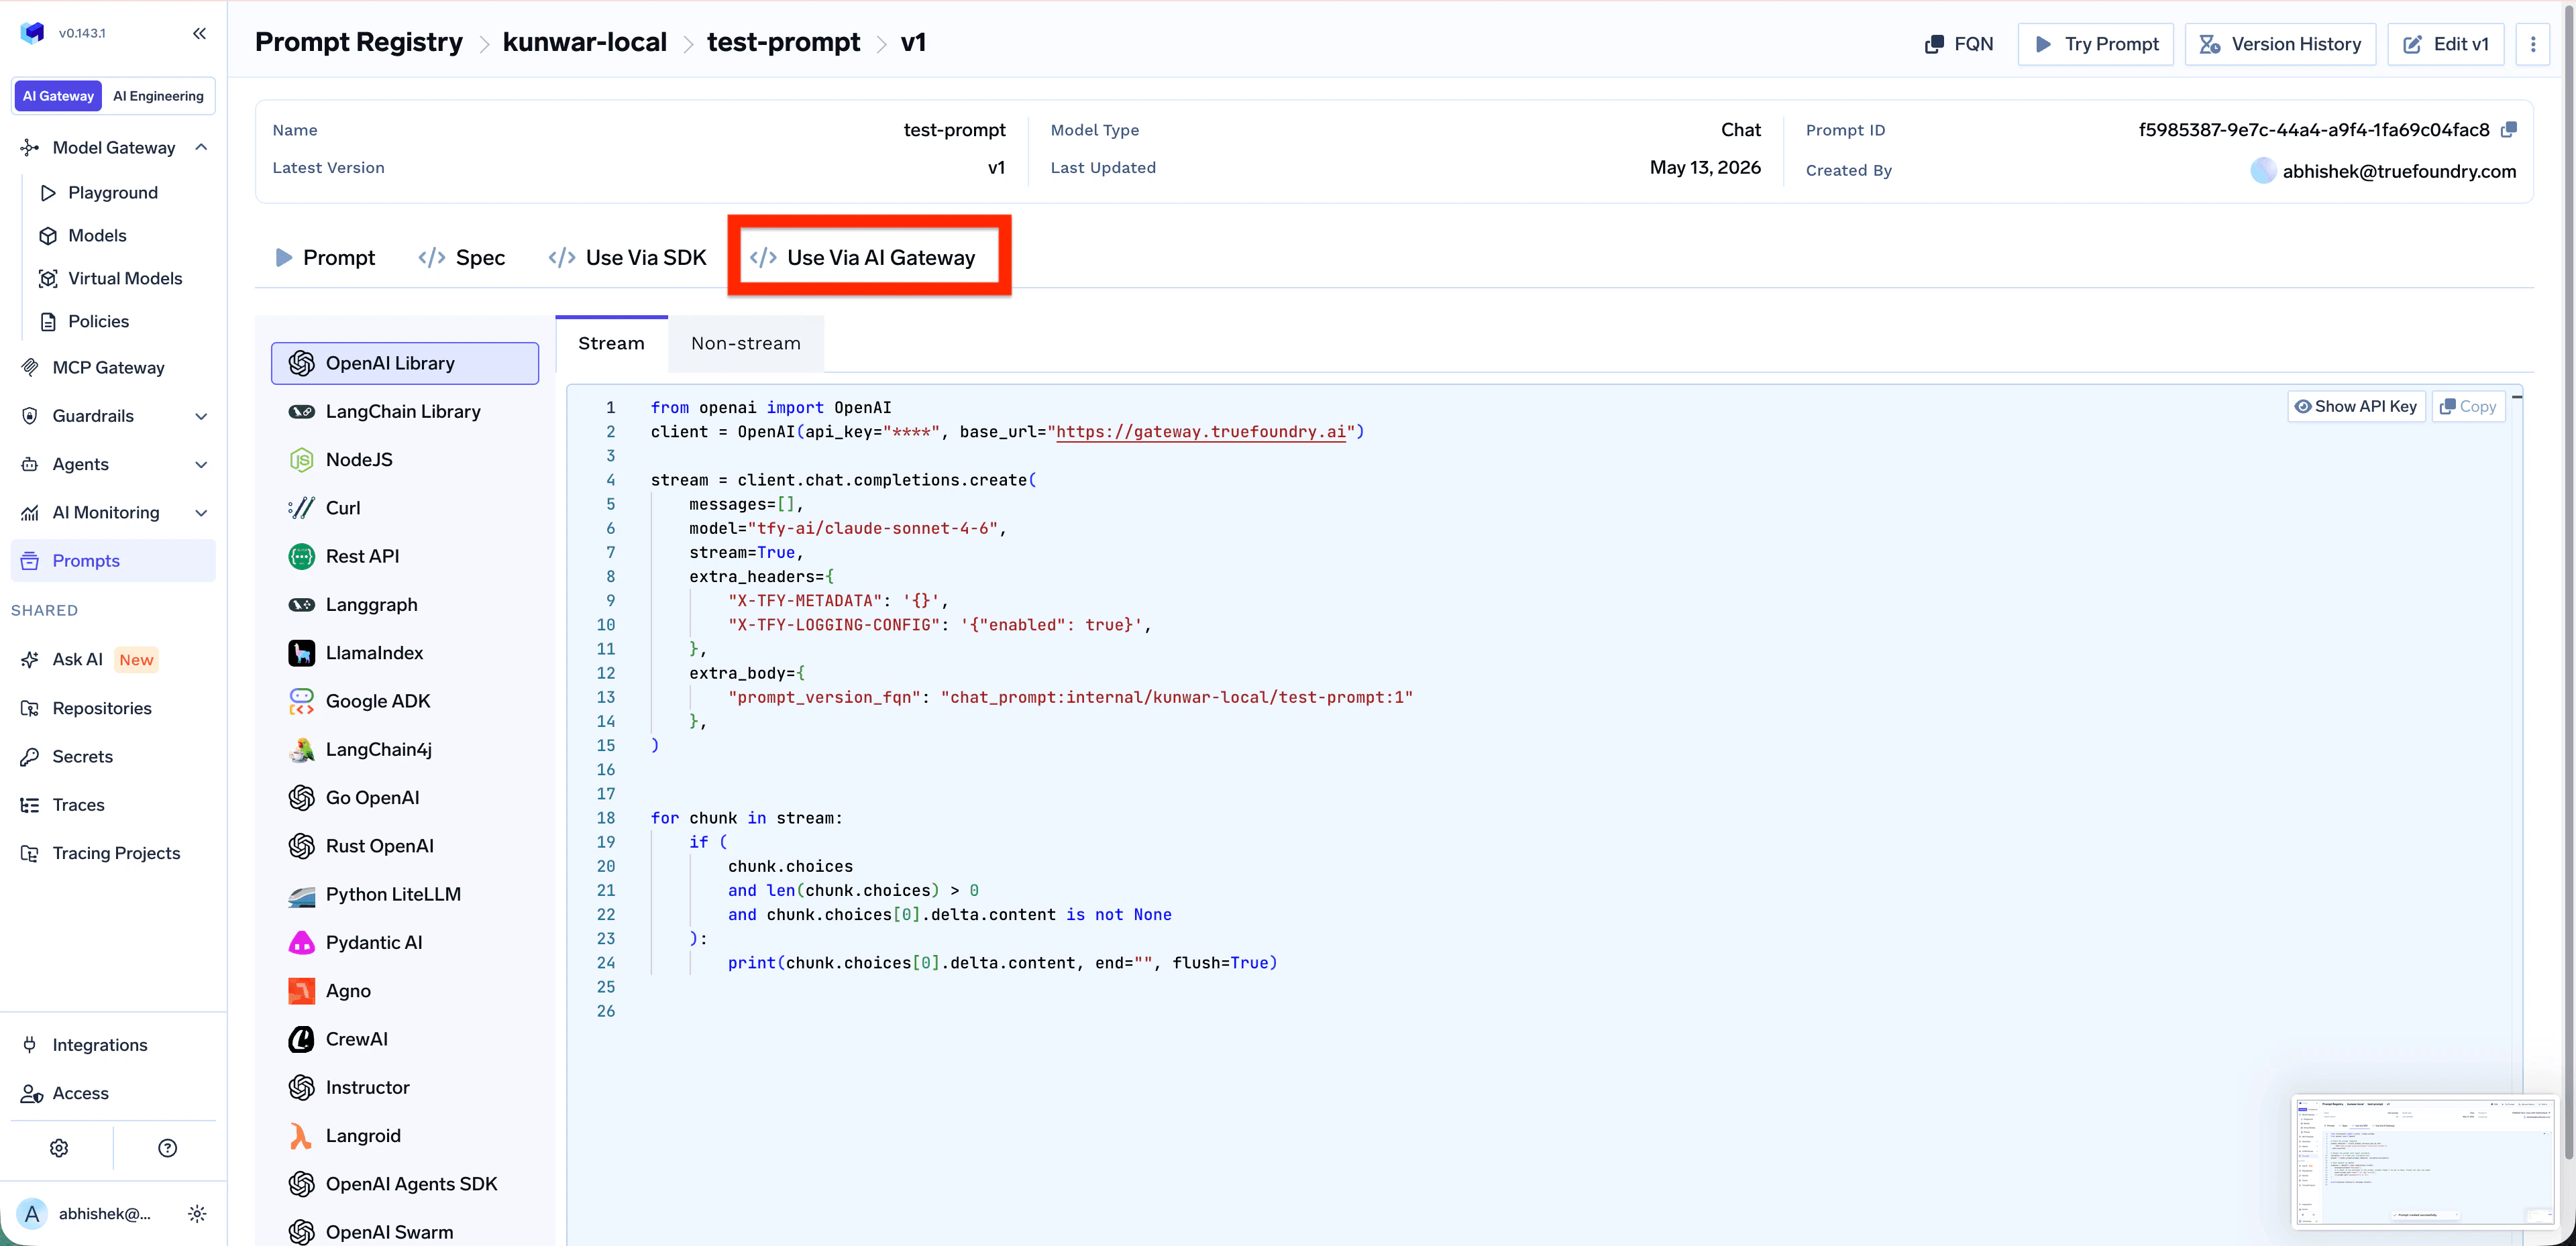
Pass the prompt version FQN in the request body. The Gateway renders the prompt and executes the call.
**Parameters**
* `prompt_version_fqn` — The fully qualified name of your prompt version
* `prompt_variables` *(optional)* — Variables to substitute into the prompt template
**Important considerations**
* If the prompt version doesn't have a model configured, pass the model in the request body via the `model` parameter
* If you specify a model in the request body and the prompt version already has one configured, the request body model takes precedence
* Any `messages` passed in the request body are appended to the messages defined in the prompt version
Open the **Use Via AI Gateway** tab on the prompt detail page to get a ready-to-paste snippet in your preferred client library (OpenAI, LangChain, Node.js, Curl, REST, and more).
## Using the Prompt
There are two ways to consume a saved prompt from your application:
| Method | When to use |
| ------------------------------------------------ | ----------------------------------------------------------------------------------- |
| **Use Via AI Gateway** *(server-side rendering)* | The Gateway renders the prompt and runs it — simplest setup, no extra dependencies. |
| **Use Via SDK** *(client-side rendering)* | Fetch the template and render it locally — full control over message construction. |
In both cases you need the prompt version's **FQN**, which you can copy from the **FQN** button on the prompt detail page.
Pass the prompt version FQN in the request body. The Gateway renders the prompt and executes the call.
**Parameters**
* `prompt_version_fqn` — The fully qualified name of your prompt version
* `prompt_variables` *(optional)* — Variables to substitute into the prompt template
**Important considerations**
* If the prompt version doesn't have a model configured, pass the model in the request body via the `model` parameter
* If you specify a model in the request body and the prompt version already has one configured, the request body model takes precedence
* Any `messages` passed in the request body are appended to the messages defined in the prompt version
Open the **Use Via AI Gateway** tab on the prompt detail page to get a ready-to-paste snippet in your preferred client library (OpenAI, LangChain, Node.js, Curl, REST, and more).
 ```python theme={"dark"}
from openai import OpenAI
client = OpenAI(
api_key="your-tfy-api-key",
base_url="{GATEWAY_BASE_URL}"
)
stream = client.chat.completions.create(
messages=[],
model="",
stream=True,
extra_headers={
"X-TFY-METADATA": '{"your_custom_key":"your_custom_value"}',
"X-TFY-LOGGING-CONFIG": '{"enabled": true}',
},
extra_body={
"prompt_version_fqn": "chat_prompt:truefoundry/default/my-second-prompt:1",
"prompt_variables": {
"name": "John Doe",
"age": "30"
}
},
)
for chunk in stream:
if (
chunk.choices
and len(chunk.choices) > 0
and chunk.choices[0].delta.content is not None
):
print(chunk.choices[0].delta.content, end="", flush=True)
```
Fetch the prompt template, render it locally, then call any OpenAI-compatible client.
Open the **Use Via SDK** tab on the prompt detail page to copy the snippet pre-filled with your prompt version FQN.
```python theme={"dark"}
from openai import OpenAI
client = OpenAI(
api_key="your-tfy-api-key",
base_url="{GATEWAY_BASE_URL}"
)
stream = client.chat.completions.create(
messages=[],
model="",
stream=True,
extra_headers={
"X-TFY-METADATA": '{"your_custom_key":"your_custom_value"}',
"X-TFY-LOGGING-CONFIG": '{"enabled": true}',
},
extra_body={
"prompt_version_fqn": "chat_prompt:truefoundry/default/my-second-prompt:1",
"prompt_variables": {
"name": "John Doe",
"age": "30"
}
},
)
for chunk in stream:
if (
chunk.choices
and len(chunk.choices) > 0
and chunk.choices[0].delta.content is not None
):
print(chunk.choices[0].delta.content, end="", flush=True)
```
Fetch the prompt template, render it locally, then call any OpenAI-compatible client.
Open the **Use Via SDK** tab on the prompt detail page to copy the snippet pre-filled with your prompt version FQN.
 ```python theme={"dark"}
from truefoundry import client, render_prompt
from openai import OpenAI
# Fetch the prompt template
prompt_template = client.prompt_versions.get_by_fqn(
fqn="chat_prompt:truefoundry/default/my-second-prompt:1",
).data.manifest
# Render the prompt with input variables
variables = {} # Add your variables here
prompt = render_prompt(prompt_template, variables=variables)
# Send request to OpenAI directly
response = OpenAI().chat.completions.create(
messages=prompt["messages"],
model=prompt.get("model") or "gpt-4o-mini",
**(prompt.get("parameters") or {}),
)
print(response.choices[0].message.content)
```
```python theme={"dark"}
from truefoundry import client, render_prompt
from openai import OpenAI
# Fetch the prompt template
prompt_template = client.prompt_versions.get_by_fqn(
fqn="chat_prompt:truefoundry/default/my-second-prompt:1",
).data.manifest
# Render the prompt with input variables
variables = {} # Add your variables here
prompt = render_prompt(prompt_template, variables=variables)
# Send request to OpenAI directly
response = OpenAI().chat.completions.create(
messages=prompt["messages"],
model=prompt.get("model") or "gpt-4o-mini",
**(prompt.get("parameters") or {}),
)
print(response.choices[0].message.content)
```