> ## Documentation Index
> Fetch the complete documentation index at: https://www.truefoundry.com/llms.txt
> Use this file to discover all available pages before exploring further.
# OpenCode
> Learn how to integrate OpenCode with TrueFoundry AI Gateway for secure, governed AI-powered coding in the terminal, desktop, or IDE.
This guide provides instructions for integrating [OpenCode](https://opencode.ai/) with the TrueFoundry AI Gateway.
## What is OpenCode?
OpenCode is an open-source AI coding agent available as a terminal-based interface, desktop app, or IDE extension. It uses the [AI SDK](https://ai-sdk.dev/) and [Models.dev](https://models.dev/) to support 75+ LLM providers, and can also run local models. With TrueFoundry AI Gateway integration, you can route all OpenCode LLM requests through TrueFoundry's Gateway for centralized access control, cost tracking, rate limiting, guardrails, and observability.
### Key Features of OpenCode
* **[AI-Powered Coding Agent](https://opencode.ai/)**: A full-featured coding agent that can read, write, and edit files, run shell commands, and navigate complex codebases directly from your terminal or desktop
* **[Multiple Agent Modes](https://opencode.ai/docs/agents/)**: Built-in Build and Plan agents with the ability to create custom agents for specialized tasks like code review, documentation, or security auditing
* **[75+ Provider Support](https://opencode.ai/docs/providers/)**: Connect to any LLM provider through a unified interface, including custom OpenAI-compatible endpoints like the TrueFoundry AI Gateway
## Prerequisites
Before integrating OpenCode with TrueFoundry, ensure you have:
1. **TrueFoundry Account**: Create a [TrueFoundry account](https://www.truefoundry.com/register) and follow the instructions in our [Gateway Quick Start Guide](https://docs.truefoundry.com/docs/ai-gateway/quick-start)
2. **OpenCode Installation**: Install OpenCode by following the [official documentation](https://opencode.ai/docs/)
## Integration Guide
This guide uses the OpenCode Desktop app for illustration, but the same configuration applies to the terminal-based (TUI) and IDE extension versions.
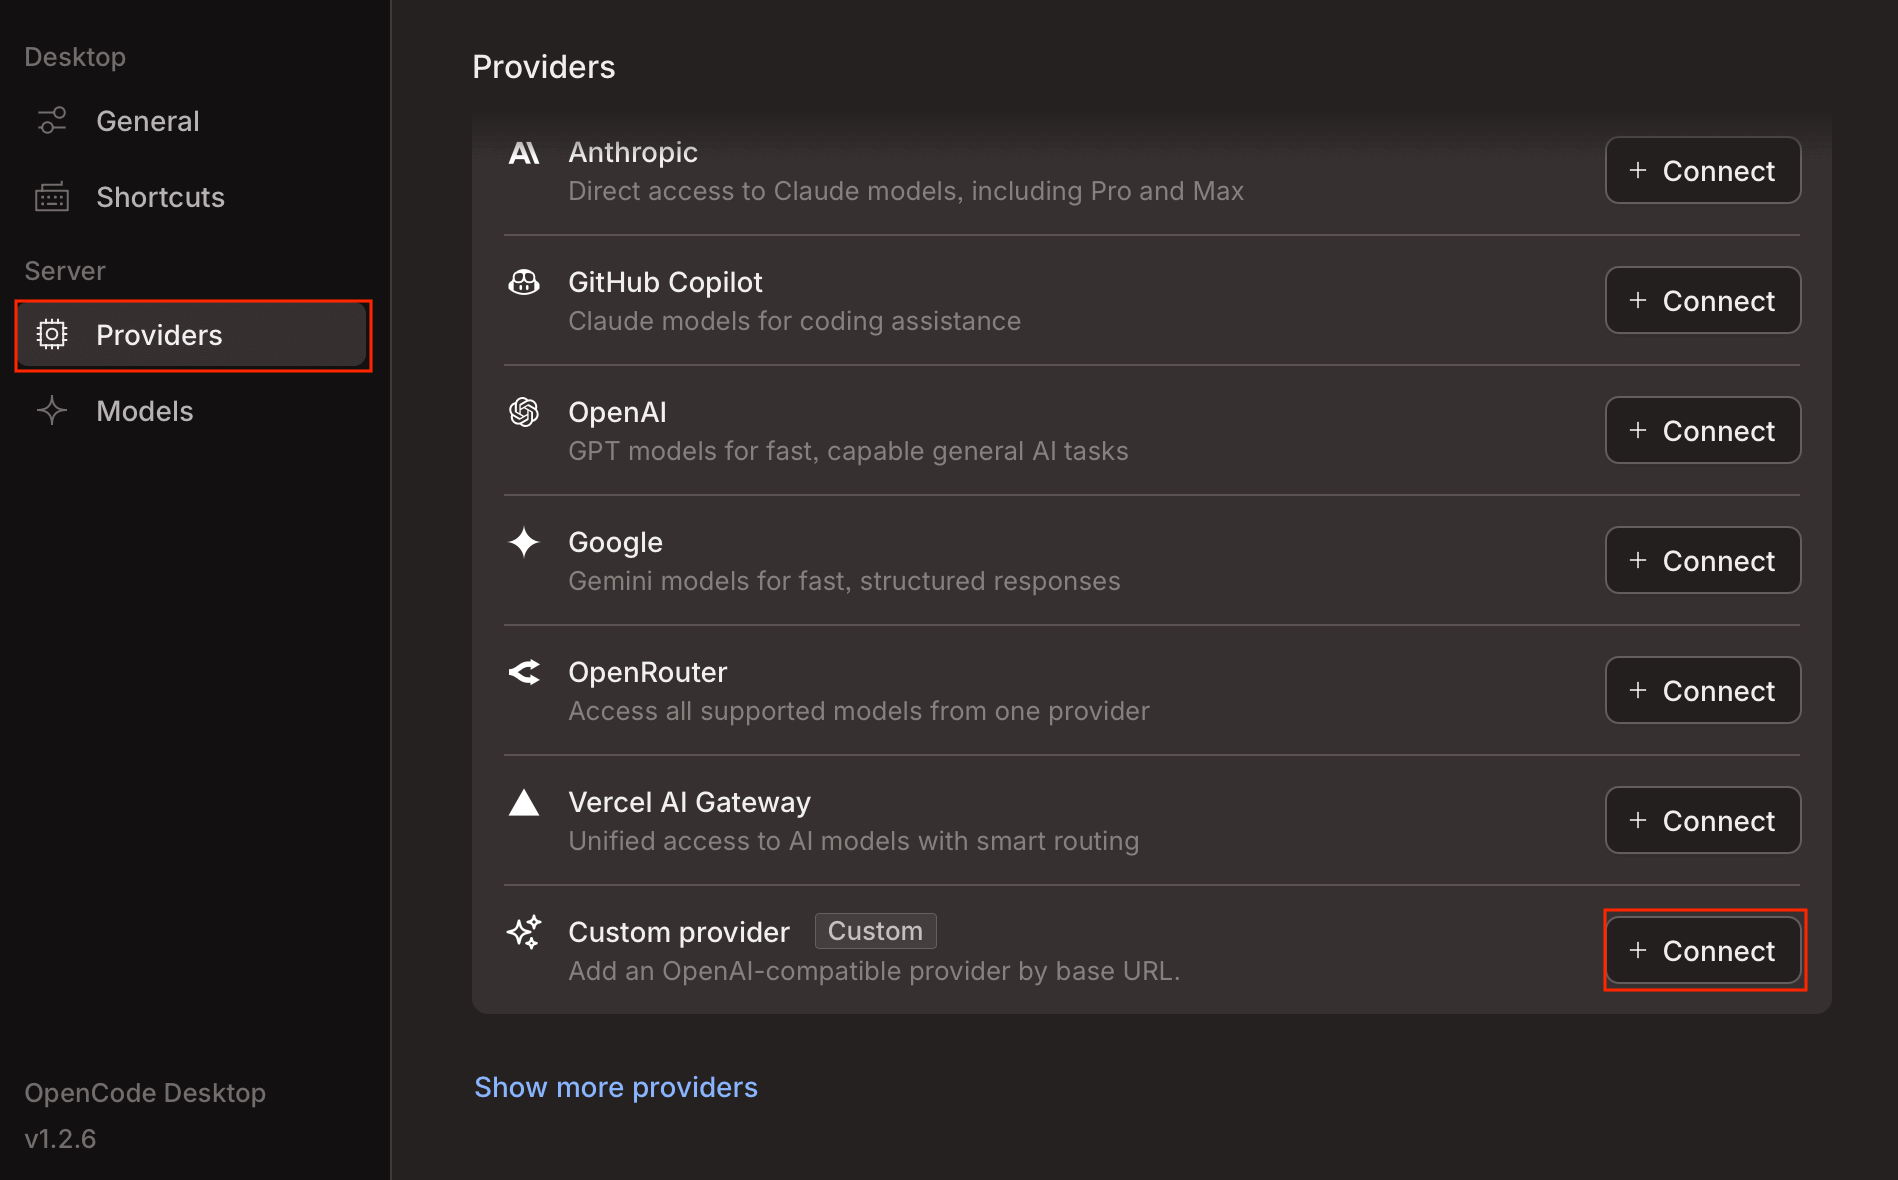
### Step 1: Open Provider Settings
1. Open the OpenCode Desktop app.
2. Navigate to **Providers** in the left sidebar.
3. Click **+ Connect** next to **Custom provider**.
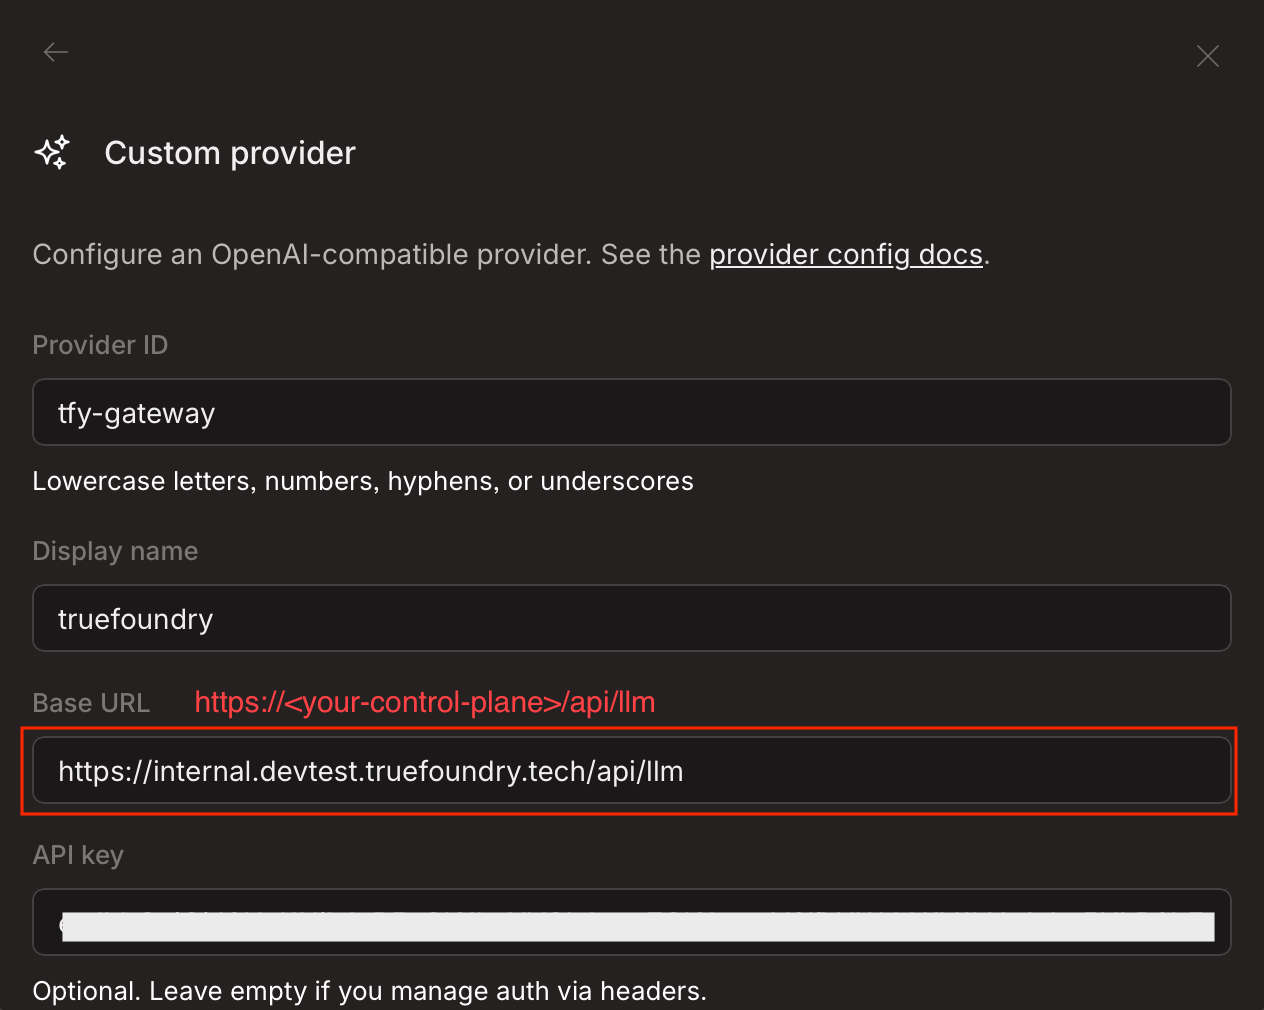
 ### Step 2: Configure TrueFoundry as a Custom Provider
Fill in the following details in the Custom provider form:
* **Provider ID**: `tfy-gateway` (or any identifier using lowercase letters, numbers, hyphens, or underscores)
* **Display name**: `truefoundry`
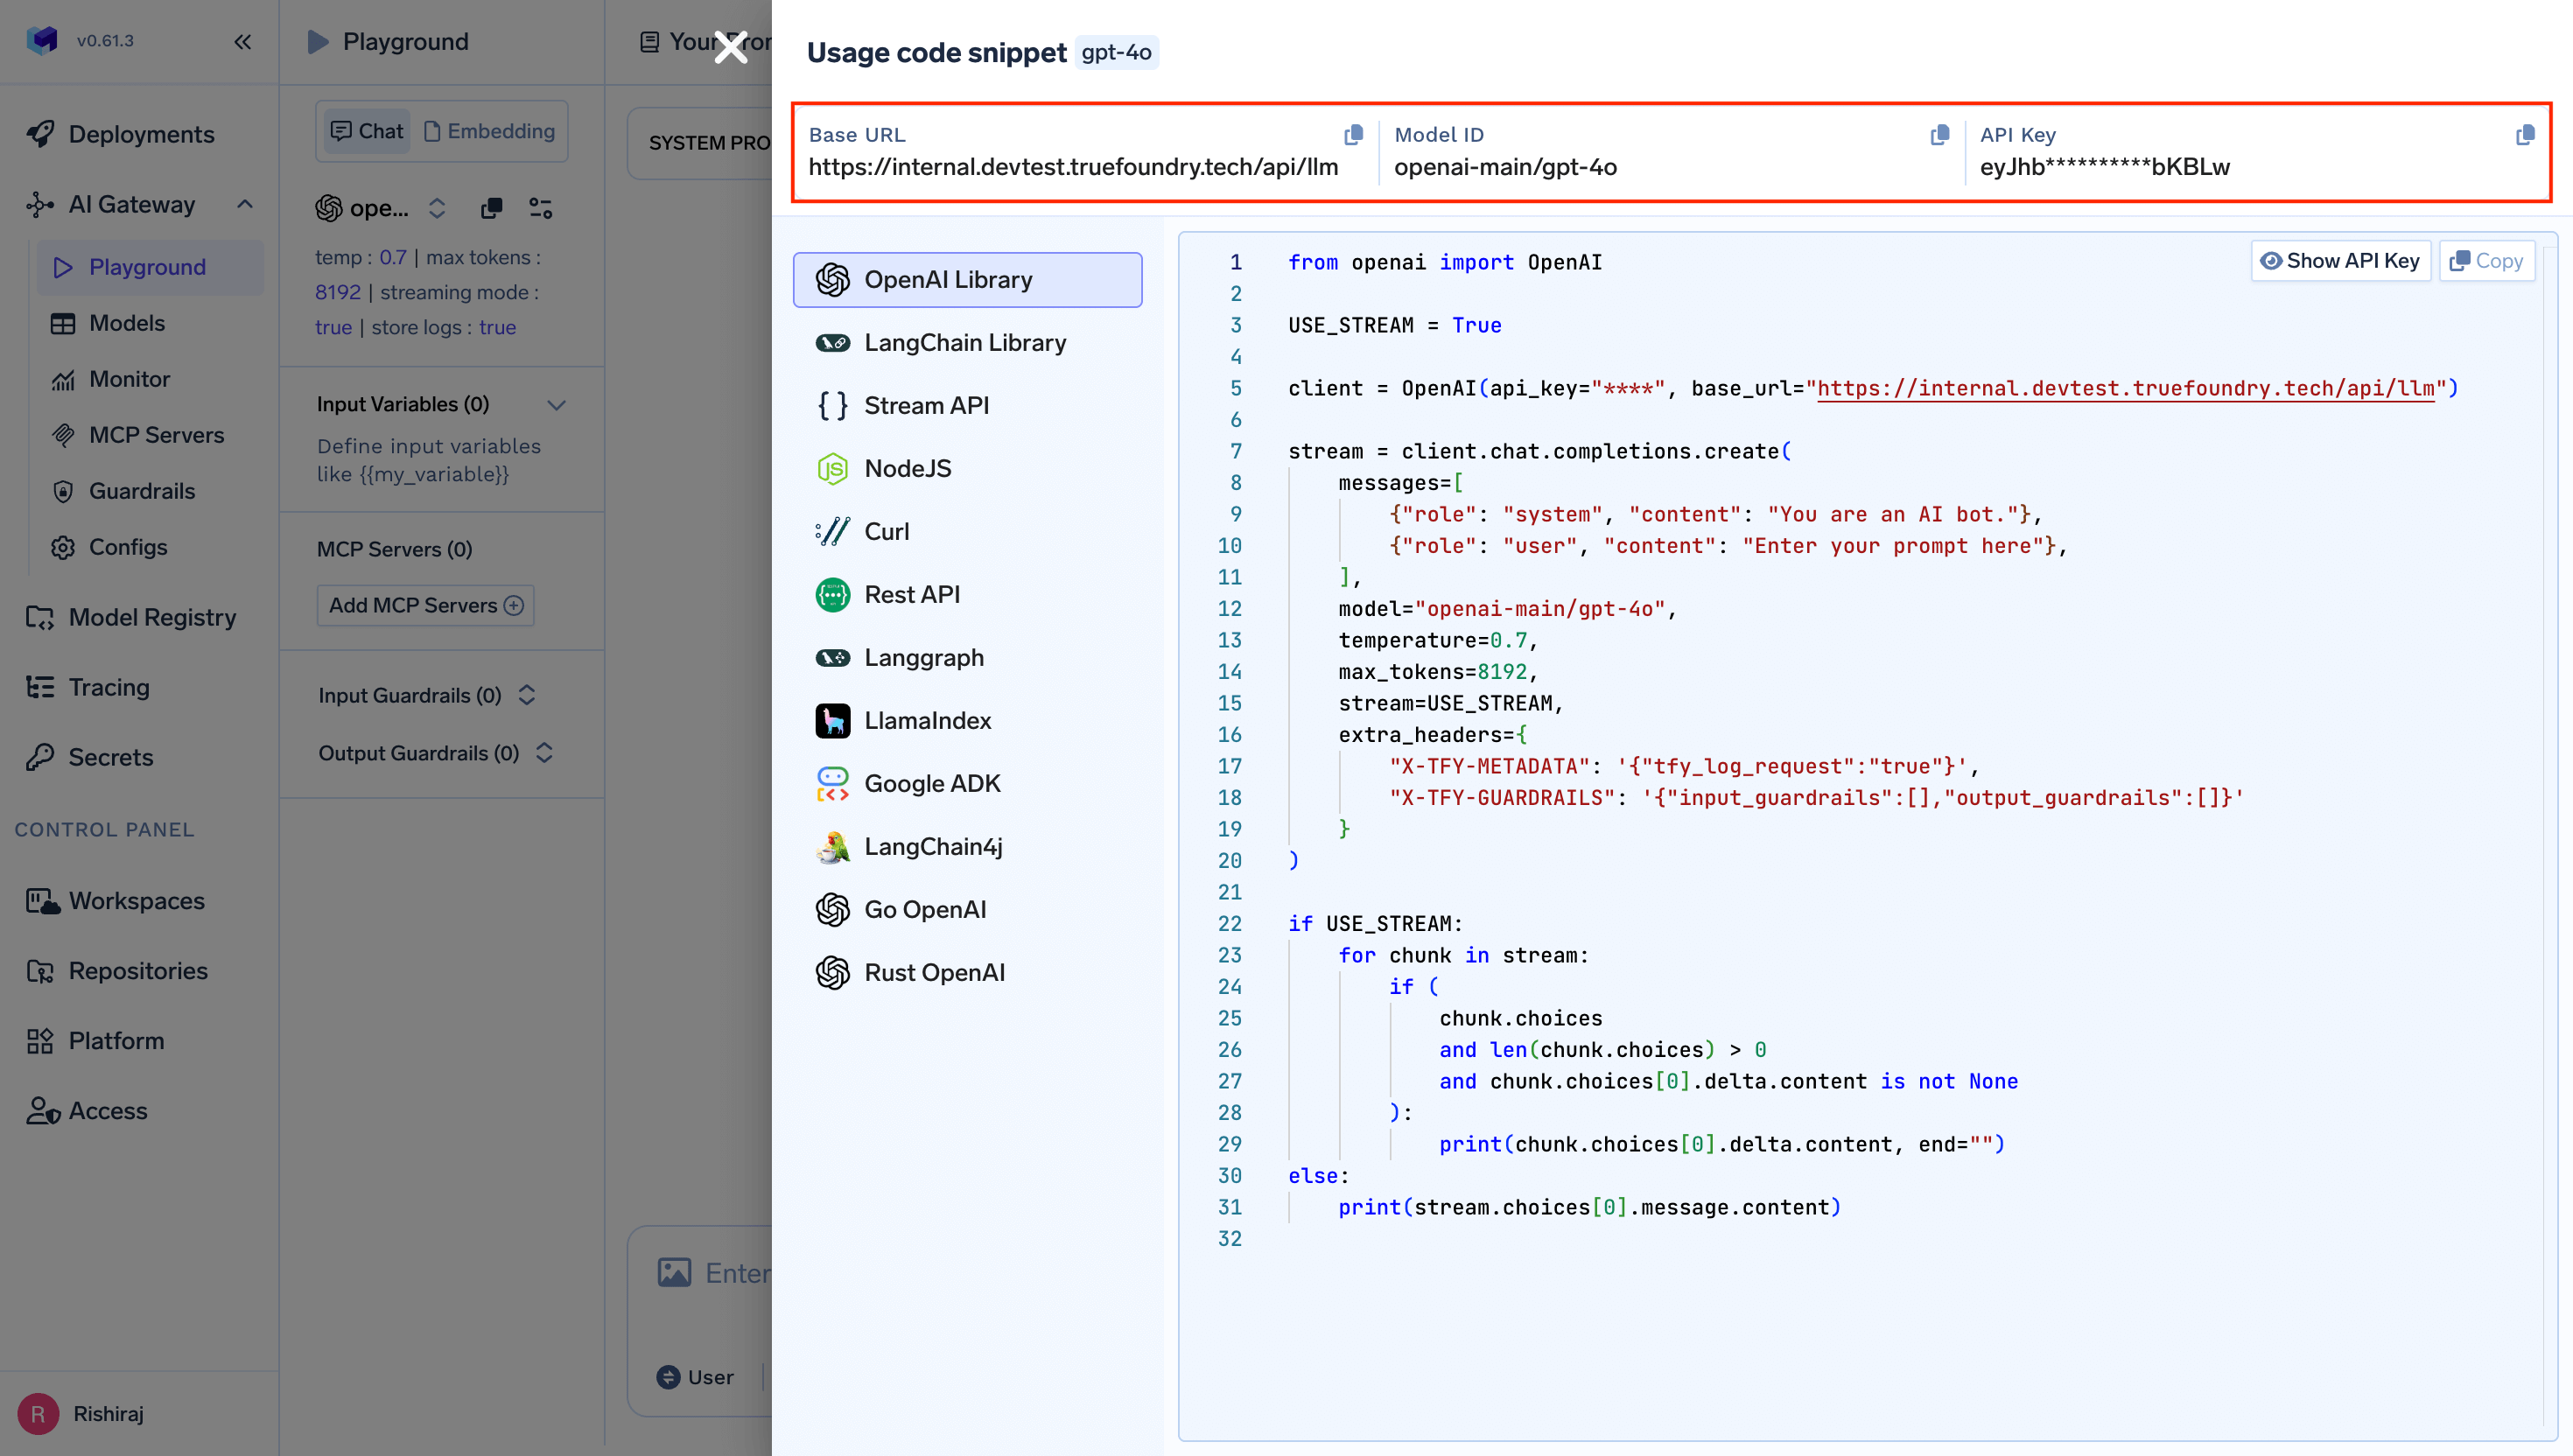
* **Base URL**: Your TrueFoundry AI Gateway URL (e.g., `{GATEWAY_BASE_URL}`). You can get this from the unified code snippet in the TrueFoundry AI Gateway Playground.
* **API key**: Your TrueFoundry API key
### Step 2: Configure TrueFoundry as a Custom Provider
Fill in the following details in the Custom provider form:
* **Provider ID**: `tfy-gateway` (or any identifier using lowercase letters, numbers, hyphens, or underscores)
* **Display name**: `truefoundry`
* **Base URL**: Your TrueFoundry AI Gateway URL (e.g., `{GATEWAY_BASE_URL}`). You can get this from the unified code snippet in the TrueFoundry AI Gateway Playground.
* **API key**: Your TrueFoundry API key
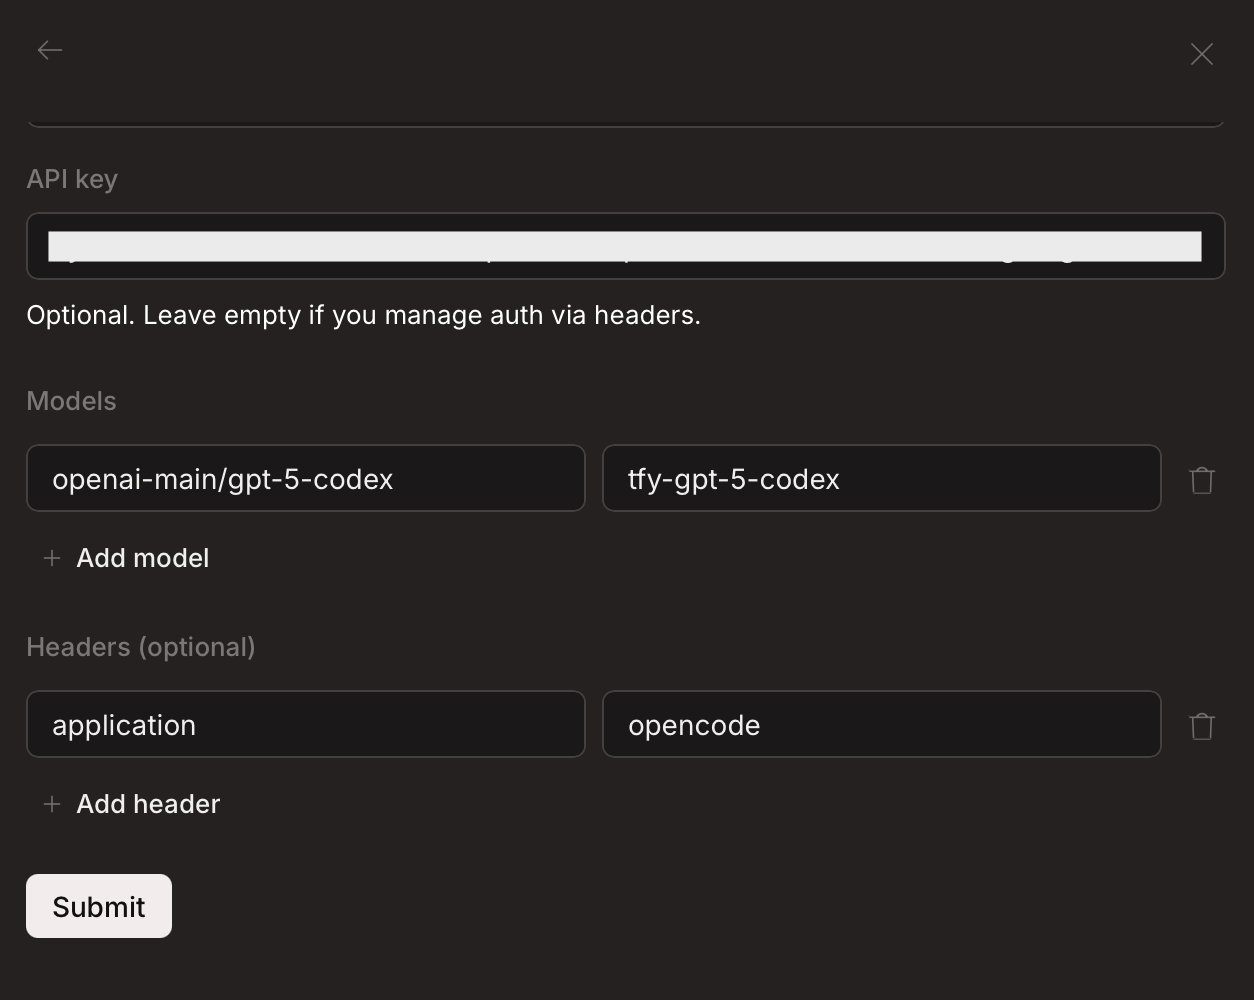
 ### Step 3: Add Models
Scroll down in the Custom provider form to add models:
1. In the **Models** section, enter the model ID from TrueFoundry (e.g., `openai-main/gpt-5-codex`) in the first field and a display name (e.g., `tfy-gpt-5-codex`) in the second field.
2. Click **+ Add model** to add more models as needed.
3. Optionally, add custom **Headers** for tracking. For example, set `application` to `opencode` to tag all requests from OpenCode in TrueFoundry's observability dashboard.
4. Click **Submit** to save the configuration.
### Step 3: Add Models
Scroll down in the Custom provider form to add models:
1. In the **Models** section, enter the model ID from TrueFoundry (e.g., `openai-main/gpt-5-codex`) in the first field and a display name (e.g., `tfy-gpt-5-codex`) in the second field.
2. Click **+ Add model** to add more models as needed.
3. Optionally, add custom **Headers** for tracking. For example, set `application` to `opencode` to tag all requests from OpenCode in TrueFoundry's observability dashboard.
4. Click **Submit** to save the configuration.
 **Minimum 128K context window required**
OpenCode includes a detailed system prompt with tool definitions, agent instructions, and project context that consumes a significant number of input tokens on every request.
* Models with smaller context windows (e.g., 8K or 32K) **will fail** with `prompt is too long` errors
* The system prompt combined with conversation history and tool call results quickly exceeds smaller limits
* Refer to the [OpenCode recommended models](https://opencode.ai/docs/models/#recommended-models) for models that are known to work well
Make sure the model you configure through the TrueFoundry AI Gateway supports **at least 128K input tokens**.
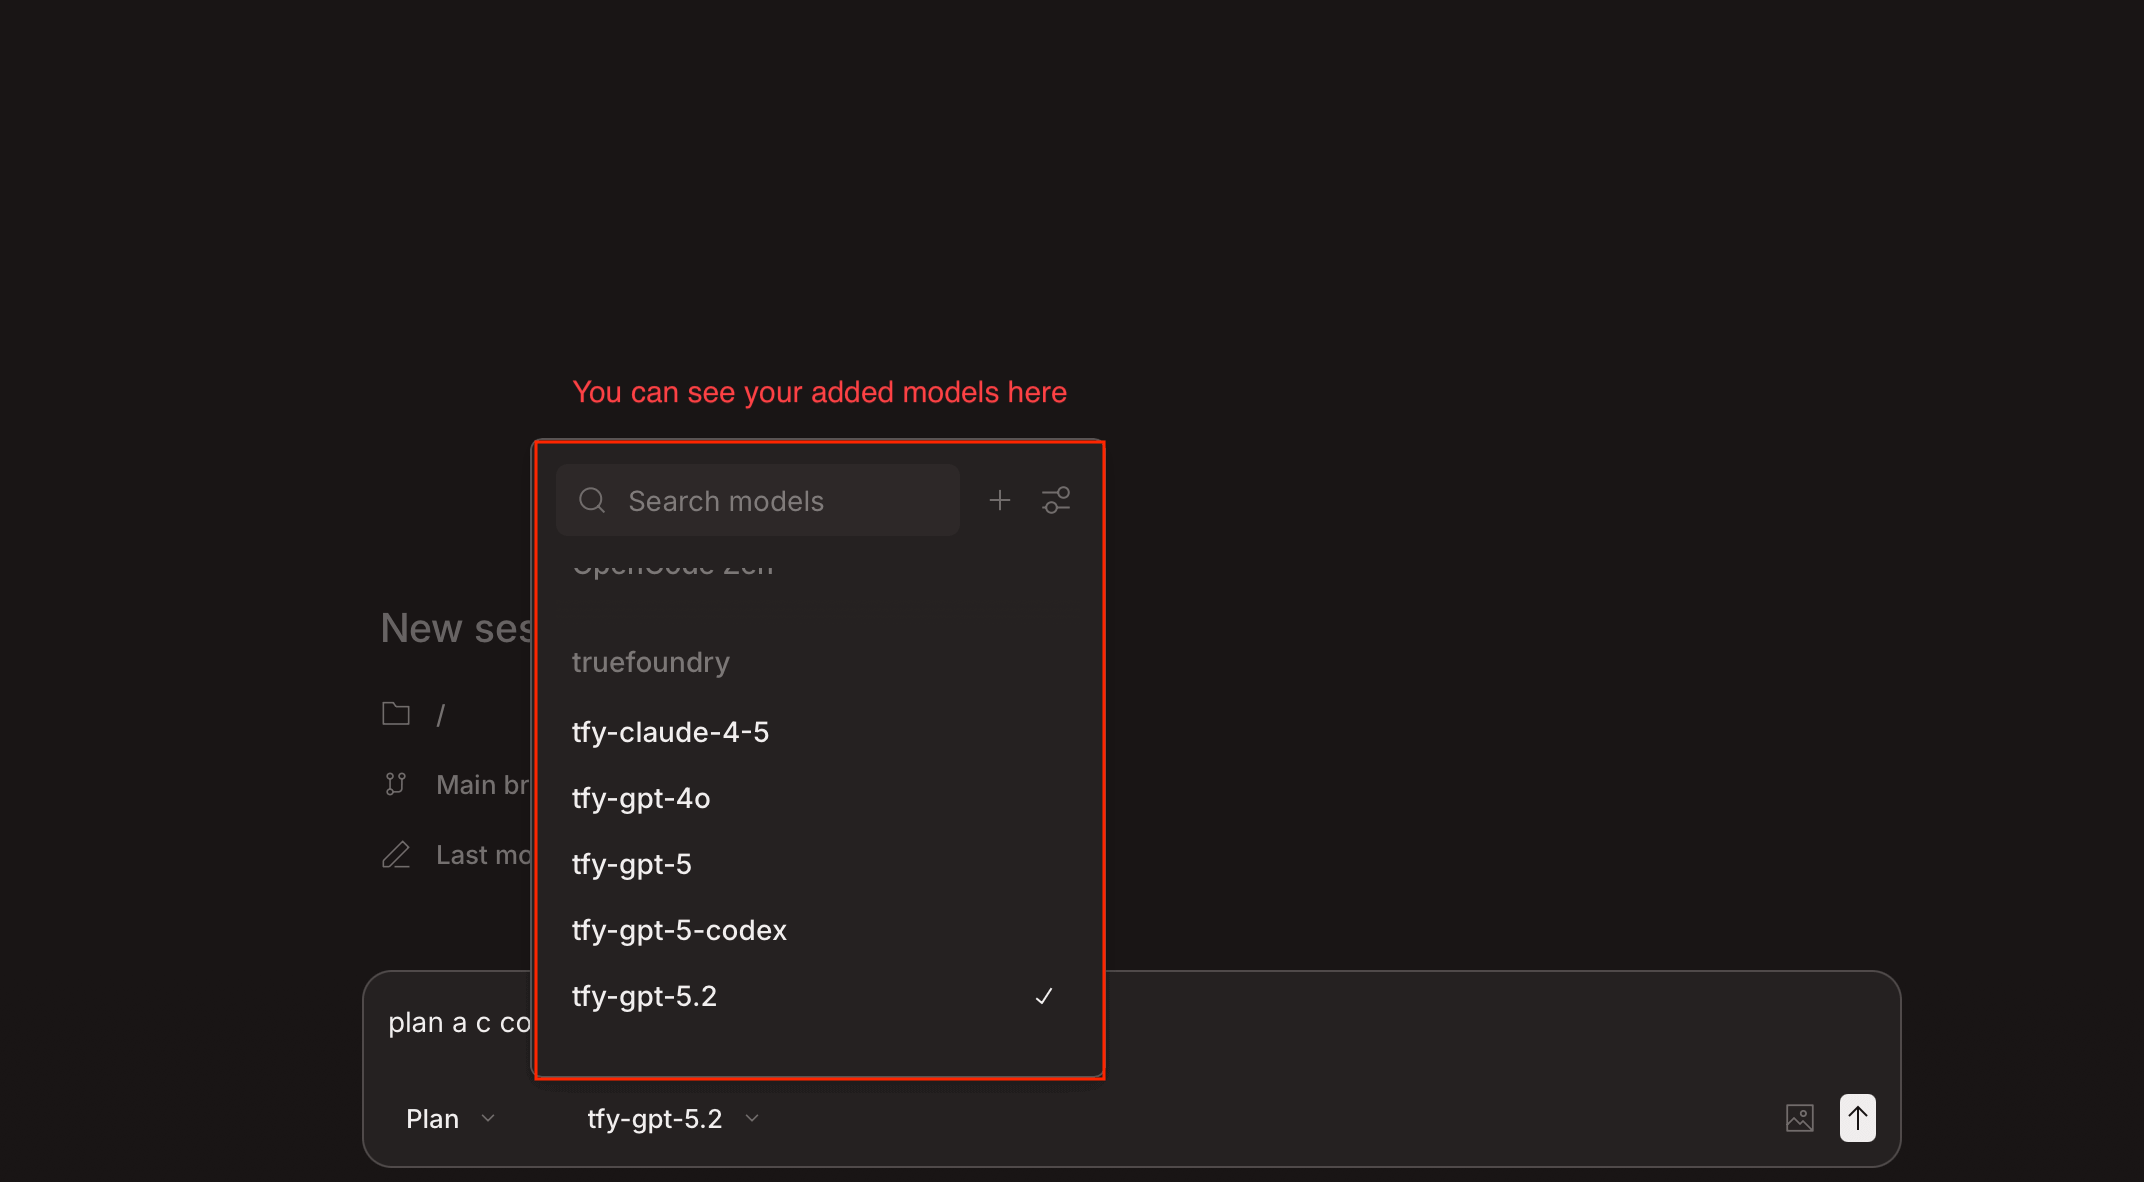
### Step 4: Select a TrueFoundry Model and Start Coding
1. In the OpenCode chat interface, click the model selector at the bottom of the screen.
2. You will see your configured TrueFoundry models listed under the **truefoundry** provider.
3. Select the model you want to use and start coding.
**Minimum 128K context window required**
OpenCode includes a detailed system prompt with tool definitions, agent instructions, and project context that consumes a significant number of input tokens on every request.
* Models with smaller context windows (e.g., 8K or 32K) **will fail** with `prompt is too long` errors
* The system prompt combined with conversation history and tool call results quickly exceeds smaller limits
* Refer to the [OpenCode recommended models](https://opencode.ai/docs/models/#recommended-models) for models that are known to work well
Make sure the model you configure through the TrueFoundry AI Gateway supports **at least 128K input tokens**.
### Step 4: Select a TrueFoundry Model and Start Coding
1. In the OpenCode chat interface, click the model selector at the bottom of the screen.
2. You will see your configured TrueFoundry models listed under the **truefoundry** provider.
3. Select the model you want to use and start coding.
 ## Alternative: Configuration via JSON
If you prefer configuring OpenCode through its JSON config file (useful for TUI or team-wide settings), add the following to your `opencode.json`:
```json theme={"dark"}
{
"$schema": "https://opencode.ai/config.json",
"provider": {
"tfy-gateway": {
"npm": "@ai-sdk/openai-compatible",
"name": "truefoundry",
"options": {
"baseURL": "{GATEWAY_BASE_URL}",
"apiKey": "",
"headers": {
"application": "opencode"
}
},
"models": {
"openai-main/gpt-5-codex": {
"name": "tfy-gpt-5-codex"
},
"anthropic-main/claude-sonnet-4-5": {
"name": "tfy-claude-4-5"
}
}
}
}
}
```
Then set the default model to one of your TrueFoundry models:
```json theme={"dark"}
{
"$schema": "https://opencode.ai/config.json",
"model": "tfy-gateway/openai-main/gpt-5-codex"
}
```
## Observability and Governance
Monitor your OpenCode usage through TrueFoundry's observability dashboard. With the `application: opencode` header configured, you can filter and analyze:
* **Performance Metrics**: Track request latency, time to first token, and inter-token latency
* **Cost and Token Usage**: Monitor input/output tokens and associated costs per model
* **Usage Patterns**: Understand usage across models, users, and teams
* **Rate Limiting and Virtual Models**: Set up rate limiting and configure [Virtual Models](/docs/ai-gateway/virtual-model) for intelligent routing and fallback across your models
## Alternative: Configuration via JSON
If you prefer configuring OpenCode through its JSON config file (useful for TUI or team-wide settings), add the following to your `opencode.json`:
```json theme={"dark"}
{
"$schema": "https://opencode.ai/config.json",
"provider": {
"tfy-gateway": {
"npm": "@ai-sdk/openai-compatible",
"name": "truefoundry",
"options": {
"baseURL": "{GATEWAY_BASE_URL}",
"apiKey": "",
"headers": {
"application": "opencode"
}
},
"models": {
"openai-main/gpt-5-codex": {
"name": "tfy-gpt-5-codex"
},
"anthropic-main/claude-sonnet-4-5": {
"name": "tfy-claude-4-5"
}
}
}
}
}
```
Then set the default model to one of your TrueFoundry models:
```json theme={"dark"}
{
"$schema": "https://opencode.ai/config.json",
"model": "tfy-gateway/openai-main/gpt-5-codex"
}
```
## Observability and Governance
Monitor your OpenCode usage through TrueFoundry's observability dashboard. With the `application: opencode` header configured, you can filter and analyze:
* **Performance Metrics**: Track request latency, time to first token, and inter-token latency
* **Cost and Token Usage**: Monitor input/output tokens and associated costs per model
* **Usage Patterns**: Understand usage across models, users, and teams
* **Rate Limiting and Virtual Models**: Set up rate limiting and configure [Virtual Models](/docs/ai-gateway/virtual-model) for intelligent routing and fallback across your models