> ## Documentation Index
> Fetch the complete documentation index at: https://www.truefoundry.com/llms.txt
> Use this file to discover all available pages before exploring further.
# Okta app setup
> Set up Okta for MCP: authorization server, OAuth app, scopes, and On-Behalf-Of token exchange.
Use this guide to create an Okta app and authorization server so TrueFoundry (or other clients) can obtain tokens for an existing MCP server. To **write** an OAuth MCP server and wire up JWT verification, see [Add Okta OAuth to a Calculator MCP Server](/docs/ai-gateway/mcp/mcp-server-oauth-okta). After Okta is configured, [register the server in TrueFoundry](/docs/ai-gateway/mcp/mcp-server-oauth-okta#add-the-mcp-server-to-the-truefoundry-ai-gateway).
Okta authorization server is the server that issues tokens to talk to the MCP server. You can either create a new authorization server per MCP server, or reuse the same authorization server for all MCP servers.
We recommend keeping the same authorization server for all MCP servers unless you need to create a different one. You can assign different scopes for each MCP server in Okta. You can also do one authorization server per MCP server in case a single MCP server is defining a lot of scopes, but this need should be rare.
**You shouldn't be making multiple authorization servers for the same MCP server corresponding to each client**. Each client can just have an Okta app which will be added to the same authorization server.
**The authorization server is common for both user authentication and machine-to-machine authentication. You only need to create it once.**
This authorization server will be used for both user authentication (via the AI Gateway), and machine-to-machine authentication.
1. Navigate to **Security** > **API** in the Okta dashboard
2. Click **Add Authorization Server**
3. Configure with the following:
* **Name**: `CalculatorMCPAuthServer` (or your preferred name)
* **Audience**: `https://calculator-mcp-server.example.com` (this will be your MCP server's identifier)
* **Description**: Authorization server for Calculator MCP servers
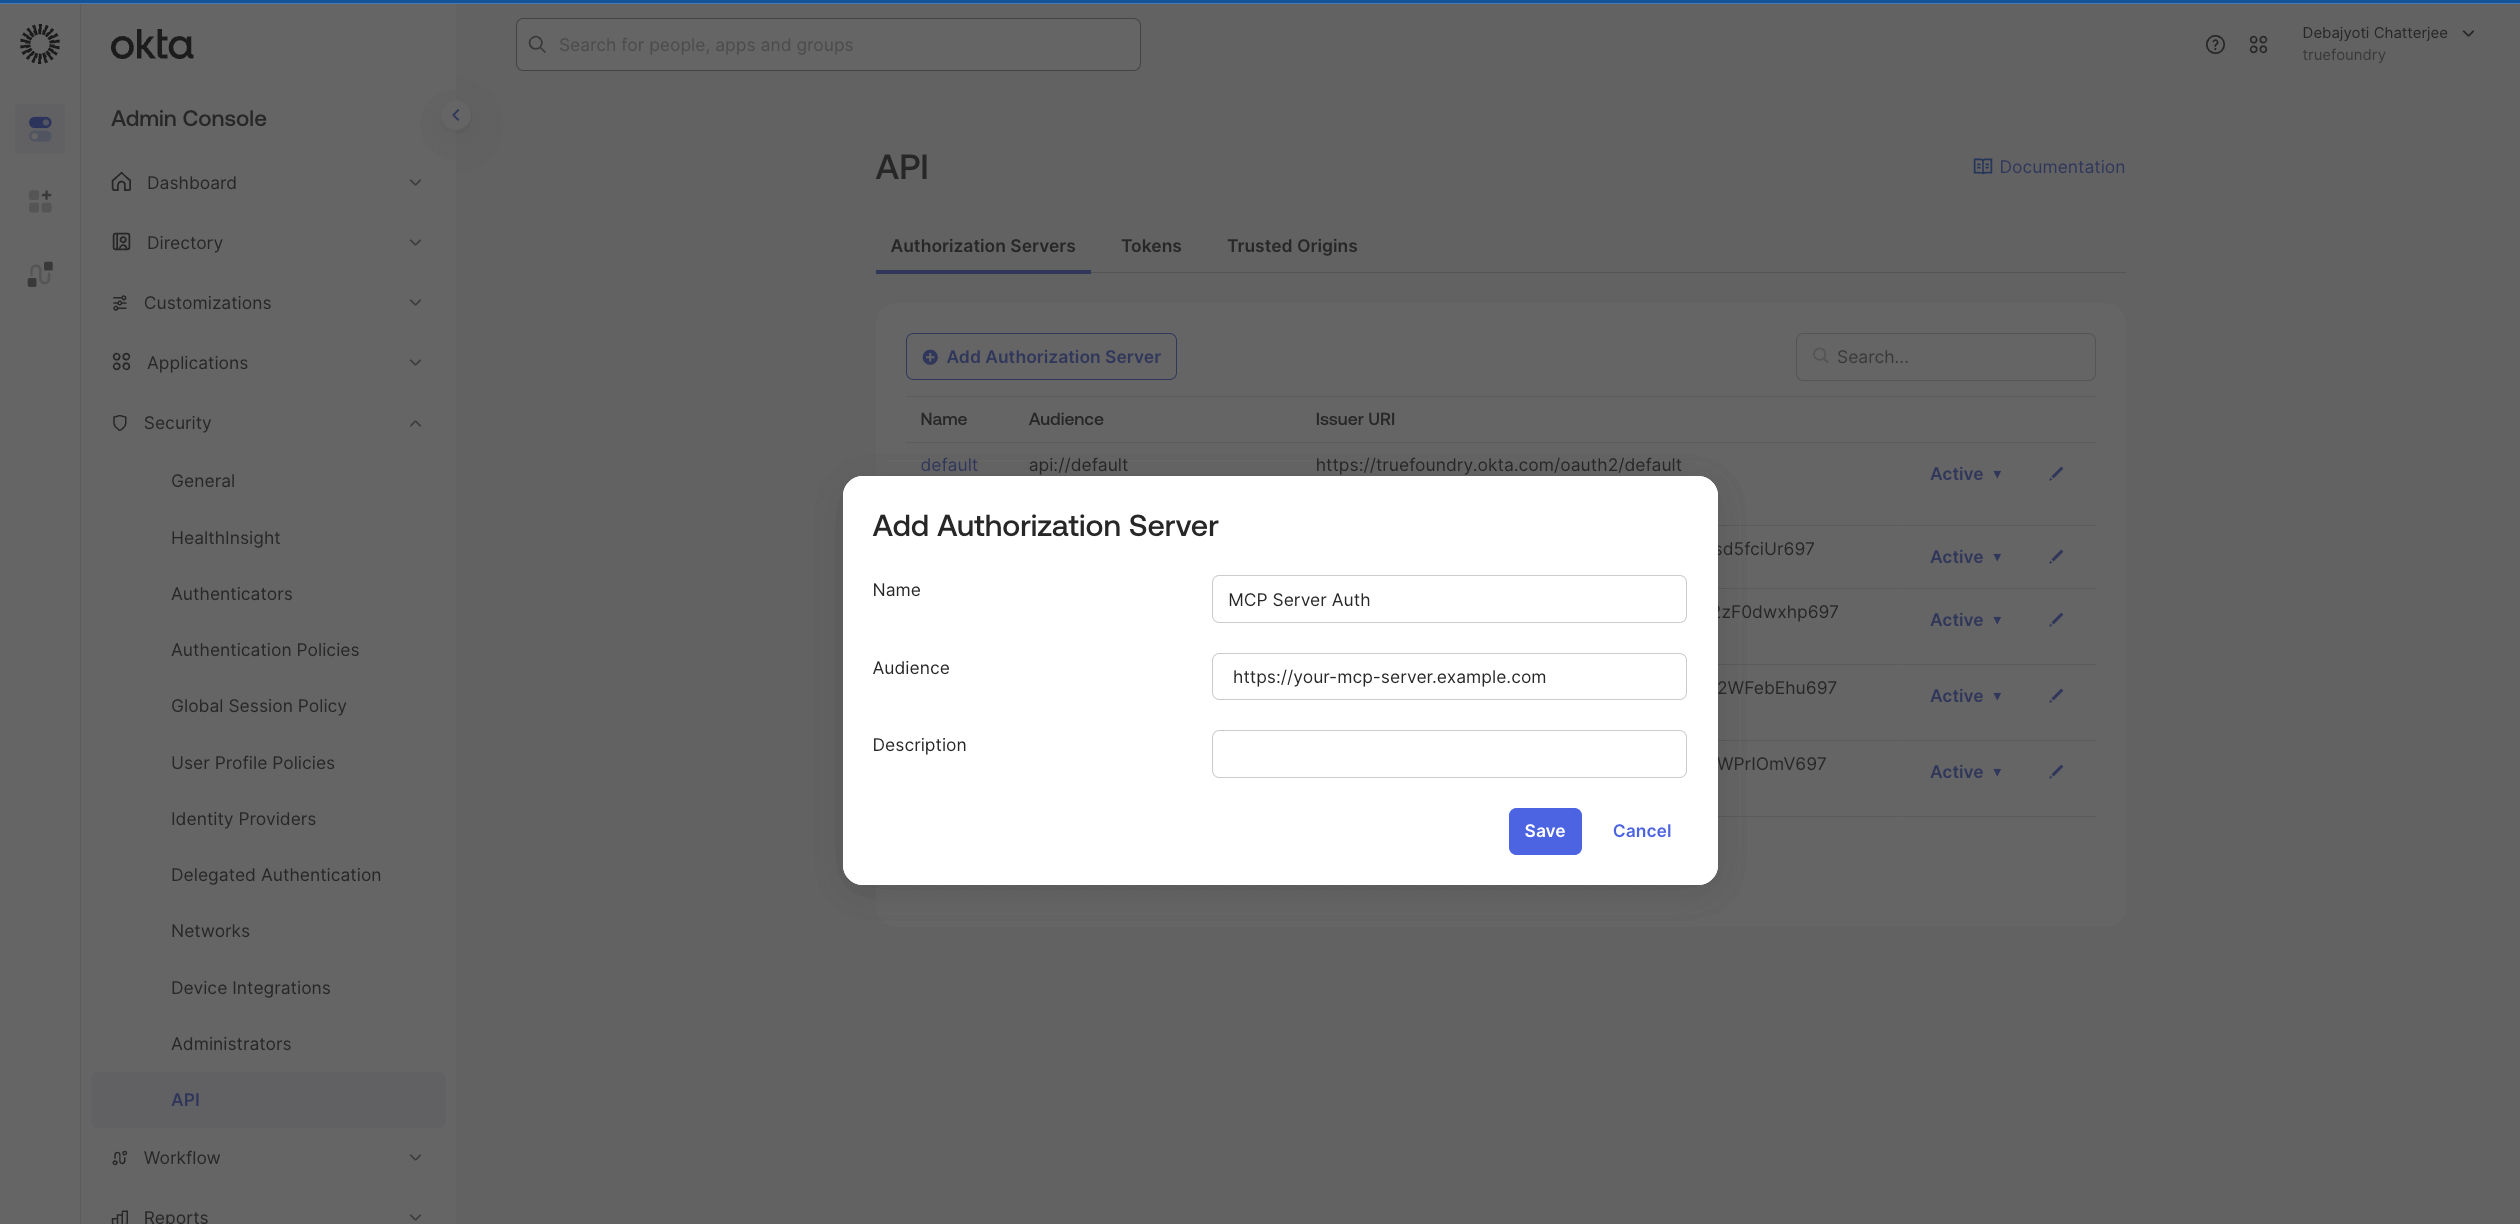 4. Click **Save**
5. Note the **Issuer URI** from the Settings tab (e.g., `https://dev-12345678.okta.com/oauth2/aus123abc`)
The audience value is an identifier for your API/resource. It doesn't have to be an actual URL, but using a URL format is a common convention.
6. **Configure Scopes**: Define what permissions your application can request.
* In your Authorization Server, go to the **Scopes** tab
* Add custom scopes if needed (e.g., read:data, write:data)
* For the calculator MCP server, we will add two scopes - `calculator.add` and `calculator.subtract`
Its important to add one scope for the MCP server - else Okta refuses to generate the token. If you are unsure about what scope to put, you can create a scope called `default` for now.
4. Click **Save**
5. Note the **Issuer URI** from the Settings tab (e.g., `https://dev-12345678.okta.com/oauth2/aus123abc`)
The audience value is an identifier for your API/resource. It doesn't have to be an actual URL, but using a URL format is a common convention.
6. **Configure Scopes**: Define what permissions your application can request.
* In your Authorization Server, go to the **Scopes** tab
* Add custom scopes if needed (e.g., read:data, write:data)
* For the calculator MCP server, we will add two scopes - `calculator.add` and `calculator.subtract`
Its important to add one scope for the MCP server - else Okta refuses to generate the token. If you are unsure about what scope to put, you can create a scope called `default` for now.
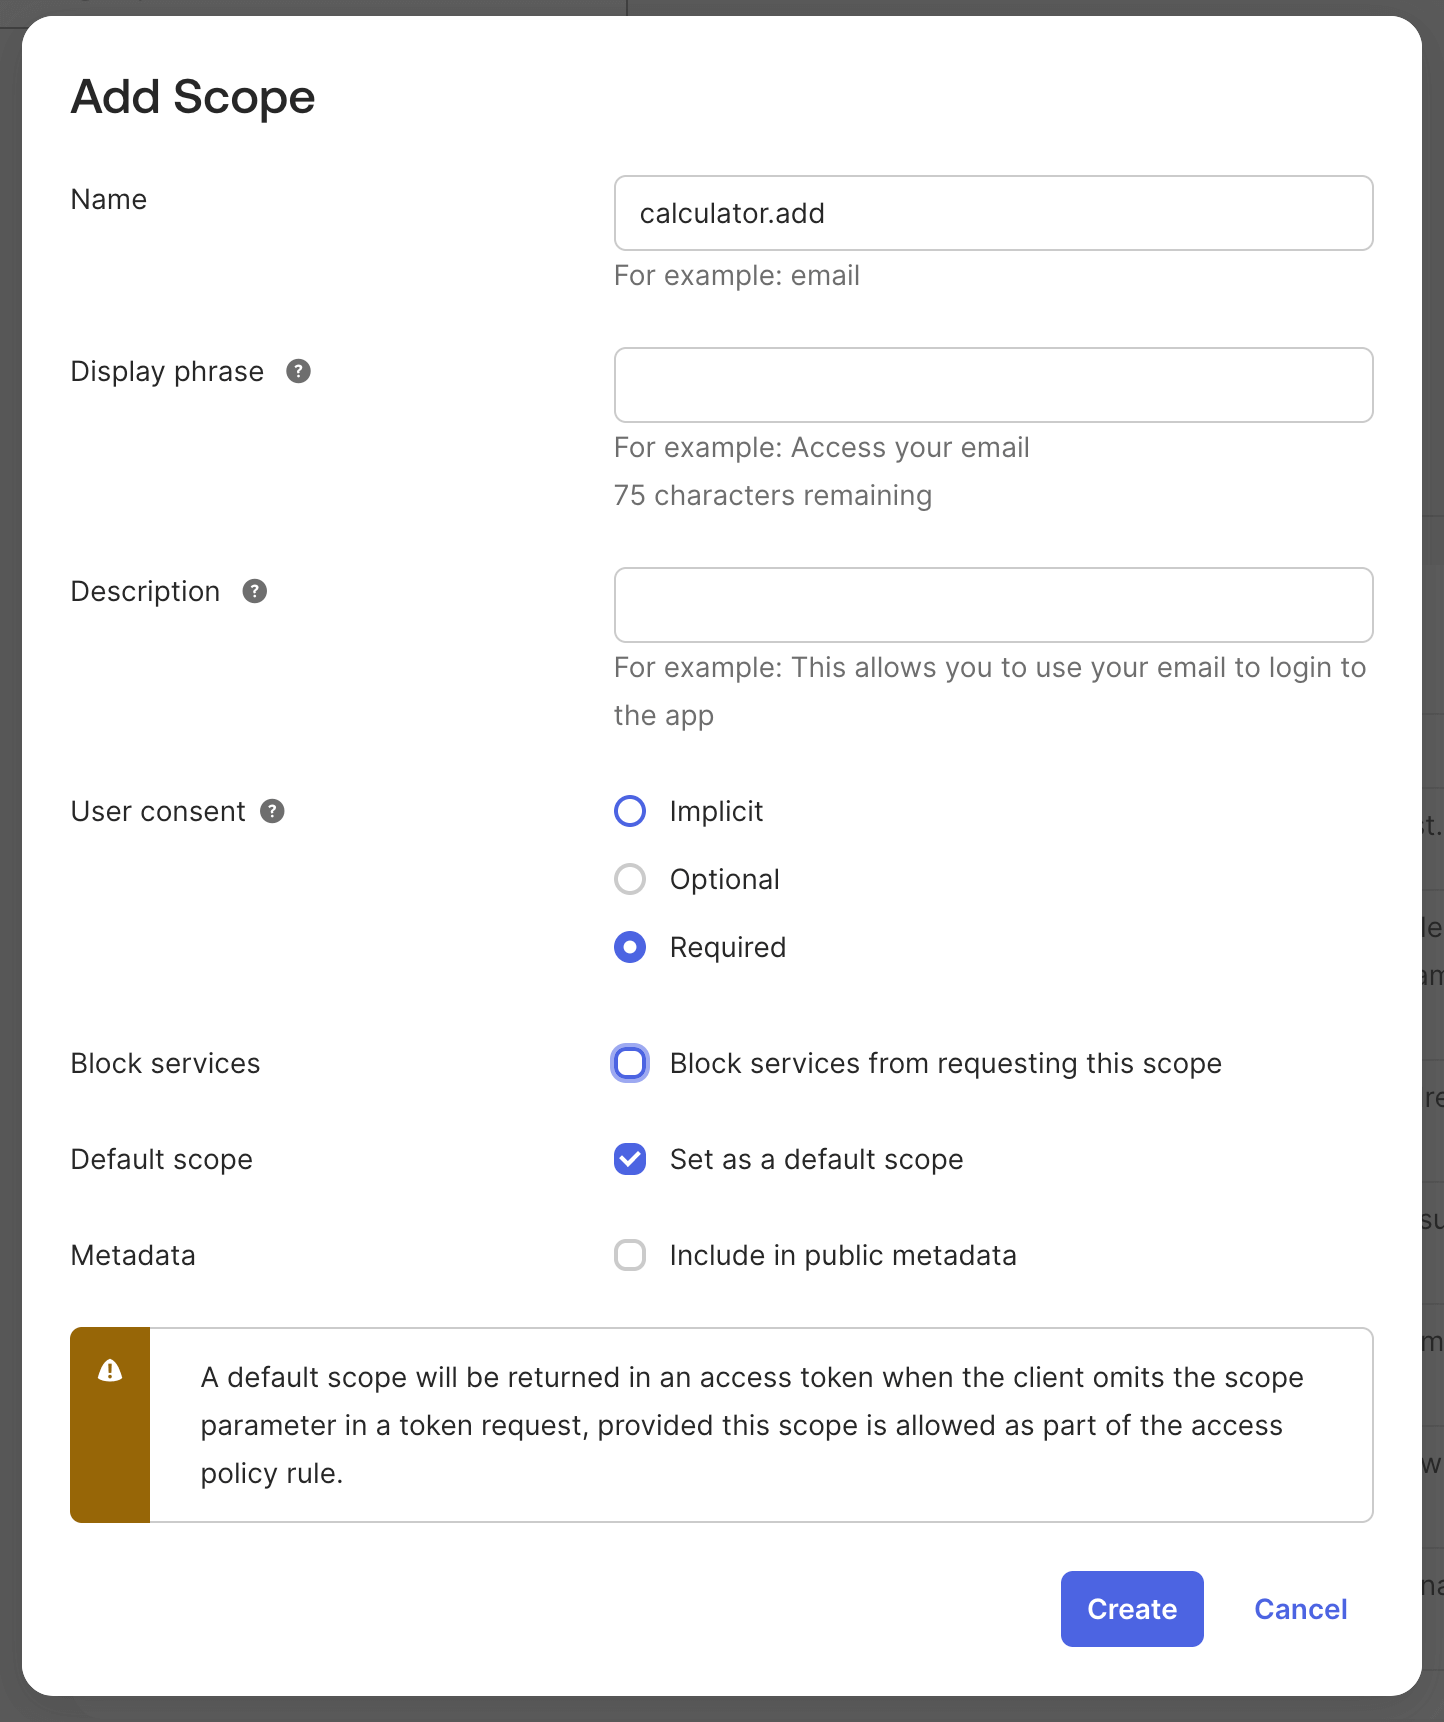 For production systems, define granular scopes that map to specific permissions in your MCP server.
For detailed instructions on customizing authorization servers, see the [Okta documentation](https://developer.okta.com/docs/guides/customize-authz-server/main/).
Okta Oauth Apps are used to authenticate with the authorization server to get the tokens from the authorization server to talk to the MCP server. Different teams or applications can have different apps with different scopes to talk to the same MCP server.
1. Navigate to **Applications** > **Applications** in the Okta dashboard
2. Click **Create App Integration**
3. Select **OIDC - OpenID Connect**
4. Select **Web Application** as the application type
If you only want Machine to Machine authentication, you can create an Okta app of type API Service Integration.
For production systems, define granular scopes that map to specific permissions in your MCP server.
For detailed instructions on customizing authorization servers, see the [Okta documentation](https://developer.okta.com/docs/guides/customize-authz-server/main/).
Okta Oauth Apps are used to authenticate with the authorization server to get the tokens from the authorization server to talk to the MCP server. Different teams or applications can have different apps with different scopes to talk to the same MCP server.
1. Navigate to **Applications** > **Applications** in the Okta dashboard
2. Click **Create App Integration**
3. Select **OIDC - OpenID Connect**
4. Select **Web Application** as the application type
If you only want Machine to Machine authentication, you can create an Okta app of type API Service Integration.
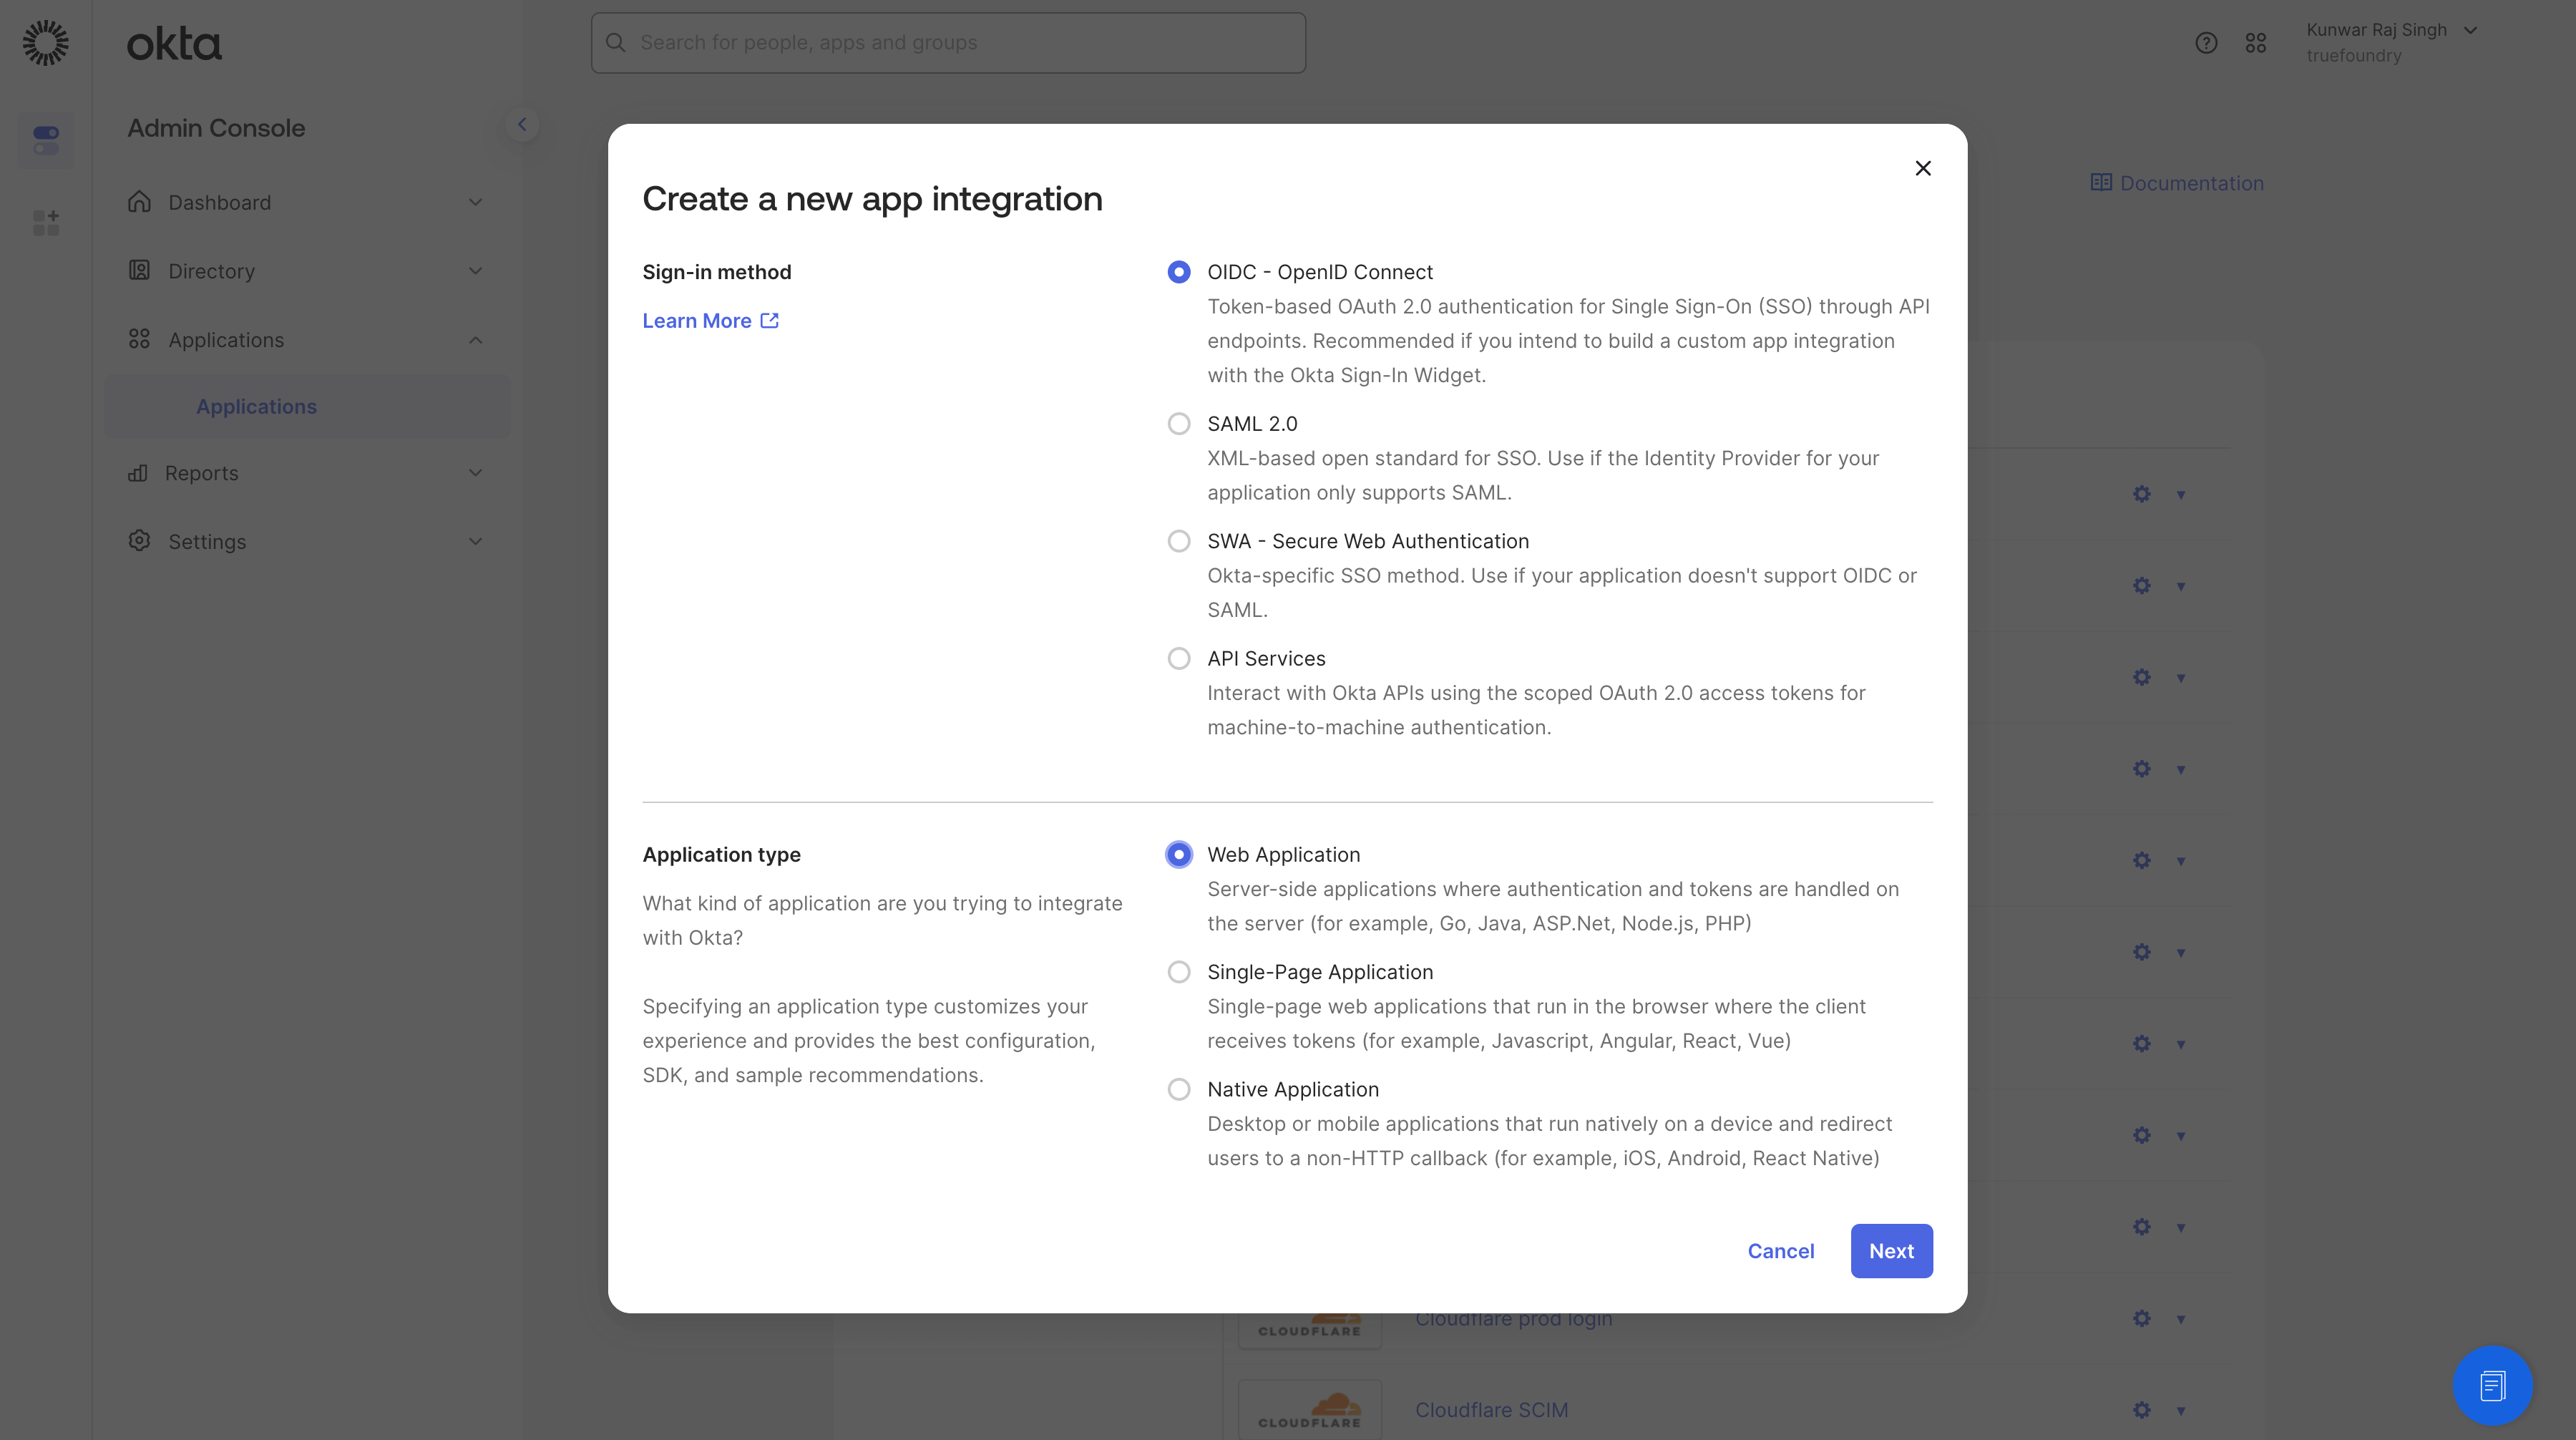 5. Configure the application:
* **App integration name**: `CalculatorMCPClient`
* **Grant type**: Check:
* **Client Credentials** (required for machine-to-machine authentication)
* **Authorization Code** (required for user authentication via Gateway)
* **Refresh Token** (required to enable automatic token refresh)
* **Sign-in redirect URIs**: Add `https:///api/svc/v1/llm-gateway/mcp-servers/oauth2/callback`
5. Configure the application:
* **App integration name**: `CalculatorMCPClient`
* **Grant type**: Check:
* **Client Credentials** (required for machine-to-machine authentication)
* **Authorization Code** (required for user authentication via Gateway)
* **Refresh Token** (required to enable automatic token refresh)
* **Sign-in redirect URIs**: Add `https:///api/svc/v1/llm-gateway/mcp-servers/oauth2/callback`
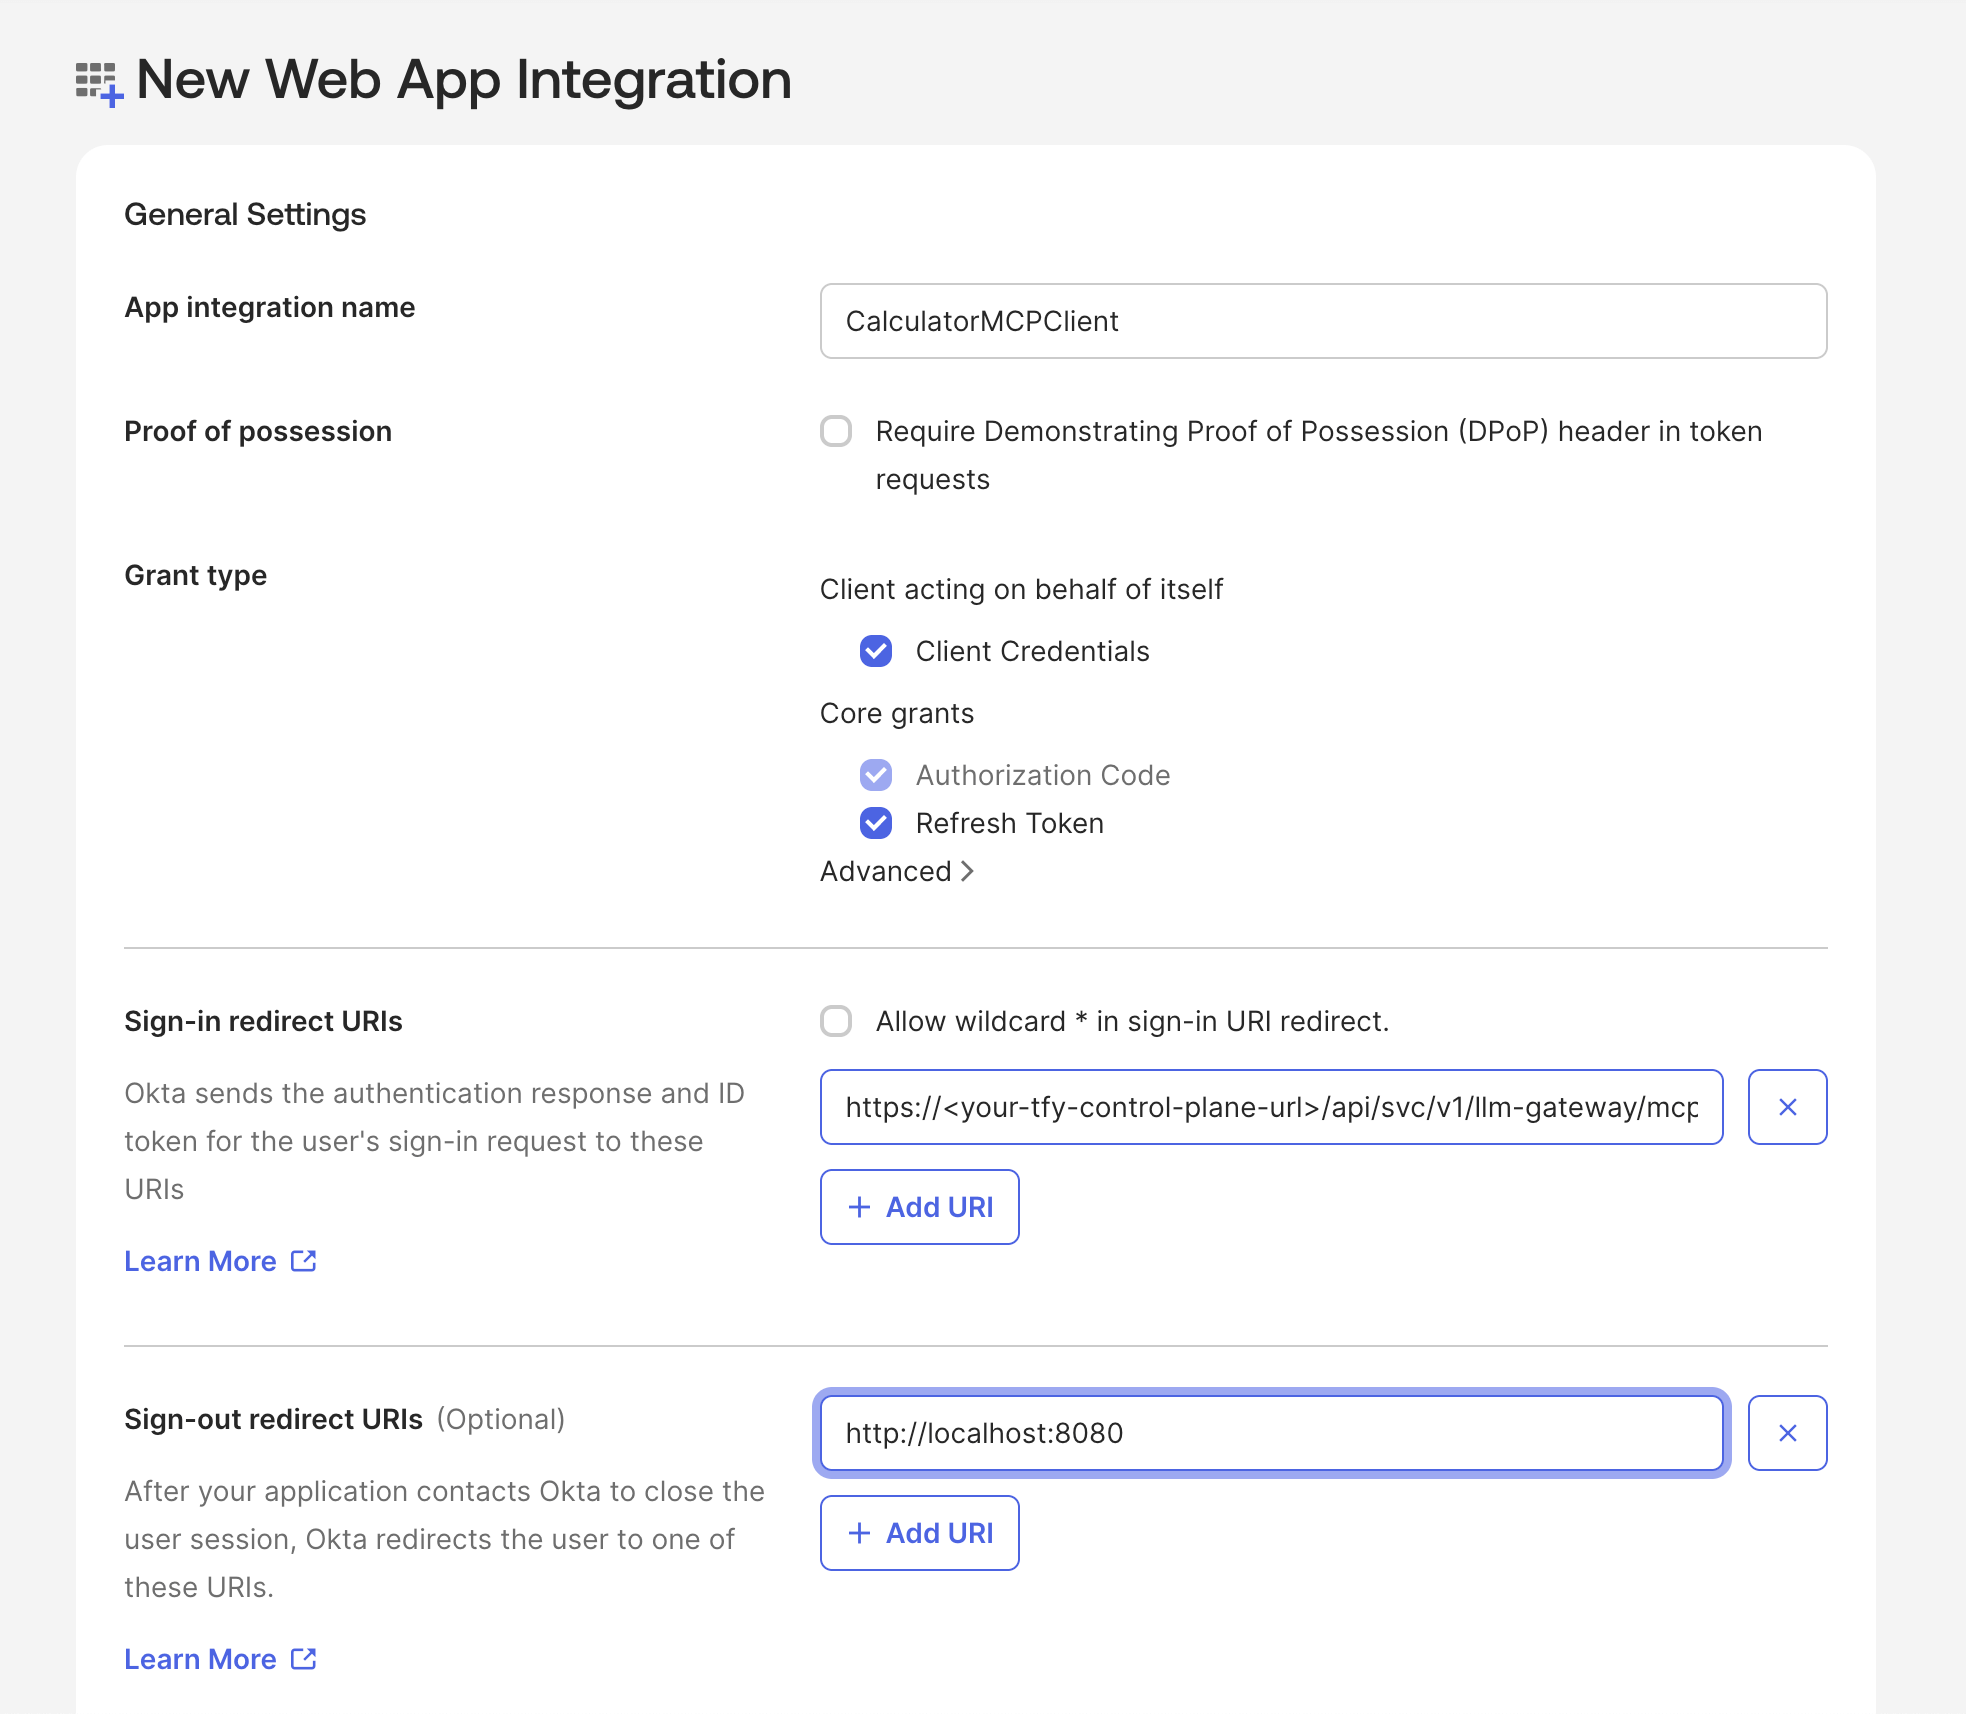 **Authorization Code** and **Refresh Token** are required for the AI Gateway OAuth integration to enable automatic token refresh.
We have also enabled **Client Credentials** since we will be using the same app in the steps below to allow an application to authenticate to the MCP server (machine-to-machine authentication). If you want to create a separate app for machine-to-machine authentication, you can do that by creating a new app and enabling **Client Credentials** in the app settings and disable the Client Credentials the app meant for user authentication.
6. Click **Save**
7. Note the **Client ID** and **Client Secret** from the application page
**Authorization Code** and **Refresh Token** are required for the AI Gateway OAuth integration to enable automatic token refresh.
We have also enabled **Client Credentials** since we will be using the same app in the steps below to allow an application to authenticate to the MCP server (machine-to-machine authentication). If you want to create a separate app for machine-to-machine authentication, you can do that by creating a new app and enabling **Client Credentials** in the app settings and disable the Client Credentials the app meant for user authentication.
6. Click **Save**
7. Note the **Client ID** and **Client Secret** from the application page
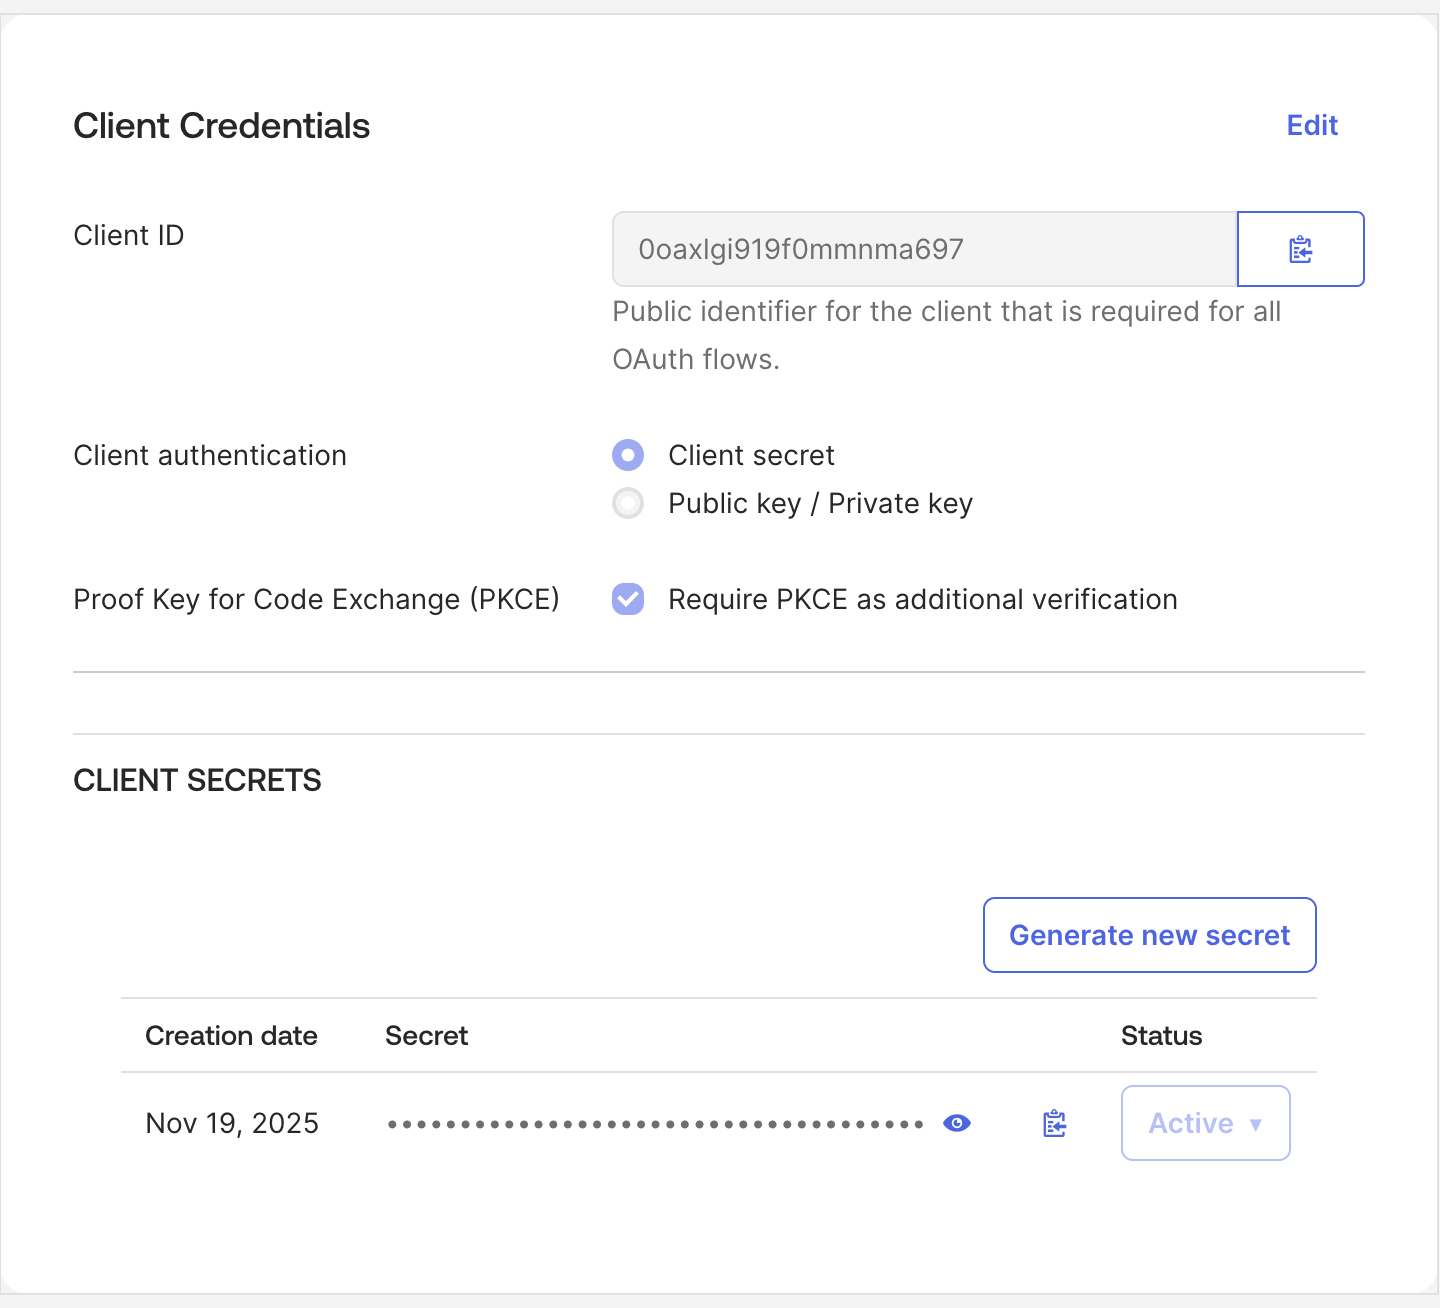 Keep your Client Secret secure. Never commit it to version control or expose it in client-side code.
This will allows the Okta app we created in the previous step to get the tokens from the authorization server for the MCP server we created in Step 2. To enable this, we need to create an access policy and rule in the authorization server.
1. In your Authorization Server, go to the **Access Policies** tab.
Keep your Client Secret secure. Never commit it to version control or expose it in client-side code.
This will allows the Okta app we created in the previous step to get the tokens from the authorization server for the MCP server we created in Step 2. To enable this, we need to create an access policy and rule in the authorization server.
1. In your Authorization Server, go to the **Access Policies** tab.
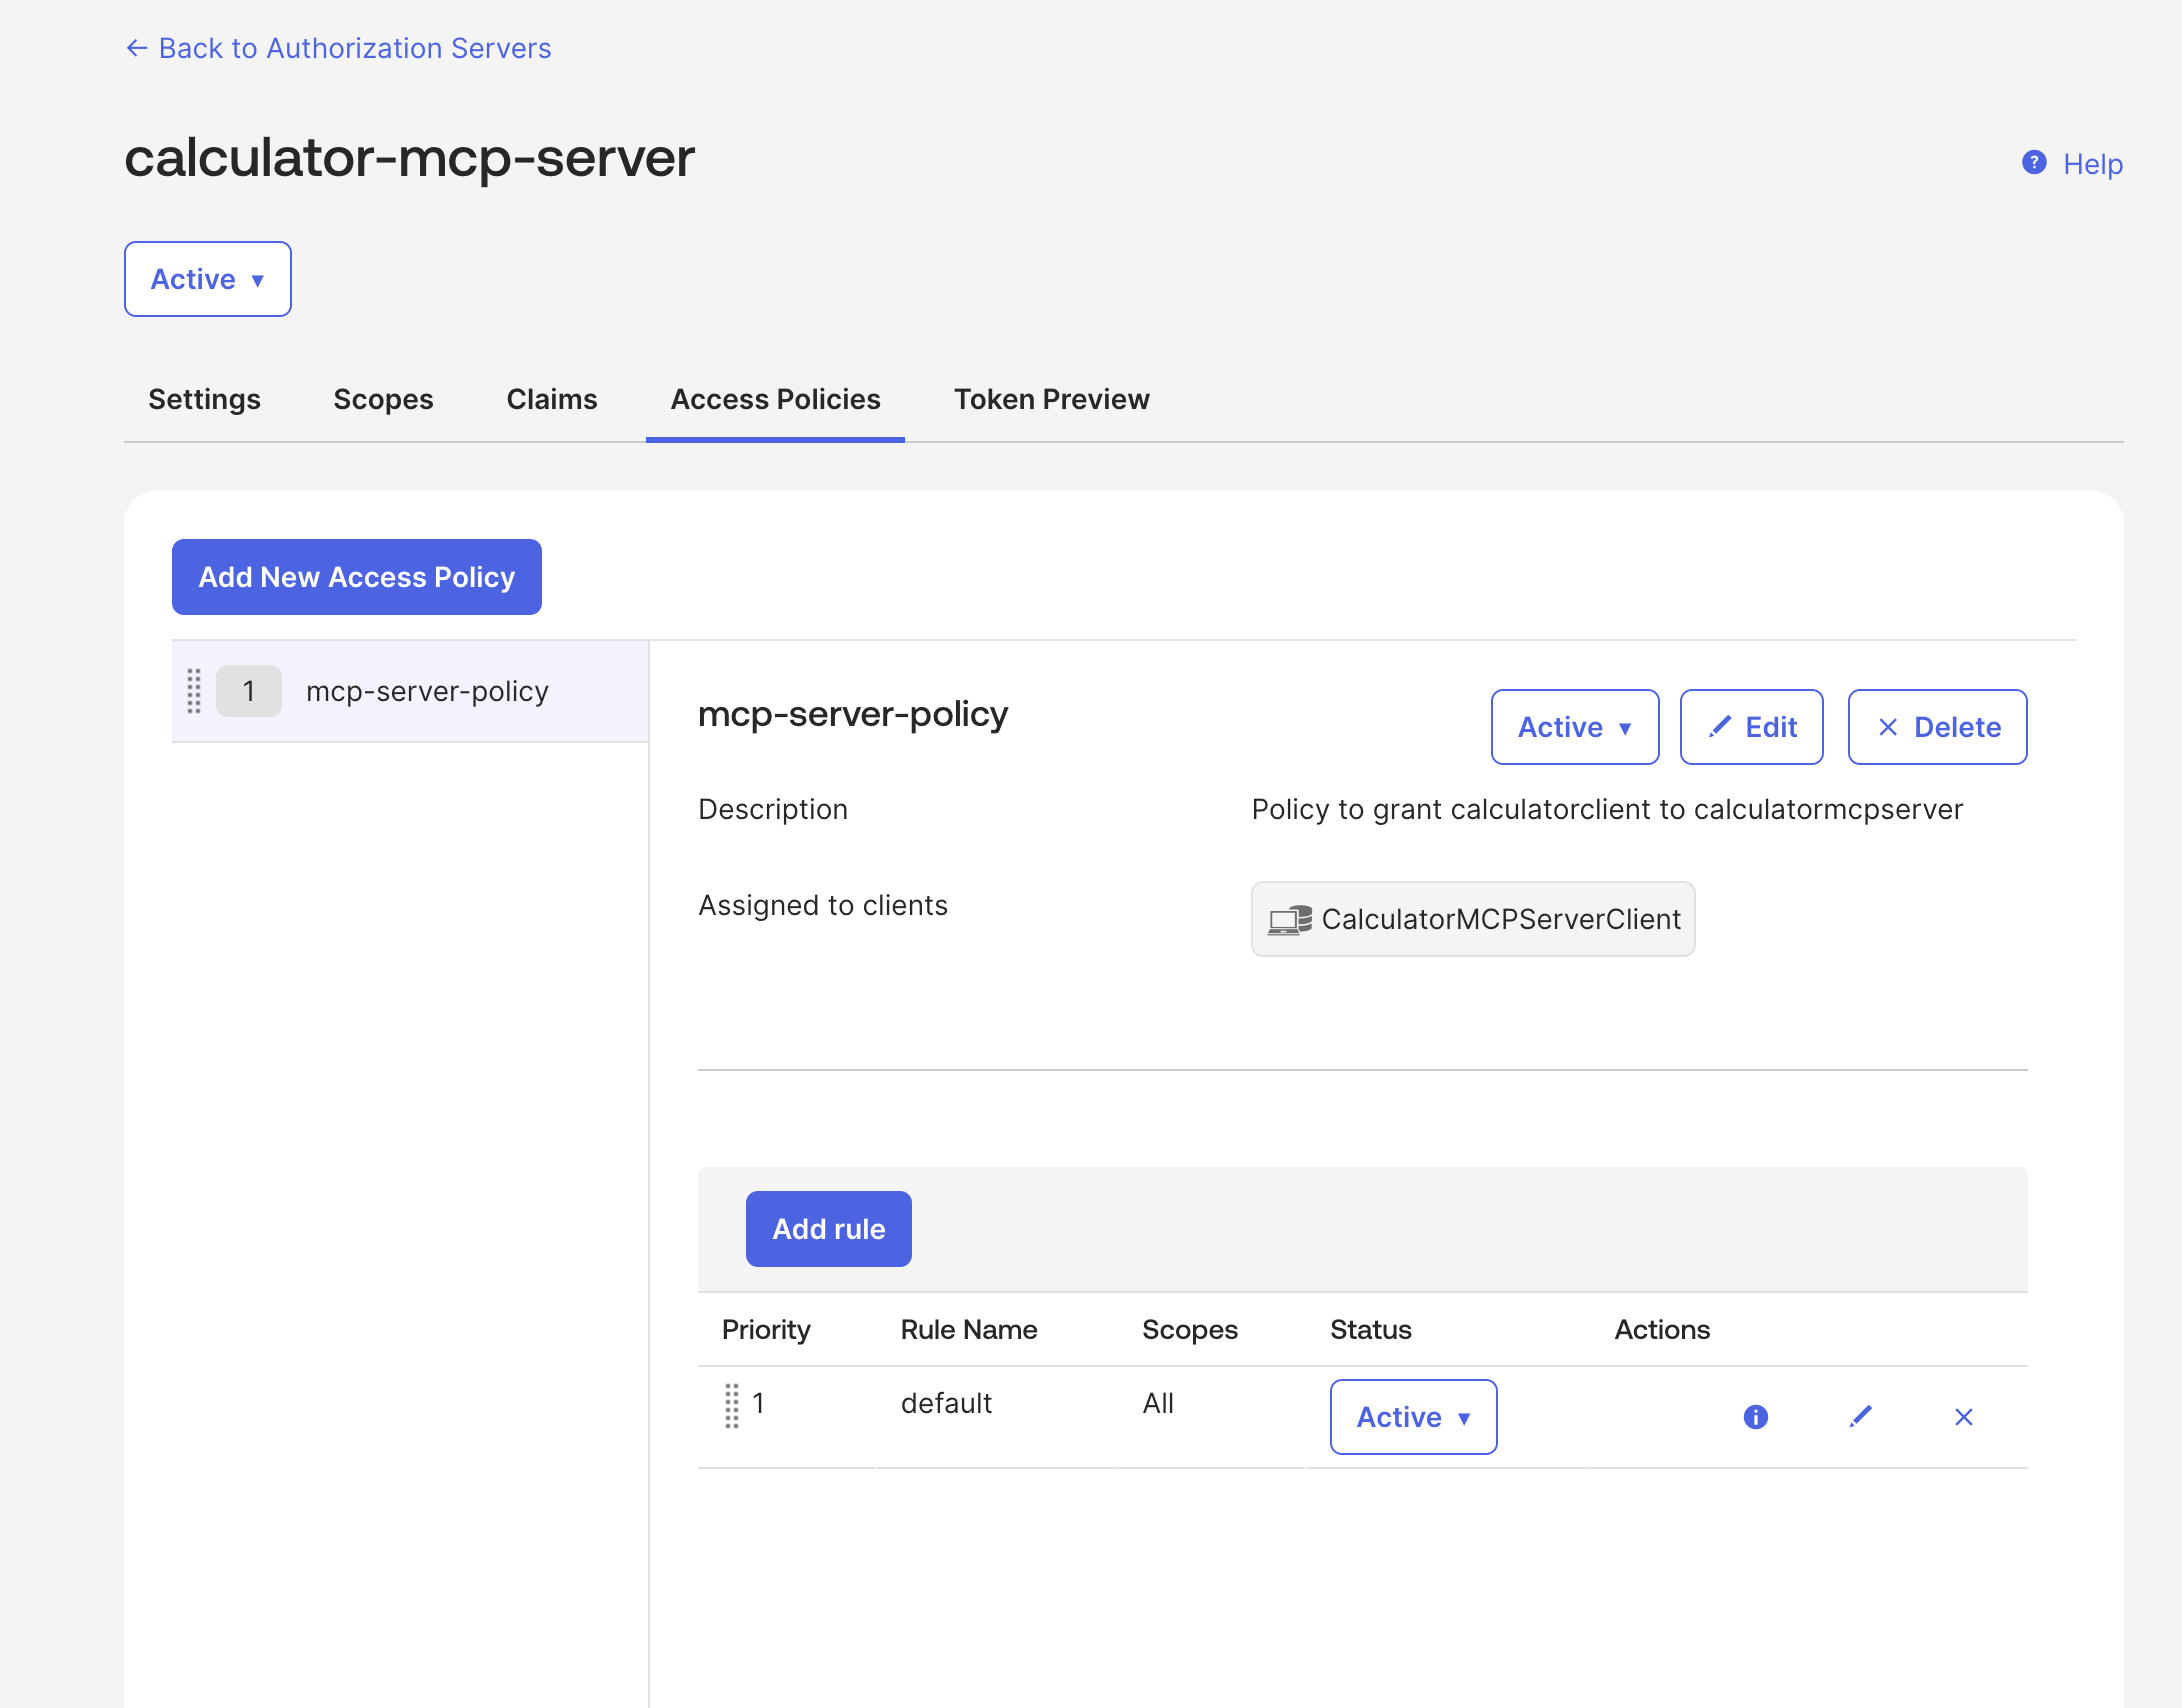 2. Click **Add New Access Policy**
3. Configure:
* **Name**: `CalculatorMCPAccessPolicy`
* **Description**: Policy for MCP server access
* **Assign to**: Select your OAuth application
2. Click **Add New Access Policy**
3. Configure:
* **Name**: `CalculatorMCPAccessPolicy`
* **Description**: Policy for MCP server access
* **Assign to**: Select your OAuth application
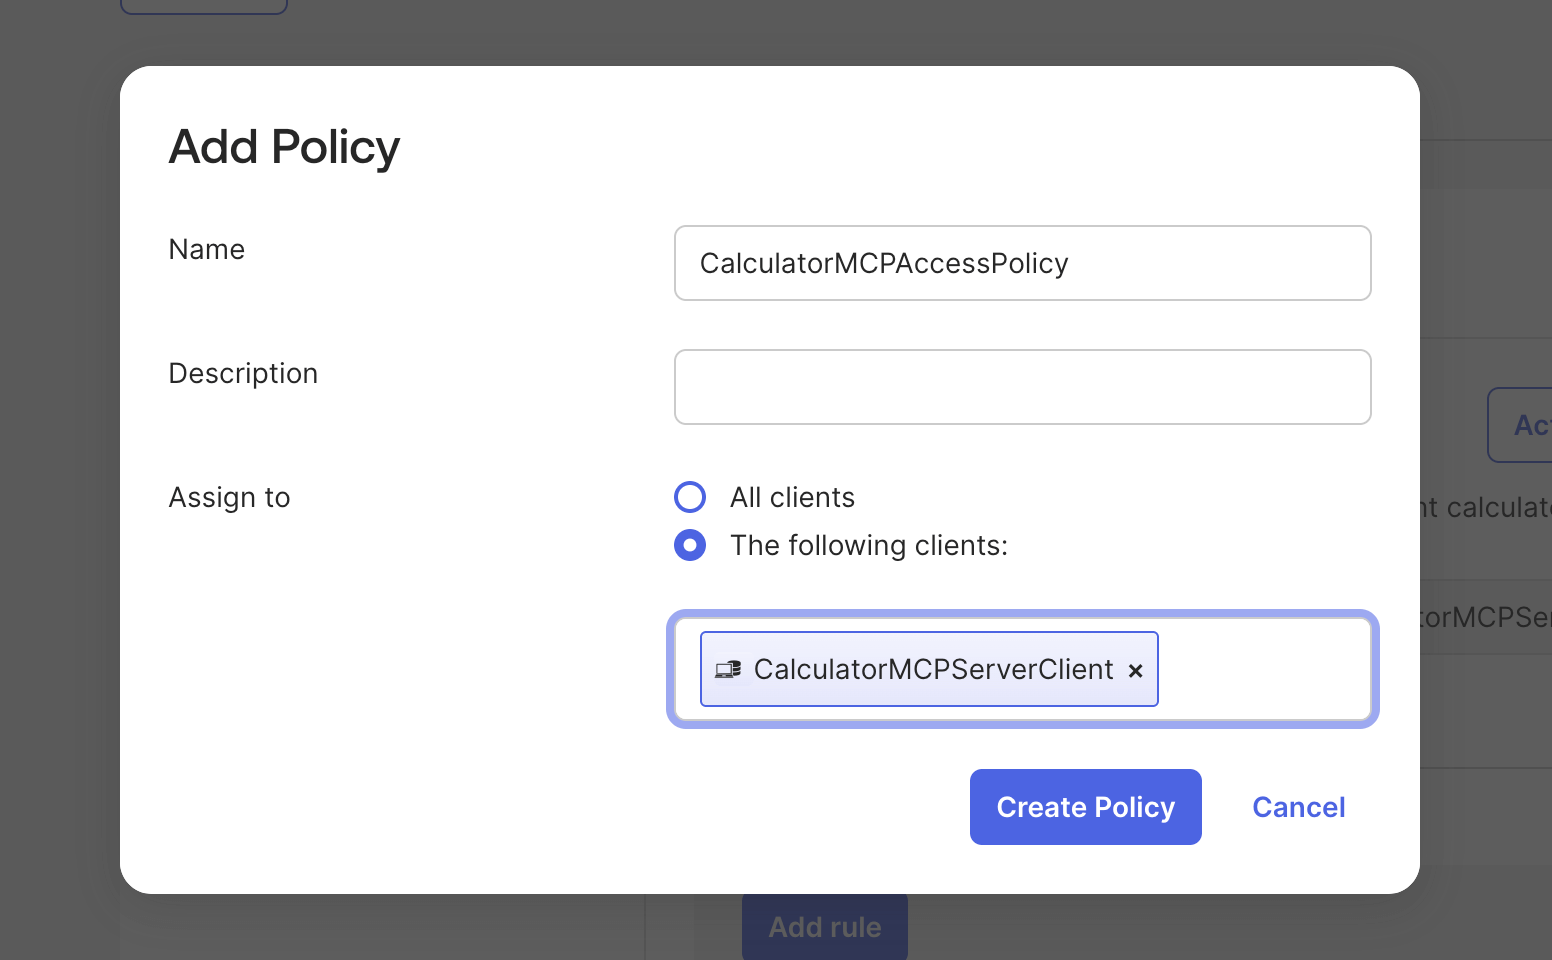 **Important**: The **Assign to** field is critical. You must select the OAuth application you created in the previous step. If you don't assign the policy to your application, the application won't be able to obtain tokens from this authorization server.
4. Click **Create Policy**
5. Click **Add Rule** to create a default rule:
* **Rule Name**: `Default Rule`
* **Grant type is**: Check **Authorization Code** and **Device Authorization** and **Client Credentials**
* **User is**: Any user assigned the app
* **Scopes requested**: Any scopes
* **Access token lifetime**: 1 hour (or as per your requirements)
6. Click **Create Rule**
**Important**: The **Assign to** field is critical. You must select the OAuth application you created in the previous step. If you don't assign the policy to your application, the application won't be able to obtain tokens from this authorization server.
4. Click **Create Policy**
5. Click **Add Rule** to create a default rule:
* **Rule Name**: `Default Rule`
* **Grant type is**: Check **Authorization Code** and **Device Authorization** and **Client Credentials**
* **User is**: Any user assigned the app
* **Scopes requested**: Any scopes
* **Access token lifetime**: 1 hour (or as per your requirements)
6. Click **Create Rule**
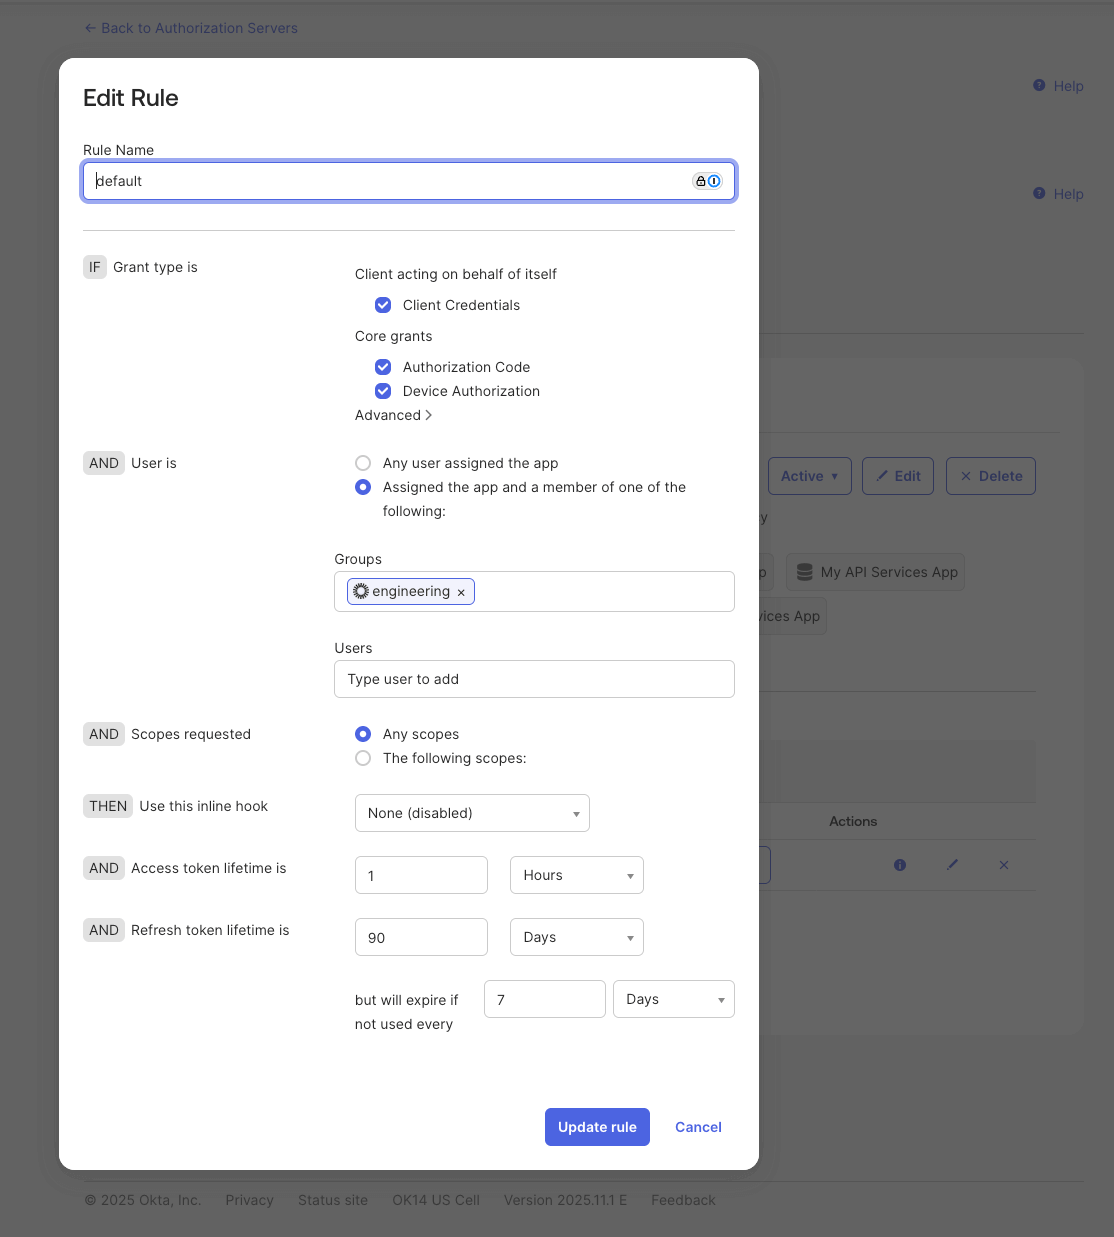 We have enabled **Client Credentials** grant type since we will be using the same app in the steps below to allow an application to authenticate to the MCP server (machine-to-machine authentication). If you want to create a separate app for machine-to-machine authentication, you can do that by creating a new app and enabling **Client Credentials** in the app settings and disable the Client Credentials the app meant for user authentication.
Once you have the **OAUTH\_ISSUER** from your authorization server Settings tab (e.g., `https://dev-12345678.okta.com/oauth2/aus123abc`), you can access the well-known URL:
**OAUTH\_WELL\_KNOWN\_URL**: `{OAUTH_ISSUER}/.well-known/oauth-authorization-server`
We have enabled **Client Credentials** grant type since we will be using the same app in the steps below to allow an application to authenticate to the MCP server (machine-to-machine authentication). If you want to create a separate app for machine-to-machine authentication, you can do that by creating a new app and enabling **Client Credentials** in the app settings and disable the Client Credentials the app meant for user authentication.
Once you have the **OAUTH\_ISSUER** from your authorization server Settings tab (e.g., `https://dev-12345678.okta.com/oauth2/aus123abc`), you can access the well-known URL:
**OAUTH\_WELL\_KNOWN\_URL**: `{OAUTH_ISSUER}/.well-known/oauth-authorization-server`
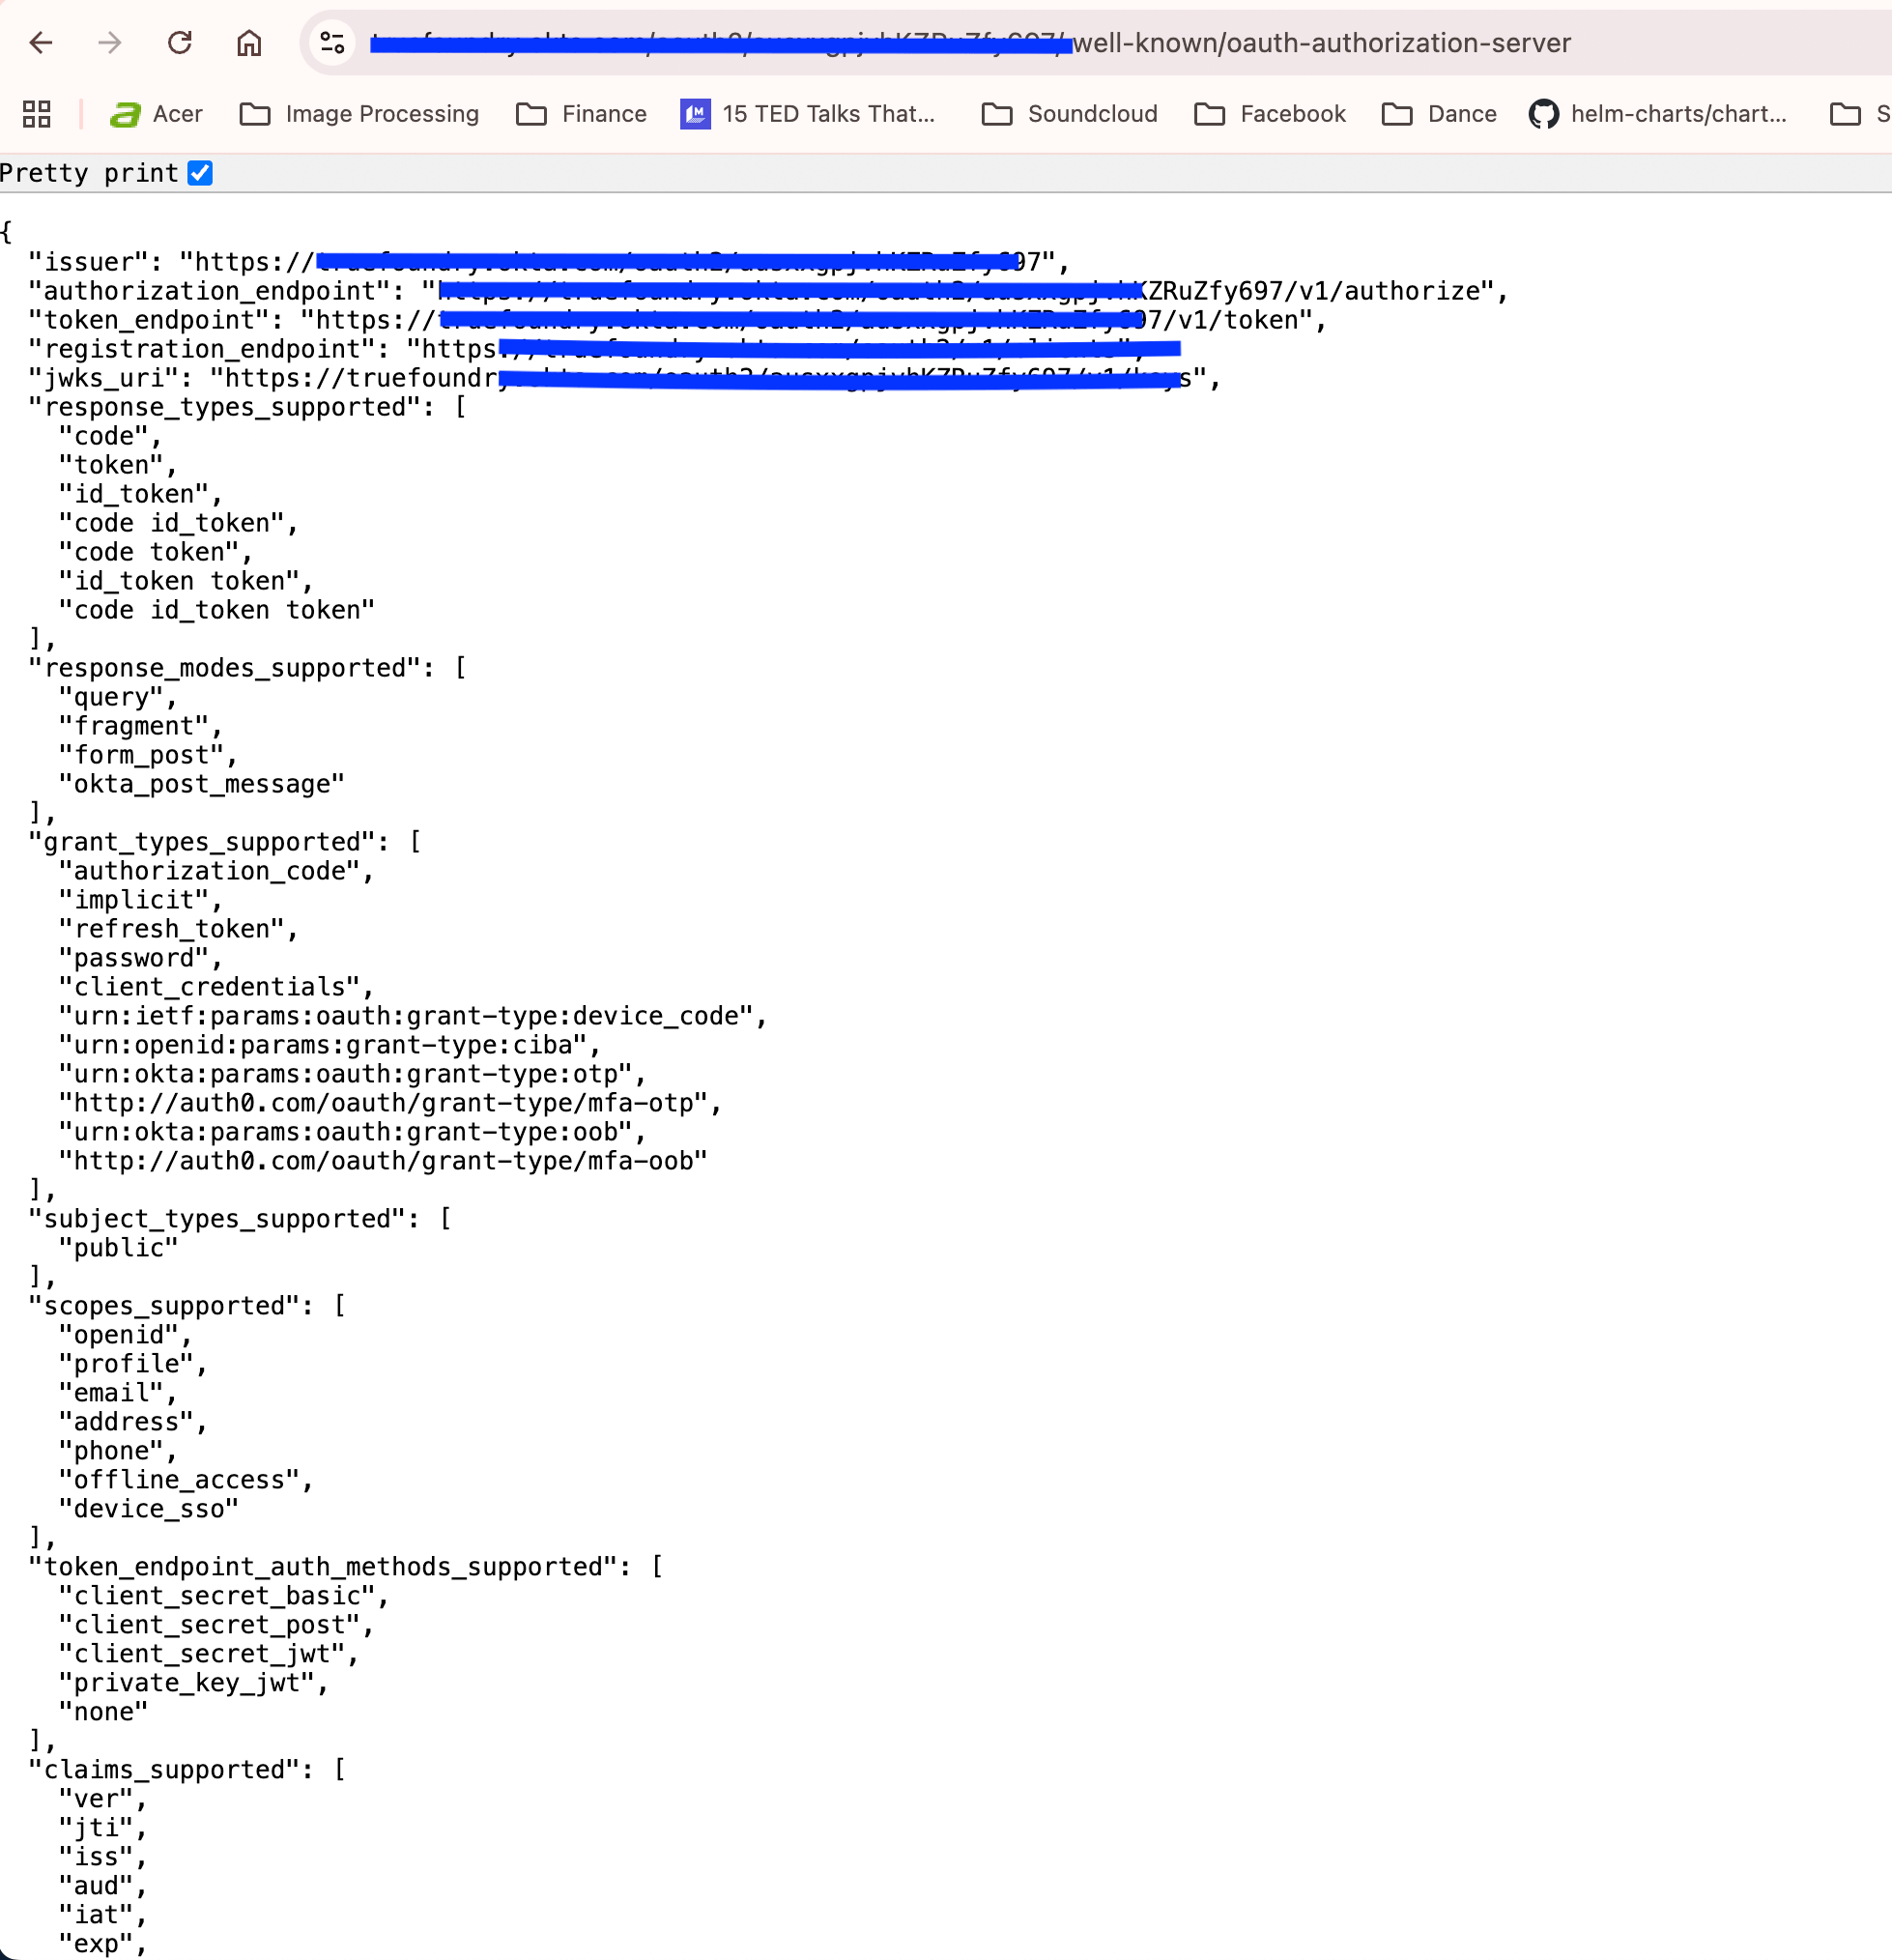 The well-known endpoint provides the **JWKS URI** for token verification.
You'll also need:
* **OAUTH\_AUDIENCE**: The audience value you configured in the authorization server (e.g., `calculator-mcp-server.example.com`)
* **CLIENT\_ID** and **CLIENT\_SECRET**: From your user-facing OAuth application (for TrueFoundry MCPGateway integration)
Store these securely. Use them when you [register the MCP server in TrueFoundry](/docs/ai-gateway/mcp/mcp-server-oauth-okta#add-the-mcp-server-to-the-truefoundry-ai-gateway) and when the MCP server verifies JWTs.
## Okta setup for On-Behalf-Of (OBO) token exchange
This runbook covers the Okta admin console setup for the **OAuth2 Token Exchange (OBO)** outbound grant type, where the AI Gateway exchanges each caller's Okta SSO access token for a fresh On-Behalf-Of token before calling the MCP server. For the gateway-side configuration (manifests, caller contract, troubleshooting), see the [Okta OBO Token Exchange scenario](/docs/ai-gateway/mcp/mcp-gateway-auth-security#end-to-end-authentication-scenarios) in Authentication and Security. Okta's own guide: [Set up token exchange](https://developer.okta.com/docs/guides/set-up-token-exchange/main/).
You need two custom authorization servers, a native app for user sign-in, and an API Services app that performs the exchange.
In the Okta Admin Console, go to **Security > API > Authorization Servers** and create:
1. A **user** authorization server — issues the SSO access tokens your users sign in with. Set its **Audience** (e.g. `user`).
2. A **service** authorization server — performs the token exchange and issues the OBO tokens. Set its **Audience** (e.g. `service`). This audience becomes the `aud` claim of the exchanged token and the `audience` value in the MCP server manifest.
On the **service** authorization server, add the **user** authorization server under **Trusted Servers**. This trust link is what allows the service server to accept the user server's access tokens as `subject_token`.
Go to **Applications > Applications > Create App Integration**:
1. Select **OIDC - OpenID Connect**, then **Native Application**.
2. Name the app and select **Allow everyone in your organization to access**.
3. Save, and note the **Client ID** — this is the value you will map on the TrueFoundry Virtual Account, because it appears as the `cid` claim in every user access token.
Click **Create App Integration** again:
1. Select **API Services**.
2. Name the app (e.g. `mcp-obo-service`), then save.
3. In **General Settings**, click **Edit** and **uncheck "Require Demonstrating Proof of Possession (DPoP) header in token requests"** — the AI Gateway authenticates with a client secret, not DPoP.
4. In the **Grant type** section, expand **Advanced** and enable **Token Exchange**. Save.
5. Note the **Client ID** and **Client Secret** — these go into the MCP server manifest's `auth_data`.
If DPoP stays enabled, Okta rejects the gateway's token exchange requests unless every request carries a DPoP proof. Uncheck it.
On **both** authorization servers, open the **Scopes** tab and add the API scopes your downstream server expects (e.g. `api:access:read`, `api:access:write`). These are the scopes the gateway requests in the exchange and are minted into the OBO token's `scp` claim.
On the **user** authorization server:
1. Go to **Access Policies** and add a policy assigned to the **native app** (**Assign to > The following clients**).
2. Add a rule allowing the scopes users sign in with (e.g. `openid`) under **Scopes requested > The following scopes**.
On the **service** authorization server:
1. Add a policy assigned to the **API Services app**.
2. Add a rule that allows the API scopes (`api:access:read`, `api:access:write`) and, under **Grant type is > Advanced**, enables **Token Exchange**.
### Verify the exchange manually
This is the RFC 8693 request the AI Gateway performs against the **service** authorization server on your behalf — useful for validating the Okta setup and debugging a failing exchange:
```bash theme={"dark"}
curl -sS --request POST \
--url 'https://your-org.okta.com/oauth2//v1/token' \
--header 'Accept: application/json' \
--header 'Content-Type: application/x-www-form-urlencoded' \
--data-urlencode 'grant_type=urn:ietf:params:oauth:grant-type:token-exchange' \
--data-urlencode 'subject_token_type=urn:ietf:params:oauth:token-type:access_token' \
--data-urlencode 'subject_token=' \
--data-urlencode 'scope=api:access:read api:access:write' \
--data-urlencode 'audience=service' \
--data-urlencode 'client_id=' \
--data-urlencode 'client_secret='
```
Okta accepts the client credentials either in the form body (`client_secret_post`, shown above) or as an `Authorization: Basic base64(client_id:client_secret)` header (`client_secret_basic`). Both work — but use **one method or the other, never both** in the same request.
## FAQ
Machine to Machine (M2M) Authentication is a type of authentication that allows a machine to authenticate to the MCP server without user interaction. For M2M authentication, you can use the Oauth2 Client Credentials grant type to obtain access tokens directly.
In the guide above, we created an Okta app of type OIDC - OpenID Connect. If you only want M2M authentication, you can create an Okta app of type API Service Integration. API Service Integrations require custom scopes. OIDC scopes like `openid`, `profile`, and `email` won't work for API Service Integrations. For detailed instructions on implementing M2M authentication using the Client Credentials grant type, see the [Okta documentation](https://developer.okta.com/docs/guides/implement-grant-type/clientcreds/main/).
**Important**: You must create at least one custom scope before creating API Service Integration apps.
The following diagram illustrates how multiple services can access the same MCP server, each with their own Okta app and different scopes for fine-grained access control:
```mermaid theme={"dark"}
flowchart TB
OAS["Okta Authorization Server"]
READAPP["Okta App: readapp"]
WRITEAPP["Okta App: writeapp"]
READSERVICE["ReadService"]
WRITESERVICE["WriteService"]
MCP["MCP Server"]
OAS --> READAPP
OAS --> WRITEAPP
READAPP -- "Obtain token (Client Credentials with read scope)" --> READSERVICE
WRITEAPP -- "Obtain token (Client Credentials with Write scope)" --> WRITESERVICE
READSERVICE -- "Bearer token" --> MCP
WRITESERVICE -- "Bearer token" --> MCP
```
**Key Points**:
* **One App Per Service**: Each service accessing the MCP server has its own API Service Integration app, providing isolation and granular access control
* **Shared MCP Server**: Multiple services can access the same MCP server, but each uses different Okta apps with different scopes
* **Custom Authorization Server**: All apps use the same custom authorization server (not the Org Authorization Server, which is only for Okta APIs)
When using a custom authorization server with your API Service Integration, use the token endpoint and custom scopes. The token endpoint can be obtained from the well-known configuration at `{OAUTH_ISSUER}/.well-known/oauth-authorization-server`. The response includes the `token_endpoint`:
```json theme={"dark"}
{
"issuer": "https://dev-12345678.okta.com/oauth2/aus123abc",
"authorization_endpoint": "https://dev-12345678.okta.com/oauth2/aus123abc/v1/authorize",
"token_endpoint": "https://dev-12345678.okta.com/oauth2/aus123abc/v1/token",
"jwks_uri": "https://dev-12345678.okta.com/oauth2/aus123abc/v1/keys",
"grant_types_supported": [
"authorization_code",
"refresh_token",
"client_credentials",
...
],
"scopes_supported": [
"backend",
"openid",
"profile",
"email",
...
],
...
}
```
Use the `token_endpoint` value from this response in your token requests.
You can use the context variable in FastMCP to access the token details and user identity in the tool.
```python theme={"dark"}
@mcp.tool()
def get_me(ctx: Context) -> dict:
"""
Get authenticated user information from the verified JWT token.
"""
claims = get_access_token().claims
return {
"user_id": claims.get('sub', 'N/A'),
"uid": claims.get('uid'),
"issuer": claims.get('iss'),
"audience": claims.get('aud'),
"client_id": claims.get('cid'),
"scopes": claims.get('scp', claims.get('scope', [])),
"issued_at": datetime.fromtimestamp(claims['iat']).isoformat() if claims.get('iat') else None,
"expires_at": datetime.fromtimestamp(claims['exp']).isoformat() if claims.get('exp') else None,
"token_id": claims.get('jti'),
}
```
Since Client Credentials doesn't support refresh tokens, you'll need to request a new access token when the current one expires. Here's a generic `TokenManager` class that handles automatic token renewal (adapt the token endpoint URL and parameters to match your OAuth provider):
```python wrap theme={"dark"}
import time
import requests
import base64
class TokenManager:
"""Manages OAuth access tokens for machine-to-machine authentication."""
def __init__(self, token_endpoint, client_id, client_secret, audience, scope=None, **kwargs):
"""
Initialize the TokenManager.
Args:
token_endpoint: Your OAuth provider's token endpoint URL
client_id: Your OAuth client ID
client_secret: Your OAuth client secret
audience: The audience value configured in your authorization server
scope: The scopes for the token (optional, provider-specific)
**kwargs: Additional provider-specific parameters (e.g., auth_server_id for Okta)
"""
self.token_endpoint = token_endpoint
self.client_id = client_id
self.client_secret = client_secret
self.audience = audience
self.scope = scope
self.extra_params = kwargs
self.token = None
self.token_expiry = 0
def get_token(self):
"""
Get a valid access token, requesting a new one if necessary.
Returns:
str: A valid access token
"""
# Return cached token if still valid (with 5 minute buffer)
if self.token and time.time() < self.token_expiry:
return self.token
# Fetch new token
credentials = base64.b64encode(
f"{self.client_id}:{self.client_secret}".encode()
).decode()
data = {
"grant_type": "client_credentials",
"audience": self.audience
}
if self.scope:
data["scope"] = " ".join(self.scope) if isinstance(self.scope, list) else self.scope
# Add provider-specific parameters
data.update(self.extra_params)
response = requests.post(
self.token_endpoint,
headers={
"Authorization": f"Basic {credentials}",
"Content-Type": "application/x-www-form-urlencoded"
},
data=data
)
response.raise_for_status()
token_data = response.json()
self.token = token_data["access_token"]
# Request new token 5 minutes before actual expiry
expires_in = token_data.get("expires_in", 3600)
self.token_expiry = time.time() + expires_in - 300
return self.token
# Example usage with Okta
token_manager = TokenManager(
token_endpoint="https://dev-12345678.okta.com/oauth2/aus123abc/v1/token",
client_id="0oa123abc...",
client_secret="secret123...",
audience="https://your-mcp-server.example.com",
scope=["my_scope"]
)
# Get a token (will be cached until near expiry)
access_token = token_manager.get_token()
# Use the token to make authenticated requests
import requests
response = requests.post(
"http://localhost:8000/mcp",
headers={
"Authorization": f"Bearer {access_token}",
"Content-Type": "application/json"
},
json={
"jsonrpc": "2.0",
"id": 1,
"method": "tools/list"
}
)
```
## Available Tools
### `get_me`
Returns authenticated user information from the verified JWT token.
**Example Response:**
```json theme={"dark"}
{
"user_id": "00u123abc...",
"uid": "user@example.com",
"issuer": "https://dev-12345678.okta.com/oauth2/aus123abc",
"audience": "https://your-mcp-server.example.com",
"client_id": "0oa123abc...",
"scopes": ["openid", "profile", "email"],
"issued_at": "2024-01-01T12:00:00",
"expires_at": "2024-01-01T13:00:00",
"token_id": "abc123..."
}
```
The well-known endpoint provides the **JWKS URI** for token verification.
You'll also need:
* **OAUTH\_AUDIENCE**: The audience value you configured in the authorization server (e.g., `calculator-mcp-server.example.com`)
* **CLIENT\_ID** and **CLIENT\_SECRET**: From your user-facing OAuth application (for TrueFoundry MCPGateway integration)
Store these securely. Use them when you [register the MCP server in TrueFoundry](/docs/ai-gateway/mcp/mcp-server-oauth-okta#add-the-mcp-server-to-the-truefoundry-ai-gateway) and when the MCP server verifies JWTs.
## Okta setup for On-Behalf-Of (OBO) token exchange
This runbook covers the Okta admin console setup for the **OAuth2 Token Exchange (OBO)** outbound grant type, where the AI Gateway exchanges each caller's Okta SSO access token for a fresh On-Behalf-Of token before calling the MCP server. For the gateway-side configuration (manifests, caller contract, troubleshooting), see the [Okta OBO Token Exchange scenario](/docs/ai-gateway/mcp/mcp-gateway-auth-security#end-to-end-authentication-scenarios) in Authentication and Security. Okta's own guide: [Set up token exchange](https://developer.okta.com/docs/guides/set-up-token-exchange/main/).
You need two custom authorization servers, a native app for user sign-in, and an API Services app that performs the exchange.
In the Okta Admin Console, go to **Security > API > Authorization Servers** and create:
1. A **user** authorization server — issues the SSO access tokens your users sign in with. Set its **Audience** (e.g. `user`).
2. A **service** authorization server — performs the token exchange and issues the OBO tokens. Set its **Audience** (e.g. `service`). This audience becomes the `aud` claim of the exchanged token and the `audience` value in the MCP server manifest.
On the **service** authorization server, add the **user** authorization server under **Trusted Servers**. This trust link is what allows the service server to accept the user server's access tokens as `subject_token`.
Go to **Applications > Applications > Create App Integration**:
1. Select **OIDC - OpenID Connect**, then **Native Application**.
2. Name the app and select **Allow everyone in your organization to access**.
3. Save, and note the **Client ID** — this is the value you will map on the TrueFoundry Virtual Account, because it appears as the `cid` claim in every user access token.
Click **Create App Integration** again:
1. Select **API Services**.
2. Name the app (e.g. `mcp-obo-service`), then save.
3. In **General Settings**, click **Edit** and **uncheck "Require Demonstrating Proof of Possession (DPoP) header in token requests"** — the AI Gateway authenticates with a client secret, not DPoP.
4. In the **Grant type** section, expand **Advanced** and enable **Token Exchange**. Save.
5. Note the **Client ID** and **Client Secret** — these go into the MCP server manifest's `auth_data`.
If DPoP stays enabled, Okta rejects the gateway's token exchange requests unless every request carries a DPoP proof. Uncheck it.
On **both** authorization servers, open the **Scopes** tab and add the API scopes your downstream server expects (e.g. `api:access:read`, `api:access:write`). These are the scopes the gateway requests in the exchange and are minted into the OBO token's `scp` claim.
On the **user** authorization server:
1. Go to **Access Policies** and add a policy assigned to the **native app** (**Assign to > The following clients**).
2. Add a rule allowing the scopes users sign in with (e.g. `openid`) under **Scopes requested > The following scopes**.
On the **service** authorization server:
1. Add a policy assigned to the **API Services app**.
2. Add a rule that allows the API scopes (`api:access:read`, `api:access:write`) and, under **Grant type is > Advanced**, enables **Token Exchange**.
### Verify the exchange manually
This is the RFC 8693 request the AI Gateway performs against the **service** authorization server on your behalf — useful for validating the Okta setup and debugging a failing exchange:
```bash theme={"dark"}
curl -sS --request POST \
--url 'https://your-org.okta.com/oauth2//v1/token' \
--header 'Accept: application/json' \
--header 'Content-Type: application/x-www-form-urlencoded' \
--data-urlencode 'grant_type=urn:ietf:params:oauth:grant-type:token-exchange' \
--data-urlencode 'subject_token_type=urn:ietf:params:oauth:token-type:access_token' \
--data-urlencode 'subject_token=' \
--data-urlencode 'scope=api:access:read api:access:write' \
--data-urlencode 'audience=service' \
--data-urlencode 'client_id=' \
--data-urlencode 'client_secret='
```
Okta accepts the client credentials either in the form body (`client_secret_post`, shown above) or as an `Authorization: Basic base64(client_id:client_secret)` header (`client_secret_basic`). Both work — but use **one method or the other, never both** in the same request.
## FAQ
Machine to Machine (M2M) Authentication is a type of authentication that allows a machine to authenticate to the MCP server without user interaction. For M2M authentication, you can use the Oauth2 Client Credentials grant type to obtain access tokens directly.
In the guide above, we created an Okta app of type OIDC - OpenID Connect. If you only want M2M authentication, you can create an Okta app of type API Service Integration. API Service Integrations require custom scopes. OIDC scopes like `openid`, `profile`, and `email` won't work for API Service Integrations. For detailed instructions on implementing M2M authentication using the Client Credentials grant type, see the [Okta documentation](https://developer.okta.com/docs/guides/implement-grant-type/clientcreds/main/).
**Important**: You must create at least one custom scope before creating API Service Integration apps.
The following diagram illustrates how multiple services can access the same MCP server, each with their own Okta app and different scopes for fine-grained access control:
```mermaid theme={"dark"}
flowchart TB
OAS["Okta Authorization Server"]
READAPP["Okta App: readapp"]
WRITEAPP["Okta App: writeapp"]
READSERVICE["ReadService"]
WRITESERVICE["WriteService"]
MCP["MCP Server"]
OAS --> READAPP
OAS --> WRITEAPP
READAPP -- "Obtain token (Client Credentials with read scope)" --> READSERVICE
WRITEAPP -- "Obtain token (Client Credentials with Write scope)" --> WRITESERVICE
READSERVICE -- "Bearer token" --> MCP
WRITESERVICE -- "Bearer token" --> MCP
```
**Key Points**:
* **One App Per Service**: Each service accessing the MCP server has its own API Service Integration app, providing isolation and granular access control
* **Shared MCP Server**: Multiple services can access the same MCP server, but each uses different Okta apps with different scopes
* **Custom Authorization Server**: All apps use the same custom authorization server (not the Org Authorization Server, which is only for Okta APIs)
When using a custom authorization server with your API Service Integration, use the token endpoint and custom scopes. The token endpoint can be obtained from the well-known configuration at `{OAUTH_ISSUER}/.well-known/oauth-authorization-server`. The response includes the `token_endpoint`:
```json theme={"dark"}
{
"issuer": "https://dev-12345678.okta.com/oauth2/aus123abc",
"authorization_endpoint": "https://dev-12345678.okta.com/oauth2/aus123abc/v1/authorize",
"token_endpoint": "https://dev-12345678.okta.com/oauth2/aus123abc/v1/token",
"jwks_uri": "https://dev-12345678.okta.com/oauth2/aus123abc/v1/keys",
"grant_types_supported": [
"authorization_code",
"refresh_token",
"client_credentials",
...
],
"scopes_supported": [
"backend",
"openid",
"profile",
"email",
...
],
...
}
```
Use the `token_endpoint` value from this response in your token requests.
You can use the context variable in FastMCP to access the token details and user identity in the tool.
```python theme={"dark"}
@mcp.tool()
def get_me(ctx: Context) -> dict:
"""
Get authenticated user information from the verified JWT token.
"""
claims = get_access_token().claims
return {
"user_id": claims.get('sub', 'N/A'),
"uid": claims.get('uid'),
"issuer": claims.get('iss'),
"audience": claims.get('aud'),
"client_id": claims.get('cid'),
"scopes": claims.get('scp', claims.get('scope', [])),
"issued_at": datetime.fromtimestamp(claims['iat']).isoformat() if claims.get('iat') else None,
"expires_at": datetime.fromtimestamp(claims['exp']).isoformat() if claims.get('exp') else None,
"token_id": claims.get('jti'),
}
```
Since Client Credentials doesn't support refresh tokens, you'll need to request a new access token when the current one expires. Here's a generic `TokenManager` class that handles automatic token renewal (adapt the token endpoint URL and parameters to match your OAuth provider):
```python wrap theme={"dark"}
import time
import requests
import base64
class TokenManager:
"""Manages OAuth access tokens for machine-to-machine authentication."""
def __init__(self, token_endpoint, client_id, client_secret, audience, scope=None, **kwargs):
"""
Initialize the TokenManager.
Args:
token_endpoint: Your OAuth provider's token endpoint URL
client_id: Your OAuth client ID
client_secret: Your OAuth client secret
audience: The audience value configured in your authorization server
scope: The scopes for the token (optional, provider-specific)
**kwargs: Additional provider-specific parameters (e.g., auth_server_id for Okta)
"""
self.token_endpoint = token_endpoint
self.client_id = client_id
self.client_secret = client_secret
self.audience = audience
self.scope = scope
self.extra_params = kwargs
self.token = None
self.token_expiry = 0
def get_token(self):
"""
Get a valid access token, requesting a new one if necessary.
Returns:
str: A valid access token
"""
# Return cached token if still valid (with 5 minute buffer)
if self.token and time.time() < self.token_expiry:
return self.token
# Fetch new token
credentials = base64.b64encode(
f"{self.client_id}:{self.client_secret}".encode()
).decode()
data = {
"grant_type": "client_credentials",
"audience": self.audience
}
if self.scope:
data["scope"] = " ".join(self.scope) if isinstance(self.scope, list) else self.scope
# Add provider-specific parameters
data.update(self.extra_params)
response = requests.post(
self.token_endpoint,
headers={
"Authorization": f"Basic {credentials}",
"Content-Type": "application/x-www-form-urlencoded"
},
data=data
)
response.raise_for_status()
token_data = response.json()
self.token = token_data["access_token"]
# Request new token 5 minutes before actual expiry
expires_in = token_data.get("expires_in", 3600)
self.token_expiry = time.time() + expires_in - 300
return self.token
# Example usage with Okta
token_manager = TokenManager(
token_endpoint="https://dev-12345678.okta.com/oauth2/aus123abc/v1/token",
client_id="0oa123abc...",
client_secret="secret123...",
audience="https://your-mcp-server.example.com",
scope=["my_scope"]
)
# Get a token (will be cached until near expiry)
access_token = token_manager.get_token()
# Use the token to make authenticated requests
import requests
response = requests.post(
"http://localhost:8000/mcp",
headers={
"Authorization": f"Bearer {access_token}",
"Content-Type": "application/json"
},
json={
"jsonrpc": "2.0",
"id": 1,
"method": "tools/list"
}
)
```
## Available Tools
### `get_me`
Returns authenticated user information from the verified JWT token.
**Example Response:**
```json theme={"dark"}
{
"user_id": "00u123abc...",
"uid": "user@example.com",
"issuer": "https://dev-12345678.okta.com/oauth2/aus123abc",
"audience": "https://your-mcp-server.example.com",
"client_id": "0oa123abc...",
"scopes": ["openid", "profile", "email"],
"issued_at": "2024-01-01T12:00:00",
"expires_at": "2024-01-01T13:00:00",
"token_id": "abc123..."
}
```