> ## Documentation Index
> Fetch the complete documentation index at: https://www.truefoundry.com/llms.txt
> Use this file to discover all available pages before exploring further.
# Set up Datadog MCP Server
> Connect Datadog as an official remote MCP server on the TrueFoundry MCP Gateway using Dynamic Client Registration (DCR) OAuth2, so agents can query logs, metrics, traces, monitors, dashboards, and incidents.
This guide walks through adding [Datadog](https://app.datadoghq.com/organization-settings/preferences) as a remote MCP server in TrueFoundry using the built-in **Connect Official Remote MCP Servers** catalogue, which comes pre-configured with Dynamic Client Registration (DCR) OAuth2. Datadog's remote MCP server lets agents query logs, metrics, traces, monitors, dashboards, and incidents.
Datadog is region and site specific (US1, US3, US5, EU, AP1, AP2, and others). The MCP server URL and every OAuth2 endpoint must match your organization's actual Datadog site. Mixing sites is the most common cause of a failed connection. See the [region reference table](#region-reference-table) below.
## How TrueFoundry Manages the MCP Server
TrueFoundry's MCP Gateway acts as a reverse proxy between your agents and Datadog's remote MCP server. When you register it, TrueFoundry handles:
* **Authentication:** Each user connects with their own Datadog account through OAuth2 with PKCE. Because Datadog supports Dynamic Client Registration, TrueFoundry registers the OAuth client automatically. No manually created OAuth app is required.
* **Tool-level access control:** You can selectively enable or disable individual tools (for example, disable the write and destructive tools) per team from the TrueFoundry UI.
* **Audit trail:** Every tool invocation is traced with the calling user, tool name, input payload, and latency. Traces export via OpenTelemetry to your observability stack.
* **Guardrails:** TrueFoundry's guardrail hooks apply at `mcp_pre_tool` (before a tool is invoked) and `mcp_post_tool` (after the tool returns), letting you enforce content policies on requests and responses in real time.
## Prerequisites
* A TrueFoundry account with permission to add MCP servers.
* A Datadog account or org with **MCP Access** and **MCP Write Access** enabled ([Organization Settings → Preferences](https://app.datadoghq.com/organization-settings/preferences)). Government sites are not supported by Datadog's hosted MCP server.
* Your Datadog site (for example, `us5.datadoghq.com`, `datadoghq.com`, or `datadoghq.eu`).
* The required Datadog permissions on your user: `mcp_read`, and `mcp_write` if you want write operations.
## Register Datadog in TrueFoundry
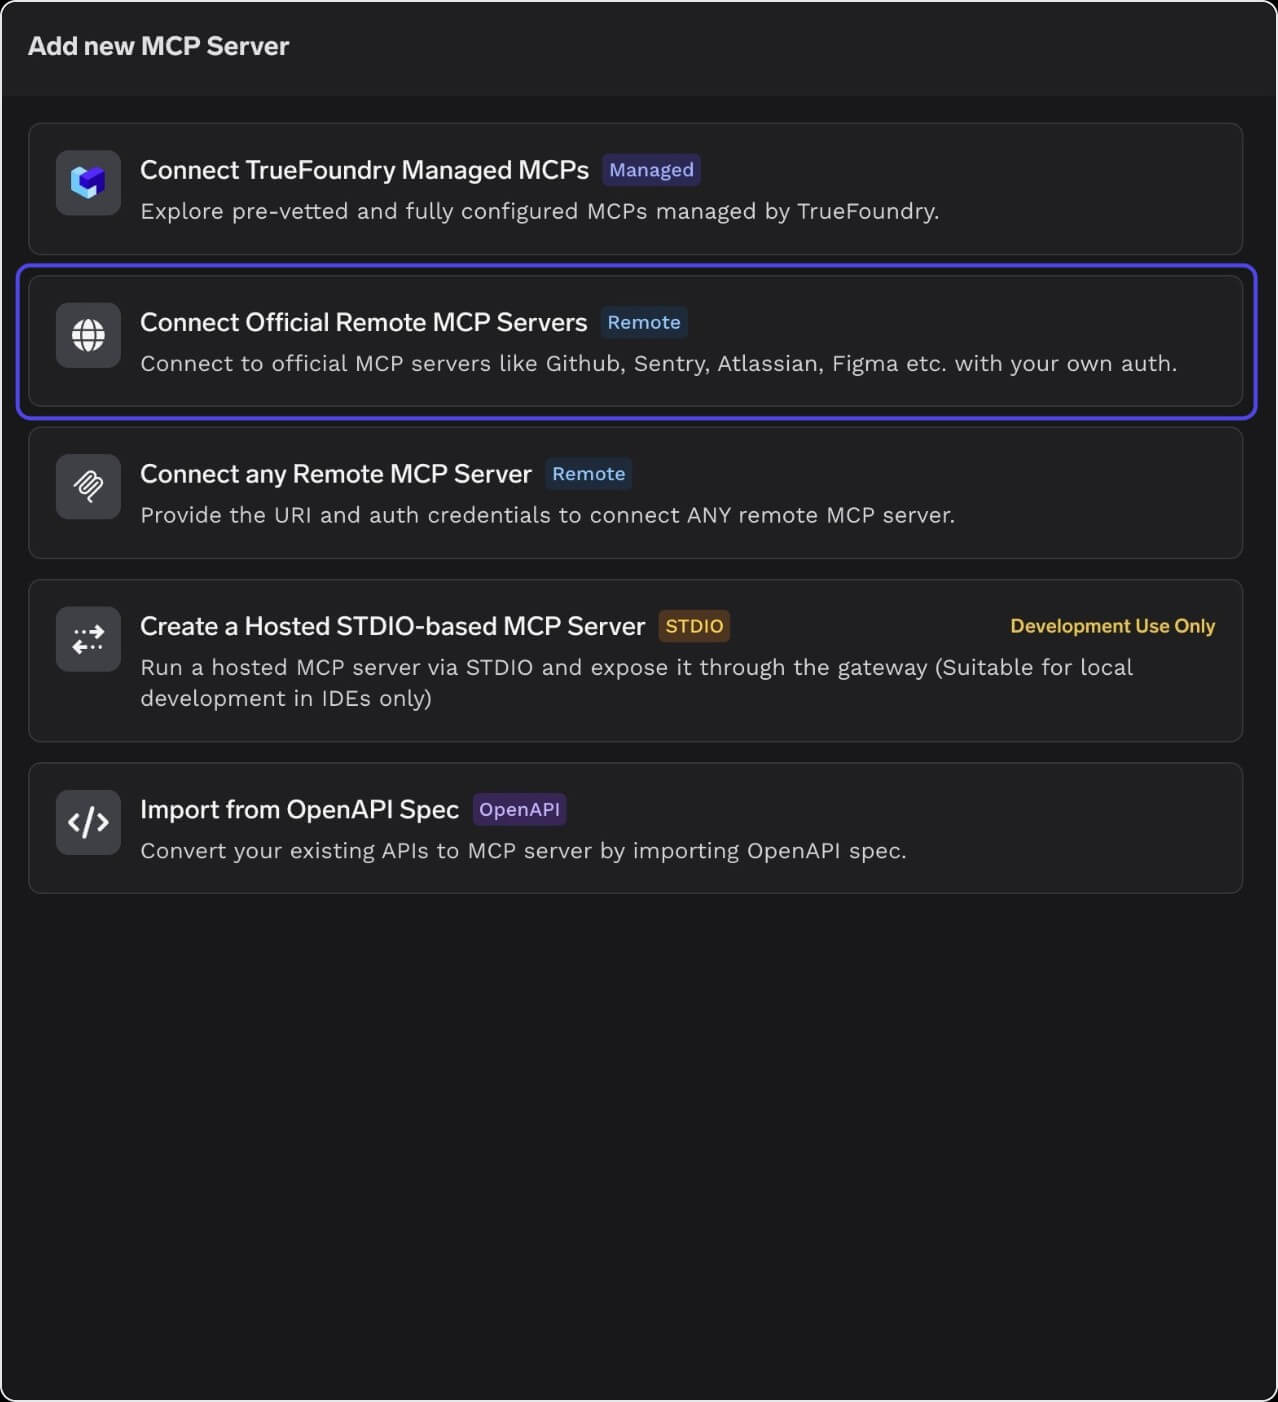
Navigate to **MCP Servers** in the TrueFoundry sidebar and click **Add new MCP Server**. Select **Connect Official Remote MCP Servers**, which gives access to pre-vetted servers (GitHub, Sentry, Atlassian, Figma, Datadog, and more) with auth already templated.
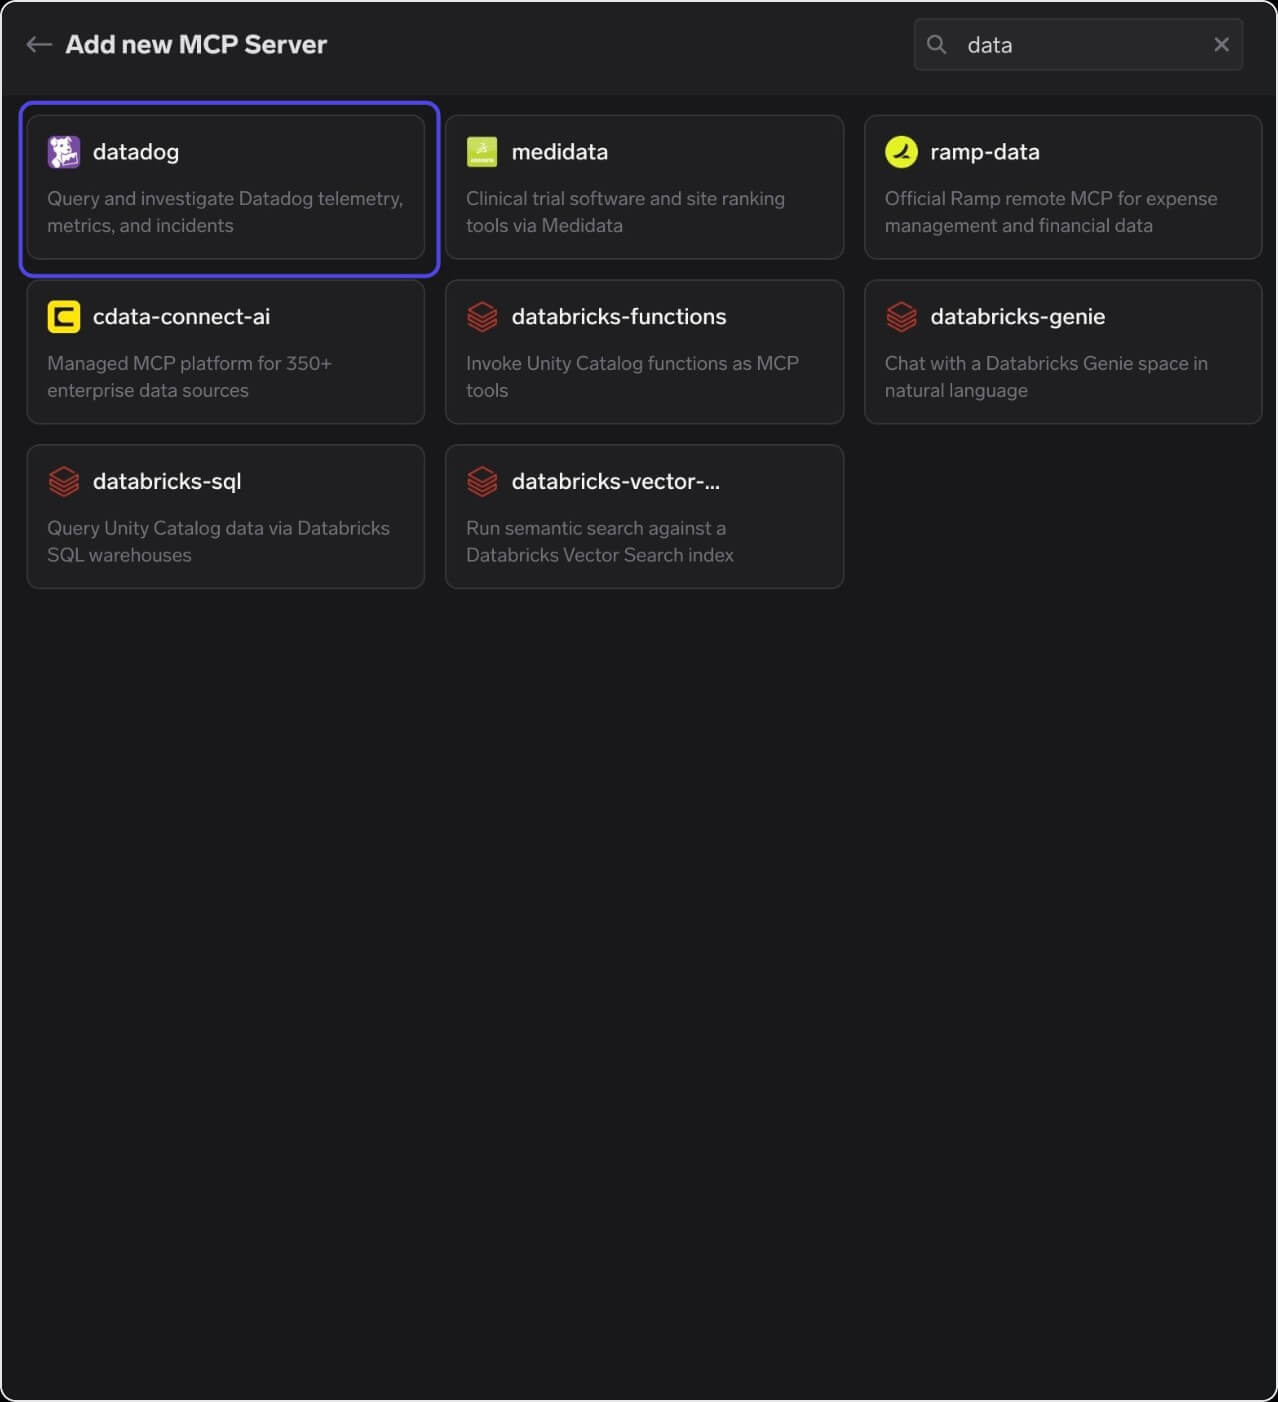
 In the catalogue search, type "data" (or "datadog") to find the Datadog entry. Click the **datadog** card ("Query and investigate Datadog telemetry, metrics, and incidents").
 TrueFoundry pre-fills the Name, Description, and URL fields for Datadog. The URL comes with a `` placeholder that **must be replaced** with your actual Datadog site subdomain. Add yourself or your team under **Collaborators** with the `MCP Server Manager` role.
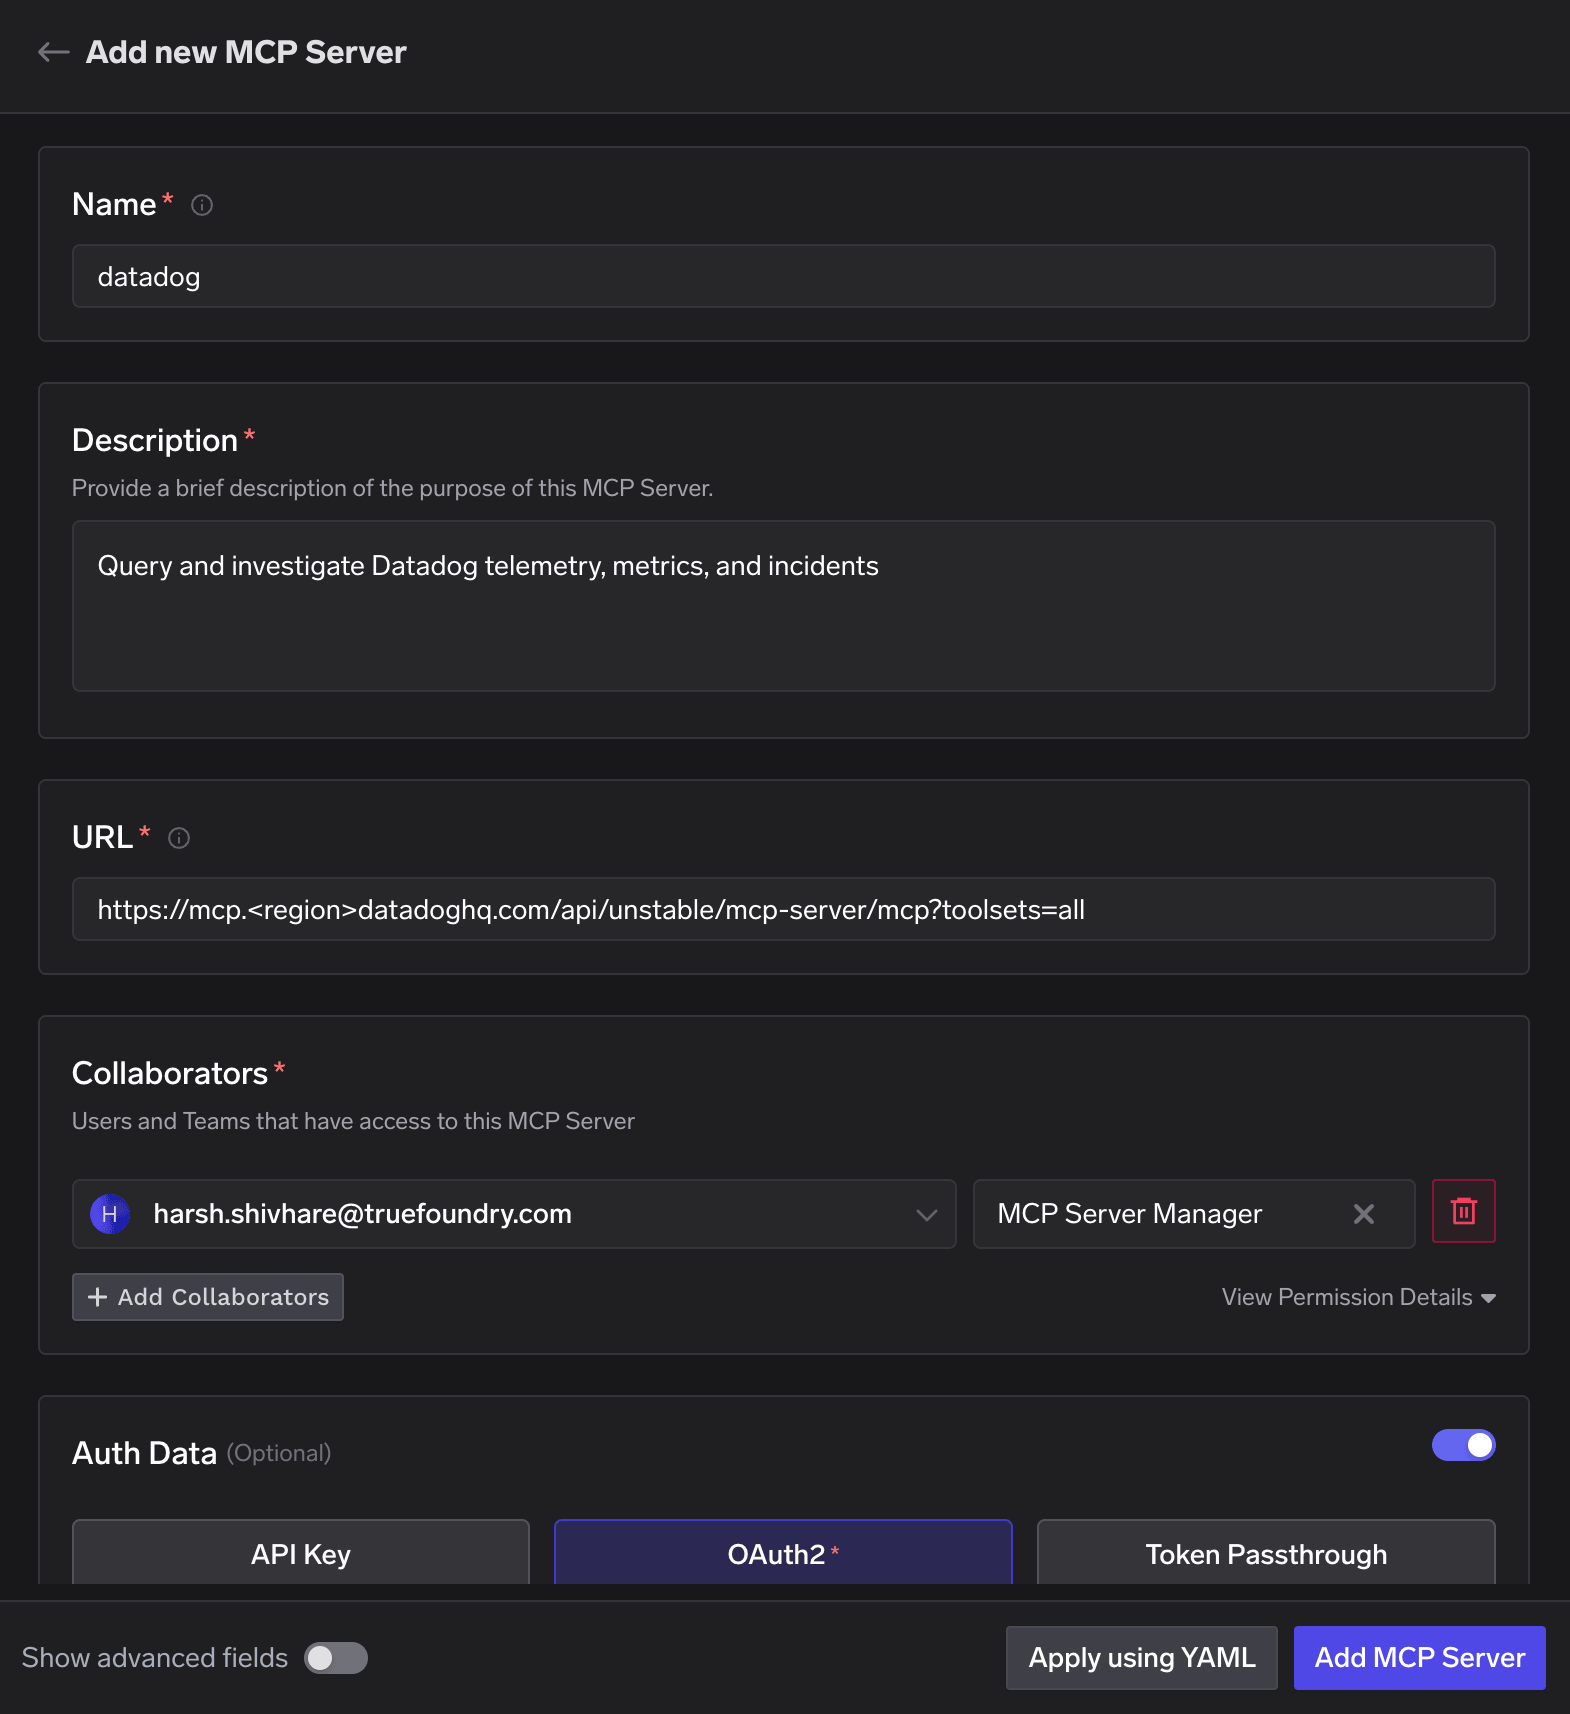 Replace `` with your site prefix. Examples:
| Datadog Site | URL to use |
| ------------- | ------------------------------------------------------------------------ |
| US1 (default) | `https://mcp.datadoghq.com/api/unstable/mcp-server/mcp?toolsets=all` |
| US5 | `https://mcp.us5.datadoghq.com/api/unstable/mcp-server/mcp?toolsets=all` |
| EU | `https://mcp.datadoghq.eu/api/unstable/mcp-server/mcp?toolsets=all` |
Datadog's MCP server supports Dynamic Client Registration, so TrueFoundry can auto-populate the OAuth2 endpoints. Click **Refetch OAuth2 details** if the fields are empty or you want to reset them. Leave **Client ID** and **Client Secret** blank, since DCR issues these automatically at connection time.
Replace `` with your site prefix. Examples:
| Datadog Site | URL to use |
| ------------- | ------------------------------------------------------------------------ |
| US1 (default) | `https://mcp.datadoghq.com/api/unstable/mcp-server/mcp?toolsets=all` |
| US5 | `https://mcp.us5.datadoghq.com/api/unstable/mcp-server/mcp?toolsets=all` |
| EU | `https://mcp.datadoghq.eu/api/unstable/mcp-server/mcp?toolsets=all` |
Datadog's MCP server supports Dynamic Client Registration, so TrueFoundry can auto-populate the OAuth2 endpoints. Click **Refetch OAuth2 details** if the fields are empty or you want to reset them. Leave **Client ID** and **Client Secret** blank, since DCR issues these automatically at connection time.
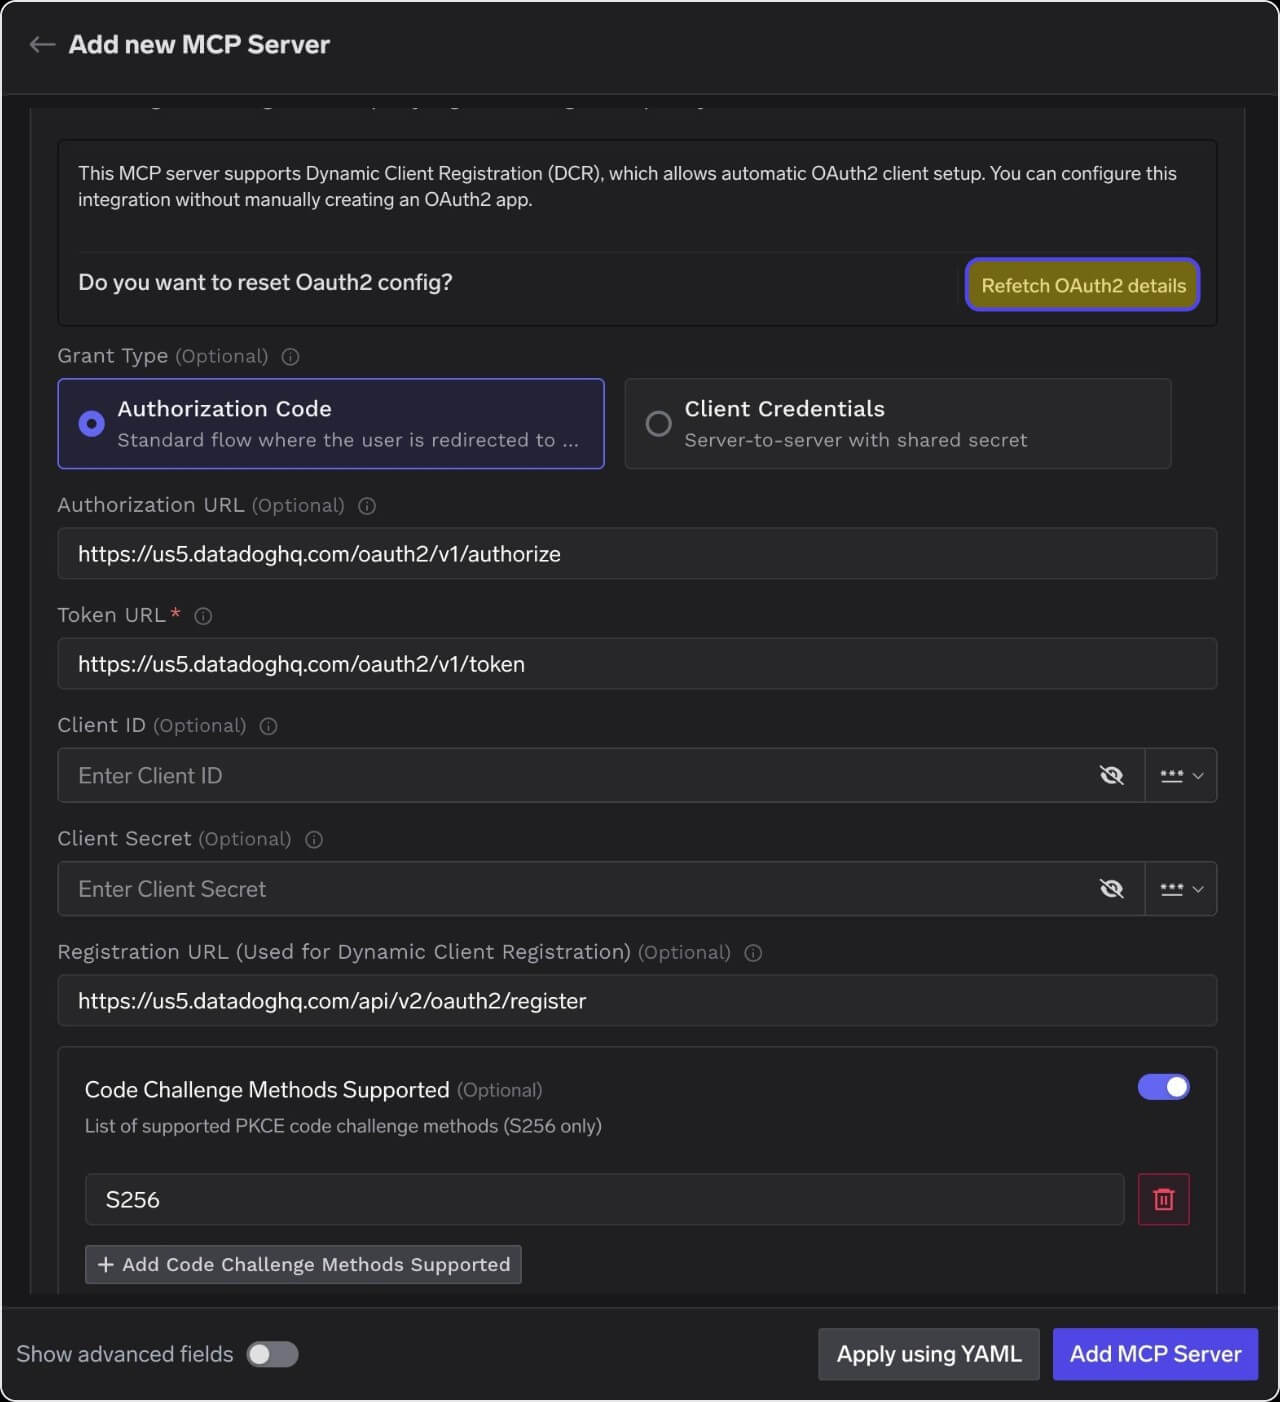 **Region consistency:** the MCP server `url`, `authorization_url`, `token_url`, and `registration_url` must all use the **same** Datadog site. Mixing the generic `datadoghq.com` (US1) host with a non-US1 org is the most common cause of a generic "Authentication failed" or `server_error` at the token-exchange step.
Reference YAML (US5 example):
```yaml theme={"dark"}
auth_data:
type: oauth2
grant_type: authorization_code
authorization_url: https://us5.datadoghq.com/oauth2/v1/authorize
token_url: https://us5.datadoghq.com/oauth2/v1/token
registration_url: https://us5.datadoghq.com/api/v2/oauth2/register
jwt_source: access_token
code_challenge_methods_supported:
- S256
```
In your Datadog org, go to [**Organization Settings → Preferences**](https://app.datadoghq.com/organization-settings/preferences) and, under **MCP OAuth Redirect URLs**, add TrueFoundry's OAuth callback URL so Datadog accepts the redirect after authorization.
**Region consistency:** the MCP server `url`, `authorization_url`, `token_url`, and `registration_url` must all use the **same** Datadog site. Mixing the generic `datadoghq.com` (US1) host with a non-US1 org is the most common cause of a generic "Authentication failed" or `server_error` at the token-exchange step.
Reference YAML (US5 example):
```yaml theme={"dark"}
auth_data:
type: oauth2
grant_type: authorization_code
authorization_url: https://us5.datadoghq.com/oauth2/v1/authorize
token_url: https://us5.datadoghq.com/oauth2/v1/token
registration_url: https://us5.datadoghq.com/api/v2/oauth2/register
jwt_source: access_token
code_challenge_methods_supported:
- S256
```
In your Datadog org, go to [**Organization Settings → Preferences**](https://app.datadoghq.com/organization-settings/preferences) and, under **MCP OAuth Redirect URLs**, add TrueFoundry's OAuth callback URL so Datadog accepts the redirect after authorization.
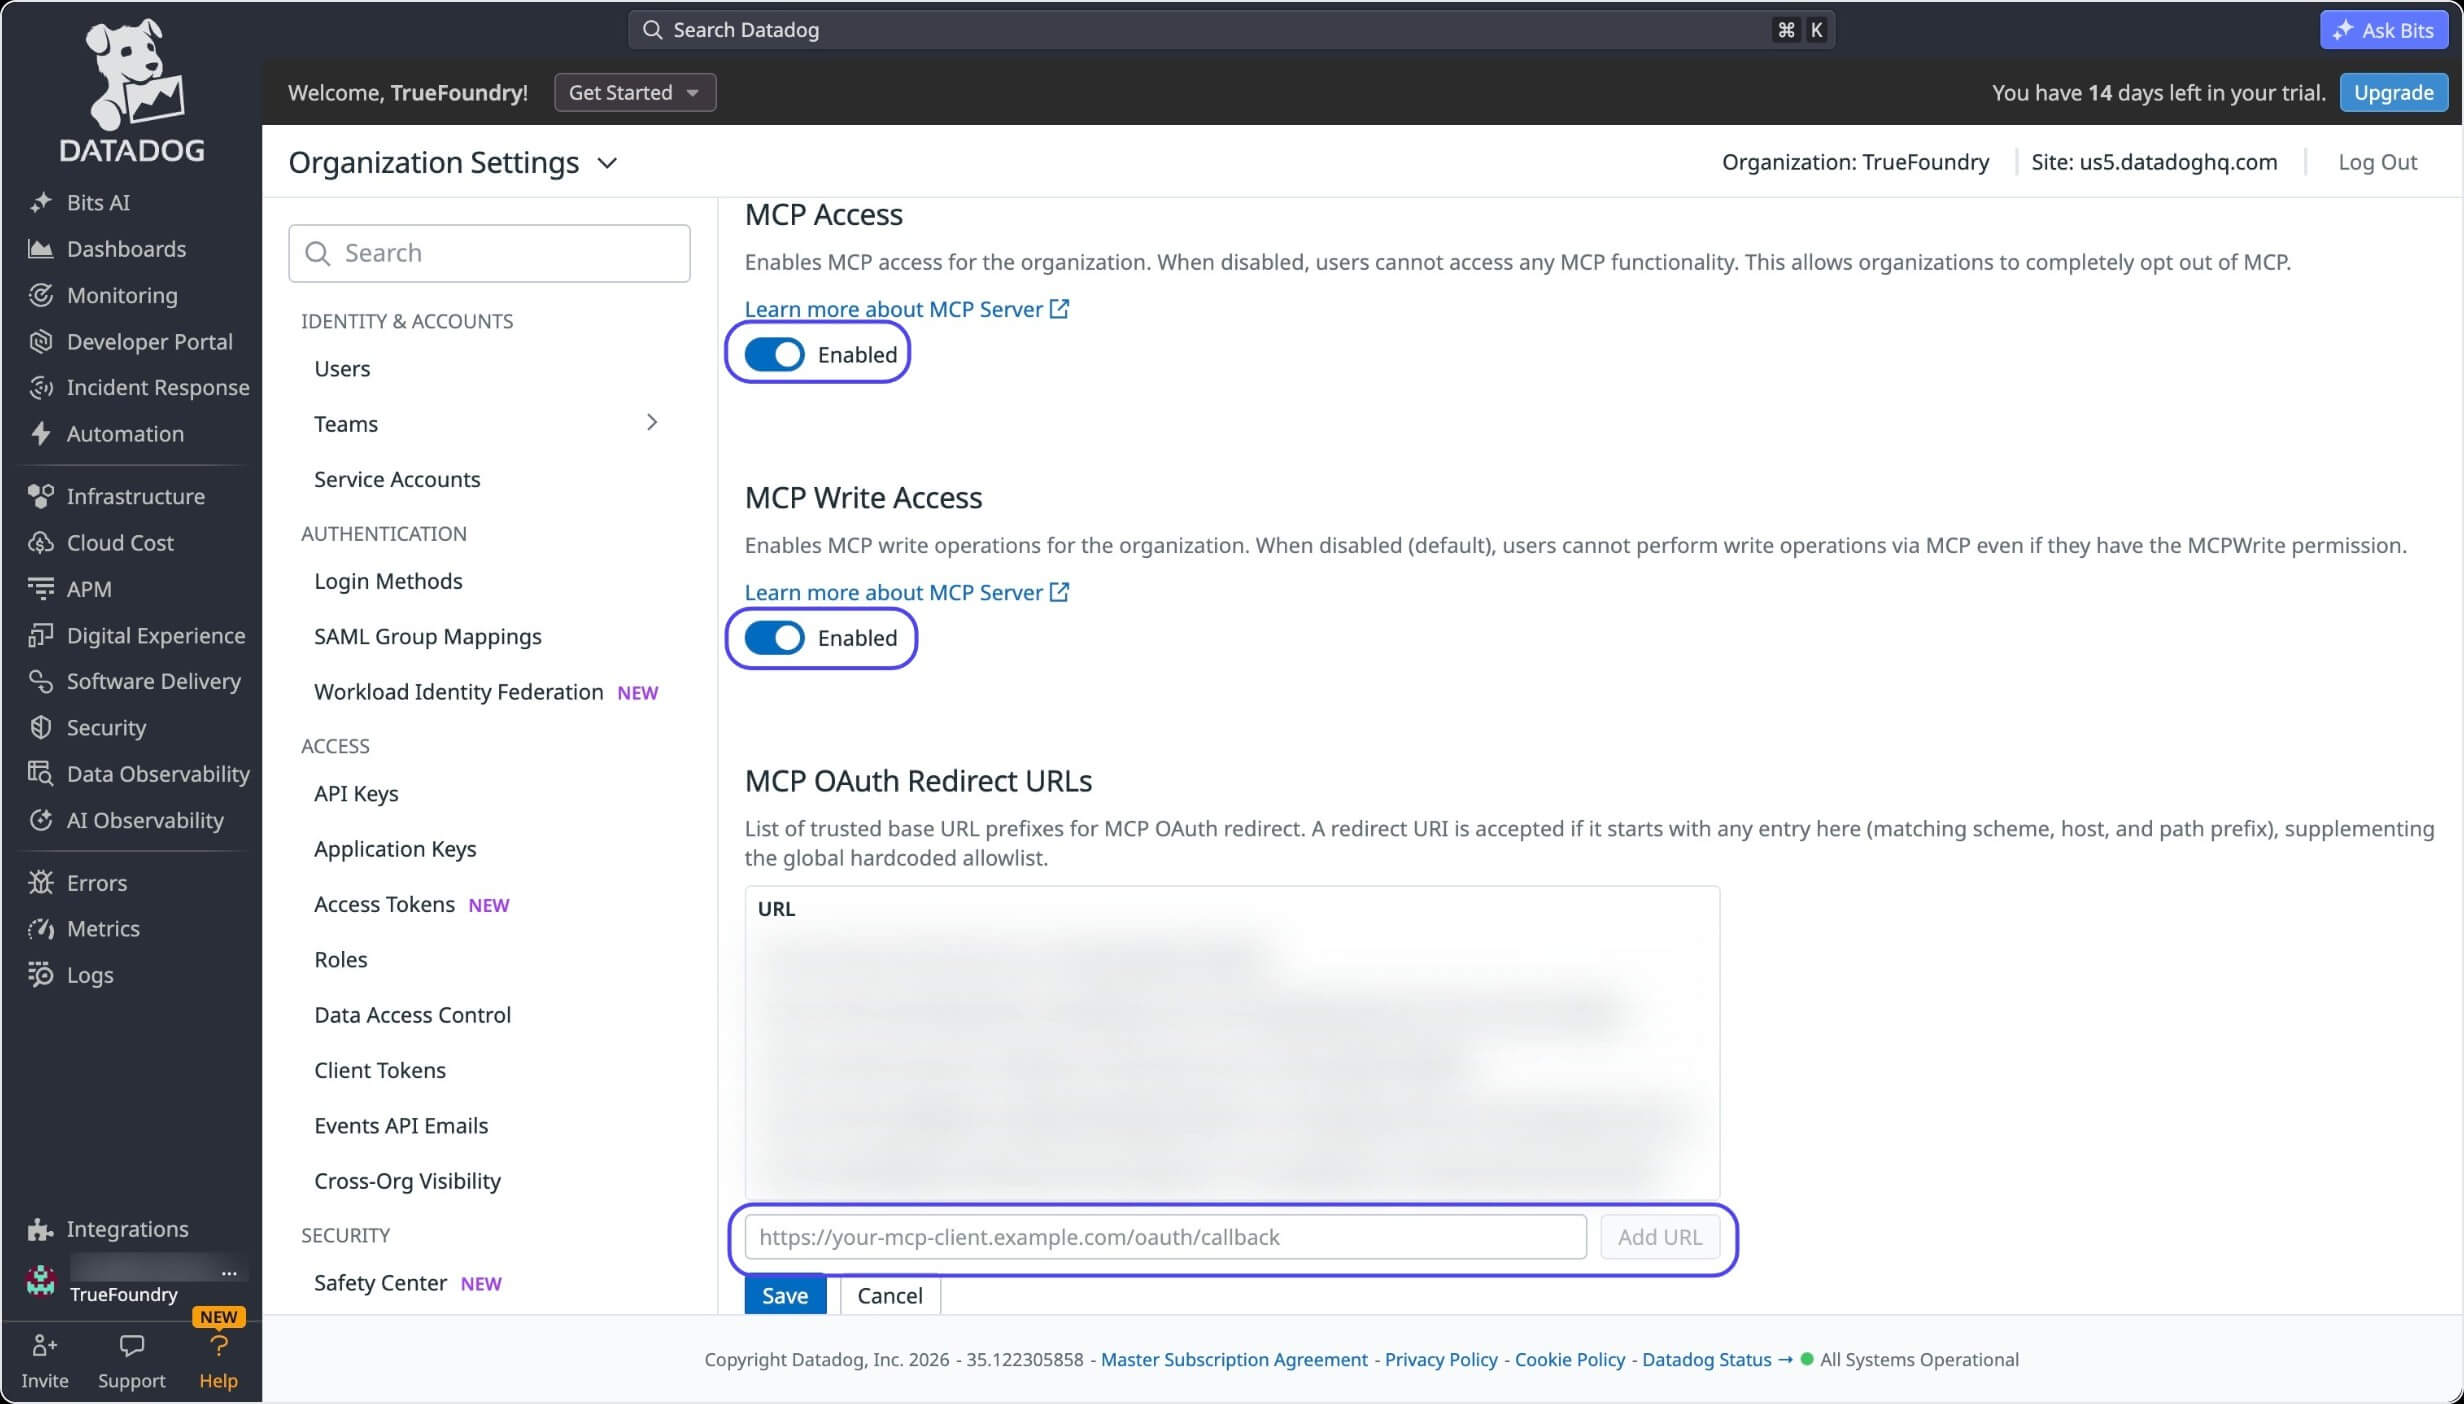 Also confirm at the top of this page that:
* **MCP Access** is Enabled.
* **MCP Write Access** is Enabled (if write tools are needed).
* The **Site** shown top-right matches the region you used in the previous steps (for example, `Site: us5.datadoghq.com`).
Save the MCP Server in TrueFoundry, then open the server's **Tools** tab and click **Connect Now**. You'll be redirected to Datadog's consent screen. Review the requested permissions and click **Authorize** as your Datadog user.
Also confirm at the top of this page that:
* **MCP Access** is Enabled.
* **MCP Write Access** is Enabled (if write tools are needed).
* The **Site** shown top-right matches the region you used in the previous steps (for example, `Site: us5.datadoghq.com`).
Save the MCP Server in TrueFoundry, then open the server's **Tools** tab and click **Connect Now**. You'll be redirected to Datadog's consent screen. Review the requested permissions and click **Authorize** as your Datadog user.
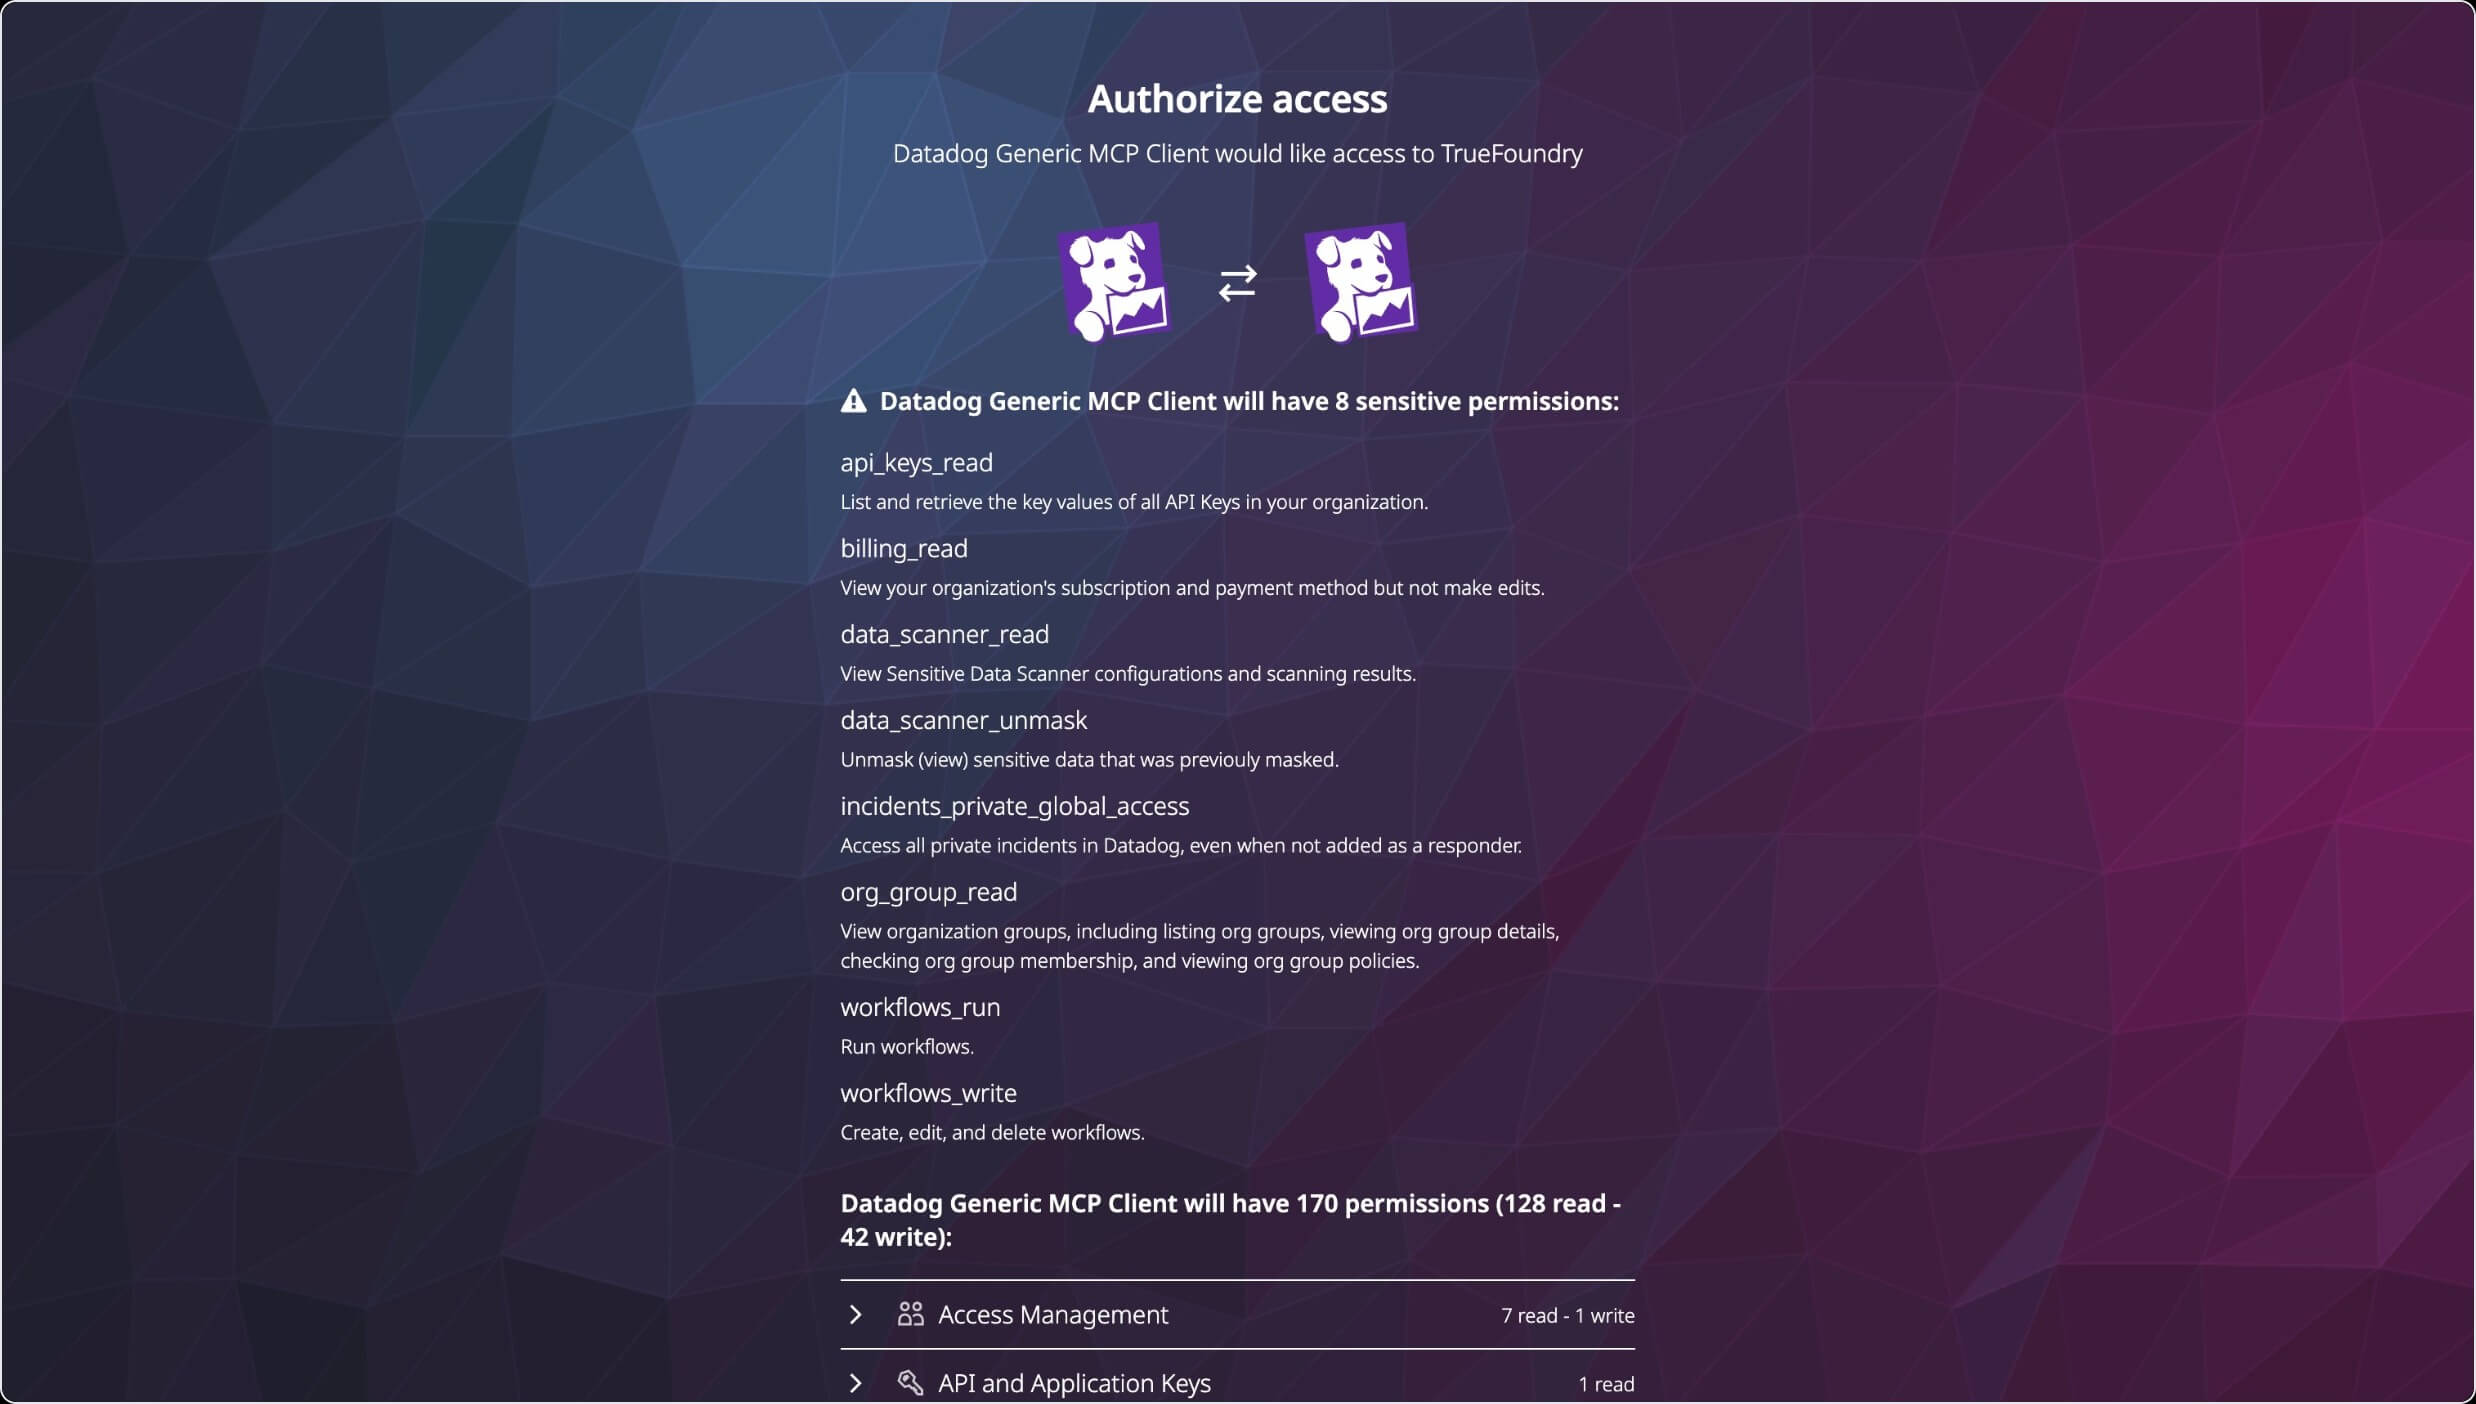 Once authorized, you land back on the MCP Server detail page in TrueFoundry, showing the connected Datadog server with a **Remote** tag, **Auth Type** `OAuth2`, and its full tool list. Read-only tools are labelled accordingly, and write tools are marked **Destructive**. Each tool has a **Try** button so you can test it before wiring it into an agent.
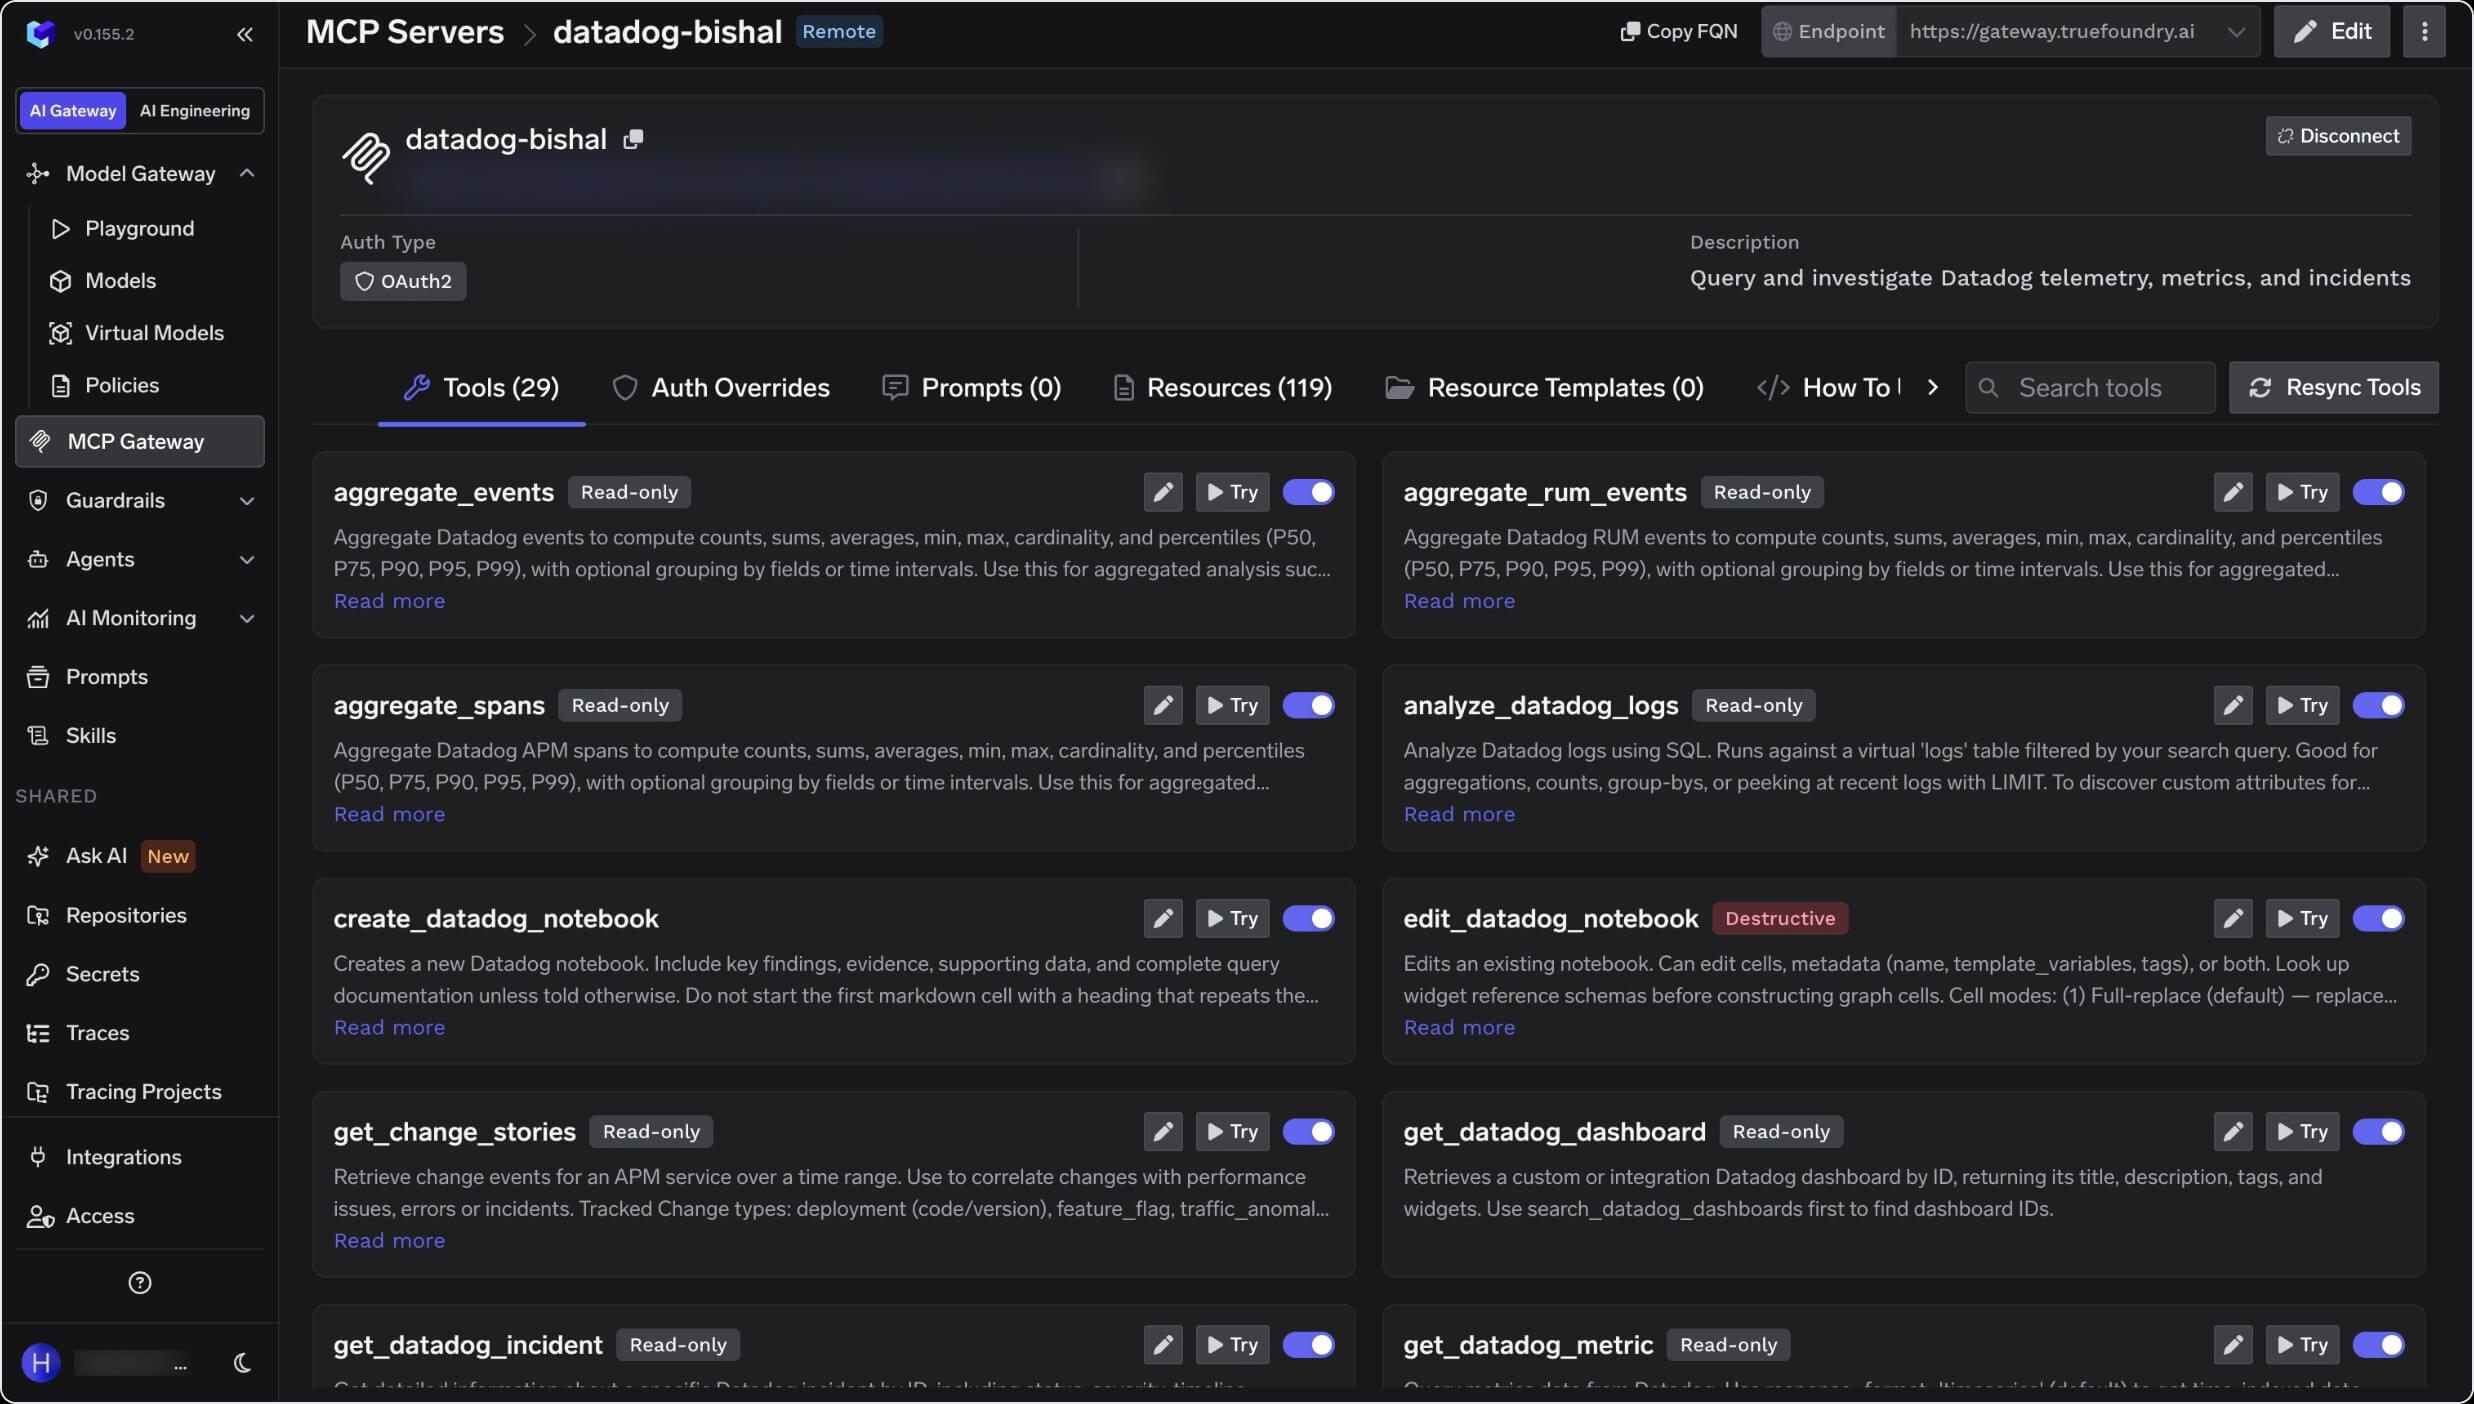 At this point the Datadog MCP server is connected and its tools are available to any agent using this TrueFoundry gateway endpoint.
## Region reference table
| Region | Site domain | MCP URL pattern |
| ------ | ------------------- | ----------------------- |
| US1 | `datadoghq.com` | `mcp.datadoghq.com` |
| US3 | `us3.datadoghq.com` | `mcp.us3.datadoghq.com` |
| US5 | `us5.datadoghq.com` | `mcp.us5.datadoghq.com` |
| EU | `datadoghq.eu` | `mcp.datadoghq.eu` |
| AP1 | `ap1.datadoghq.com` | `mcp.ap1.datadoghq.com` |
| AP2 | `ap2.datadoghq.com` | `mcp.ap2.datadoghq.com` |
## Security Notes
Datadog MCP permissions do not grant resource access by themselves; they only unlock the MCP surface on top of the user's existing Datadog role. Each user operates with their existing Datadog permissions. Keep **MCP Write Access** disabled for general access unless write tools are required.
## References
* [Datadog MCP Server setup guide](https://docs.datadoghq.com/mcp_server/setup/) — setup for all clients, including the "Other / custom connector" option.
* [Datadog MCP Server overview](https://docs.datadoghq.com/mcp_server/) — overview, toolsets, and supported clients.
* [Datadog MCP Server tools reference](https://docs.datadoghq.com/mcp_server/tools.md) — the full list of available tools.
## Next Steps
Learn how the TrueFoundry MCP Gateway centralizes access, auth, and observability for all your MCP servers.
Add MCP servers and use them in the AI Gateway playground and IDEs.
Reference for Datadog's remote MCP server, toolsets, and permissions.
Configure authentication and guardrails on your MCP servers.
At this point the Datadog MCP server is connected and its tools are available to any agent using this TrueFoundry gateway endpoint.
## Region reference table
| Region | Site domain | MCP URL pattern |
| ------ | ------------------- | ----------------------- |
| US1 | `datadoghq.com` | `mcp.datadoghq.com` |
| US3 | `us3.datadoghq.com` | `mcp.us3.datadoghq.com` |
| US5 | `us5.datadoghq.com` | `mcp.us5.datadoghq.com` |
| EU | `datadoghq.eu` | `mcp.datadoghq.eu` |
| AP1 | `ap1.datadoghq.com` | `mcp.ap1.datadoghq.com` |
| AP2 | `ap2.datadoghq.com` | `mcp.ap2.datadoghq.com` |
## Security Notes
Datadog MCP permissions do not grant resource access by themselves; they only unlock the MCP surface on top of the user's existing Datadog role. Each user operates with their existing Datadog permissions. Keep **MCP Write Access** disabled for general access unless write tools are required.
## References
* [Datadog MCP Server setup guide](https://docs.datadoghq.com/mcp_server/setup/) — setup for all clients, including the "Other / custom connector" option.
* [Datadog MCP Server overview](https://docs.datadoghq.com/mcp_server/) — overview, toolsets, and supported clients.
* [Datadog MCP Server tools reference](https://docs.datadoghq.com/mcp_server/tools.md) — the full list of available tools.
## Next Steps
Learn how the TrueFoundry MCP Gateway centralizes access, auth, and observability for all your MCP servers.
Add MCP servers and use them in the AI Gateway playground and IDEs.
Reference for Datadog's remote MCP server, toolsets, and permissions.
Configure authentication and guardrails on your MCP servers.