> ## Documentation Index
> Fetch the complete documentation index at: https://www.truefoundry.com/llms.txt
> Use this file to discover all available pages before exploring further.

# Comet Opik

> Learn how to export LLM Gateway traces to Comet Opik using OpenTelemetry integration.

This guide provides instructions for integrating [Comet Opik](https://www.comet.com/site/products/opik/) with the TrueFoundry AI Gateway to export OpenTelemetry traces.

## What is Comet Opik?

Comet Opik is an open-source LLM observability and evaluation platform. It ingests OpenTelemetry trace spans over OTLP HTTP and renders them as LLM traces with per-call inputs, outputs, token usage, latency, and cost. It also supports evaluation, scoring, and dataset management on top of the ingested traces.

### Key Features of Comet Opik

* **[OTLP trace ingestion](https://www.comet.com/docs/opik/integrations/opentelemetry)**: Accepts OpenTelemetry spans over HTTP transport at a native OTLP endpoint, so any OTLP-compliant producer can send traces without an SDK.
* **[LLM trace and span views](https://www.comet.com/docs/opik/tracing/log_traces)**: Displays each LLM call with inputs, outputs, token breakdowns, latency, and cost, with nested spans for multi-step pipelines.
* **[Evaluation and scoring](https://www.comet.com/docs/opik/evaluation/overview)**: Runs automated and human evaluations against traced calls and datasets built from production traffic.

## Prerequisites

Before integrating Comet Opik with TrueFoundry, ensure you have:

1. **TrueFoundry Account**: Create a [TrueFoundry account](https://www.truefoundry.com/register) and follow the instructions in our [Gateway Quick Start Guide](https://docs.truefoundry.com/gateway/quick-start)
2. **Comet Opik Account**: A [Comet account](https://www.comet.com/signup) for Opik Cloud, or a self-hosted / enterprise Opik deployment. You will need your **API key**, your **workspace name**, and a target **project name**.

## Understanding the Comet Opik Endpoint

Opik exposes a native OTLP base endpoint at the path **/api/v1/private/otel**. The host in front of that path depends on your deployment mode:

<table>
  <thead>
    <tr><th>Deployment</th><th>Base endpoint</th></tr>
  </thead>

  <tbody>
    <tr><td>Opik Cloud</td><td><code>[https://www.comet.com/opik/api/v1/private/otel](https://www.comet.com/opik/api/v1/private/otel)</code></td></tr>
    <tr><td>Self-hosted</td><td><code>http\://\<YOUR-OPIK-INSTANCE>/api/v1/private/otel</code></td></tr>
    <tr><td>Enterprise</td><td><code>https\://\<COMET-SERVER>/api/v1/private/otel</code></td></tr>
  </tbody>
</table>

TrueFoundry sends traces to the **signal-specific** endpoint, which is the base endpoint with **/v1/traces** appended. TrueFoundry does not auto-append this path, so the full path must be entered in the Endpoint field.

<Note>
  Opik ingests **traces only**. It does not accept OTLP metrics, so you configure the Traces exporter and leave the Metrics exporter disabled. Opik also supports **HTTP transport only** — do not select the gRPC configuration.
</Note>

## Integration Steps

<Steps>
  <Step title="Get Your Opik API Key and Workspace">
    1. Log into your Comet Opik account.
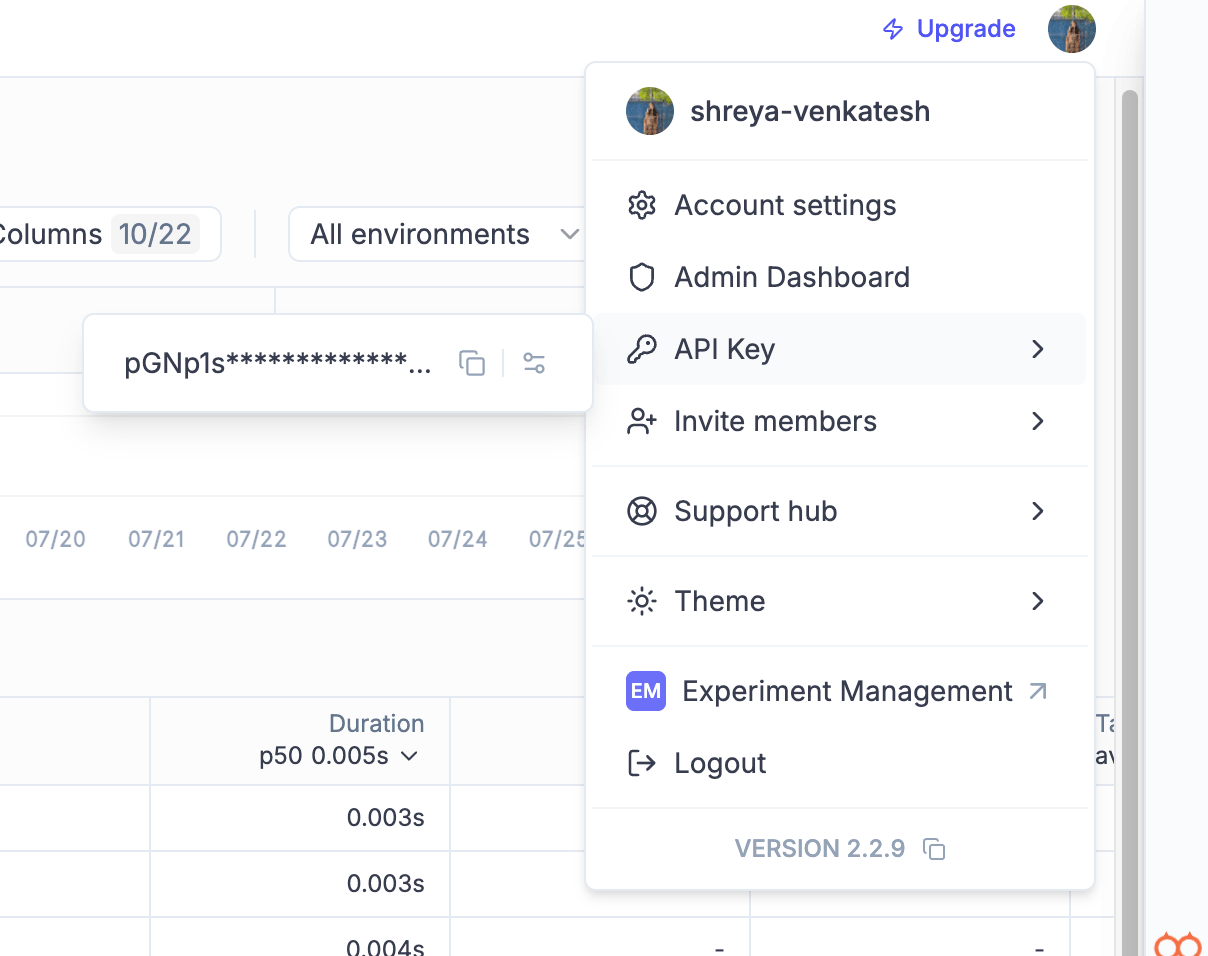
    2. Open your account settings and copy your **API key**.
    3. Note your **workspace name** (shown in the workspace switcher) and the **project name** you want traces to land in. The project is created automatically on first ingest if it does not exist.

    <Frame>
      <img src="https://mintcdn.com/truefoundry/wR6cxhXlWvLBXlUe/images/comet-opik-api-key.png?fit=max&auto=format&n=wR6cxhXlWvLBXlUe&q=85&s=e3817f9f7d73332f630123d8d8ef4faf" alt="Comet Opik account menu showing the API Key option and the workspace name" width="1208" height="956" data-path="images/comet-opik-api-key.png" />
    </Frame>

    <Tip>
      The `Authorization` header value is the **raw API key** — do not prefix it with `Bearer`. This differs from most other OTEL destinations.
    </Tip>
  </Step>

  <Step title="Configure OTEL Export in TrueFoundry">
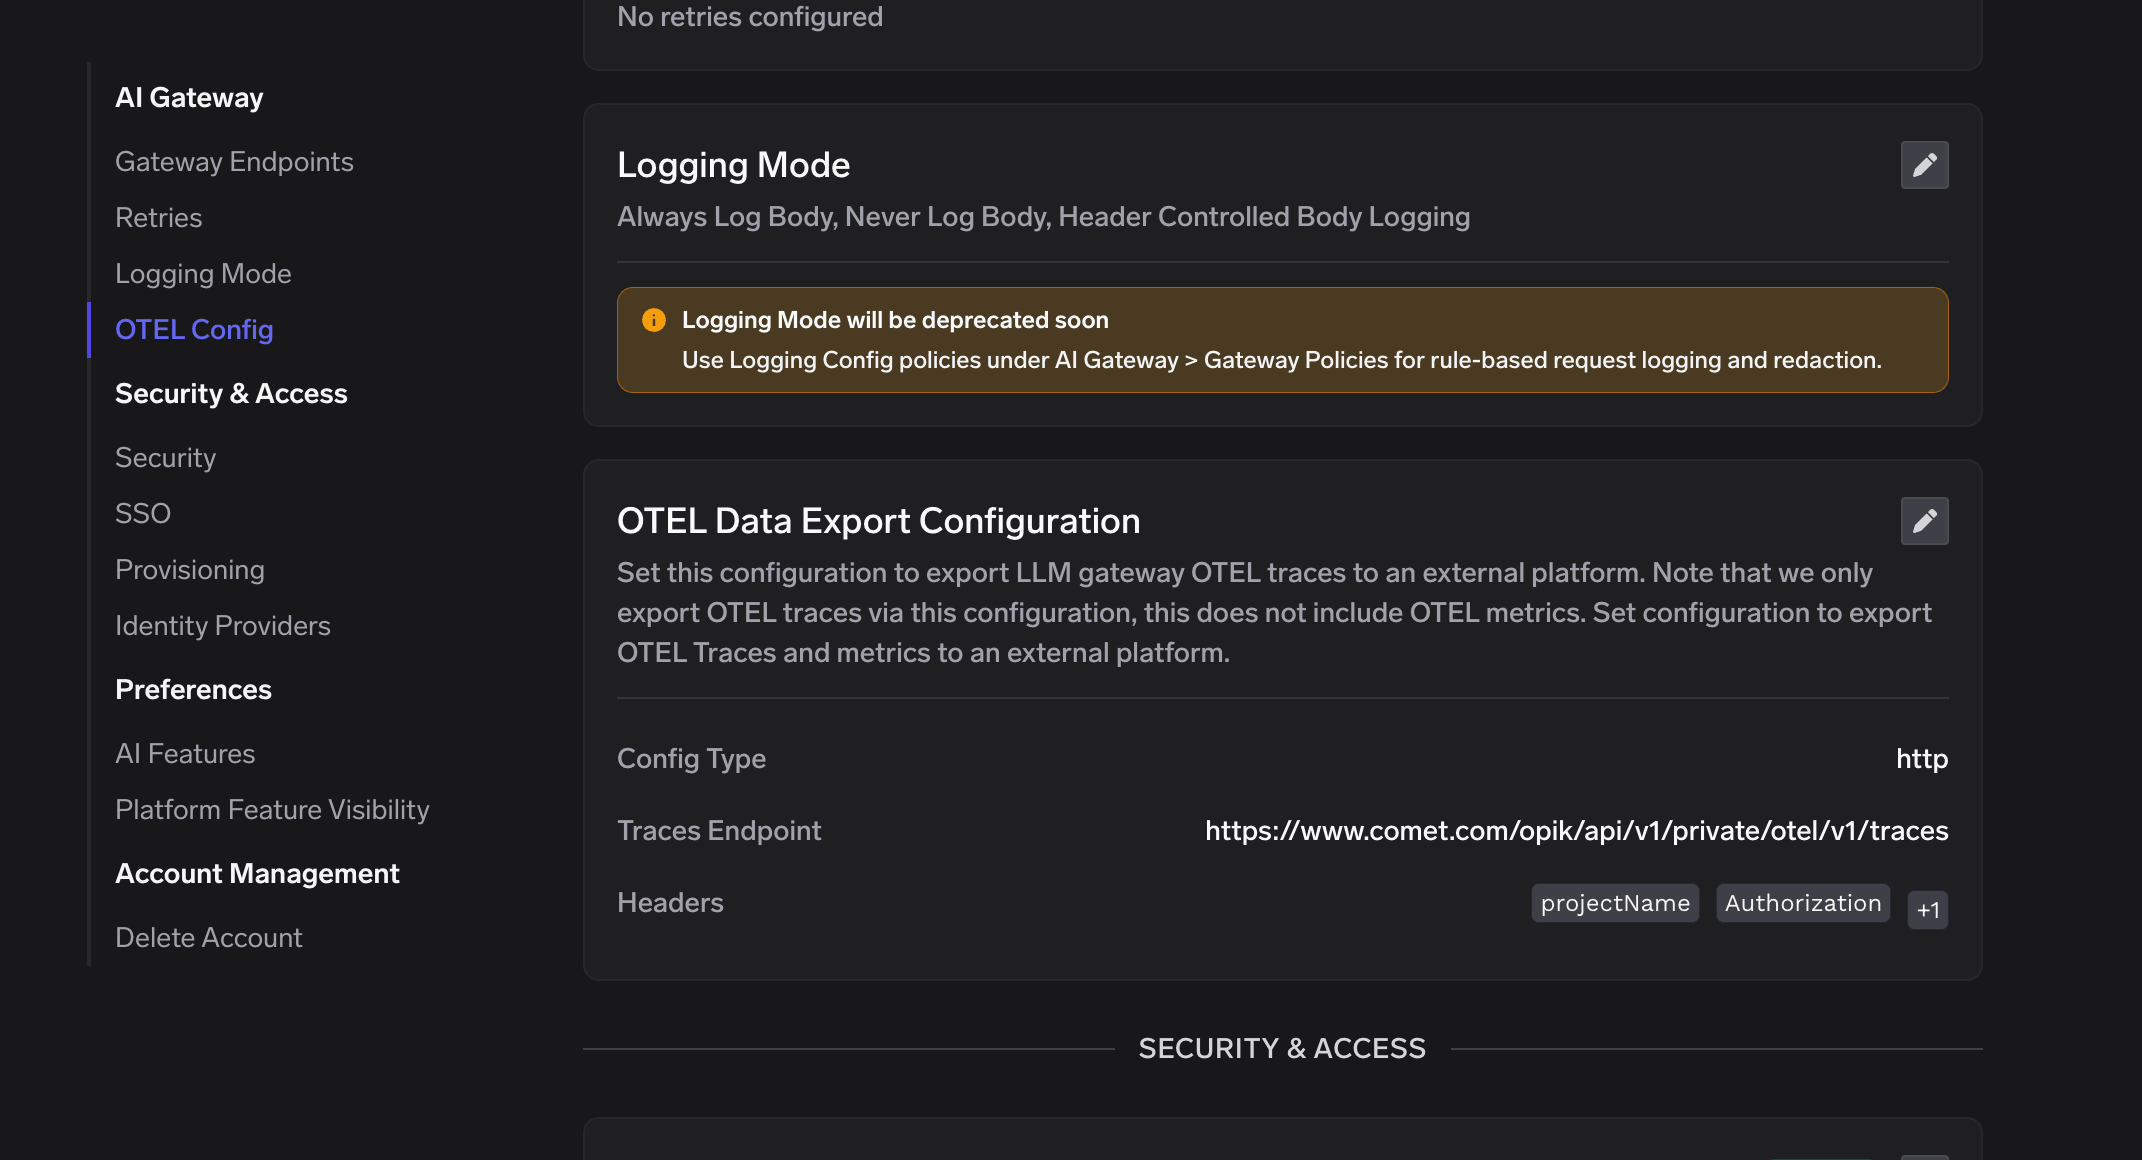
    1. Go to **AI Gateway** → **Controls** → **Settings** in the TrueFoundry dashboard.
    2. Scroll down to the **OTEL Config** section and click the edit (✏️) button.

    <Frame>
      <img src="https://mintcdn.com/truefoundry/wR6cxhXlWvLBXlUe/images/comet-tfy-otel-config-section.png?fit=max&auto=format&n=wR6cxhXlWvLBXlUe&q=85&s=eac3b64679277fdd4216651914d0dd5b" alt="TrueFoundry AI Gateway Settings page showing the OTEL Data Export Configuration section" width="2142" height="1160" data-path="images/comet-tfy-otel-config-section.png" />
    </Frame>

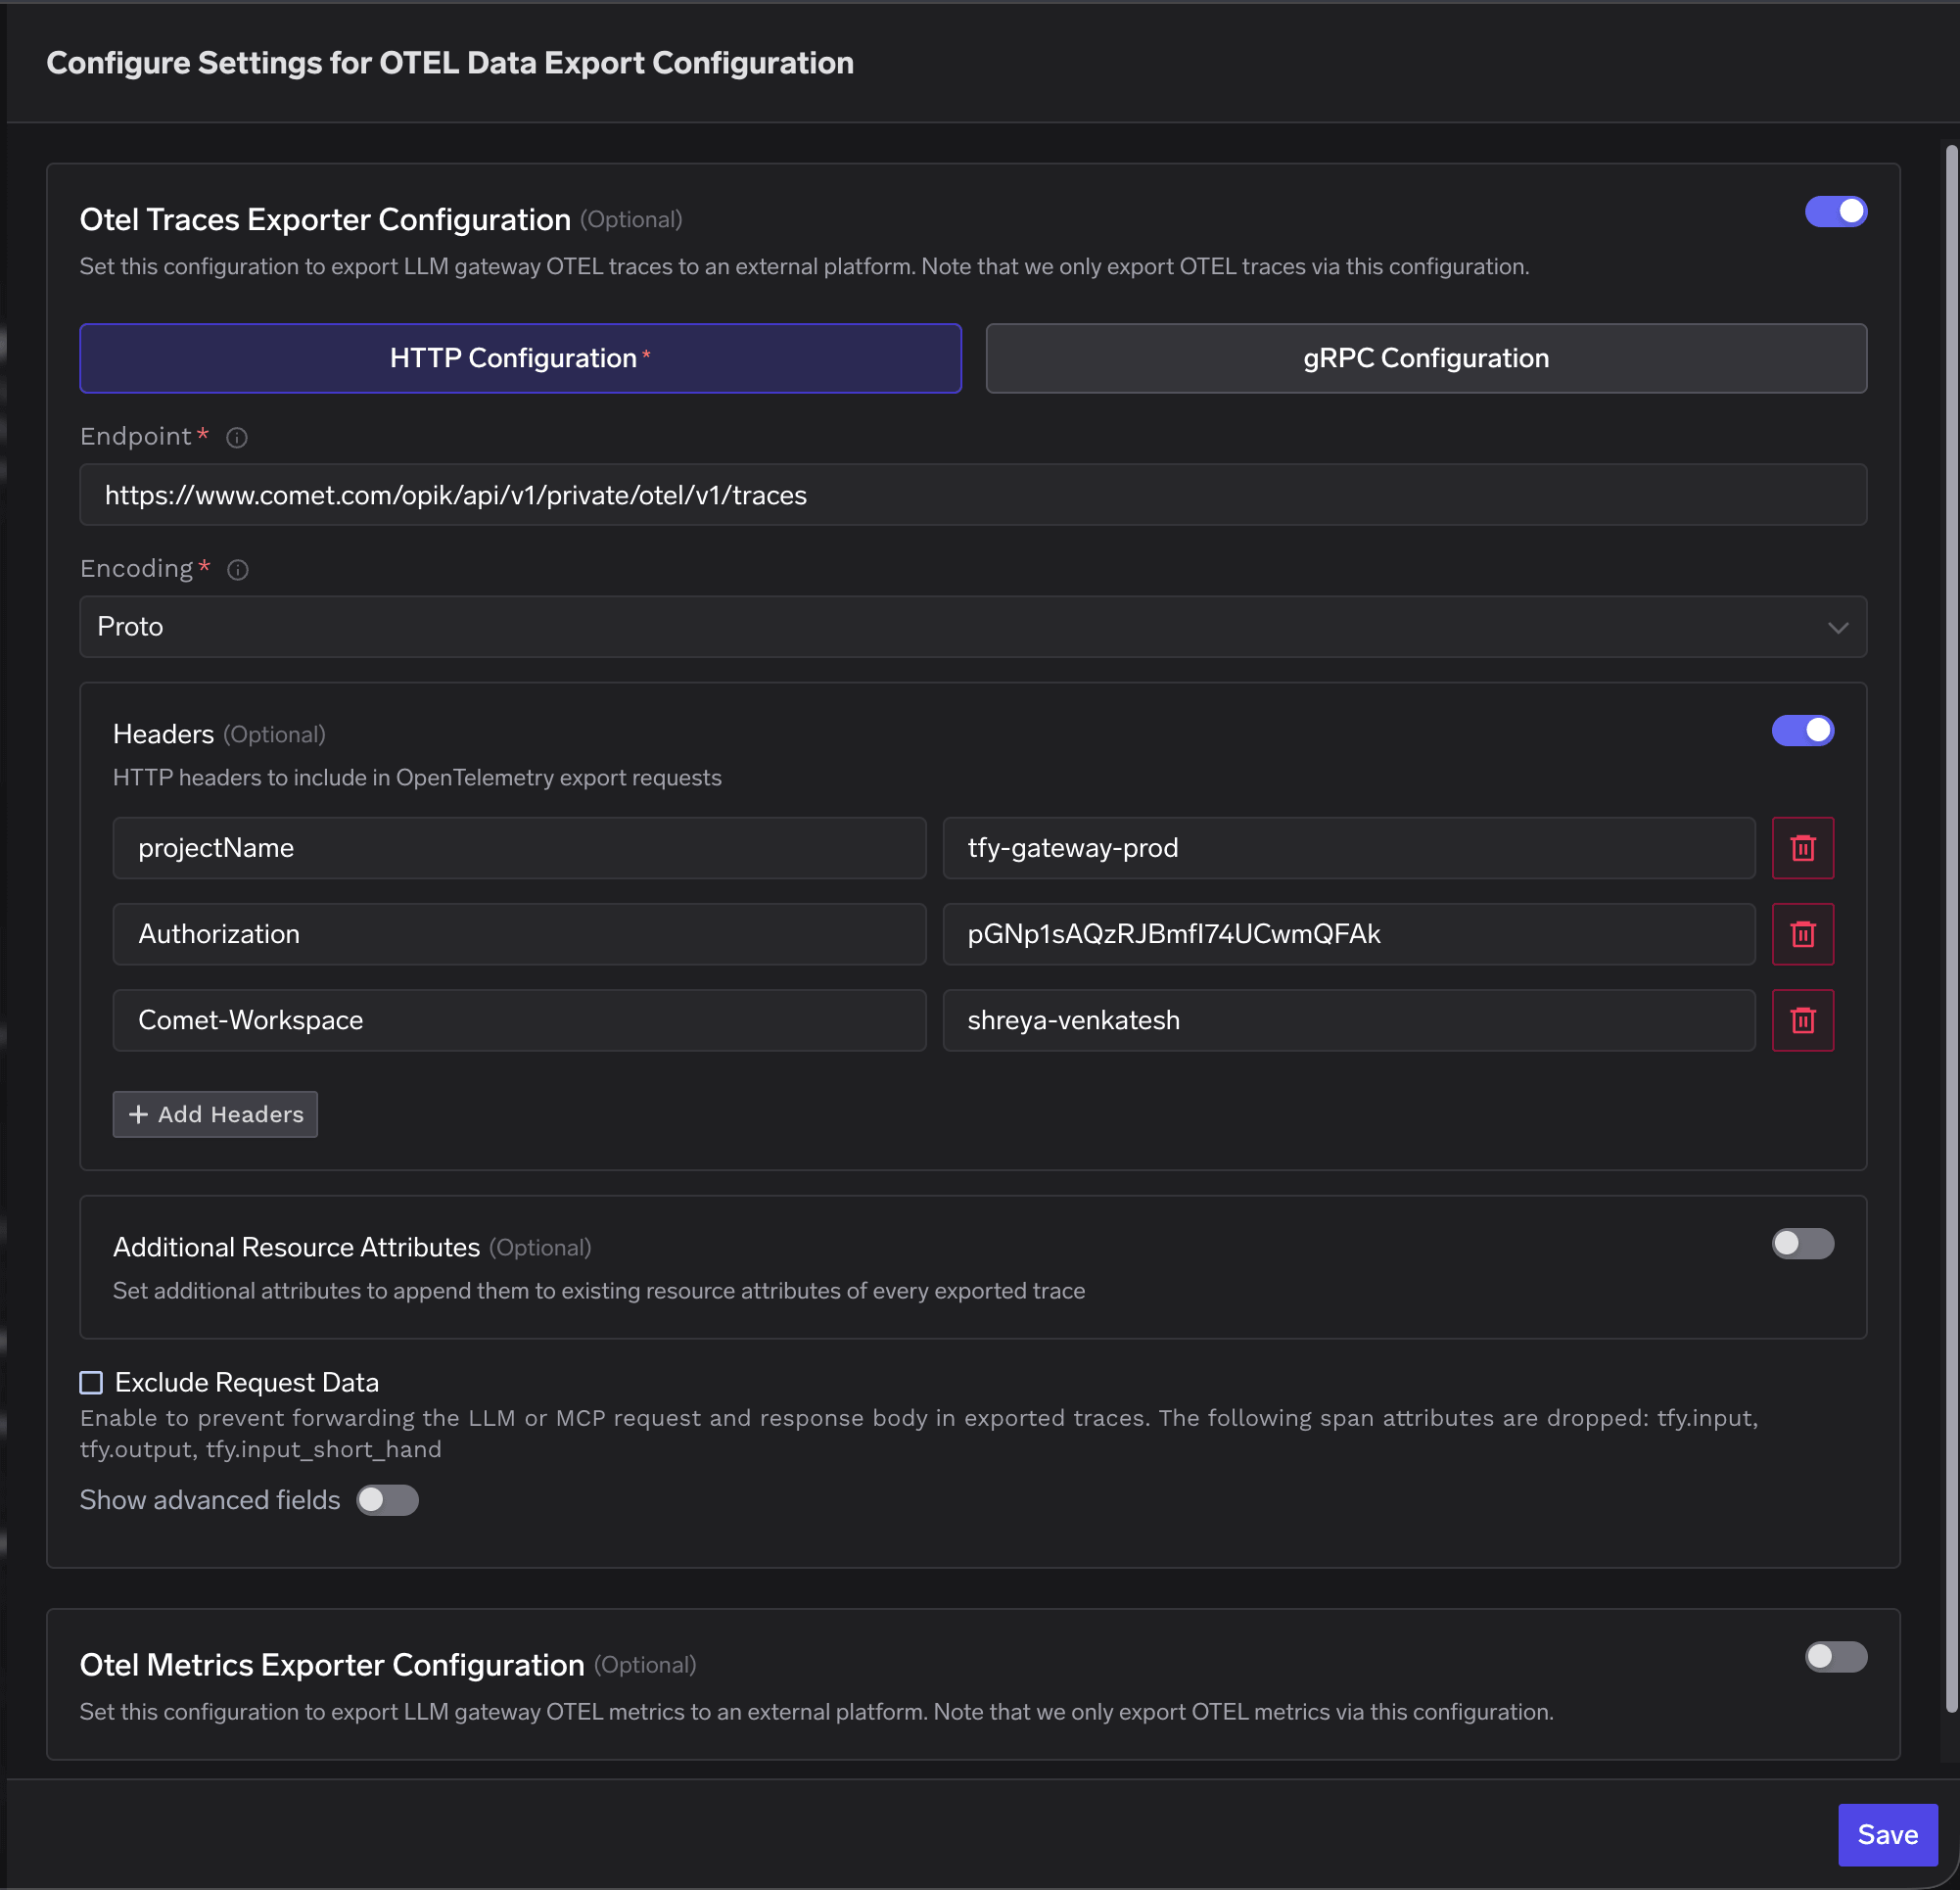
    3. Enable the **Otel Traces Exporter Configuration** toggle and fill in:

    <table>
      <thead>
        <tr><th>Field</th><th>Value</th></tr>
      </thead>

      <tbody>
        <tr><td>Toggle</td><td>Enabled</td></tr>
        <tr><td>Protocol</td><td>HTTP Configuration</td></tr>
        <tr><td>Endpoint</td><td><code>[https://www.comet.com/opik/api/v1/private/otel/v1/traces](https://www.comet.com/opik/api/v1/private/otel/v1/traces)</code></td></tr>
        <tr><td>Encoding</td><td>Proto</td></tr>
        <tr><td>Header Key</td><td><code>Authorization</code></td></tr>
        <tr><td>Header Value</td><td>\<your-opik-api-key></td></tr>
        <tr><td>Header Key</td><td><code>Comet-Workspace</code></td></tr>
        <tr><td>Header Value</td><td>\<your-workspace-name></td></tr>
        <tr><td>Header Key</td><td><code>projectName</code></td></tr>
        <tr><td>Header Value</td><td>\<your-project-name></td></tr>
      </tbody>
    </table>

    <Frame>
      <img src="https://mintcdn.com/truefoundry/wR6cxhXlWvLBXlUe/images/comet-tfy-traces-exporter-config.png?fit=max&auto=format&n=wR6cxhXlWvLBXlUe&q=85&s=87ed423beda6d51f5473ef954fd9ac50" alt="TrueFoundry OTEL Traces Exporter Configuration showing the endpoint, Proto encoding, and the three Comet Opik headers" width="2002" height="1930" data-path="images/comet-tfy-traces-exporter-config.png" />
    </Frame>

    4. Leave the **Otel Metrics Exporter Configuration** toggle **disabled** — Opik does not accept OTLP metrics.

    5. Click **Save** to apply the configuration.

    <Note>
      For a self-hosted or enterprise Opik deployment, replace the host in the endpoint with your instance host (for example <code>http\://\<YOUR-OPIK-INSTANCE>/api/v1/private/otel/v1/traces</code>) and keep the same three headers.
    </Note>
  </Step>

  <Step title="Verify the Integration">
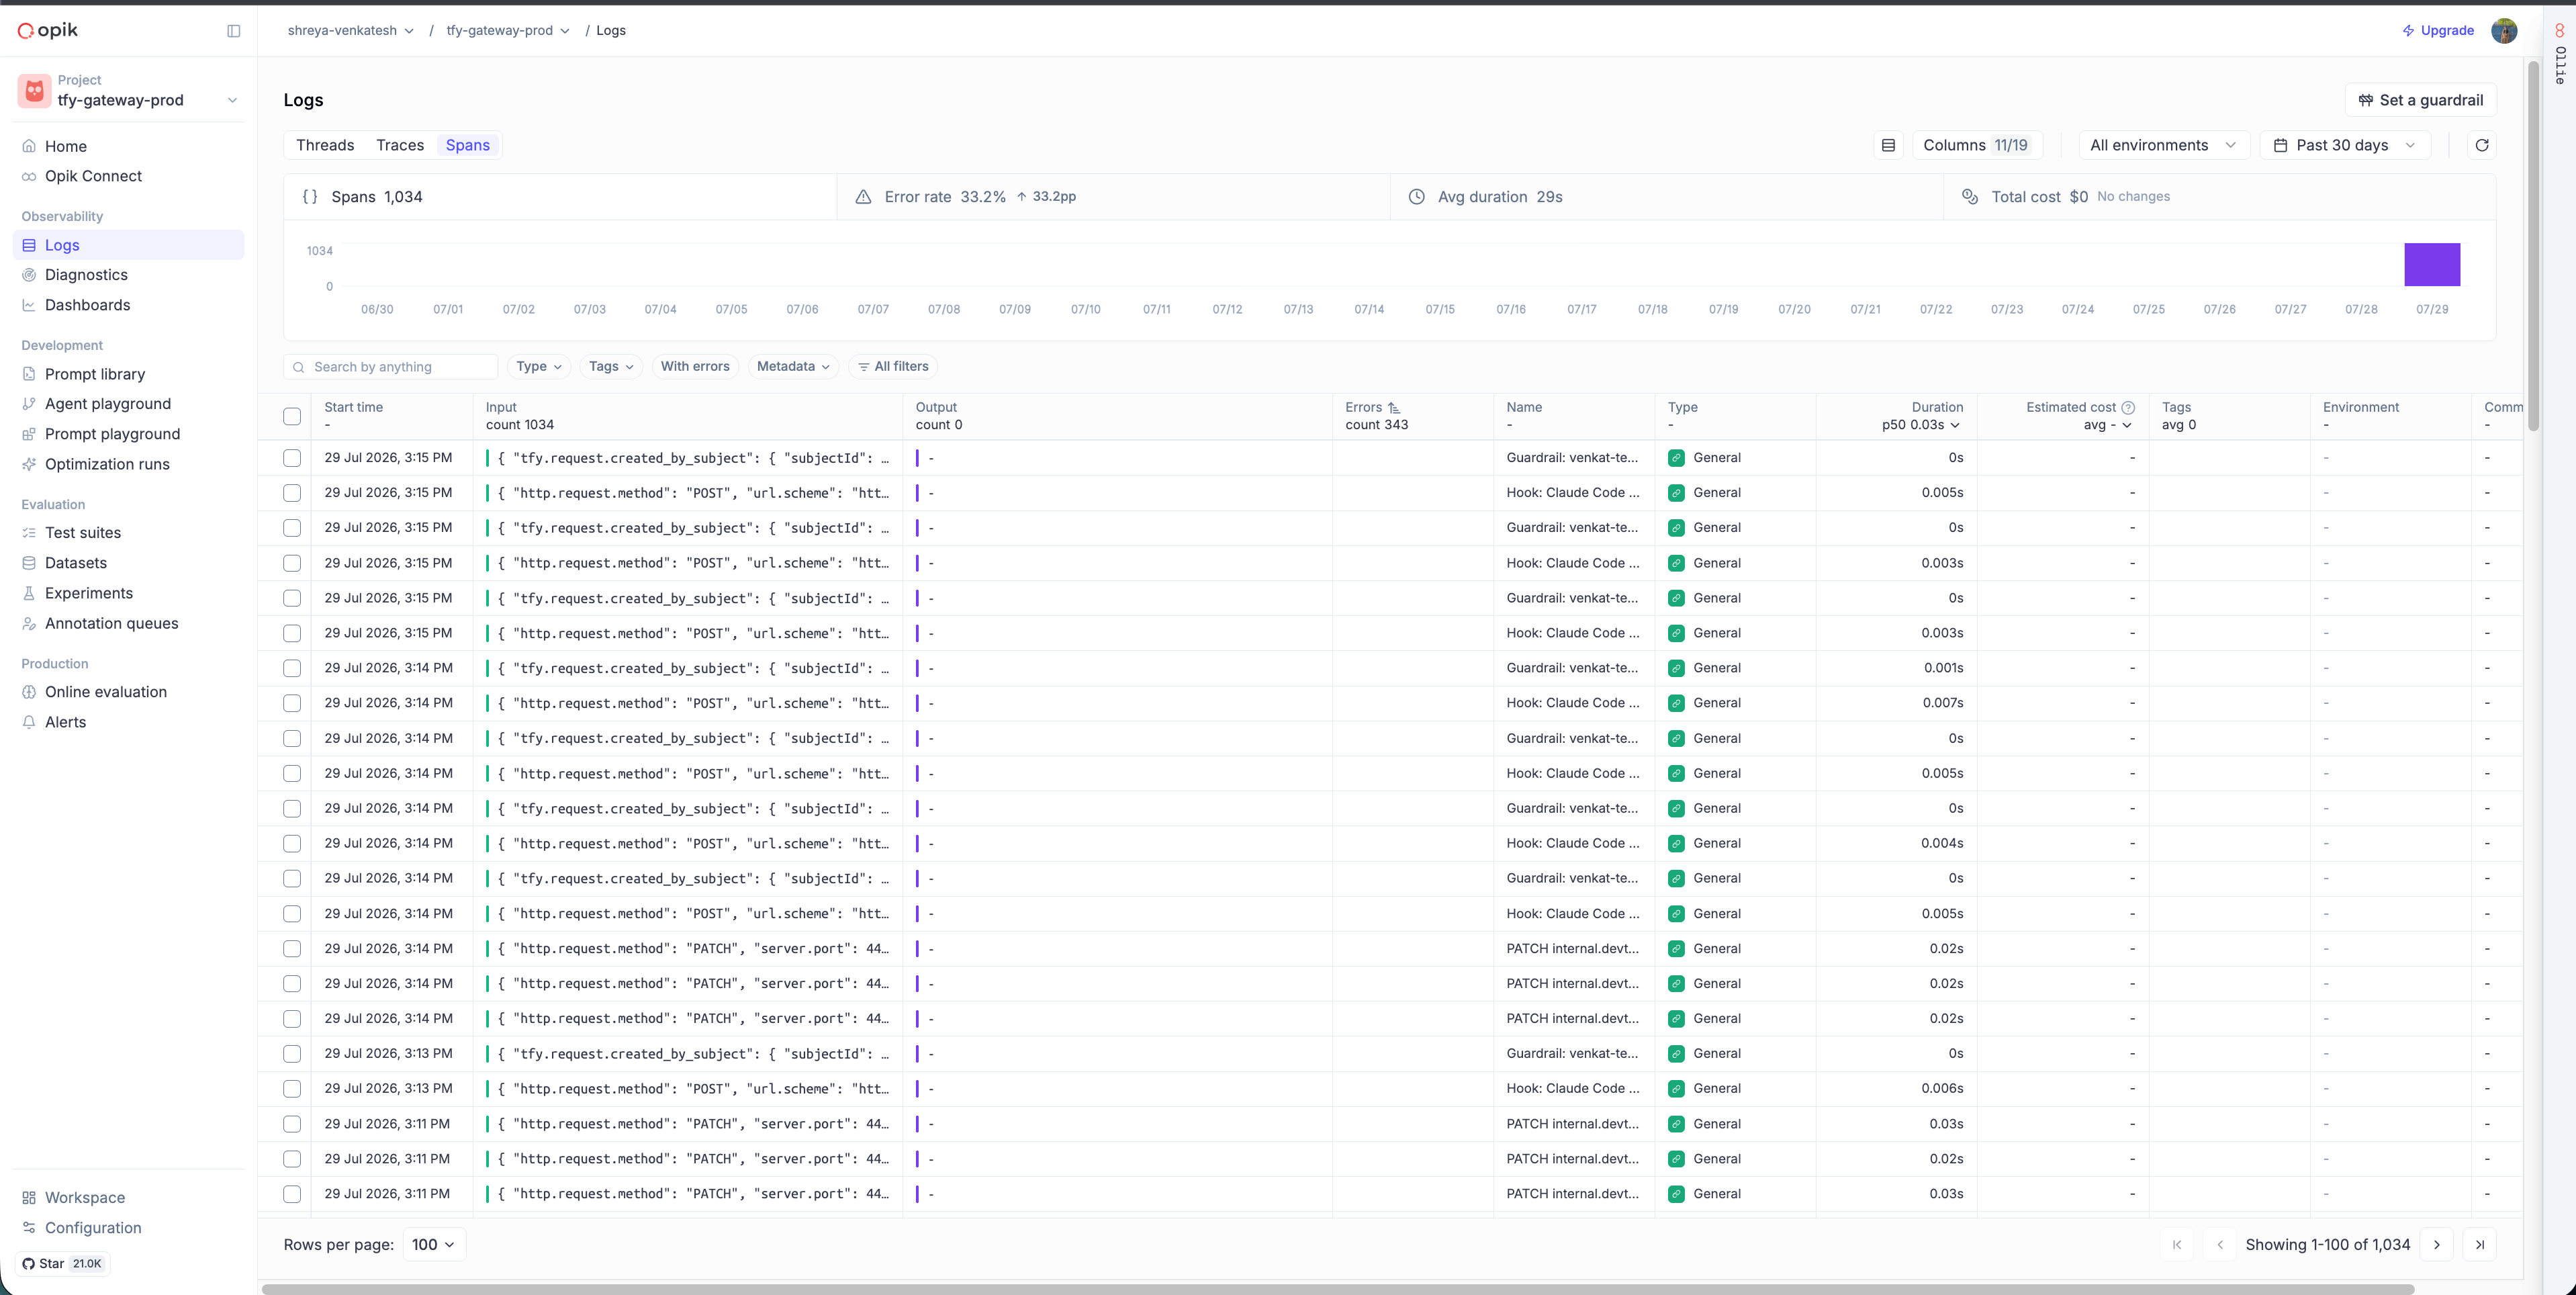
    1. Make a request through the TrueFoundry AI Gateway.
    2. Log into your Comet Opik dashboard and open the **Traces** view for the project named in the `projectName` header.
    3. Confirm traces from `tfy-llm-gateway` are appearing, with inputs, outputs, token usage, and latency populated.

    <Frame>
      <img src="https://mintcdn.com/truefoundry/wR6cxhXlWvLBXlUe/images/comet-opik-agent-trace.png?fit=max&auto=format&n=wR6cxhXlWvLBXlUe&q=85&s=48ce5e317861f6219a3d7eaf05a0bb5d" alt="Comet Opik Logs view showing TrueFoundry AI Gateway spans arriving in the project" width="3836" height="1928" data-path="images/comet-opik-agent-trace.png" />
    </Frame>
  </Step>
</Steps>

## Configuration Reference

<table>
  <thead>
    <tr><th>Configuration</th><th>Value</th></tr>
  </thead>

  <tbody>
    <tr><td>Traces Endpoint</td><td><code>[https://www.comet.com/opik/api/v1/private/otel/v1/traces](https://www.comet.com/opik/api/v1/private/otel/v1/traces)</code></td></tr>
    <tr><td>Metrics Endpoint</td><td>Not supported — Opik ingests traces only</td></tr>
    <tr><td>Protocol</td><td>HTTP</td></tr>
    <tr><td>Encoding</td><td>Proto</td></tr>
    <tr><td>Auth Header Key</td><td><code>Authorization</code></td></tr>
    <tr><td>Auth Header Value</td><td>Your Opik API key (raw, no Bearer prefix)</td></tr>
    <tr><td>Header Key</td><td><code>Comet-Workspace</code></td></tr>
    <tr><td>Header Value</td><td>Your Opik workspace name</td></tr>
    <tr><td>Header Key</td><td><code>projectName</code></td></tr>
    <tr><td>Header Value</td><td>Target Opik project name</td></tr>
  </tbody>
</table>