> ## Documentation Index
> Fetch the complete documentation index at: https://www.truefoundry.com/llms.txt
> Use this file to discover all available pages before exploring further.
# Access Cloud Services Like S3
> Guide to accessing S3 and cloud data sources from services deployed on TrueFoundry.
We often have a requirement to access cloud managed services like blob storage, queues, databases etc from our services. A most common use case is access S3 or GCS bucket from our services to read or write data. To enable this in Truefoundry, the process is the same as you would do in a normal Kubernetes cluster. In this example below we explain the process to read and write data to blob storage - however, the concept remains roughly the same in case you are connecting to other cloud services like SQS. The key steps are:
### 1. Add the cloud specific code access the service in your code
```python lines theme={"dark"}
from fastapi import FastAPI, UploadFile
from fastapi.responses import StreamingResponse
import boto3
import io
app = FastAPI()
AWS_REGION = "YOUR_AWS_REGION"
S3_BUCKET_NAME = "your-s3-bucket-name"
s3 = boto3.client("s3")
@app.post("/upload/{object_name}")
async def upload_file(object_name: str, file: UploadFile):
"""Uploads a file to S3."""
contents = await file.read()
s3.upload_fileobj(io.BytesIO(contents), S3_BUCKET_NAME, object_name)
return {"message": f"File uploaded to s3://{S3_BUCKET_NAME}/{object_name}"}
@app.get("/download/{object_name}")
async def download_file(object_name: str):
"""Downloads a file from S3."""
obj = s3.get_object(Bucket=S3_BUCKET_NAME, Key=object_name)
return StreamingResponse(
obj["Body"].iter_chunks(chunk_size=4096),
media_type=obj["ContentType"],
headers={"Content-Disposition": f"attachment;filename={object_name}"},
)
if __name__ == "__main__":
import uvicorn
uvicorn.run(app, host="0.0.0.0", port=8000)
```
```python lines theme={"dark"}
from fastapi import FastAPI, UploadFile
from fastapi.responses import StreamingResponse
from google.cloud import storage
import io
import os
app = FastAPI()
GCS_BUCKET_NAME = "your-gcs-bucket-name"
# Make sure GOOGLE_APPLICATION_CREDENTIALS env var is set to your service account JSON file path
client = storage.Client()
bucket = client.bucket(GCS_BUCKET_NAME)
@app.post("/upload/{object_name}")
async def upload_file(object_name: str, file: UploadFile):
"""Uploads a file to GCS."""
contents = await file.read()
blob = bucket.blob(object_name)
blob.upload_from_file(io.BytesIO(contents), rewind=True)
return {"message": f"File uploaded to gs://{GCS_BUCKET_NAME}/{object_name}"}
@app.get("/download/{object_name}")
async def download_file(object_name: str):
"""Downloads a file from GCS."""
blob = bucket.blob(object_name)
file_stream = io.BytesIO()
blob.download_to_file(file_stream)
file_stream.seek(0)
return StreamingResponse(
file_stream,
media_type="application/octet-stream",
headers={"Content-Disposition": f"attachment;filename={object_name}"},
)
if __name__ == "__main__":
import uvicorn
uvicorn.run(app, host="0.0.0.0", port=8000)
```
```python lines theme={"dark"}
from fastapi import FastAPI, UploadFile
from fastapi.responses import StreamingResponse
from azure.storage.blob import BlobServiceClient
import io
import os
app = FastAPI()
AZURE_CONNECTION_STRING = "your-azure-connection-string"
AZURE_CONTAINER_NAME = "your-container-name"
blob_service_client = BlobServiceClient.from_connection_string(AZURE_CONNECTION_STRING)
container_client = blob_service_client.get_container_client(AZURE_CONTAINER_NAME)
@app.post("/upload/{blob_name}")
async def upload_file(blob_name: str, file: UploadFile):
"""Uploads a file to Azure Blob Storage."""
contents = await file.read()
blob_client = container_client.get_blob_client(blob_name)
blob_client.upload_blob(contents, overwrite=True)
return {"message": f"File uploaded to azure://{AZURE_CONTAINER_NAME}/{blob_name}"}
@app.get("/download/{blob_name}")
async def download_file(blob_name: str):
"""Downloads a file from Azure Blob Storage."""
blob_client = container_client.get_blob_client(blob_name)
stream = io.BytesIO()
download_stream = blob_client.download_blob()
stream.write(download_stream.readall())
stream.seek(0)
return StreamingResponse(
stream,
media_type="application/octet-stream",
headers={"Content-Disposition": f"attachment;filename={blob_name}"},
)
if __name__ == "__main__":
import uvicorn
uvicorn.run(app, host="0.0.0.0", port=8000)
```
### 2. Authenticate your service to access the cloud service
We need to provide the correct credentials to our code so that it can authenticate and connect to the cloud services. The exact approach depends on the cloud provider. Here's how you can do it for the most common cloud providers:
There are two ways to authenticate your service to access AWS services:
### 1. Access Key and Secret Access Key
This involves setting the `AWS_ACCESS_KEY_ID` and `AWS_SECRET_ACCESS_KEY` environment variables. AWS SDKs will automatically pick these up from the environment variables and authenticate with the corresponding AWS service. The accesskey and secretaccesskey can be found in the AWS console and can be generated by your Infra team.
### 2. IAM Role-Based Access through Service Account (Recommended)
This approach typically involves creating IAM roles, associating them with Kubernetes service accounts, and configuring your deployments to use those service accounts. Here's a detailed breakdown:
**Key Concepts**
* **Kubernetes Service Accounts (SA)**: These are identities for processes running inside a pod. They provide a way to authenticate your pods with other Kubernetes services and external resources.
* **IAM Roles**: IAM roles are sets of permissions that define what actions an AWS entity (like a user, application, or service) can perform.
* **IAM Roles for Service Accounts (IRSA)**: This is the key technology that allows you to map a Kubernetes service account to an IAM role. It uses AWS's OpenID Connect (OIDC) provider capability.
Using IRSA (IAM Role for Service Accounts), you can securely grant Kubernetes deployments access to cloud services using service accounts and IAM roles, leveraging the power of IRSA for authentication and authorization. This is recommended and well understood by the Infrastructure / Devops teams. Please reach out to them to get the IAM role and service account created.
We will need the name of the cluster, AWS account ID, region, namespace (workspace in Truefoundry) in which the application is to be deployed. Set the following variables:
```bash lines theme={"dark"}
export CLUSTER_NAME="your-cluster-name"
export ACCOUNT_ID="your-aws-account-id"
export AWS_REGION="your-aws-region"
export NAMESPACE="your-namespace / workspace in Truefoundry"
export SERVICE_ACCOUNT_NAME="your-service-account-name" # You can set this to anything descriptive like s3-access-sa
```
```bash wrap lines theme={"dark"}
OIDC_ISSUER_URL=$(aws eks describe-cluster --name $CLUSTER_NAME --query "cluster.identity.oidc.issuer" --output text | sed 's/https:\/\///')
```
The value of OIDC\_ISSUER\_URL will be the OIDC provider URL. It will be something like: `oidc.eks.YOUR_REGION.amazonaws.com/id/YOUR_OIDC_ID`
Create an IAM policy with the required permissions. This example grants full access to S3. It's strongly recommended to scope down the permissions to only what's necessary for security best practices.
```json s3-access-policy.json wrap lines theme={"dark"}
{
"Version": "2012-10-17",
"Statement": [
{
"Effect": "Allow",
"Action": "s3:*",
"Resource": [
"arn:aws:s3:::your-bucket-name",
"arn:aws:s3:::your-bucket-name/*"
]
}
]
}
```
Replace your-bucket-name with the actual name of your S3 bucket. You can also use wildcards to specify multiple buckets or prefixes within a bucket.
Create the policy using the AWS CLI:
```bash wrap lines theme={"dark"}
aws iam create-policy \
--policy-name "${CLUSTER_NAME}-s3-policy" \
--policy-document file://s3-access-policy.json
```
Create the assume role policy file.
```bash wrap lines theme={"dark"}
cat > assume-role-policy.json <
```bash wrap lines theme={"dark"}
aws iam attach-role-policy --role-name "$CLUSTER_NAME-s3-role" --policy-arn="arn:aws:iam::${ACCOUNT_ID}:policy/${CLUSTER_NAME}-s3-policy"
```
Create a Kubernetes service account in your desired namespace. You can apply this either via Kubectl or using the Truefoundry UI.
This is a simple YAML file (e.g., `service-account.yaml`):
```yaml service-account.yaml wrap lines theme={"dark"}
apiVersion: v1
kind: ServiceAccount
metadata:
name: ${SERVICE_ACCOUNT_NAME}
namespace: ${NAMESPACE}
annotations:
eks.amazonaws.com/role-arn: $IAM_ROLE_ARN
```
Apply using Kubectl:
```bash lines theme={"dark"}
kubectl apply -f service-account.yaml
```
or using the Truefoundry UI:
TODO: Add supademo link here
Run a pod and test if you are able to perform operations on the AWS S3 bucket
```bash lines theme={"dark"}
kubectl apply -f -<
In Google Kubernetes Engine (GKE), applications leverage Workload Identity to securely connect with Google Cloud Platform (GCP) services through IAM service accounts. This seamless integration enables fine-grained access control and eliminates the need for managing credentials within the application code, enhancing both security and operational efficiency in the GKE environment.
## Step 1 (A) - Pre-requisites
1. Export important variables
```shell Shell lines theme={"dark"}
export PROJECT_ID=""
export CLUSTER_NAME=""
export GKE_REGION=""
```
2. Authenticate using `gcloud`
```shell Shell lines theme={"dark"}
gcloud auth login
```
3. Set your project ID
```shell Shell lines theme={"dark"}
gcloud config set project $PROJECT_ID
```
## Step 1 (B) - Enabling workload identity for your cluster
Workload identity needs to be enabled for your GKE cluster so that pods can leverage this to authenticate to GCP services without credentials.
1. If workload identity is not enabled for your GKE cluster, run the below command to enable it
```shell Shell lines theme={"dark"}
gcloud container clusters update $CLUSTER_NAME \
--region=$GKE_REGION \
--workload-pool=$PROJECT_ID.svc.id.goog
```
2. The above step will enable workload identity only in the new node pool. To enable the workload identity in the existing node pool
```shell Shell lines theme={"dark"}
gcloud container node-pools create \
--cluster=$CLUSTER_NAME \
--region=$GKE_REGION \
--workload-metadata=GKE_METADATA
```
## Step 2 - Create a kubernetes workspace
1. Export the namespace and the `serviceaccount `. TrueFoundry's workspace is analogous to Kubernetes namespace.
```shell Shell lines theme={"dark"}
export APP_NS=""
export APP_SA=""
```
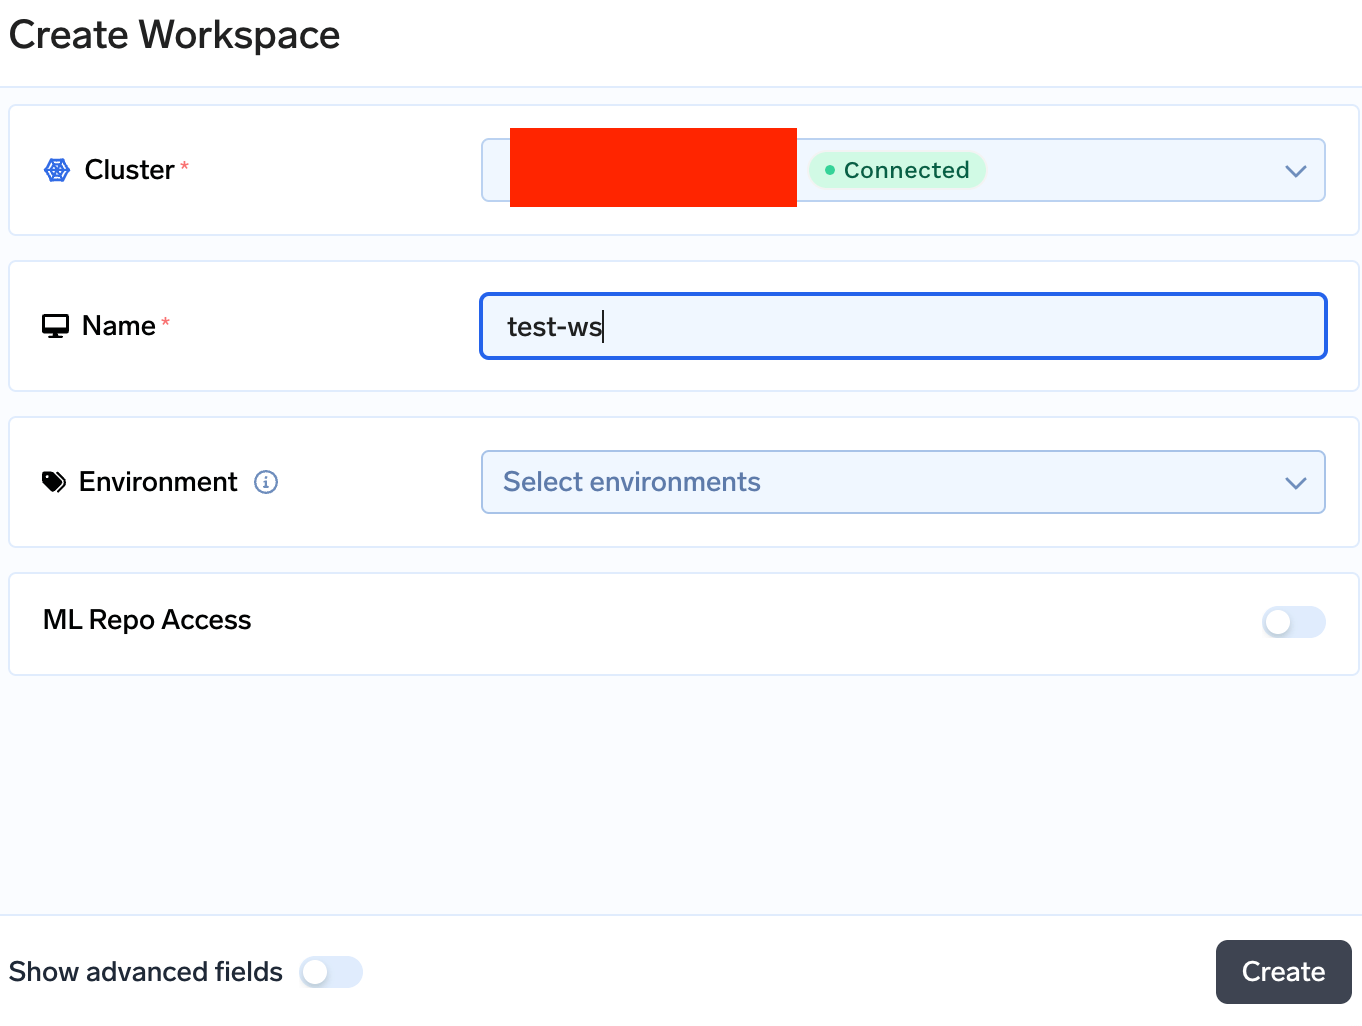
2. Go to Workspaces tab from the left panel of the portal and create the workspace with same name as of your namespace \$APP\_NS
1. Click on `+ New Workspace` to create a new workspace. If you already have a workspace created click on the **Edit** section from the right side of the workspace card.
2. Select the cluster where you want to create the serviceaccount and enter the name of the workspace (namespace).
 ## Step 3 - Create IAM serviceaccount in GCP
In this section we will create an IAM `serviceaccount` which has access to buckets. We will try to use this to access the bucket files in GCP
1. Export these variables and enter the name of the google serviceaccount you want to give in the variable `GSA_NAME`. We are assigning this serviceaccount Storage admin permission. You can assign the permissions that you want for accessing your GCP application.
```shell Shell lines theme={"dark"}
# google serviceaccount
export GSA_NAME=""
export ROLE_NAME="roles/storage.admin"
```
2. Create the IAM serviceaccount and assign the role using the below command. We are also assigning `roles/iam.workloadIdentityUser` role to the IAM serviceaccount on itself so that it can be accessed from inside GKE.
```powershell Shell lines theme={"dark"}
# creating the IAM serviceaccount
gcloud iam service-accounts create $GSA_NAME \
--project=$PROJECT_ID
# assigning the role
gcloud projects add-iam-policy-binding $PROJECT_ID \
--member "serviceAccount:$GSA_NAME@$PROJECT_ID.iam.gserviceaccount.com" \
--role "$ROLE_NAME"
# assign the roles/iam.workloadIdentityUser
gcloud iam service-accounts add-iam-policy-binding $GSA_NAME@$PROJECT_ID.iam.gserviceaccount.com \
--role roles/iam.workloadIdentityUser \
--member "serviceAccount:$PROJECT_ID.svc.id.goog[$APP_NS/$APP_SA]"
```
### The policy contains bindings with conditions
When you are trying to run the command `gcloud projects add-iam-policy-binding` you might get the below output
```shell Shell lines theme={"dark"}
Created service account [test-iam-sa].
[1] EXPRESSION=resource.name.startsWith("projects/_/buckets/xxxxxxxx"), TITLE=xxxxxxx Admin
[2] None
[3] Specify a new condition
The policy contains bindings with conditions, so specifying a condition is required when adding a binding. Please specify a condition.:
```
You can enter a condition if you want to restrict the GCP IAM serviceaccount to a certain bucket or you can use option 2 and continue.
## Step 4 - Create Kubernetes Serviceaccount in your workspace
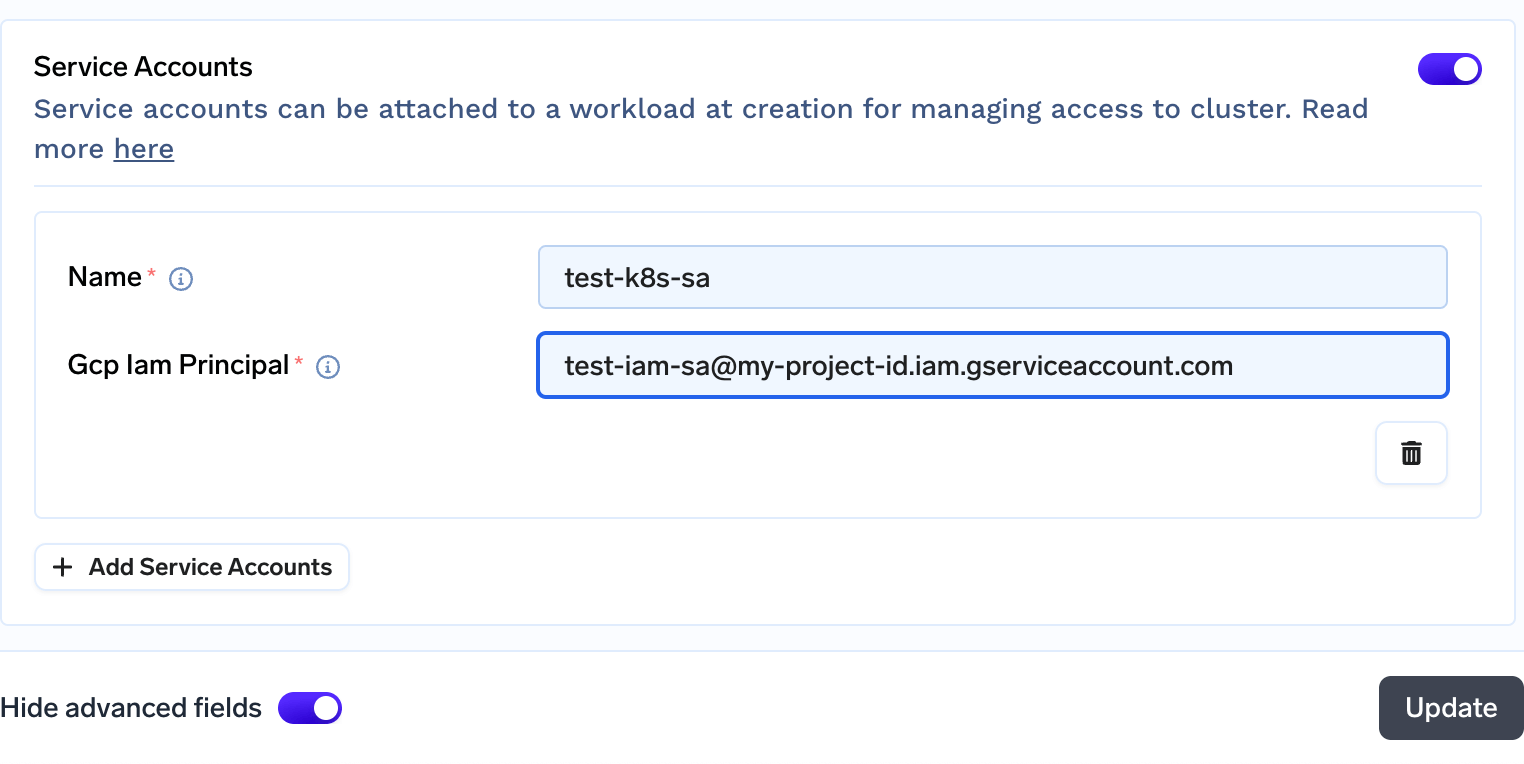
1. Go to Workspaces tab from the left panel of the portal and click on the pencil icon to edit your workspace.
2. Click on `Show Advanced fields` on bottom of the screen and enable `Service accounts` field.
3. Click on `+ Add Service Accounts` to add a Serviceaccount
1. Enter the name of your Kubernetes Serviceaccount which is in the variable \$APP\_SA
2. Enter the IAM Serviceaccount name which will be `$GSA_NAME@$PROJECT_ID.iam.gserviceaccount.com`
```shell Shell lines theme={"dark"}
# run this command to get your IAM serviceaccount name
echo $GSA_NAME@$PROJECT_ID.iam.gserviceaccount.com
```
4. Click on update to continue\\
## Step 3 - Create IAM serviceaccount in GCP
In this section we will create an IAM `serviceaccount` which has access to buckets. We will try to use this to access the bucket files in GCP
1. Export these variables and enter the name of the google serviceaccount you want to give in the variable `GSA_NAME`. We are assigning this serviceaccount Storage admin permission. You can assign the permissions that you want for accessing your GCP application.
```shell Shell lines theme={"dark"}
# google serviceaccount
export GSA_NAME=""
export ROLE_NAME="roles/storage.admin"
```
2. Create the IAM serviceaccount and assign the role using the below command. We are also assigning `roles/iam.workloadIdentityUser` role to the IAM serviceaccount on itself so that it can be accessed from inside GKE.
```powershell Shell lines theme={"dark"}
# creating the IAM serviceaccount
gcloud iam service-accounts create $GSA_NAME \
--project=$PROJECT_ID
# assigning the role
gcloud projects add-iam-policy-binding $PROJECT_ID \
--member "serviceAccount:$GSA_NAME@$PROJECT_ID.iam.gserviceaccount.com" \
--role "$ROLE_NAME"
# assign the roles/iam.workloadIdentityUser
gcloud iam service-accounts add-iam-policy-binding $GSA_NAME@$PROJECT_ID.iam.gserviceaccount.com \
--role roles/iam.workloadIdentityUser \
--member "serviceAccount:$PROJECT_ID.svc.id.goog[$APP_NS/$APP_SA]"
```
### The policy contains bindings with conditions
When you are trying to run the command `gcloud projects add-iam-policy-binding` you might get the below output
```shell Shell lines theme={"dark"}
Created service account [test-iam-sa].
[1] EXPRESSION=resource.name.startsWith("projects/_/buckets/xxxxxxxx"), TITLE=xxxxxxx Admin
[2] None
[3] Specify a new condition
The policy contains bindings with conditions, so specifying a condition is required when adding a binding. Please specify a condition.:
```
You can enter a condition if you want to restrict the GCP IAM serviceaccount to a certain bucket or you can use option 2 and continue.
## Step 4 - Create Kubernetes Serviceaccount in your workspace
1. Go to Workspaces tab from the left panel of the portal and click on the pencil icon to edit your workspace.
2. Click on `Show Advanced fields` on bottom of the screen and enable `Service accounts` field.
3. Click on `+ Add Service Accounts` to add a Serviceaccount
1. Enter the name of your Kubernetes Serviceaccount which is in the variable \$APP\_SA
2. Enter the IAM Serviceaccount name which will be `$GSA_NAME@$PROJECT_ID.iam.gserviceaccount.com`
```shell Shell lines theme={"dark"}
# run this command to get your IAM serviceaccount name
echo $GSA_NAME@$PROJECT_ID.iam.gserviceaccount.com
```
4. Click on update to continue\\
 ## Test the `serviceaccount`
1. Create the below pod
```powershell Shell lines theme={"dark"}
kubectl apply -f -<
2. Check if you are able to list buckets without passing creds
```bash Shell lines theme={"dark"}
kubectl exec -it workload-identity-test -n $APP_NS -- gcloud storage ls
```
Coming Soon
### 3. Select the service account for the service
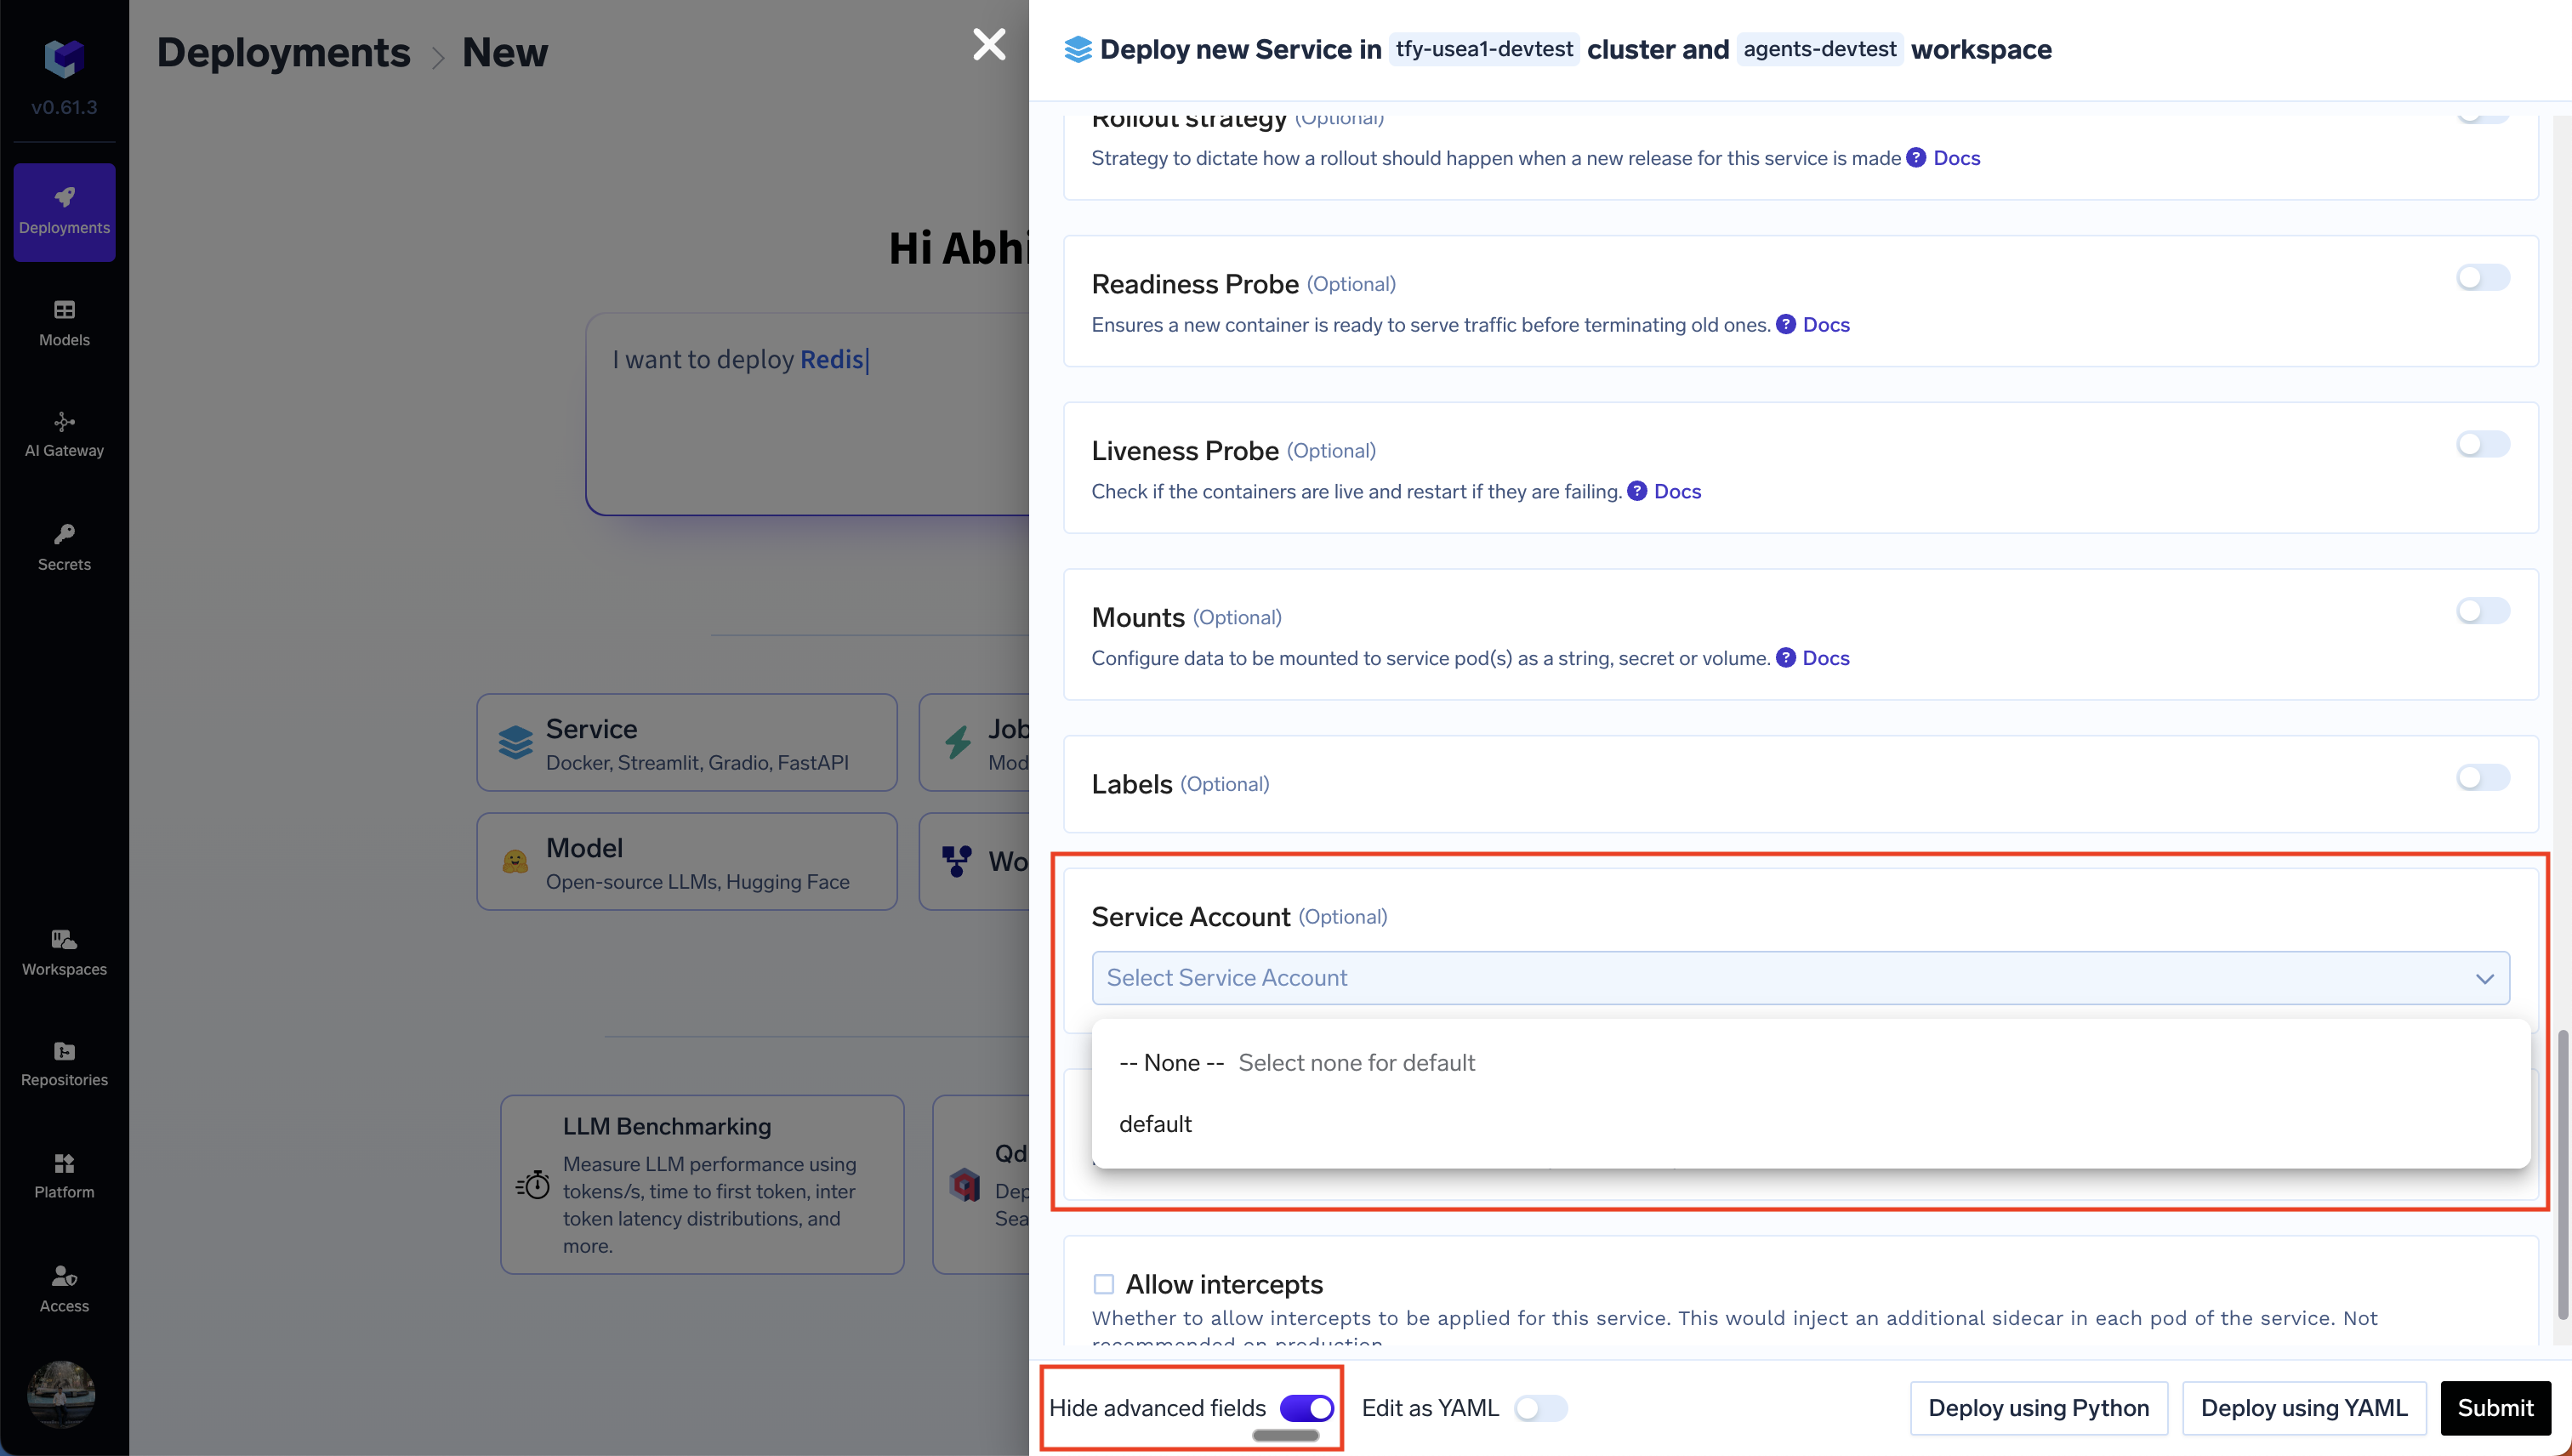
Once you've configured the Service Account in Kubernetes following the steps above, you can select the service account for the service in the Truefoundry UI. This can be viewed after switching on the advanced options in the service deployment form.
## Test the `serviceaccount`
1. Create the below pod
```powershell Shell lines theme={"dark"}
kubectl apply -f -<
2. Check if you are able to list buckets without passing creds
```bash Shell lines theme={"dark"}
kubectl exec -it workload-identity-test -n $APP_NS -- gcloud storage ls
```
Coming Soon
### 3. Select the service account for the service
Once you've configured the Service Account in Kubernetes following the steps above, you can select the service account for the service in the Truefoundry UI. This can be viewed after switching on the advanced options in the service deployment form.